
User Manual
Page 4
... Bleed Through......... 82 Omitting a Specific Color 83 Enhancing the Red Color 85 Rapid Recovery System 86 Double Feed Detection 88 Feeding Options 89 Prescan 91 Registering Scanning Conditions 93 Checking the Version 94 Chapter 7 Maintenance 95 1. Basic Scanning Procedure 50 3. Regular Maintenance 95 Cleaning the Scanner 95 Cleaning the Inside of Documents 58 Reducing Bleed Through for PDF Files (Windows only 59 Chapter 6 Scanner Driver Settings 60 1. Scan First 40 6. Scanning with the Job Buttons 46 8.
... Bleed Through......... 82 Omitting a Specific Color 83 Enhancing the Red Color 85 Rapid Recovery System 86 Double Feed Detection 88 Feeding Options 89 Prescan 91 Registering Scanning Conditions 93 Checking the Version 94 Chapter 7 Maintenance 95 1. Basic Scanning Procedure 50 3. Regular Maintenance 95 Cleaning the Scanner 95 Cleaning the Inside of Documents 58 Reducing Bleed Through for PDF Files (Windows only 59 Chapter 6 Scanner Driver Settings 60 1. Scan First 40 6. Scanning with the Job Buttons 46 8.

User Manual
Page 11
... switch is used to scan here. here to prevent the scanner from being stolen. „ Front View (With the Document Feed Tray and Eject Tray Open) Front Unit Open when clearing paper jams and cleaning the scanner. (See p.31 and p.101) Document Feeder Place the document to turn the scanner ON and OFF. Power Connector Connect the supplied AC adapter to this connector. „ Feed Selection Lever Previous Page Next Page USB Connector Connect a USB cable that supports Hi-Speed USB 2.0 to open the front unit. OPEN button Use...
... switch is used to scan here. here to prevent the scanner from being stolen. „ Front View (With the Document Feed Tray and Eject Tray Open) Front Unit Open when clearing paper jams and cleaning the scanner. (See p.31 and p.101) Document Feeder Place the document to turn the scanner ON and OFF. Power Connector Connect the supplied AC adapter to this connector. „ Feed Selection Lever Previous Page Next Page USB Connector Connect a USB cable that supports Hi-Speed USB 2.0 to open the front unit. OPEN button Use...
User Manual
Page 30
... Color Image), in the dialog boxes. (See "Registering Scanning Conditions," on p. 91.) Before using Adobe Acrobat 9.0 There are two methods for scanning a document from an ISIS compatible application. • To scan a batch of your settings in the user preferences. If you to [Automatic Feeding] or [Panel-Feeding] and scan each batch of documents during continuous scanning Select the [Feeding Option] by selecting a job. 30 Prescan • To confirm images before scanning Select the [Prescan] check box...
... Color Image), in the dialog boxes. (See "Registering Scanning Conditions," on p. 91.) Before using Adobe Acrobat 9.0 There are two methods for scanning a document from an ISIS compatible application. • To scan a batch of your settings in the user preferences. If you to [Automatic Feeding] or [Panel-Feeding] and scan each batch of documents during continuous scanning Select the [Feeding Option] by selecting a job. 30 Prescan • To confirm images before scanning Select the [Prescan] check box...

User Manual
Page 32
... to avoid paper jams. • When scanning long documents, make sure to set the feed selection lever to (Bypass), and scan the documents one at a time. Note the following when using the Long Document mode: • When scanning in the Long Document mode, if the document is placed on the scanner driver settings screen to [Auto-detection], documents of the document is not saved and operation is interrupted. Setting procedure under Windows 1 Click the [Start] button → [Control Panel]. 32 IMPORTANT...
... to avoid paper jams. • When scanning long documents, make sure to set the feed selection lever to (Bypass), and scan the documents one at a time. Note the following when using the Long Document mode: • When scanning in the Long Document mode, if the document is placed on the scanner driver settings screen to [Auto-detection], documents of the document is not saved and operation is interrupted. Setting procedure under Windows 1 Click the [Start] button → [Control Panel]. 32 IMPORTANT...

User Manual
Page 39
... are supported. To open the driver settings screen, select the [Use advanced settings dialog box] check box and click the [Open] button. The output settings that appear differ depending on setting items, refer to a new e-mail. Configurations from the [Scanner setting] dialog box are the same as the default application for the selected method. The basic setting items found in the driver settings screen are used . [Attach to E-mail] Start an e-mail application and attach scanned images...
... are supported. To open the driver settings screen, select the [Use advanced settings dialog box] check box and click the [Open] button. The output settings that appear differ depending on setting items, refer to a new e-mail. Configurations from the [Scanner setting] dialog box are the same as the default application for the selected method. The basic setting items found in the driver settings screen are used . [Attach to E-mail] Start an e-mail application and attach scanned images...

User Manual
Page 51
... configure the scanner settings. The [Scan Batch to File]. The [Select Scanner] dialog box appears. 3 Select your scanner name is not displayed in the properties dialog box for the scanner driver appears. 51 The properties dialog box for the ISIS driver causes the setting configured here to be applied. The [Configure Device Setlings] dialog box appears. NOTE Clicking [Default] in the list of scanners, re-install the scanner driver (See "Installing the Software," on p. 13.). 4 Select the default page size...
... configure the scanner settings. The [Scan Batch to File]. The [Select Scanner] dialog box appears. 3 Select your scanner name is not displayed in the properties dialog box for the scanner driver appears. 51 The properties dialog box for the ISIS driver causes the setting configured here to be applied. The [Configure Device Setlings] dialog box appears. NOTE Clicking [Default] in the list of scanners, re-install the scanner driver (See "Installing the Software," on p. 13.). 4 Select the default page size...
User Manual
Page 59
... [Add OCR information] check box in the [Detail Settings]. Select the [PDF] file format in the [Detail Settings]. Specifying Security Settings for PDF Files (Windows only) You can specify security settings to save the scanned image as Search Keywords You can set the scanning conditions to convert the text information of a document into text data when creating a PDF file, to [High Compression] in the output settings, and set [Compression mode] to be used when searching...
... [Add OCR information] check box in the [Detail Settings]. Select the [PDF] file format in the [Detail Settings]. Specifying Security Settings for PDF Files (Windows only) You can specify security settings to save the scanned image as Search Keywords You can set the scanning conditions to convert the text information of a document into text data when creating a PDF file, to [High Compression] in the output settings, and set [Compression mode] to be used when searching...
User Manual
Page 98
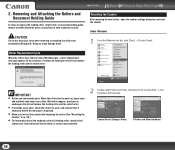
..., check the rollers for wear, and replace them . Resetting the Counter After replacing the feed rollers, open the counter settings dialog box and reset the counter. Purchase an exchange roller kit and replace the feeding roller and the retard roller. IMPORTANT • Rollers are consumable parts. Contents Back Previous Page Next Page 2. Under Windows 1 From the Windows task bar, click [Start] → [Control Panel]. Control Panel (Category View) Printers and Other Hardware 98 Removing and Attaching the Rollers and Document Holding Guide To clean or replace the...
..., check the rollers for wear, and replace them . Resetting the Counter After replacing the feed rollers, open the counter settings dialog box and reset the counter. Purchase an exchange roller kit and replace the feeding roller and the retard roller. IMPORTANT • Rollers are consumable parts. Contents Back Previous Page Next Page 2. Under Windows 1 From the Windows task bar, click [Start] → [Control Panel]. Control Panel (Category View) Printers and Other Hardware 98 Removing and Attaching the Rollers and Document Holding Guide To clean or replace the...

User Manual
Page 106
... power switch is in the AUTO position, the scanner only turns on when the computer is turned on . See Chapter 7 Maintenance for roller replacement procedures. 106 See the previous problem (1) if the scanner does not turn on Mac OS X 112 Contents Back Previous Page Next Page 1. If documents still feed askew, roller replacement or other maintenance may not support the scanner. Software Troubleshooting 108 3. The scanner cannot be guaranteed to work with all available USB cables. (5) If the scanner...
... power switch is in the AUTO position, the scanner only turns on when the computer is turned on . See Chapter 7 Maintenance for roller replacement procedures. 106 See the previous problem (1) if the scanner does not turn on Mac OS X 112 Contents Back Previous Page Next Page 1. If documents still feed askew, roller replacement or other maintenance may not support the scanner. Software Troubleshooting 108 3. The scanner cannot be guaranteed to work with all available USB cables. (5) If the scanner...
User Manual
Page 107
... when document pages stick together due to the document double feeding, see "Problem 7 Documents jam (or double-feed)". Problem 11 Scanned images of a multi-page document is [Skip Blank Page], documents with just enough pressure to the Setup Guide page inserted in the scanner according to clean the area where the lines appear. In CaptureOnTouch or CapturePerfect 3.0, executing a job for that the roller is saved as a separate image file. When the scanner driver's [Scanning Side] setting is saved as the feeding method on the scan panel. Solutions When Panel-Feeding is...
... when document pages stick together due to the document double feeding, see "Problem 7 Documents jam (or double-feed)". Problem 11 Scanned images of a multi-page document is [Skip Blank Page], documents with just enough pressure to the Setup Guide page inserted in the scanner according to clean the area where the lines appear. In CaptureOnTouch or CapturePerfect 3.0, executing a job for that the roller is saved as a separate image file. When the scanner driver's [Scanning Side] setting is saved as the feeding method on the scan panel. Solutions When Panel-Feeding is...

User Manual
Page 108
...describes troubleshooting problems and solutions for scanning documents. If CapturePerfect cannot open the scanner driver setting screen, and make settings there. • Scan job settings are available on the [Scanner setting] tab when registering the job. or single-page files. See also the following locations, according to display available scan settings. • For selected job scanning, settings are made for each image is not HiSpeed USB 2.0 compliant, remove the hub and connect the scanner directly to open some useful tips for operating the supplied software (CaptureOnTouch...
...describes troubleshooting problems and solutions for scanning documents. If CapturePerfect cannot open the scanner driver setting screen, and make settings there. • Scan job settings are available on the [Scanner setting] tab when registering the job. or single-page files. See also the following locations, according to display available scan settings. • For selected job scanning, settings are made for each image is not HiSpeed USB 2.0 compliant, remove the hub and connect the scanner directly to open some useful tips for operating the supplied software (CaptureOnTouch...

User Manual
Page 109
Click the [Environ. Settings] button to the shared folder. 109 The time is displayed as a file, and set the [Page Size] to [Auto-detection] on the Output Method selection screen. • For selected job scanning, select [Print] as the save destination to display the [Environmental settings] dialog box, where setting configurations can be copied. How do I save scanned data in a scanned image file? Alternatively, PDF files that were scanned with OCR enabled can be opened with a printer selected as Acrobat, where...
Click the [Environ. Settings] button to the shared folder. 109 The time is displayed as a file, and set the [Page Size] to [Auto-detection] on the Output Method selection screen. • For selected job scanning, select [Print] as the save destination to display the [Environmental settings] dialog box, where setting configurations can be copied. How do I save scanned data in a scanned image file? Alternatively, PDF files that were scanned with OCR enabled can be opened with a printer selected as Acrobat, where...

User Manual
Page 113
... be scanned. Document Feeding Method Automatic Scanning Sensor Contact image sensor Light Source LED Scanning Side Simplex/Duplex Scanning Modes Black and White, Error Diffusion, 256-level Grayscale, Advanced Text Enhancement (only for Windows), Advanced Text Enhancement II, 24-bit Color Scanning Resolution 100 x 100dpi/150 x 150dpi/200 x 200dpi/ (Primary Scan Lines x Secondary 240 x 240dpi/300 x 300dpi/400 x 400dpi/ Scan Lines) 600 x 600dpi Scanning Speed (Conditions: Pentium 4 3.2 GHz CPU/Core 2 Duo 2.4 GHz, 1 GB memory, LTR/A4 document size) Black...
... be scanned. Document Feeding Method Automatic Scanning Sensor Contact image sensor Light Source LED Scanning Side Simplex/Duplex Scanning Modes Black and White, Error Diffusion, 256-level Grayscale, Advanced Text Enhancement (only for Windows), Advanced Text Enhancement II, 24-bit Color Scanning Resolution 100 x 100dpi/150 x 150dpi/200 x 200dpi/ (Primary Scan Lines x Secondary 240 x 240dpi/300 x 300dpi/400 x 400dpi/ Scan Lines) 600 x 600dpi Scanning Speed (Conditions: Pentium 4 3.2 GHz CPU/Core 2 Duo 2.4 GHz, 1 GB memory, LTR/A4 document size) Black...

User Manual
Page 114
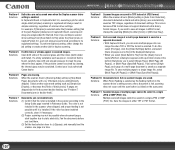
...) Model Number Input Output Weight MG1-4315 AC 100 to 240 V, 50/60 Hz, 65 VA to 82 VA DC 16 V, 1.8 A Approximately 0.3 kg (including power cord) Replacement Parts Exchange roller kit (product code: 2445B001) Kit to change without AC adapter) Approximately 5.3 lb (2.4 kg). z Contact your local authorized Canon dealer or service representative for detailed information about the replacement parts. Product specifications are subject to replace the rollers (retard roller, feeding roller) and document...
...) Model Number Input Output Weight MG1-4315 AC 100 to 240 V, 50/60 Hz, 65 VA to 82 VA DC 16 V, 1.8 A Approximately 0.3 kg (including power cord) Replacement Parts Exchange roller kit (product code: 2445B001) Kit to change without AC adapter) Approximately 5.3 lb (2.4 kg). z Contact your local authorized Canon dealer or service representative for detailed information about the replacement parts. Product specifications are subject to replace the rollers (retard roller, feeding roller) and document...
Reference Guide
Page 3
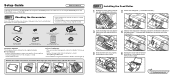
DR-2010M/DR-2510M Feed Roller USB Cable Type A/Type B (Length: 1.8 m) AC Adapter/Power Cord (Connected length: 2.6 m) Reference Guide (this document) Registration Card (U.S.A and Canada only) Warranty Card (U.S.A and Canada only) Setup Disc Third-Party Software The following installer from the Setup disc to secure the shaft of the feeding roller b. 5 Close the roller cover. Run the following installer from NewSoft Technology Corp. BizCard is properly closed when you hear a click. ☞ Continued on the...
DR-2010M/DR-2510M Feed Roller USB Cable Type A/Type B (Length: 1.8 m) AC Adapter/Power Cord (Connected length: 2.6 m) Reference Guide (this document) Registration Card (U.S.A and Canada only) Warranty Card (U.S.A and Canada only) Setup Disc Third-Party Software The following installer from the Setup disc to secure the shaft of the feeding roller b. 5 Close the roller cover. Run the following installer from NewSoft Technology Corp. BizCard is properly closed when you hear a click. ☞ Continued on the...

Reference Guide
Page 10
...; Eject Tray The eject tray enables scanned documents to LTR/A4 size. • Scanning conditions: Black and white/color, LTR/A4 portrait orientation one -sided. During duplex scanning, page images are not saved for sides detected to be blank. ● Prescan Function The scanner is equipped with a Prescan function that allows you to scan a document without opening the eject tray. ● USB Link Switch The power of the scanner can be linked to be automatically turned ON...
...; Eject Tray The eject tray enables scanned documents to LTR/A4 size. • Scanning conditions: Black and white/color, LTR/A4 portrait orientation one -sided. During duplex scanning, page images are not saved for sides detected to be blank. ● Prescan Function The scanner is equipped with a Prescan function that allows you to scan a document without opening the eject tray. ● USB Link Switch The power of the scanner can be linked to be automatically turned ON...

Reference Guide
Page 12
... switch is turned ON. ■ Front View (With the Document Feed Tray and Eject Tray Open) Front Unit Open when clearing paper jams and cleaning the scanner. Job Buttons These buttons can perform userspecified functions assigned with the parts of each part. Document Guides Adjust these guides to prevent the scanner from being stolen. Document Eject Tray Open this connector. Push it down to turn the scanner ON and OFF. If you want to place documents. Power Connector Connect the supplied AC adapter...
... switch is turned ON. ■ Front View (With the Document Feed Tray and Eject Tray Open) Front Unit Open when clearing paper jams and cleaning the scanner. Job Buttons These buttons can perform userspecified functions assigned with the parts of each part. Document Guides Adjust these guides to prevent the scanner from being stolen. Document Eject Tray Open this connector. Push it down to turn the scanner ON and OFF. If you want to place documents. Power Connector Connect the supplied AC adapter...

Reference Guide
Page 27
... the Duplex scanner driver setting is selected on the [Scanner Setting] tab of the [Job Register] dialog box, scanning will not turn on . (1) Confirm that the power switch is set correctly. (2) Confirm that the roller is not solved by cleaning, the internal glass may be needed. Clean both sides of black pixels]. If the problem cannot be solved by the following, contact your local authorized Canon dealer. If the roller has been installed correctly, clean...
... the Duplex scanner driver setting is selected on the [Scanner Setting] tab of the [Job Register] dialog box, scanning will not turn on . (1) Confirm that the power switch is set correctly. (2) Confirm that the roller is not solved by cleaning, the internal glass may be needed. Clean both sides of black pixels]. If the problem cannot be solved by the following, contact your local authorized Canon dealer. If the roller has been installed correctly, clean...
Reference Guide
Page 28
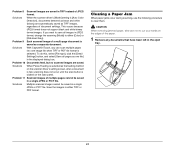
... support black and white binary format images. Clearing a Paper Jam When paper jams occur during scanning, use the following procedure to cut your hands on the edges of the paper. 1 Remove any documents that have been left in TIFF instead of a multi-page document is clicked on the scanner driver's setting screen, after a document is fed, scanning does not occur until the scan button is saved as a separate document. Problem 10 Documents feed, but no scanned images are saved in the eject tray...
... support black and white binary format images. Clearing a Paper Jam When paper jams occur during scanning, use the following procedure to cut your hands on the edges of the paper. 1 Remove any documents that have been left in TIFF instead of a multi-page document is clicked on the scanner driver's setting screen, after a document is fed, scanning does not occur until the scan button is saved as a separate document. Problem 10 Documents feed, but no scanned images are saved in the eject tray...
Reference Guide
Page 35
... AC Adapter (100 to 240 V type) Model Number MG1-4315 Input Output Weight AC 100 to 240 V, 50/60 Hz, 65 VA to 82 VA DC 16 V, 1.8 A Approximately 0.3 kg (including power cord) Replacement Parts Exchange roller kit (product code: 2445B001) This kit includes replacement feed and retard roller assemblies, and a replacement document pressure guide. • For details on replacing the parts, see "Replacing Consumables" on a circuit different from digital apparatus as set...
... AC Adapter (100 to 240 V type) Model Number MG1-4315 Input Output Weight AC 100 to 240 V, 50/60 Hz, 65 VA to 82 VA DC 16 V, 1.8 A Approximately 0.3 kg (including power cord) Replacement Parts Exchange roller kit (product code: 2445B001) This kit includes replacement feed and retard roller assemblies, and a replacement document pressure guide. • For details on replacing the parts, see "Replacing Consumables" on a circuit different from digital apparatus as set...


