imageCLASS MF6500 Series Basic Guide
Page 11
... 1-3 Facsimile Operation Panel (MF6550/MF6560/MF6580 Only 1-5 LCD (Standby Mode 1-6 Copy Mode 1-6 Fax Mode 1-6 Scan Mode 1-6 Toner Cartridge 1-7 Maintaining the Toner Cartridge 1-7 Timer Settings 1-9 Setting Sleep Mode 1-9 Setting Auto Clear Time 1-12 Setting Daylight Saving Time 1-14 2 Document Handling 2-1 Document Requirements 2-1 Scanning Area 2-3 Loading Documents 2-4 On the Platen Glass 2-4 In the ADF 2-6 ix...
... 1-3 Facsimile Operation Panel (MF6550/MF6560/MF6580 Only 1-5 LCD (Standby Mode 1-6 Copy Mode 1-6 Fax Mode 1-6 Scan Mode 1-6 Toner Cartridge 1-7 Maintaining the Toner Cartridge 1-7 Timer Settings 1-9 Setting Sleep Mode 1-9 Setting Auto Clear Time 1-12 Setting Daylight Saving Time 1-14 2 Document Handling 2-1 Document Requirements 2-1 Scanning Area 2-3 Loading Documents 2-4 On the Platen Glass 2-4 In the ADF 2-6 ix...
imageCLASS MF6500 Series Basic Guide
Page 33
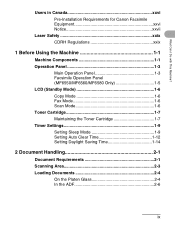
... type paper stacks. P USB port Q Connect the USB (Universal Serial Bus) cable. T Power socket Connect the power cord. L Platen glass Place documents. N Slide guides for multi-purpose tray Adjusts to load paper stack. Before Using the Machine IJ K L I Left cover...Pull out to the width of the paper. S External device jack (MF6550/MF6560/ MF6580 only) Connect an external device. U T SR 1-2 R Telephone line jack (MF6550/MF6560/ MF6580 only) Connect the external telephone cable. K Platen glass cover Open this cover when replacing the toner cartridge or clearing paper jams....
... type paper stacks. P USB port Q Connect the USB (Universal Serial Bus) cable. T Power socket Connect the power cord. L Platen glass Place documents. N Slide guides for multi-purpose tray Adjusts to load paper stack. Before Using the Machine IJ K L I Left cover...Pull out to the width of the paper. S External device jack (MF6550/MF6560/ MF6580 only) Connect an external device. U T SR 1-2 R Telephone line jack (MF6550/MF6560/ MF6580 only) Connect the external telephone cable. K Platen glass cover Open this cover when replacing the toner cartridge or clearing paper jams....
imageCLASS MF6500 Series Basic Guide
Page 50
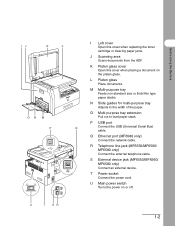
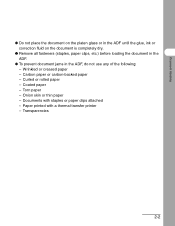
Special types of plain white paper to cover the document after placing it face-down on the platen glass. *2 22 lb bond (80 g/m2) paper 2-1 Document Handling Document Handling Document Requirements Platen Glass ADF Type - Photographs - Book (Height: max. 7/8" (20 mm)) Plain paper (Multipage documents of the same size, thickness and weight or one page...
Special types of plain white paper to cover the document after placing it face-down on the platen glass. *2 22 lb bond (80 g/m2) paper 2-1 Document Handling Document Handling Document Requirements Platen Glass ADF Type - Photographs - Book (Height: max. 7/8" (20 mm)) Plain paper (Multipage documents of the same size, thickness and weight or one page...
imageCLASS MF6500 Series Basic Guide
Page 51
... printer - Wrinkled or creased paper - Transparencies 2-2 Curled or rolled paper - Onion skin or thin paper - Document Handling ● Do not place the document on the platen glass or in the ADF until the glue, ink or correction fluid on the document is completely dry. ● Remove all fasteners (staples, paper clips, etc...
... printer - Wrinkled or creased paper - Transparencies 2-2 Curled or rolled paper - Onion skin or thin paper - Document Handling ● Do not place the document on the platen glass or in the ADF until the glue, ink or correction fluid on the document is completely dry. ● Remove all fasteners (staples, paper clips, etc...

imageCLASS MF6500 Series Basic Guide
Page 53
Document Handling Loading Documents On the Platen Glass 1 Lift up the platen glass cover. 2 Place your document with the appropriate paper size marks. If your document does not match any of the paper size marks, align the center of your document face down. 3 Align the document with the arrow mark. 2-4
Document Handling Loading Documents On the Platen Glass 1 Lift up the platen glass cover. 2 Place your document with the appropriate paper size marks. If your document does not match any of the paper size marks, align the center of your document face down. 3 Align the document with the arrow mark. 2-4
imageCLASS MF6500 Series Basic Guide
Page 54
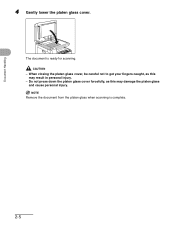
Document Handling 4 Gently lower the platen glass cover. The document is complete. 2-5 Do not press down the platen glass cover forcefully, as this may result in personal injury. - CAUTION - When closing the platen glass cover, be careful not to get your fingers caught, as this may damage the platen glass and cause personal injury. NOTE Remove the document from the platen glass when scanning is ready for scanning.
Document Handling 4 Gently lower the platen glass cover. The document is complete. 2-5 Do not press down the platen glass cover forcefully, as this may result in personal injury. - CAUTION - When closing the platen glass cover, be careful not to get your fingers caught, as this may damage the platen glass and cause personal injury. NOTE Remove the document from the platen glass when scanning is ready for scanning.

imageCLASS MF6500 Series Basic Guide
Page 72
The FAX indicator lights up and the machine enters fax standby mode. Sending Faxes (MF6550/MF6560/MF6580 Only) Sending Faxes (MF6550/MF6560/MF6580 Only) Follow this procedure to adjust the resolution and density: See "Scan Settings," on the platen glass or load it in the ADF. Press [FAX]. For advanced sending features, see "Document Requirements...
The FAX indicator lights up and the machine enters fax standby mode. Sending Faxes (MF6550/MF6560/MF6580 Only) Sending Faxes (MF6550/MF6560/MF6580 Only) Follow this procedure to adjust the resolution and density: See "Scan Settings," on the platen glass or load it in the ADF. Press [FAX]. For advanced sending features, see "Document Requirements...
imageCLASS MF6500 Series Basic Guide
Page 73
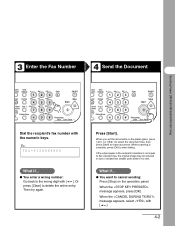
...Frame Erase d SYMBOLS 0# Tone Clear C ON/OFF Stop Start Processing/ Data Error Power Press [Start]. 3 Enter the Fax Number 4 Send the Document Sending Faxes (MF6550/MF6560/MF6580 Only) stem View nitor Settings @./ 1 ABC 2 DEF 3 eset Collate GHI JKL MNO 456 tional 2 on 1 PQRS ctions 7 TUV WXYZ 89 Frame... Or press [Clear] to select the document size, then press [Start] for each document. When you set the documents on the platen glass, press [ ] or [ ] to delete the entire entry. When the message appears, press [OK]. When the message appears, select with [ ]. 4-2
...Frame Erase d SYMBOLS 0# Tone Clear C ON/OFF Stop Start Processing/ Data Error Power Press [Start]. 3 Enter the Fax Number 4 Send the Document Sending Faxes (MF6550/MF6560/MF6580 Only) stem View nitor Settings @./ 1 ABC 2 DEF 3 eset Collate GHI JKL MNO 456 tional 2 on 1 PQRS ctions 7 TUV WXYZ 89 Frame... Or press [Clear] to select the document size, then press [Start] for each document. When you set the documents on the platen glass, press [ ] or [ ] to delete the entire entry. When the message appears, press [OK]. When the message appears, select with [ ]. 4-2

imageCLASS MF6500 Series Basic Guide
Page 103
... Colla Stop Start Additional 2 on Functions 5 OK 09 10 11 12 Image Quality Density Enlarge/Reduce Two-Sided Frame E rocessing/ Data Error Power Sending Faxes (MF6550/MF6560/MF6580 Only) 1 Place the document on p. 4-3. 4 Press the desired one-touch speed or group dialing key (01 to start dialing. 4-32 Using Speed Dialing... the procedure below to send faxes to dial the number. When scanning is complete, press [OK] to 23). For details, see "Scan Settings," on the platen glass or load it in the ADF. 2 Press [FAX]. 3 Adjust any necessary settings for each document.
... Colla Stop Start Additional 2 on Functions 5 OK 09 10 11 12 Image Quality Density Enlarge/Reduce Two-Sided Frame E rocessing/ Data Error Power Sending Faxes (MF6550/MF6560/MF6580 Only) 1 Place the document on p. 4-3. 4 Press the desired one-touch speed or group dialing key (01 to start dialing. 4-32 Using Speed Dialing... the procedure below to send faxes to dial the number. When scanning is complete, press [OK] to 23). For details, see "Scan Settings," on the platen glass or load it in the ADF. 2 Press [FAX]. 3 Adjust any necessary settings for each document.

imageCLASS MF6500 Series Basic Guide
Page 104
... details, see "Scan Settings," on p. 4-3. 4 Press [Coded Dial]. 5 Enter the desired two-digit code (00 to start dialing. 4-33 Sending Faxes (MF6550/MF6560/MF6580 Only) ● Using Coded Speed/Group Dialing 2 4 Coded Address Redial Dial Book 03 04 07 08 11 12 5 COPY FAX SCAN ViSeywste SetMtinognsi...Functi 7 8 9 6 ame Erase Image Quality Density Enlarge/Reduce Two-Sided Tone SYMBOLS 0# Processing/ Data Error Power 1 Place the document on the platen glass or load it in the ADF. 2 Press [FAX]. 3 Adjust any necessary settings for each document. Ex. TEL=012XXXXXXX [*01...
... details, see "Scan Settings," on p. 4-3. 4 Press [Coded Dial]. 5 Enter the desired two-digit code (00 to start dialing. 4-33 Sending Faxes (MF6550/MF6560/MF6580 Only) ● Using Coded Speed/Group Dialing 2 4 Coded Address Redial Dial Book 03 04 07 08 11 12 5 COPY FAX SCAN ViSeywste SetMtinognsi...Functi 7 8 9 6 ame Erase Image Quality Density Enlarge/Reduce Two-Sided Tone SYMBOLS 0# Processing/ Data Error Power 1 Place the document on the platen glass or load it in the ADF. 2 Press [FAX]. 3 Adjust any necessary settings for each document. Ex. TEL=012XXXXXXX [*01...

imageCLASS MF6500 Series Basic Guide
Page 105
...see "Scan Settings," on 1 PQRS OK Functions 7 09 10 11 12 Frame Erase Image Quality Density Enlarge/Reduce Two-Sided To Sending Faxes (MF6550/MF6560/MF6580 Only) 1 Connect an external telephone to the machine if you want to talk to the recipient before sending a document. NOTE -...COPY FAX SCAN System Monitor Reset View Settings Collate @./ 1 GHI 4 05 06 07 08 Paper Select Additional 2 on p. 4-3. 4-34 You cannot use the platen glass for your document. For details, see "Set Up the Machine," in the Starter Guide. 2 Load the document in the ADF. 3 Press [FAX]. 4...
...see "Scan Settings," on 1 PQRS OK Functions 7 09 10 11 12 Frame Erase Image Quality Density Enlarge/Reduce Two-Sided To Sending Faxes (MF6550/MF6560/MF6580 Only) 1 Connect an external telephone to the machine if you want to talk to the recipient before sending a document. NOTE -...COPY FAX SCAN System Monitor Reset View Settings Collate @./ 1 GHI 4 05 06 07 08 Paper Select Additional 2 on p. 4-3. 4-34 You cannot use the platen glass for your document. For details, see "Set Up the Machine," in the Starter Guide. 2 Load the document in the ADF. 3 Press [FAX]. 4...

imageCLASS MF6500 Series Basic Guide
Page 107
.... You cannot use group dialing for direct sending. - NOTE - To cancel direct sending, press [Direct TX] again. 4-36 You cannot use the platen glass for direct sending. - Sending Faxes (MF6550/MF6560/MF6580 Only) Direct Sending With direct sending, the machine sends the document on 1 PQRS OK Functions 7 09 10 11 12 Frame Erase...
.... You cannot use group dialing for direct sending. - NOTE - To cancel direct sending, press [Direct TX] again. 4-36 You cannot use the platen glass for direct sending. - Sending Faxes (MF6550/MF6560/MF6580 Only) Direct Sending With direct sending, the machine sends the document on 1 PQRS OK Functions 7 09 10 11 12 Frame Erase...

imageCLASS MF6500 Series Basic Guide
Page 112
... System Vie Monitor Settin Reset Colla Paper Select Image Quality Additional 2 on Functions OK Frame E Density Enlarge/Reduce Two-Sided Place the document on the platen glass or load it in the ADF. The COPY indicator lights and the machine enters copy standby mode. What if... ● You want to make a copy...
... System Vie Monitor Settin Reset Colla Paper Select Image Quality Additional 2 on Functions OK Frame E Density Enlarge/Reduce Two-Sided Place the document on the platen glass or load it in the ADF. The COPY indicator lights and the machine enters copy standby mode. What if... ● You want to make a copy...
imageCLASS MF6500 Series Basic Guide
Page 122
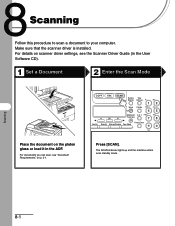
... documents you can scan, see the Scanner Driver Guide (in the User Software CD). 1 Set a Document 2 Enter the Scan Mode Place the document on the platen glass or load it in the ADF. Scanning Follow this procedure to scan a document to your computer. ABC COPY FAX SCAN System Monitor View Settings @./ 1 ABC...
... documents you can scan, see the Scanner Driver Guide (in the User Software CD). 1 Set a Document 2 Enter the Scan Mode Place the document on the platen glass or load it in the ADF. Scanning Follow this procedure to scan a document to your computer. ABC COPY FAX SCAN System Monitor View Settings @./ 1 ABC...
imageCLASS MF6500 Series Basic Guide
Page 132
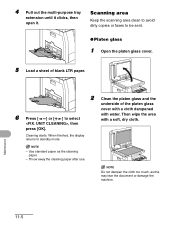
...Throw away the cleaning paper after use. When finished, the display returns to select , then press [OK]. 2 Clean the platen glass and the underside of the platen glass cover with a cloth dampened with a soft, dry cloth. Scanning area Keep the scanning area clean to avoid dirty copies or ...faxes to be sent. ● Platen glass 1 Open the platen glass cover. 5 Load a sheet of blank LTR paper. 6 Press [ ] or [ ] to standby mode. 4 Pull out the multi-purpose tray extension...
...Throw away the cleaning paper after use. When finished, the display returns to select , then press [OK]. 2 Clean the platen glass and the underside of the platen glass cover with a cloth dampened with a soft, dry cloth. Scanning area Keep the scanning area clean to avoid dirty copies or ...faxes to be sent. ● Platen glass 1 Open the platen glass cover. 5 Load a sheet of blank LTR paper. 6 Press [ ] or [ ] to standby mode. 4 Pull out the multi-purpose tray extension...
imageCLASS MF6500 Series Basic Guide
Page 133
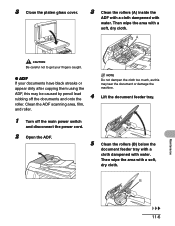
3 Close the platen glass cover. 3 Clean the rollers (A) inside the ADF with a cloth dampened with a soft, dry cloth. roller. A CAUTION Be careful not to get your fingers caught. ● ...
3 Close the platen glass cover. 3 Clean the rollers (A) inside the ADF with a cloth dampened with a soft, dry cloth. roller. A CAUTION Be careful not to get your fingers caught. ● ...
imageCLASS MF6500 Series Basic Guide
Page 134
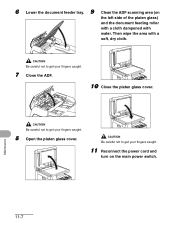
CAUTION Be careful not to get your fingers caught. 7 Close the ADF. 10 Close the platen glass cover. Maintenance 11-7 CAUTION Be careful not to get your fingers caught. 11 Reconnect the power cord and turn on the left side of the platen glass) and the document feeding roller with a cloth dampened with a soft, dry cloth. Clean the ADF scanning area (on the main power switch. Then wipe the area with water. CAUTION Be careful not to get your fingers caught. 8 Open the platen glass cover. 6 9 Lower the document feeder tray.
CAUTION Be careful not to get your fingers caught. 7 Close the ADF. 10 Close the platen glass cover. Maintenance 11-7 CAUTION Be careful not to get your fingers caught. 11 Reconnect the power cord and turn on the left side of the platen glass) and the document feeding roller with a cloth dampened with a soft, dry cloth. Clean the ADF scanning area (on the main power switch. Then wipe the area with water. CAUTION Be careful not to get your fingers caught. 8 Open the platen glass cover. 6 9 Lower the document feeder tray.

imageCLASS MF6500 Series Basic Guide
Page 153
3 Lift the document feeder tray. 6 Open the platen glass cover, and remove any jammed documents. 4 Remove any jammed documents. 7 Close the platen glass cover. 5 Lower the document feeder tray and close the ADF. CAUTION Be careful not to get your fingers caught. 12-2 Troubleshooting CAUTION Be careful not to get your fingers caught.
3 Lift the document feeder tray. 6 Open the platen glass cover, and remove any jammed documents. 4 Remove any jammed documents. 7 Close the platen glass cover. 5 Lower the document feeder tray and close the ADF. CAUTION Be careful not to get your fingers caught. 12-2 Troubleshooting CAUTION Be careful not to get your fingers caught.
imageCLASS MF6500 Series Basic Guide
Page 158
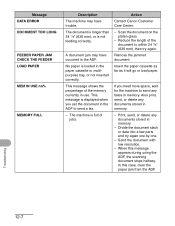
No paper is displayed when you need more space, wait for the machine to send a fax. - Scan the document on the platen glass. - Remove the jammed document. Send the document with low resolution. - When this case, clear the paper jam from the ADF. In this message appears during ... DOCUMENT TOO LONG FEEDER PAPER JAM CHECK THE FEEDER LOAD PAPER MEM IN USE nn% MEMORY FULL Description The machine may have trouble. Action Contact Canon Customer Care Center. - Insert the paper cassette as far as it will go or load paper. The document is longer than 24 7/8" (630 mm), or...
No paper is displayed when you need more space, wait for the machine to send a fax. - Scan the document on the platen glass. - Remove the jammed document. Send the document with low resolution. - When this case, clear the paper jam from the ADF. In this message appears during ... DOCUMENT TOO LONG FEEDER PAPER JAM CHECK THE FEEDER LOAD PAPER MEM IN USE nn% MEMORY FULL Description The machine may have trouble. Action Contact Canon Customer Care Center. - Insert the paper cassette as far as it will go or load paper. The document is longer than 24 7/8" (630 mm), or...
imageCLASS MF6500 Series Basic Guide
Page 160
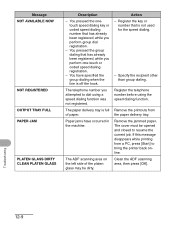
... job. Register the key or number that is off the hook. Message NOT AVAILABLE NOW NOT REGISTERED OUTPUT TRAY FULL PAPER JAM PLATEN GLASS DIRTY CLEAN PLATEN GLASS Description - Register the telephone number before using a speed dialing function was not registered. The cover must be dirty. Clean the ...that has already been registered, while you perform one-touch or coded speed dialing registration. - The paper delivery tray is full of the platen glass may be opened and closed to dial using the speed dialing function. Remove the printouts from a PC, press [Start] to bring ...
... job. Register the key or number that is off the hook. Message NOT AVAILABLE NOW NOT REGISTERED OUTPUT TRAY FULL PAPER JAM PLATEN GLASS DIRTY CLEAN PLATEN GLASS Description - Register the telephone number before using a speed dialing function was not registered. The cover must be dirty. Clean the ...that has already been registered, while you perform one-touch or coded speed dialing registration. - The paper delivery tray is full of the platen glass may be opened and closed to dial using the speed dialing function. Remove the printouts from a PC, press [Start] to bring ...


