imageCLASS MF6500 Series Basic Guide
Page 11
What Can I Do with This Machine? Users in Canada xxvi Pre-Installation Requirements for Canon Facsimile Equipment xxvi Notice xxvii Laser Safety xxix CDRH Regulations xxix 1 Before Using the Machine 1-1 Machine Components...1-3 Main Operation Panel 1-3 Facsimile Operation Panel (MF6550/MF6560/MF6580 Only 1-5 LCD (Standby Mode 1-6 Copy Mode 1-6 Fax Mode 1-6 Scan Mode 1-6 Toner Cartridge 1-7 Maintaining the Toner Cartridge 1-7 Timer Settings 1-9 Setting Sleep Mode 1-9 Setting Auto Clear Time 1-12 Setting Daylight Saving Time 1-14 2 Document Handling 2-1 Document Requirements ...
What Can I Do with This Machine? Users in Canada xxvi Pre-Installation Requirements for Canon Facsimile Equipment xxvi Notice xxvii Laser Safety xxix CDRH Regulations xxix 1 Before Using the Machine 1-1 Machine Components...1-3 Main Operation Panel 1-3 Facsimile Operation Panel (MF6550/MF6560/MF6580 Only 1-5 LCD (Standby Mode 1-6 Copy Mode 1-6 Fax Mode 1-6 Scan Mode 1-6 Toner Cartridge 1-7 Maintaining the Toner Cartridge 1-7 Timer Settings 1-9 Setting Sleep Mode 1-9 Setting Auto Clear Time 1-12 Setting Daylight Saving Time 1-14 2 Document Handling 2-1 Document Requirements ...
imageCLASS MF6500 Series Basic Guide
Page 13
... 11-1 Exterior 11-1 Interior 11-2 Fuser Roller 11-4 Scanning area 11-5 Cleaning the ADF Automatically 11-8 Transcription Roller 11-9 Replacing the Toner Cartridge 11-10 Redistributing Toner 11-10 Replacing the Toner Cartridge 11-12 Recycling Used Cartridges 11-16 The Clean Earth Campaign 11-16 U.S.A. PROGRAM 11-17 CANADA PROGRAM-CANADA PROGRAMME...
... 11-1 Exterior 11-1 Interior 11-2 Fuser Roller 11-4 Scanning area 11-5 Cleaning the ADF Automatically 11-8 Transcription Roller 11-9 Replacing the Toner Cartridge 11-10 Redistributing Toner 11-10 Replacing the Toner Cartridge 11-12 Recycling Used Cartridges 11-16 The Clean Earth Campaign 11-16 U.S.A. PROGRAM 11-17 CANADA PROGRAM-CANADA PROGRAMME...
imageCLASS MF6500 Series Basic Guide
Page 15
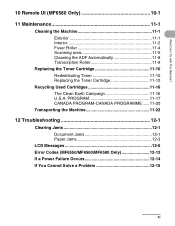
...and other risks. This could result in the machine while printing. - xiii Follow all service, contact Canon Customer Care Center, or a Canon Authorized Service Facility. Place the toner cartridge in a thick cloth to prevent exposure to service the machine yourself. Keep the machine clean. What.... Preface Thank you lift the machine. Important Safety Instructions WARNING Except as pins, paper clips, or staples) to remove the toner cartridge from operating properly. Handling and Maintenance - To avoid paper jams, never unplug the power cord, open the left cover,...
...and other risks. This could result in the machine while printing. - xiii Follow all service, contact Canon Customer Care Center, or a Canon Authorized Service Facility. Place the toner cartridge in a thick cloth to prevent exposure to service the machine yourself. Keep the machine clean. What.... Preface Thank you lift the machine. Important Safety Instructions WARNING Except as pins, paper clips, or staples) to remove the toner cartridge from operating properly. Handling and Maintenance - To avoid paper jams, never unplug the power cord, open the left cover,...
imageCLASS MF6500 Series Basic Guide
Page 33
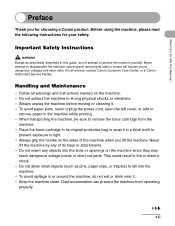
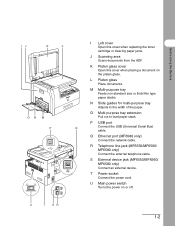
... socket Connect the power cord. U T SR 1-2 U Main power switch Turns the power on the platen glass. K Platen glass cover Open this cover when replacing the toner cartridge or clearing paper jams. J Scanning area Scans documents from the ADF. Q Ethernet port (MF6580 only) Connect the network cable. M Multi-purpose tray Feeds non...
... socket Connect the power cord. U T SR 1-2 U Main power switch Turns the power on the platen glass. K Platen glass cover Open this cover when replacing the toner cartridge or clearing paper jams. J Scanning area Scans documents from the ADF. Q Ethernet port (MF6580 only) Connect the network cable. M Multi-purpose tray Feeds non...

imageCLASS MF6500 Series Basic Guide
Page 38
... computer screens, disk drives, and floppy disks. The level of toner consumption varies depending on the basis of documents printed. Toner Cartridge name: Canon Cartridge 106 Maintaining the Toner Cartridge ● Keep the toner cartridge away from the machine unnecessarily. 1-7 If your local Canon dealer or Canon Customer Care Center (1-800-828-4040). * "ISO/IEC 19752" is...
... computer screens, disk drives, and floppy disks. The level of toner consumption varies depending on the basis of documents printed. Toner Cartridge name: Canon Cartridge 106 Maintaining the Toner Cartridge ● Keep the toner cartridge away from the machine unnecessarily. 1-7 If your local Canon dealer or Canon Customer Care Center (1-800-828-4040). * "ISO/IEC 19752" is...

imageCLASS MF6500 Series Basic Guide
Page 39
Toner powder is damaged. ● Always hold the toner cartridge by shaking the toner cartridge. If toner becomes caked in fire. CAUTION Do not place the toner cartridge in the toner cartridge, it may deteriorate if the drum surface is exposed to free it upside down. Print quality may become impossible to light or is flammable. 1-8 Before Using the Machine ● Do not open the drum protective shutter on end, and do not turn it even by its handle to avoid touching the drum protective shutter. ● Do not stand the toner cartridge on the toner cartridge.
Toner powder is damaged. ● Always hold the toner cartridge by shaking the toner cartridge. If toner becomes caked in fire. CAUTION Do not place the toner cartridge in the toner cartridge, it may deteriorate if the drum surface is exposed to free it upside down. Print quality may become impossible to light or is flammable. 1-8 Before Using the Machine ● Do not open the drum protective shutter on end, and do not turn it even by its handle to avoid touching the drum protective shutter. ● Do not stand the toner cartridge on the toner cartridge.
imageCLASS MF6500 Series Basic Guide
Page 129
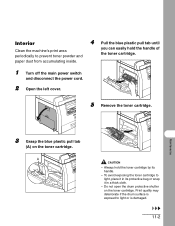
...the drum protective shutter on the toner cartridge. Always hold the handle of the toner cartridge. 1 Turn off the main power switch and disconnect the power cord. 2 Open the left cover. 5 Remove the toner cartridge. To avoid exposing the toner cartridge to prevent toner powder and paper dust from ...accumulating inside. 4 Pull the blue plastic pull tab until you can easily hold the toner cartridge by its protective bag or wrap it in its ...
...the drum protective shutter on the toner cartridge. Always hold the handle of the toner cartridge. 1 Turn off the main power switch and disconnect the power cord. 2 Open the left cover. 5 Remove the toner cartridge. To avoid exposing the toner cartridge to prevent toner powder and paper dust from ...accumulating inside. 4 Pull the blue plastic pull tab until you can easily hold the toner cartridge by its protective bag or wrap it in its ...
imageCLASS MF6500 Series Basic Guide
Page 130
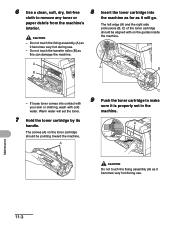
... the transfer roller (B) as it becomes very hot during use . Warm water will go. If loose toner comes into cloth to make sure it is properly set the toner. 7 Hold the toner cartridge by its handle. The arrows (A) on the guides inside the machine. - A CAUTION Do not... touch the fixing assembly (A) as this can damage the machine. Maintenance 11-3 A A B B - A C 9 Push the toner cartridge to remove any toner or the machine as far as it becomes very hot during use . - 6 Use a clean, soft, dry, lint-free 8 Insert the...
... the transfer roller (B) as it becomes very hot during use . Warm water will go. If loose toner comes into cloth to make sure it is properly set the toner. 7 Hold the toner cartridge by its handle. The arrows (A) on the guides inside the machine. - A CAUTION Do not... touch the fixing assembly (A) as this can damage the machine. Maintenance 11-3 A A B B - A C 9 Push the toner cartridge to remove any toner or the machine as far as it becomes very hot during use . - 6 Use a clean, soft, dry, lint-free 8 Insert the...
imageCLASS MF6500 Series Basic Guide
Page 131
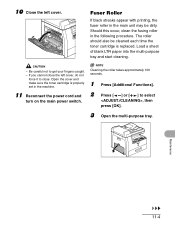
Load a sheet of blank LTR paper into the multi-purpose tray and start cleaning. Open the cover and make sure the toner cartridge is replaced. Maintenance 11-4 Be careful not to close the left cover. If you cannot close . 10 Close the left cover, do not force ... should also be dirty. Fuser Roller If black streaks appear with printing, the fuser roller in the main unit may be cleaned each time the toner cartridge is properly set in the following procedure. Should this occur, clean the fusing roller in the machine. 11 Reconnect the power cord and turn...
Load a sheet of blank LTR paper into the multi-purpose tray and start cleaning. Open the cover and make sure the toner cartridge is replaced. Maintenance 11-4 Be careful not to close the left cover. If you cannot close . 10 Close the left cover, do not force ... should also be dirty. Fuser Roller If black streaks appear with printing, the fuser roller in the main unit may be cleaned each time the toner cartridge is properly set in the following procedure. Should this occur, clean the fusing roller in the machine. 11 Reconnect the power cord and turn...

imageCLASS MF6500 Series Basic Guide
Page 137
... or is damaged. message persists, replace the toner cartridge. Do not open the drum protective shutter on the toner cartridge. Maintenance 11-10 Replacing the Toner Cartridge 3 When the LCD displays , redistribute you can easily hold the toner cartridge by its handle. - Always hold the handle of toner in the toner cartridge. A CAUTION - If the the...
... or is damaged. message persists, replace the toner cartridge. Do not open the drum protective shutter on the toner cartridge. Maintenance 11-10 Replacing the Toner Cartridge 3 When the LCD displays , redistribute you can easily hold the toner cartridge by its handle. - Always hold the handle of toner in the toner cartridge. A CAUTION - If the the...

imageCLASS MF6500 Series Basic Guide
Page 138
The left edge (A) and the right side protrusions (B, C) of the toner cartridge should be aligned with the guides inside the machine. A C 8 Push the toner cartridge to distribute toner evenly. CAUTION Do not touch the fixing assembly (A) as it will go. Maintenance 11-11 A 7 Insert the toner cartridge into the machine as far as it is...
The left edge (A) and the right side protrusions (B, C) of the toner cartridge should be aligned with the guides inside the machine. A C 8 Push the toner cartridge to distribute toner evenly. CAUTION Do not touch the fixing assembly (A) as it will go. Maintenance 11-11 A 7 Insert the toner cartridge into the machine as far as it is...

imageCLASS MF6500 Series Basic Guide
Page 139
CAUTION - Open the cover and make sure the toner cartridge is properly 2 set in the machine. Be careful not to close the left cover, do not force it to get your fingers caught. - If you can easily hold the handle of the toner cartridge. Grasp the blue plastic pull tab (A) on the toner cartridge. A 3 Pull the blue plastic pull tab until you cannot close . Maintenance 11-12 9 Close the left cover. Replacing the Toner Cartridge 1 Open the left cover.
CAUTION - Open the cover and make sure the toner cartridge is properly 2 set in the machine. Be careful not to close the left cover, do not force it to get your fingers caught. - If you can easily hold the handle of the toner cartridge. Grasp the blue plastic pull tab (A) on the toner cartridge. A 3 Pull the blue plastic pull tab until you cannot close . Maintenance 11-12 9 Close the left cover. Replacing the Toner Cartridge 1 Open the left cover.
imageCLASS MF6500 Series Basic Guide
Page 140
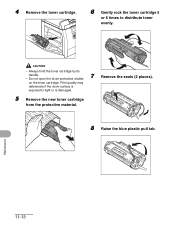
Do not open the drum protective shutter 7 Remove the seals (2 places). Always hold the toner cartridge by its handle. - on the toner cartridge. Maintenance 11-13 CAUTION - Print quality may deteriorate if the drum surface is damaged. 5 Remove the new toner cartridge from the protective material. 8 Raise the blue plastic pull tab. 4 Remove the toner cartridge. 6 Gently rock the toner cartridge 5 or 6 times to light or is exposed to distribute toner evenly.
Do not open the drum protective shutter 7 Remove the seals (2 places). Always hold the toner cartridge by its handle. - on the toner cartridge. Maintenance 11-13 CAUTION - Print quality may deteriorate if the drum surface is damaged. 5 Remove the new toner cartridge from the protective material. 8 Raise the blue plastic pull tab. 4 Remove the toner cartridge. 6 Gently rock the toner cartridge 5 or 6 times to light or is exposed to distribute toner evenly.

imageCLASS MF6500 Series Basic Guide
Page 141
...it becomes very hot during use. The arrows (A) on the toner cartridge should be pointing toward the machine. A CAUTION Do not touch the fixing assembly (A) as it will go. 9 Pull out the seal completely. 11 Insert the toner cartridge into the machine as far as it is properly set in... the machine. The left edge (A) and the right side protrusions (B, C) of the toner cartridge should be aligned with the guides inside the machine. Maintenance 11-14...
...it becomes very hot during use. The arrows (A) on the toner cartridge should be pointing toward the machine. A CAUTION Do not touch the fixing assembly (A) as it will go. 9 Pull out the seal completely. 11 Insert the toner cartridge into the machine as far as it is properly set in... the machine. The left edge (A) and the right side protrusions (B, C) of the toner cartridge should be aligned with the guides inside the machine. Maintenance 11-14...
imageCLASS MF6500 Series Basic Guide
Page 142
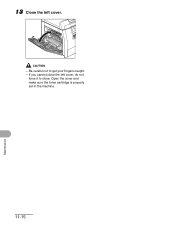
CAUTION - Open the cover and make sure the toner cartridge is properly set in the machine. 11-15 Maintenance 13 Close the left cover, do not force it to get your fingers caught. - Be careful not to close the left cover. If you cannot close .
CAUTION - Open the cover and make sure the toner cartridge is properly set in the machine. 11-15 Maintenance 13 Close the left cover, do not force it to get your fingers caught. - Be careful not to close the left cover. If you cannot close .

imageCLASS MF6500 Series Basic Guide
Page 149
... Follow this procedure to avoid 4 Pull the blue plastic pull tab until vibration damage to the machine when you can easily hold the toner cartridge by its protective bag or wrap it over a long distance. CAUTION Be sure at least two people carry the machine. 1 Disconnect ...handle of the machine. 2 Open the left cover. 5 Remove the toner cartridge. Do not open the drum protective shutter on the toner cartridge. Maintenance 3 Grasp the blue plastic pull tab (A) on the toner cartridge. To avoid exposing the toner cartridge to light or is exposed to light, place it in a...
... Follow this procedure to avoid 4 Pull the blue plastic pull tab until vibration damage to the machine when you can easily hold the toner cartridge by its protective bag or wrap it over a long distance. CAUTION Be sure at least two people carry the machine. 1 Disconnect ...handle of the machine. 2 Open the left cover. 5 Remove the toner cartridge. Do not open the drum protective shutter on the toner cartridge. Maintenance 3 Grasp the blue plastic pull tab (A) on the toner cartridge. To avoid exposing the toner cartridge to light or is exposed to light, place it in a...
imageCLASS MF6500 Series Basic Guide
Page 154
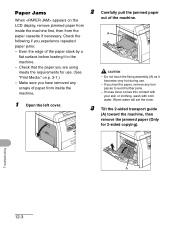
... have removed any torn pieces to avoid further jams. - Do not touch the fixing assembly (A) as it in the machine. - Warm water will set the toner. 3 Tilt the 2-sided transport guide (A) toward the machine, then remove the jammed paper (Only for use . - If you experience repeated paper jams: - If loose...
... have removed any torn pieces to avoid further jams. - Do not touch the fixing assembly (A) as it in the machine. - Warm water will set the toner. 3 Tilt the 2-sided transport guide (A) toward the machine, then remove the jammed paper (Only for use . - If you experience repeated paper jams: - If loose...

imageCLASS MF6500 Series Basic Guide
Page 161
...[OK], then set the document again. A transmission error occurred because the line condition was loaded. Load the correct-size paper in memory because paper or toner ran out, paper jams occurred, or incorrectsize paper was poor. - Check the line condition, then try again. The machine received the fax in the paper..., or clear the paper jams. For more information, see the following: "Setting Paper Type and Size," on p. 3-8 "Replacing the Toner Cartridge," on p. 11-12 "Clearing Jams," on the main power switch, or when the machine is not ready for printing. The paper jammed or ran...
...[OK], then set the document again. A transmission error occurred because the line condition was loaded. Load the correct-size paper in memory because paper or toner ran out, paper jams occurred, or incorrectsize paper was poor. - Check the line condition, then try again. The machine received the fax in the paper..., or clear the paper jams. For more information, see the following: "Setting Paper Type and Size," on p. 3-8 "Replacing the Toner Cartridge," on p. 11-12 "Clearing Jams," on the main power switch, or when the machine is not ready for printing. The paper jammed or ran...
imageCLASS MF6500 Series Basic Guide
Page 162
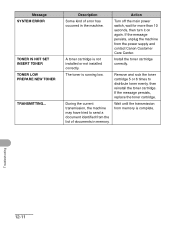
... or not installed correctly. Description Some kind of documents in the machine. Remove and rock the toner cartridge 5 or 6 times to send a document identified from the power supply and contact Canon Customer Care Center. Troubleshooting 12-11 A toner cartridge is complete. Action Turn off the main power switch, wait for more than 10...
... or not installed correctly. Description Some kind of documents in the machine. Remove and rock the toner cartridge 5 or 6 times to send a document identified from the power supply and contact Canon Customer Care Center. Troubleshooting 12-11 A toner cartridge is complete. Action Turn off the main power switch, wait for more than 10...
imageCLASS MF6500 Series Basic Guide
Page 173
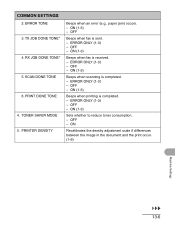
... is sent. - SCAN DONE TONE 6. PRINT DONE TONE 4. OFF Beeps when fax is received. - ON (1-3) Beeps when printing is completed. - ON (1-3) Sets whether to reduce toner consumption. - ON Recalibrates the density adjustment scale if differences between the image in the document and the print occur. (1-9) Machine Settings 13-6 TX JOB DONE...
... is sent. - SCAN DONE TONE 6. PRINT DONE TONE 4. OFF Beeps when fax is received. - ON (1-3) Beeps when printing is completed. - ON (1-3) Sets whether to reduce toner consumption. - ON Recalibrates the density adjustment scale if differences between the image in the document and the print occur. (1-9) Machine Settings 13-6 TX JOB DONE...


