Operation Guide
Page 40
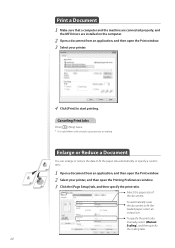
...data to fit the paper size automatically, or specify a custom ratio. 1 Open a document from an application, and then open the Printing Preferences window. 3 Click the [Page Setup] tab, and then specify the print ratio. Select the paper size of the document. To specify the print ratio...connected properly, and the MF Drivers are installed on the computer. 2 Open a document from an application, and then open the Print window. 2 Select your printer, and then open the Print window. 3 Select your printer. 4 Click [Print] to start printing. Canceling Print Jobs Press [ ] (Stop) twice. * It ...
...data to fit the paper size automatically, or specify a custom ratio. 1 Open a document from an application, and then open the Printing Preferences window. 3 Click the [Page Setup] tab, and then specify the print ratio. Select the paper size of the document. To specify the print ratio...connected properly, and the MF Drivers are installed on the computer. 2 Open a document from an application, and then open the Print window. 2 Select your printer, and then open the Print window. 3 Select your printer. 4 Click [Print] to start printing. Canceling Print Jobs Press [ ] (Stop) twice. * It ...
Operation Guide
Page 41
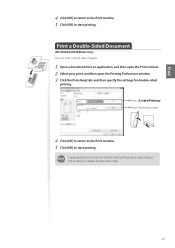
... Double-Sided Document (MF4890dw/MF4880dw Only) You can print on the models. Select the binding edge. 4 Click [OK] to return to the Print window. 5 Click [OK] to start printing. Supported document sizes for double-sided printing varies depending on both sides of paper. 1 Open a document from ...an application, and then open the Print window. 2 Select your print, and then open the Printing Preferences window. 3 Click the [Finishing] tab, and then specify the settings for double-sided printing. Print 4 Click [OK]...
... Double-Sided Document (MF4890dw/MF4880dw Only) You can print on the models. Select the binding edge. 4 Click [OK] to return to the Print window. 5 Click [OK] to start printing. Supported document sizes for double-sided printing varies depending on both sides of paper. 1 Open a document from ...an application, and then open the Print window. 2 Select your print, and then open the Printing Preferences window. 3 Click the [Finishing] tab, and then specify the settings for double-sided printing. Print 4 Click [OK]...
Operation Guide
Page 42
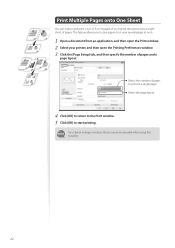
... this function. 42 This feature allows you to save paper or to start printing. Select the page layout. 4 Click [OK] to return to the Print window. 5 Click [OK] to view several pages at once. 1 Open a document from an application, and then open the Print... window. 2 Select your printer, and then open the Printing Preferences window. 3 Click the [Page Setup] tab, and then specify the number of pages and a page layout. Select the number of paper. Print Multiple Pages onto...
... this function. 42 This feature allows you to save paper or to start printing. Select the page layout. 4 Click [OK] to return to the Print window. 5 Click [OK] to view several pages at once. 1 Open a document from an application, and then open the Print... window. 2 Select your printer, and then open the Printing Preferences window. 3 Click the [Page Setup] tab, and then specify the number of pages and a page layout. Select the number of paper. Print Multiple Pages onto...
Operation Guide
Page 43
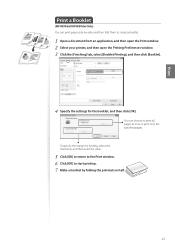
To specify the margin for binding, select the check box, and then enter the value. 5 Click [OK] to return to the Print window. 6 Click [OK] to start printing. 7 Make a booklet by -side, and then fold them to print all pages at once or print only the ...a Booklet (MF4890dw/MF4880dw Only) You can choose to create a booklet. 1 Open a document from an application, and then open the Print window. 2 Select your printer, and then open the Printing Preferences window. 3 Click the [Finishing] tab, select [Booklet Printing], and then click [Booklet]. 4 Specify the settings for the booklet, and then ...
To specify the margin for binding, select the check box, and then enter the value. 5 Click [OK] to return to the Print window. 6 Click [OK] to start printing. 7 Make a booklet by -side, and then fold them to print all pages at once or print only the ...a Booklet (MF4890dw/MF4880dw Only) You can choose to create a booklet. 1 Open a document from an application, and then open the Print window. 2 Select your printer, and then open the Printing Preferences window. 3 Click the [Finishing] tab, select [Booklet Printing], and then click [Booklet]. 4 Specify the settings for the booklet, and then ...

Operation Guide
Page 44
... printing. 6 Make a poster by high). 4 Click [OK] to return to the Print window. 5 Click [OK] to create a large poster. 1 Open a document from an application, and then open the Print window. 2 Select your printer, and then open the Printing Preferences window. 3 Click [Page Setup] tab, and then select [Poster(N×N)] from the [Page Layout...
... printing. 6 Make a poster by high). 4 Click [OK] to return to the Print window. 5 Click [OK] to create a large poster. 1 Open a document from an application, and then open the Print window. 2 Select your printer, and then open the Printing Preferences window. 3 Click [Page Setup] tab, and then select [Poster(N×N)] from the [Page Layout...
Operation Guide
Page 45
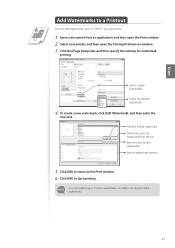
Delete the selected watermark from an application, and then open the Print window. 2 Select your printer, and then open the Printing Preferences window. 3 Click the [Page Setup] tab, and then specify the settings for the watermark. Print Add Watermarks to a Printout You can register up to 50 new ... desired watermark. 4 To create a new watermark, click [Edit Watermark], and then enter the new text. Specify watermark options. 5 Click [OK] to return to the Print window. 6 Click [OK] to the provided watermarks. 45 You can add watermarks, such as "DRAFT," to add watermarks.
Delete the selected watermark from an application, and then open the Print window. 2 Select your printer, and then open the Printing Preferences window. 3 Click the [Page Setup] tab, and then specify the settings for the watermark. Print Add Watermarks to a Printout You can register up to 50 new ... desired watermark. 4 To create a new watermark, click [Edit Watermark], and then enter the new text. Specify watermark options. 5 Click [OK] to return to the Print window. 6 Click [OK] to the provided watermarks. 45 You can add watermarks, such as "DRAFT," to add watermarks.
Operation Guide
Page 74
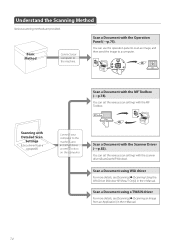
... MF Toolbox (→p.78). Scan a Document with the MF Toolbox. Scanning with the scanner driver (ScanGear MF Window). Scan a Document using WIA driver For more details, see [Scanning] [Scanning Using the WIA Driver (Window XP/Vista/7 Only)] in the e-Manual. 74 You can set the various scan settings with Detailed Scan...
... MF Toolbox (→p.78). Scan a Document with the MF Toolbox. Scanning with the scanner driver (ScanGear MF Window). Scan a Document using WIA driver For more details, see [Scanning] [Scanning Using the WIA Driver (Window XP/Vista/7 Only)] in the e-Manual. 74 You can set the various scan settings with Detailed Scan...
Operation Guide
Page 76
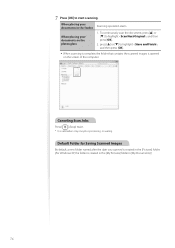
... the computer. Default Folder for Saving Scanned Images By default, a new folder named after the date you scanned is created in the [Pictures] folder. (For Windows XP, the folder is created in the [My Pictures] folder in the feeder When placing your documents in [My Documents].) 76 To continuously scan the...
... the computer. Default Folder for Saving Scanned Images By default, a new folder named after the date you scanned is created in the [Pictures] folder. (For Windows XP, the folder is created in the [My Pictures] folder in the feeder When placing your documents in [My Documents].) 76 To continuously scan the...
Operation Guide
Page 79
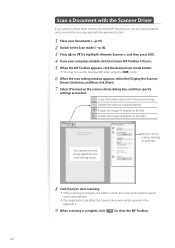
... setting is displayed. • The scanned document will be saved in a destination that you specify and opened in the registered application. 6 When the scan setting window appears, specify the scan settings as needed (→p.80). 7 Click [OK] to start scanning. • When scanning is complete, the folder in which the scanned...
... setting is displayed. • The scanned document will be saved in a destination that you specify and opened in the registered application. 6 When the scan setting window appears, specify the scan settings as needed (→p.80). 7 Click [OK] to start scanning. • When scanning is complete, the folder in which the scanned...
Operation Guide
Page 82
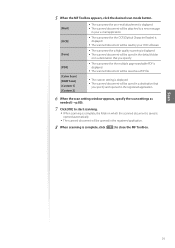
... , and then press [OK]. 4 From your computer, double-click the [Canon MF Toolbox 4.9] icon. 5 When the MF Toolbox appears, click the desired scan mode button. • You may not use the scanner driver window (ScanGear MF Window), you use the ScanGear MF when using the [OCR] mode. 6 When ...the scan setting window appears, select the [Display the Scanner Driver] check box, and then click [Start]. 7 Select...
... , and then press [OK]. 4 From your computer, double-click the [Canon MF Toolbox 4.9] icon. 5 When the MF Toolbox appears, click the desired scan mode button. • You may not use the scanner driver window (ScanGear MF Window), you use the ScanGear MF when using the [OCR] mode. 6 When ...the scan setting window appears, select the [Display the Scanner Driver] check box, and then click [Start]. 7 Select...


