Basic Guide
Page 6
... the Exterior and Interior 52 Cleaning the Fixing Unit 53 Cleaning the Platen Glass and Feeder 54 Check and Replace Toner Cartridges 55 Conserving the Toner to Extend the Life of Toner Cartridges 55 Replacing the Toner Cartridge 56 Manage Using the List Function 58 Troubleshooting Clear Jams 60 Clearing Document Jams in the Feeder (D560 Only...
... the Exterior and Interior 52 Cleaning the Fixing Unit 53 Cleaning the Platen Glass and Feeder 54 Check and Replace Toner Cartridges 55 Conserving the Toner to Extend the Life of Toner Cartridges 55 Replacing the Toner Cartridge 56 Manage Using the List Function 58 Troubleshooting Clear Jams 60 Clearing Document Jams in the Feeder (D560 Only...
Basic Guide
Page 10
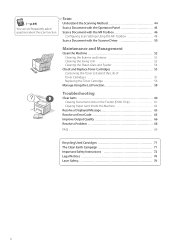
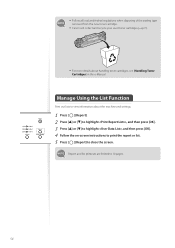
Transfer roller Transfers toner onto paper. Toner guides When inserting the toner cartridge, fit the protrusions on the toner cartridge into these guides. 10 Paper exit guide Open this cover to clear paper jams (→P.62). Interior Toner cover Open this guide to access the toner cartridge or clear paper jams (→P.55, P.62).
Transfer roller Transfers toner onto paper. Toner guides When inserting the toner cartridge, fit the protrusions on the toner cartridge into these guides. 10 Paper exit guide Open this cover to clear paper jams (→P.62). Interior Toner cover Open this guide to access the toner cartridge or clear paper jams (→P.55, P.62).
Basic Guide
Page 51
Maintenance and Management This chapter describes how to Extend the Life of Toner Cartridges 55 Replacing the Toner Cartridge 56 Manage Using the List Function 58 51 Clean the Machine 52 Cleaning the Exterior and Interior 52 Cleaning the Fixing Unit 53 Cleaning the Platen Glass and Feeder 54 Check and Replace Toner Cartridges 55 Conserving the Toner to clean the machine, replace the toner cartridge, and explains the report and list function used for managing the machine.
Maintenance and Management This chapter describes how to Extend the Life of Toner Cartridges 55 Replacing the Toner Cartridge 56 Manage Using the List Function 58 51 Clean the Machine 52 Cleaning the Exterior and Interior 52 Cleaning the Fixing Unit 53 Cleaning the Platen Glass and Feeder 54 Check and Replace Toner Cartridges 55 Conserving the Toner to clean the machine, replace the toner cartridge, and explains the report and list function used for managing the machine.
Basic Guide
Page 52
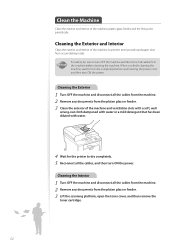
... the power. Clean the Machine Clean the exterior and interior of the machine to prevent toner powder and paper dust from the platen glass or feeder. 3 Lift the scanning platform, open the toner cover, and then remove the toner cartridge. 52 Cleaning the Exterior and Interior Clean the exterior and interior of the machine...
... the power. Clean the Machine Clean the exterior and interior of the machine to prevent toner powder and paper dust from the platen glass or feeder. 3 Lift the scanning platform, open the toner cover, and then remove the toner cartridge. 52 Cleaning the Exterior and Interior Clean the exterior and interior of the machine...
Basic Guide
Page 53
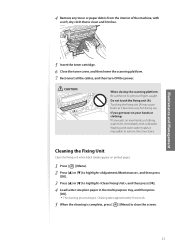
...cleaning process begins. Touching the fixing unit (A) may cause burns as it impossible to close the screen. 53 Maintenance and Management 5 Insert the toner cartridge. 6 Close the toner cover, and then lower the scanning platform. 7 Reconnect all the cables, and then turn ON the power. Cleaning takes approximately 90 seconds.... 5 When the cleaning is clean and lint-free. Do not touch the fixing unit (A). 4 Remove any toner or paper debris from the interior of the machine, with a soft, dry cloth that is complete, press [ ] (Menu) to remove the...
...cleaning process begins. Touching the fixing unit (A) may cause burns as it impossible to close the screen. 53 Maintenance and Management 5 Insert the toner cartridge. 6 Close the toner cover, and then lower the scanning platform. 7 Reconnect all the cables, and then turn ON the power. Cleaning takes approximately 90 seconds.... 5 When the cleaning is clean and lint-free. Do not touch the fixing unit (A). 4 Remove any toner or paper debris from the interior of the machine, with a soft, dry cloth that is complete, press [ ] (Menu) to remove the...

Basic Guide
Page 55
... impossible to remove the toner stains. 2 Gently shake the toner cartridge 5-6 times to evenly distribute the toner. 55 Check and Replace Toner Cartridges Toner cartridges are consumable products. If the print result is not improved, replace the toner cartridge (→p.56). Maintenance and Management CAUTION If toner gets on printed pages. Replace the toner cartridge if necessary. Gently shake the toner cartridge 5-6 times to print...
... impossible to remove the toner stains. 2 Gently shake the toner cartridge 5-6 times to evenly distribute the toner. 55 Check and Replace Toner Cartridges Toner cartridges are consumable products. If the print result is not improved, replace the toner cartridge (→p.56). Maintenance and Management CAUTION If toner gets on printed pages. Replace the toner cartridge if necessary. Gently shake the toner cartridge 5-6 times to print...
Basic Guide
Page 56
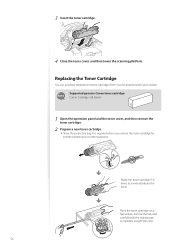
Shake the toner cartridge 5-6 times to evenly distribute the toner. 3 Insert the toner cartridge. 4 Close the toner cover, and then lower the scanning platform. Supported genuine Canon toner cartridge: Canon Cartridge 128 Starter 1 Open the operation panel and the toner cover, and then remove the toner cartridge. 2 Prepare a new toner cartridge. • Store the protective bag. Place the toner cartridge on a flat surface, remove the tab, and carefully pull...
Shake the toner cartridge 5-6 times to evenly distribute the toner. 3 Insert the toner cartridge. 4 Close the toner cover, and then lower the scanning platform. Supported genuine Canon toner cartridge: Canon Cartridge 128 Starter 1 Open the operation panel and the toner cover, and then remove the toner cartridge. 2 Prepare a new toner cartridge. • Store the protective bag. Place the toner cartridge on a flat surface, remove the tab, and carefully pull...
Basic Guide
Page 57
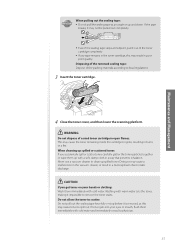
... according to scatter. Do not allow the toner to local regulations. 3 Insert the toner cartridge. Maintenance and Management 4 Close the toner cover, and then lower the scanning platform. When cleaning up spilled or scattered toner: If you get toner on your eyes or mouth, flush them immediately...with cold water. WARNING Do not dispose of a used toner cartridge in a dust explosion due to spill out. This may cause toner to static discharge. CAUTION If you accidentally spill or scatter toner, carefully gather the toner particles together or wipe them up with cold water and ...
... according to scatter. Do not allow the toner to local regulations. 3 Insert the toner cartridge. Maintenance and Management 4 Close the toner cover, and then lower the scanning platform. When cleaning up spilled or scattered toner: If you get toner on your eyes or mouth, flush them immediately...with cold water. WARNING Do not dispose of a used toner cartridge in a dust explosion due to spill out. This may cause toner to static discharge. CAUTION If you accidentally spill or scatter toner, carefully gather the toner particles together or wipe them up with cold water and ...
Basic Guide
Page 58
Report and list printouts are limited to view information about handling toner cartridges, see [Handling Toner Cartridges] in the e-Manual. • Follow all local and federal regulations when disposing of the sealing tape removed from the new toner cartridge. • Canon will collect and recycle your used toner cartridges (→p.71). • For more details about the machine and settings...
Report and list printouts are limited to view information about handling toner cartridges, see [Handling Toner Cartridges] in the e-Manual. • Follow all local and federal regulations when disposing of the sealing tape removed from the new toner cartridge. • Canon will collect and recycle your used toner cartridges (→p.71). • For more details about the machine and settings...
Basic Guide
Page 62
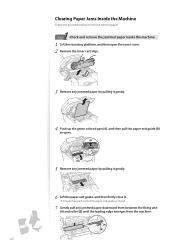
... procedure below to remove jammed paper. 1 Step Check and remove the jammed paper inside the machine. 1 Lift the scanning platform, and then open the toner cover. 2 Remove the toner cartridge. 3 Remove any jammed paper by pulling it gently. 4 Push up the green colored part (A), and then pull the paper exit guide (B) to open...
... procedure below to remove jammed paper. 1 Step Check and remove the jammed paper inside the machine. 1 Lift the scanning platform, and then open the toner cover. 2 Remove the toner cartridge. 3 Remove any jammed paper by pulling it gently. 4 Push up the green colored part (A), and then pull the paper exit guide (B) to open...
Basic Guide
Page 64
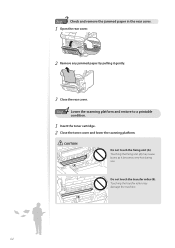
Touching the fixing unit (A) may damage the machine. 64 Touching the transfer roller may cause burns as it gently. 3 Close the rear cover. 4 Step Lower the scanning platform and restore to a printable condition. 1 Insert the toner cartridge. 2 Close the toner cover and lower the scanning platform. CAUTION ʢ"ʣ Do not touch the fixing unit (A). 3 Step Check and remove the jammed paper in the rear cover. 1 Open the rear cover. 2 Remove any jammed paper by pulling it becomes very hot during use. ʢ"#ʣ Do not touch the transfer roller (B).
Touching the fixing unit (A) may damage the machine. 64 Touching the transfer roller may cause burns as it gently. 3 Close the rear cover. 4 Step Lower the scanning platform and restore to a printable condition. 1 Insert the toner cartridge. 2 Close the toner cover and lower the scanning platform. CAUTION ʢ"ʣ Do not touch the fixing unit (A). 3 Step Check and remove the jammed paper in the rear cover. 1 Open the rear cover. 2 Remove any jammed paper by pulling it becomes very hot during use. ʢ"#ʣ Do not touch the transfer roller (B).

Basic Guide
Page 67
... a margin around the data. Provide a margin around the data. The overall print result is not in use for a long time after the toner cartridge has been replaced, change the settings from the operation panel. • When copying, change the and settings from the operation panel. • ... If the machine is dark. A portion of paper has smudge marks. Symptom Example The printed paper has vertical steaks. Smudge marks of spattering toner appear around the text or as patterns. Action • Verify that the appropriate paper is being used (→p.19). • Print a test...
... a margin around the data. Provide a margin around the data. The overall print result is not in use for a long time after the toner cartridge has been replaced, change the settings from the operation panel. • When copying, change the and settings from the operation panel. • ... If the machine is dark. A portion of paper has smudge marks. Symptom Example The printed paper has vertical steaks. Smudge marks of spattering toner appear around the text or as patterns. Action • Verify that the appropriate paper is being used (→p.19). • Print a test...
Basic Guide
Page 73
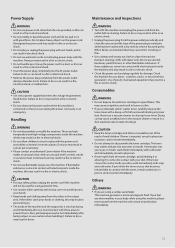
.... • Insert the power plug completely into contact with your skin becomes irritated due to your hands. • Keep hands and clothing away from the toner cartridge, avoid inhaling it or allowing it . Maintenance and Inspections WARNING • Turn OFF the machine and unplug the power cord from the power outlet periodically... or tie up the power cord in a knot, as this can unplug the power cord easily in serious personal injury. • Please contact an authorized Canon dealer if the machine makes an unusual noise, emits an unusual smell, or emits smoke or excessive heat. If...
.... • Insert the power plug completely into contact with your skin becomes irritated due to your hands. • Keep hands and clothing away from the toner cartridge, avoid inhaling it or allowing it . Maintenance and Inspections WARNING • Turn OFF the machine and unplug the power cord from the power outlet periodically... or tie up the power cord in a knot, as this can unplug the power cord easily in serious personal injury. • Please contact an authorized Canon dealer if the machine makes an unusual noise, emits an unusual smell, or emits smoke or excessive heat. If...
Starter Guide
Page 2
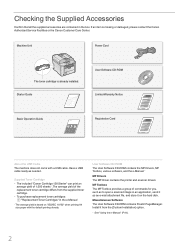
... Basic Operation Guide Registration Card About the USB Cable The machine does not come with the default printing density. Supplied Toner Cartridge • The included "Canon Cartridge 128 Starter" can print an average yield of commands for you, such as to open a scanned image in an... Drivers The MF Driver contains the printer and scanner drivers. PageManager. Machine Unit Power Cord The toner cartridge is missing or damaged, please contact the Canon Authorized Service Facilities or the Canon Customer Care Center. MF Toolbox The MF Toolbox provides a group of 1,000 sheets*. Install it...
... Basic Operation Guide Registration Card About the USB Cable The machine does not come with the default printing density. Supplied Toner Cartridge • The included "Canon Cartridge 128 Starter" can print an average yield of commands for you, such as to open a scanned image in an... Drivers The MF Driver contains the printer and scanner drivers. PageManager. Machine Unit Power Cord The toner cartridge is missing or damaged, please contact the Canon Authorized Service Facilities or the Canon Customer Care Center. MF Toolbox The MF Toolbox provides a group of 1,000 sheets*. Install it...
Starter Guide
Page 6
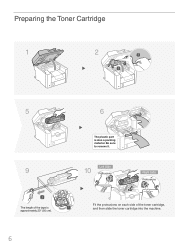
Be sure to remove it. 9 2 The length of the tape is also a packing material. Preparing the Toner Cartridge 1 2 1 2 5 6 The plastic part is approximately 20" (50 cm). 10 Left Side Protrusions Right Side Protrusions 1 Fit the protrusions on each side of the toner cartridge, and then slide the toner cartridge into the machine. 6
Be sure to remove it. 9 2 The length of the tape is also a packing material. Preparing the Toner Cartridge 1 2 1 2 5 6 The plastic part is approximately 20" (50 cm). 10 Left Side Protrusions Right Side Protrusions 1 Fit the protrusions on each side of the toner cartridge, and then slide the toner cartridge into the machine. 6

Starter Guide
Page 7
Packing materials Sealing Tape Packing material with a sheet 1 2 3 Preface Installing the Machine Connecting to 6 times. Are all the packing materials removed? Preparing the Toner Cartridge 3 4 7 8 Shake 5 to a Computer and Installing the Drivers 7 Place on a flat surface. 11 2 1 Check!
Packing materials Sealing Tape Packing material with a sheet 1 2 3 Preface Installing the Machine Connecting to 6 times. Are all the packing materials removed? Preparing the Toner Cartridge 3 4 7 8 Shake 5 to a Computer and Installing the Drivers 7 Place on a flat surface. 11 2 1 Check!
Starter Guide
Page 11
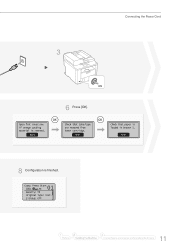
Next Check that tabs/tape are removed from toner cartridge. Next 8 Configuration is removed. Connecting the Power Cord 3 Open frnt cover;see if orange packing material is finished. 01 Copy: Press Start 100% 1 LTR Density: +-0 Original Type: Text... 2-Sided: Off 1 2 Preface Installing the Machine 3 Connecting to a Computer and Installing the Drivers 11 Check that paper is loaded in Drawer 1. Next ON 6 Press [OK].
Next Check that tabs/tape are removed from toner cartridge. Next 8 Configuration is removed. Connecting the Power Cord 3 Open frnt cover;see if orange packing material is finished. 01 Copy: Press Start 100% 1 LTR Density: +-0 Original Type: Text... 2-Sided: Off 1 2 Preface Installing the Machine 3 Connecting to a Computer and Installing the Drivers 11 Check that paper is loaded in Drawer 1. Next ON 6 Press [OK].


