
imageCLASS D320/D340 Basic Guide
Page 13
... the document. POWER CORD CONNECTOR USB INTERFACE CONNECTOR 1-4 POWER CORD CONNECTOR USB INTERFACE CONNECTOR I imageCLASS D340 ADF (AUTOMATIC DOCUMENT FEEDER) Holds documents for copying. Left Side View I imageCLASS D320 LEFT COVER Open it when you output paper face up or remove jammed paper. LEFT COVER Open it when you place documents on the platen glass for copying. DOCUMENT OUTPUT...
... the document. POWER CORD CONNECTOR USB INTERFACE CONNECTOR 1-4 POWER CORD CONNECTOR USB INTERFACE CONNECTOR I imageCLASS D340 ADF (AUTOMATIC DOCUMENT FEEDER) Holds documents for copying. Left Side View I imageCLASS D320 LEFT COVER Open it when you output paper face up or remove jammed paper. LEFT COVER Open it when you place documents on the platen glass for copying. DOCUMENT OUTPUT...
imageCLASS D320/D340 Basic Guide
Page 21
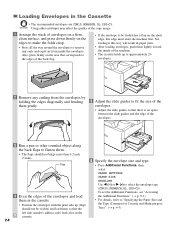
... inside the envelopes. Flap • Press Additional Functions, then select: PAPER SETTINGS PAPER SIZE ENVELOPE Use 4 (-) or e (+) to select the envelope type 4 Even the edges of the envelopes and load them in paper jams. • After loading envelopes, push them so that corresponds to the...the envelopes. 3 Run a pen or other rounded object along the back flaps to "Specifying the Paper Size and the Type (Common for Cassette and Multi-purpose Tray)". (→ p. 4-3) left side (sender's address side) feeds first in the Cassette • The recommended envelopes are COM10,...
... inside the envelopes. Flap • Press Additional Functions, then select: PAPER SETTINGS PAPER SIZE ENVELOPE Use 4 (-) or e (+) to select the envelope type 4 Even the edges of the envelopes and load them in paper jams. • After loading envelopes, push them so that corresponds to the...the envelopes. 3 Run a pen or other rounded object along the back flaps to "Specifying the Paper Size and the Type (Common for Cassette and Multi-purpose Tray)". (→ p. 4-3) left side (sender's address side) feeds first in the Cassette • The recommended envelopes are COM10,...
imageCLASS D320/D340 Basic Guide
Page 23
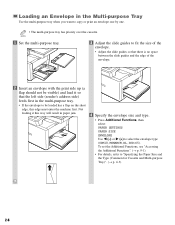
Not loading it so that the left side (sender's address side) feeds first in the multi-purpose tray. • If the envelope to "Specifying the Paper Size and the Type (Common for Cassette and Multi-purpose Tray)". (→ p. 4-3) 2-6 To set the Additional Functions, see "Accessing the ...one by one. • The multi-purpose tray has priority over the cassette. Loading an Envelope in paper jam. 4 Specify the envelope size and type. • Press Additional Functions, then select: PAPER SETTINGS PAPER SIZE ENVELOPE Use 4 (-) or e (+) to select the envelope type (COM10, MONARCH, DL, ISO...
Not loading it so that the left side (sender's address side) feeds first in the multi-purpose tray. • If the envelope to "Specifying the Paper Size and the Type (Common for Cassette and Multi-purpose Tray)". (→ p. 4-3) 2-6 To set the Additional Functions, see "Accessing the ...one by one. • The multi-purpose tray has priority over the cassette. Loading an Envelope in paper jam. 4 Specify the envelope size and type. • Press Additional Functions, then select: PAPER SETTINGS PAPER SIZE ENVELOPE Use 4 (-) or e (+) to select the envelope type (COM10, MONARCH, DL, ISO...
imageCLASS D320/D340 Basic Guide
Page 26
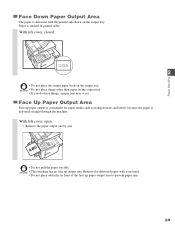
... tray. IMPORTANT • If you do these things, a paper jam may occur. With left cover, closed. 2 • Do not place the output paper back on the output tray. • Do not place things other than paper on the output tray. Paper Handling Face Down Paper Output Area The paper is delivered with your hand. IMPORTANT • Do not...
... tray. IMPORTANT • If you do these things, a paper jam may occur. With left cover, closed. 2 • Do not place the output paper back on the output tray. • Do not place things other than paper on the output tray. Paper Handling Face Down Paper Output Area The paper is delivered with your hand. IMPORTANT • Do not...
imageCLASS D320/D340 Basic Guide
Page 64
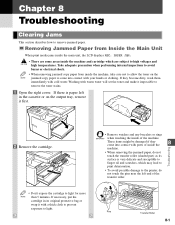
...displays REC. If necessary, put the cartridge in the cassette or on the NOTE jammed copy paper to come into contact with your hands or clothing. Chapter 8 Troubleshooting Clearing Jams This section describes how to high voltages and CAUTION high temperatures. These items might... When removing jammed copy paper from Inside the Main Unit When print media jams inside of the machine. PAPER JAM. • There are some areas inside the 8 Troubleshooting machine. • When removing the jammed paper, do not touch the pins near the left in its surface is paper left end of ...
...displays REC. If necessary, put the cartridge in the cassette or on the NOTE jammed copy paper to come into contact with your hands or clothing. Chapter 8 Troubleshooting Clearing Jams This section describes how to high voltages and CAUTION high temperatures. These items might... When removing jammed copy paper from Inside the Main Unit When print media jams inside of the machine. PAPER JAM. • There are some areas inside the 8 Troubleshooting machine. • When removing the jammed paper, do not touch the pins near the left in its surface is paper left end of ...

imageCLASS D320/D340 Basic Guide
Page 65
... it inward, then gently pull it inwards. • Do not pull the jammed paper upward; the paper forwards and roll it but has not entered the imaging area, pull out. the IMPORTANT toner on the paper will stain the printer and cause a permanent reduction in print quality. 4 Roll... the trailing edge of the machine. 6 Open the left . 8-2 the IMPORTANT toner on the right and left cover and push down the green paper release levers on the paper will stain the printer and cause a permanent reduction in print quality. • Do not pull...
... it inward, then gently pull it inwards. • Do not pull the jammed paper upward; the paper forwards and roll it but has not entered the imaging area, pull out. the IMPORTANT toner on the paper will stain the printer and cause a permanent reduction in print quality. 4 Roll... the trailing edge of the machine. 6 Open the left . 8-2 the IMPORTANT toner on the right and left cover and push down the green paper release levers on the paper will stain the printer and cause a permanent reduction in print quality. • Do not pull...

imageCLASS D320/D340 Basic Guide
Page 66
... up and out from the machine. 10 Place the paper release levers back to their original position. Never push down , the paper jam error will not be ready for operating, confirm that the paper release levers are left cover. • Be sure to place the paper release levers IMPORTANT back to the ready state for operating...
... up and out from the machine. 10 Place the paper release levers back to their original position. Never push down , the paper jam error will not be ready for operating, confirm that the paper release levers are left cover. • Be sure to place the paper release levers IMPORTANT back to the ready state for operating...
imageCLASS D320/D340 Basic Guide
Page 74
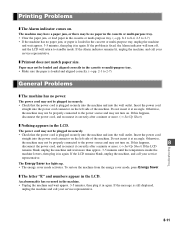
... service representative. Otherwise, the machine may not be properly connected to the power source and may not be no paper in the cassette or multi-purpose tray. • Clear the paper jam, or load paper in the cassette or multi-purpose tray. (→ pp. 8-1 to 8-4, 2-3 to 2-7) • If ...the machine has no paper jam, or paper is loaded and aligned correctly. (→ pp. 2-3 to standby mode. If the message is fixed, the Alarm indicator will turn on the left side of the machine. Insert the power cord straight into the power cord connector...
... service representative. Otherwise, the machine may not be properly connected to the power source and may not be no paper in the cassette or multi-purpose tray. • Clear the paper jam, or load paper in the cassette or multi-purpose tray. (→ pp. 8-1 to 8-4, 2-3 to 2-7) • If ...the machine has no paper jam, or paper is loaded and aligned correctly. (→ pp. 2-3 to standby mode. If the message is fixed, the Alarm indicator will turn on the left side of the machine. Insert the power cord straight into the power cord connector...

imageCLASS D320/D340 Basic Guide
Page 83
... 9-4 Exposure automatically 4-6 key 1-6 manually 4-6 F Feeder 1-4 G Guides document 1-4, 3-4 H Handling, safety instructions 1-3 I Image Quality key 1-6, 4-6 Image Quality, setting 4-6 INCORRECT PAPER SIZE message 8-5 Indicator Memory/Alarm 1-6 INSTALL CARTRIDGE message 8-5 J Jams clearing 8-1 in ADF 8-4 inside the main unit 8-1 L LCD 1-7 Left cover 1-4, 2-8, 8-2 Loading an envelope in the multi-purpose tray 2-6 documents in the ADF 3-4 envelopes in the cassette...
... 9-4 Exposure automatically 4-6 key 1-6 manually 4-6 F Feeder 1-4 G Guides document 1-4, 3-4 H Handling, safety instructions 1-3 I Image Quality key 1-6, 4-6 Image Quality, setting 4-6 INCORRECT PAPER SIZE message 8-5 Indicator Memory/Alarm 1-6 INSTALL CARTRIDGE message 8-5 J Jams clearing 8-1 in ADF 8-4 inside the main unit 8-1 L LCD 1-7 Left cover 1-4, 2-8, 8-2 Loading an envelope in the multi-purpose tray 2-6 documents in the ADF 3-4 envelopes in the cassette...


