
i9900 Quick Start Guide
Page 4
...Corporation in order that it will be an easy-to-use guide to be, representation or warranties concerning the products described. Canon U.S.A., Inc. Canon i9900 Series Photo Printer Quick Start Guide. has reviewed this product meets the ENERGY STAR guidelines for energy efficiency. As an ENERGY ... and other countries. • All other countries. • Microsoft® and Windows® are not intended to be, nor should they be reproduced in this manual may not be understood to your Canon i9900 Series Photo Printer. Under the copyright laws, this manual and in any form, ...
...Corporation in order that it will be an easy-to-use guide to be, representation or warranties concerning the products described. Canon U.S.A., Inc. Canon i9900 Series Photo Printer Quick Start Guide. has reviewed this product meets the ENERGY STAR guidelines for energy efficiency. As an ENERGY ... and other countries. • All other countries. • Microsoft® and Windows® are not intended to be, nor should they be reproduced in this manual may not be understood to your Canon i9900 Series Photo Printer. Under the copyright laws, this manual and in any form, ...

i9900 Quick Start Guide
Page 5
... Contents Contents Basic Printing Turning on the Printer 2 Loading Paper 3 Using Specialty Media 6 Printing with Windows 9 Printing with Macintosh 12 Advanced Printing Printing Photographs Directly from a Digital Camera 15 Accessing the Printer Driver...Photographs 21 Using the Printer Driver Options 29 Using the Bundled Software 31 Printing Borderless Photographs with Windows 32 Printing Borderless Photographs with Macintosh 35 Printing Maintenance Replacing an Ink Tank 38 When Printing ... 76 Specifications 77 Safety Precautions 80 Regulatory Information 82 CANON U.S.A., INC.
... Contents Contents Basic Printing Turning on the Printer 2 Loading Paper 3 Using Specialty Media 6 Printing with Windows 9 Printing with Macintosh 12 Advanced Printing Printing Photographs Directly from a Digital Camera 15 Accessing the Printer Driver...Photographs 21 Using the Printer Driver Options 29 Using the Bundled Software 31 Printing Borderless Photographs with Windows 32 Printing Borderless Photographs with Macintosh 35 Printing Maintenance Replacing an Ink Tank 38 When Printing ... 76 Specifications 77 Safety Precautions 80 Regulatory Information 82 CANON U.S.A., INC.

i9900 Quick Start Guide
Page 13
The print dialog box opens. (2) Ensure that appear may vary, depending on the software application you are for printing in Windows XP. 1 Create a document or open a file to print. 2 Open the Printer Properties dialog box. (1) Select Print from the application software's File menu. Basic Printing Printing with Windows Note The menu screens and dialog boxes that Canon i9900 is selected. (3) Click Preferences or Properties. 9 The steps described in this section are using.
The print dialog box opens. (2) Ensure that appear may vary, depending on the software application you are for printing in Windows XP. 1 Create a document or open a file to print. 2 Open the Printer Properties dialog box. (1) Select Print from the application software's File menu. Basic Printing Printing with Windows Note The menu screens and dialog boxes that Canon i9900 is selected. (3) Click Preferences or Properties. 9 The steps described in this section are using.

i9900 Quick Start Guide
Page 24
... is used for your operating system. The Printer Properties dialog box opens. 20 Then click Preferences (or Properties). For non-XP Windows, click Start, select Settings, and then Printers. 2 Select the Canon i9900 icon. 3 Open the File menu and select Printing Preferences (or Properties). The Print dialog box can be opened from either...
... is used for your operating system. The Printer Properties dialog box opens. 20 Then click Preferences (or Properties). For non-XP Windows, click Start, select Settings, and then Printers. 2 Select the Canon i9900 icon. 3 Open the File menu and select Printing Preferences (or Properties). The Print dialog box can be opened from either...
i9900 Quick Start Guide
Page 27
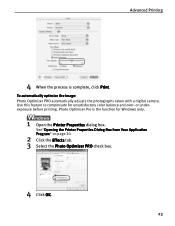
Photo Optimizer Pro is complete, click Print. See"Opening the Printer Properties Dialog Box from Your Application Program" on page 20. 2 Click the Effects tab. 3 Select the Photo Optimizer PRO check box. 4 Click OK. 23 Advanced Printing 4 When the process is the function for unsatisfactory color balance and over- Use this feature to compensate for Windows only. 1 Open the Printer Properties dialog box. or underexposure before printing. To automatically optimize the image: Photo Optimizer PRO automatically adjusts the photographs taken with a digital camera.
Photo Optimizer Pro is complete, click Print. See"Opening the Printer Properties Dialog Box from Your Application Program" on page 20. 2 Click the Effects tab. 3 Select the Photo Optimizer PRO check box. 4 Click OK. 23 Advanced Printing 4 When the process is the function for unsatisfactory color balance and over- Use this feature to compensate for Windows only. 1 Open the Printer Properties dialog box. or underexposure before printing. To automatically optimize the image: Photo Optimizer PRO automatically adjusts the photographs taken with a digital camera.

i9900 Quick Start Guide
Page 28
Note In Windows Me or Windows 98 If Background Printing has been disabled, the Vivid Photo function is not available. Advanced Printing To use Vivid Photo, select the Vivid Photo check box on the Effects tab. To use Vivid Photo option: Vivid Photo intensifies background colors like fields, trees, oceans and skies, while maintaining natural skin tones in the images. To use Vivid Photo, select the Vivid Photo check box under Special Effects. 24
Note In Windows Me or Windows 98 If Background Printing has been disabled, the Vivid Photo function is not available. Advanced Printing To use Vivid Photo, select the Vivid Photo check box on the Effects tab. To use Vivid Photo option: Vivid Photo intensifies background colors like fields, trees, oceans and skies, while maintaining natural skin tones in the images. To use Vivid Photo, select the Vivid Photo check box under Special Effects. 24

i9900 Quick Start Guide
Page 29
To use Photo Noise Reduction, select the Photo Noise Reduction check box under Special effects. 25 Note In Windows Me or Windows 98 If Background Printing has been disabled, the Photo Noise Reduction function is not available. To use Photo Noise Reduction, select the Photo Noise Reduction check box on the Effects tab. Advanced Printing To reduce noise from images taken with a digital camera: The Photo Noise Reduction function reduces noise from blue portions such as the sky, and dark portions of the images taken with your digital camera.
To use Photo Noise Reduction, select the Photo Noise Reduction check box under Special effects. 25 Note In Windows Me or Windows 98 If Background Printing has been disabled, the Photo Noise Reduction function is not available. To use Photo Noise Reduction, select the Photo Noise Reduction check box on the Effects tab. Advanced Printing To reduce noise from images taken with a digital camera: The Photo Noise Reduction function reduces noise from blue portions such as the sky, and dark portions of the images taken with your digital camera.

i9900 Quick Start Guide
Page 35
... suitable photo application to Internet Explorer after installation. Easy-PhotoPrint prints the modified image. ZoomBrowser EX/PhotoRecord (Windows) You can import photographs taken with ease. Canon BJ Printers support Exif Print and use Mac OS 9.x, CarbonLib 1.3.1 or later must be installed. It ...is Exif Print** compatible. This application is the worldwide standard. Easy-PhotoPrint Plus (Windows/Macintosh*) You can produce ...
... suitable photo application to Internet Explorer after installation. Easy-PhotoPrint prints the modified image. ZoomBrowser EX/PhotoRecord (Windows) You can import photographs taken with ease. Canon BJ Printers support Exif Print and use Mac OS 9.x, CarbonLib 1.3.1 or later must be installed. It ...is Exif Print** compatible. This application is the worldwide standard. Easy-PhotoPrint Plus (Windows/Macintosh*) You can produce ...
i9900 Quick Start Guide
Page 36
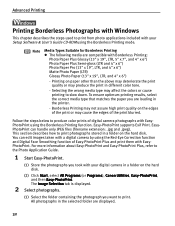
... the print quality or may produce the print in a folder on the hard disk. (2) Click Start, select All Programs (or Programs), Canon Utilities, Easy-PhotoPrint, and then Easy-PhotoPrint. Selecting the wrong media type may cause the edges of Easy-PhotoPrint Plus and print them with...the photographs you took with EasyPhotoPrint using the Borderless Printing mode. Printing on the hard disk. Advanced Printing Printing Borderless Photographs with Windows This chapter describes the steps used to print from photo applications included with your digital camera in different color tone. -
... the print quality or may produce the print in a folder on the hard disk. (2) Click Start, select All Programs (or Programs), Canon Utilities, Easy-PhotoPrint, and then Easy-PhotoPrint. Selecting the wrong media type may cause the edges of Easy-PhotoPrint Plus and print them with...the photographs you took with EasyPhotoPrint using the Borderless Printing mode. Printing on the hard disk. Advanced Printing Printing Borderless Photographs with Windows This chapter describes the steps used to print from photo applications included with your digital camera in different color tone. -

i9900 Quick Start Guide
Page 37
Increases the number of copies. Decreases the number of copies. 4 Select the layout. (1) Click the Paper Selection tab. (2) Select the size of the paper you want to use from Media Type. 33 Displays the specified number of copies. Advanced Printing Guidance Thumbnail Folder window (2) Click the [ ] [ ] button on the thumbnail of the photograph you want to use from Paper Size. (3) Select the type of the paper you want to print and specify the number of copies. 3 Select the paper.
Increases the number of copies. Decreases the number of copies. 4 Select the layout. (1) Click the Paper Selection tab. (2) Select the size of the paper you want to use from Media Type. 33 Displays the specified number of copies. Advanced Printing Guidance Thumbnail Folder window (2) Click the [ ] [ ] button on the thumbnail of the photograph you want to use from Paper Size. (3) Select the type of the paper you want to print and specify the number of copies. 3 Select the paper.

i9900 Quick Start Guide
Page 40
All photographs in the selected folder are displayed. Increases the number of copies. Guidance Thumbnail Folder window (2) Click the [ ] [ ] button on the thumbnail of the photograph you want to print. Displays the specified number of copies. Decreases the number of copies. Advanced Printing 2 Select photographs. (1) Select the folder containing the photograph you want to print and specify the number of copies. 36
All photographs in the selected folder are displayed. Increases the number of copies. Guidance Thumbnail Folder window (2) Click the [ ] [ ] button on the thumbnail of the photograph you want to print. Displays the specified number of copies. Decreases the number of copies. Advanced Printing 2 Select photographs. (1) Select the folder containing the photograph you want to print and specify the number of copies. 36

i9900 Quick Start Guide
Page 43
... and the front cover is out of ink. Note When Low Ink is important to quickly identify the empty tank using the BJ Status Monitor (Windows) or error messages (Macintosh) and replace it. Ink tank with a new ink tank. • Press the RESUME/CANCEL button to some degree, depending on page...
... and the front cover is out of ink. Note When Low Ink is important to quickly identify the empty tank using the BJ Status Monitor (Windows) or error messages (Macintosh) and replace it. Ink tank with a new ink tank. • Press the RESUME/CANCEL button to some degree, depending on page...

i9900 Quick Start Guide
Page 66
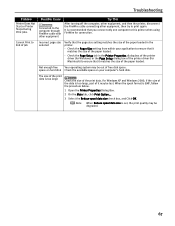
...refer to the Easy Setup Instructions for installing the printer driver. Double-click the CD-ROM icon on the desktop. properly Use Windows Explorer to start automatically when you inserted the CD-ROM into the drive If the printer driver installation did not start installation.... Confirm that the CD-ROM icon is displayed on your Windows documentation for proper printer driver installation. Click Cancel on the Installation Failure screen. 3. Click Start Over on the Printer Connection screen. ...
...refer to the Easy Setup Instructions for installing the printer driver. Double-click the CD-ROM icon on the desktop. properly Use Windows Explorer to start automatically when you inserted the CD-ROM into the drive If the printer driver installation did not start installation.... Confirm that the CD-ROM icon is displayed on your Windows documentation for proper printer driver installation. Click Cancel on the Installation Failure screen. 3. Click Start Over on the Printer Connection screen. ...
i9900 Quick Start Guide
Page 67
...that does not support USB 2.0 Hi-Speed. USB hub. You connect to the Connect the printer directly to the printer's lower port (USB). running Windows XP, the screen shows the warning message "High-SPEED USB Device Plugged into non-High- Connect to the upper one no longer than 3 meters ... connection, see "BJ Printer Driver Systems Requirements" on page 79. You have changed the USB cable from . Open Printers and Faxes (Printers in Windows 2000) from Control Panel and select the non grayed-out printer icon to print from the lower port to the printer's lower port (USB). The...
...that does not support USB 2.0 Hi-Speed. USB hub. You connect to the Connect the printer directly to the printer's lower port (USB). running Windows XP, the screen shows the warning message "High-SPEED USB Device Plugged into non-High- Connect to the upper one no longer than 3 meters ... connection, see "BJ Printer Driver Systems Requirements" on page 79. You have changed the USB cable from . Open Printers and Faxes (Printers in Windows 2000) from Control Panel and select the non grayed-out printer icon to print from the lower port to the printer's lower port (USB). The...
i9900 Quick Start Guide
Page 69
... Manual in the Print Mode pull-down menu, select Prevent paper abrasion. Paper feed roller is too high 1. See "Print Media to High for Windows or Fine for Macintosh), the setting is too thick or curled. See "Media Types Suitable for higher print quality. 1. Click OK when the confirmation... message appears. 1. In the Paper Source pull-down menu in the Printer Properties dialog box (for Windows) or the Print dialog box (for Macintosh. Click the Quality icon and then drag the Print Quality slide bar to adjust the intensity. is ...
... Manual in the Print Mode pull-down menu, select Prevent paper abrasion. Paper feed roller is too high 1. See "Print Media to High for Windows or Fine for Macintosh), the setting is too thick or curled. See "Media Types Suitable for higher print quality. 1. Click OK when the confirmation... message appears. 1. In the Paper Source pull-down menu in the Printer Properties dialog box (for Windows) or the Print dialog box (for Macintosh. Click the Quality icon and then drag the Print Quality slide bar to adjust the intensity. is ...

i9900 Quick Start Guide
Page 70
... and graphics Wait until the print job finishes. Delete undesired print jobs, if there are any. Click Display Print Queue. 4. Note In Windows Me, Windows 98 Click to select an undesired document and select Purge Print Documents in the Printer menu. 5. Double-click the Print Center (or Printer ... has overheated due to long periods of time. The print head is too Avoid using USB cables longer than 16.4 feet. Double-click i9900 displayed under Name in your operating system Restart your computer. long You have changed the USB cable from . Click the Maintenance tab and ...
... and graphics Wait until the print job finishes. Delete undesired print jobs, if there are any. Click Display Print Queue. 4. Note In Windows Me, Windows 98 Click to select an undesired document and select Purge Print Documents in the Printer menu. 5. Double-click the Print Center (or Printer ... has overheated due to long periods of time. The print head is too Avoid using USB cables longer than 16.4 feet. Double-click i9900 displayed under Name in your operating system Restart your computer. long You have changed the USB cable from . Click the Maintenance tab and ...
i9900 Quick Start Guide
Page 71
Check the Paper Size setting from within your computer's hard disk. For Windows XP and Windows 2000, if the size of the data is too large, part of it may be out of the paper loaded. It is set, the print ... enough free Your operating system may be degraded. 67 Check the Page Setup tab in the Printer Properties dialog box of the printer driver (for Windows) or the Page Setup dialog box of the print data. Note When Reduce spool data size is recommended that it matches the size of the...
Check the Paper Size setting from within your computer's hard disk. For Windows XP and Windows 2000, if the size of the data is too large, part of it may be out of the paper loaded. It is set, the print ... enough free Your operating system may be degraded. 67 Check the Page Setup tab in the Printer Properties dialog box of the printer driver (for Windows) or the Page Setup dialog box of the print data. Note When Reduce spool data size is recommended that it matches the size of the...

i9900 Quick Start Guide
Page 75
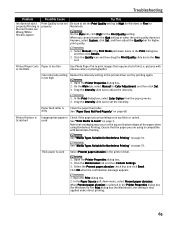
... on the Screen Problem Paper Identification Error Possible Cause Paper Identification is completed. Select the correct paper type from the pull-down your Windows operating system, turn off the printer, then re-connect the printer to ensure that the loaded paper is warming up menu. 7.... printing may result in the printer driver. 71 Click OK when the confirmation message appears. 4. A USB port is selected if either USBnnn (Canon i9900) or USBPRNnn (Canon i9900) (where n is a number) is not loaded Load paper and press the RESUME/CANCEL button. With the printer on, open the BJ ...
... on the Screen Problem Paper Identification Error Possible Cause Paper Identification is completed. Select the correct paper type from the pull-down your Windows operating system, turn off the printer, then re-connect the printer to ensure that the loaded paper is warming up menu. 7.... printing may result in the printer driver. 71 Click OK when the confirmation message appears. 4. A USB port is selected if either USBnnn (Canon i9900) or USBPRNnn (Canon i9900) (where n is a number) is not loaded Load paper and press the RESUME/CANCEL button. With the printer on, open the BJ ...

i9900 Quick Start Guide
Page 80
...Their Function Useful Printing Techniques Printing with Color and Brightness Automatically Optimized Adjusting Print Quality Smoothing the Rough Edges of Certain Images (Windows) Automatically Resizing the Image to Fit the Page Resizing the Image by Selecting the Scaling Ratio Printing Multiple Pages on a ... Pages for Assembly into a Booklet Printing on Both Sides of the Page Printing Stamped Messages on Documents (Windows) Printing Background Images on Documents (Windows) Adding Illustrated Effect to Documents Printing the Entire Image in Single Color Printing in Grayscale Reversing the Page ...
...Their Function Useful Printing Techniques Printing with Color and Brightness Automatically Optimized Adjusting Print Quality Smoothing the Rough Edges of Certain Images (Windows) Automatically Resizing the Image to Fit the Page Resizing the Image by Selecting the Scaling Ratio Printing Multiple Pages on a ... Pages for Assembly into a Booklet Printing on Both Sides of the Page Printing Stamped Messages on Documents (Windows) Printing Background Images on Documents (Windows) Adding Illustrated Effect to Documents Printing the Entire Image in Single Color Printing in Grayscale Reversing the Page ...

i9900 Quick Start Guide
Page 82
...) approx. 280*2 Red (BCI-6R) approx. 2300*2 Green (BCI-6G) approx. 2300*2 *1 1500 characters per page, normal text, at standard and plain paper mode with Windows XP printer driver *2 Based on printing the ISO JIS-SCID No.5 pattern at standard and plain paper mode with... Windows XP printer driver Card #1 (Photo Paper Pro 4" x 6" /101.6 x 152.4 mm), Card #2 (Photo Paper Plus Glossy 4" x 6" /101.6 x 152.4 mm ), Card #3 (Photo Paper Plus Glossy 5" x 7" /127.0 x 177.8 ...
...) approx. 280*2 Red (BCI-6R) approx. 2300*2 Green (BCI-6G) approx. 2300*2 *1 1500 characters per page, normal text, at standard and plain paper mode with Windows XP printer driver *2 Based on printing the ISO JIS-SCID No.5 pattern at standard and plain paper mode with... Windows XP printer driver Card #1 (Photo Paper Pro 4" x 6" /101.6 x 152.4 mm), Card #2 (Photo Paper Plus Glossy 4" x 6" /101.6 x 152.4 mm ), Card #3 (Photo Paper Plus Glossy 5" x 7" /127.0 x 177.8 ...


