i9900 Quick Start Guide
Page 46
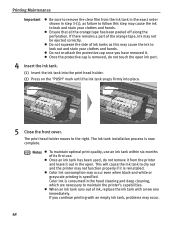
... not squeeze the side of the orange tape, ink may occur. 42 The print head holder moves to the right. The ink tank installation process is specified. Color... first use an ink tank within six months of ink, replace the ink tank with an empty ink tank, problems may not be ejected correctly. Color ink is reinstalled. If you have removed it. If there remains a part...printer and leave it out in the open ink port. 4 Insert the ink tank. (1) Insert the ink tank into the print head holder. (2) Press on the "PUSH" mark until the ink tank snaps firmly into place. 5 Close the front cover....
... not squeeze the side of the orange tape, ink may occur. 42 The print head holder moves to the right. The ink tank installation process is specified. Color... first use an ink tank within six months of ink, replace the ink tank with an empty ink tank, problems may not be ejected correctly. Color ink is reinstalled. If you have removed it. If there remains a part...printer and leave it out in the open ink port. 4 Insert the ink tank. (1) Insert the ink tank into the print head holder. (2) Press on the "PUSH" mark until the ink tank snaps firmly into place. 5 Close the front cover....

i9900 Quick Start Guide
Page 47
... Nozzle Check Pattern" on page 44 If white stripes appear Step 1 See "Aligning the Print Head" on page 56 Step 2 See "Print Head Cleaning" on page 48 If the problem remains Step 3 See "Print Head Deep Cleaning" on the ink tank and ensure that each ink tank is installed at the correct... it is installed securely. Press "PUSH" on page 52 Note If Print Head Deep Cleaning does not solve the problem, contact the Customer Care Center. 43 Printing Maintenance When Printing Becomes Faint or Colors are Incorrect When printing becomes faint or colors are incorrect, even if ink remains in the ...
... Nozzle Check Pattern" on page 44 If white stripes appear Step 1 See "Aligning the Print Head" on page 56 Step 2 See "Print Head Cleaning" on page 48 If the problem remains Step 3 See "Print Head Deep Cleaning" on the ink tank and ensure that each ink tank is installed at the correct... it is installed securely. Press "PUSH" on page 52 Note If Print Head Deep Cleaning does not solve the problem, contact the Customer Care Center. 43 Printing Maintenance When Printing Becomes Faint or Colors are Incorrect When printing becomes faint or colors are incorrect, even if ink remains in the ...

i9900 Quick Start Guide
Page 53
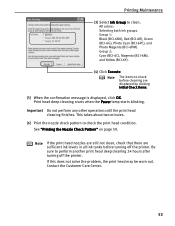
.... See "Print Head Deep Cleaning" on page 44. Printing Maintenance (3) Select Ink Group to check the print head condition. This takes about one minute. (6) Print the nozzle check pattern to clean. See "Printing the Nozzle Check Pattern" on page 50. Notes If this does not solve the problem, clean the print heads again, up to verify that the print head nozzles are...
.... See "Print Head Deep Cleaning" on page 44. Printing Maintenance (3) Select Ink Group to check the print head condition. This takes about one minute. (6) Print the nozzle check pattern to clean. See "Printing the Nozzle Check Pattern" on page 50. Notes If this does not solve the problem, clean the print heads again, up to verify that the print head nozzles are...

i9900 Quick Start Guide
Page 55
.... 51 Note The items to check the print head condition. Important Do not perform any other operations until the print head cleaning finishes. If the problem persists, perform print head deep cleaning. See "Print Head Deep Cleaning" on page 50. After print head cleaning finishes, print the nozzle check pattern to verify that the print head nozzles are displayed by clicking Initial Check Items...
.... 51 Note The items to check the print head condition. Important Do not perform any other operations until the print head cleaning finishes. If the problem persists, perform print head deep cleaning. See "Print Head Deep Cleaning" on page 50. After print head cleaning finishes, print the nozzle check pattern to verify that the print head nozzles are displayed by clicking Initial Check Items...
i9900 Quick Start Guide
Page 57
... any other operation until the print head cleaning finishes. This takes about two minutes. (6) Print the nozzle check pattern to clean. Print head deep cleaning starts when the Power lamp starts blinking. If this does not solve the problem, the print head may be worn out. Printing Maintenance (3) Select Ink Group to check the print head condition. Group 2: Cyan (BCI-6C...
... any other operation until the print head cleaning finishes. This takes about two minutes. (6) Print the nozzle check pattern to clean. Print head deep cleaning starts when the Power lamp starts blinking. If this does not solve the problem, the print head may be worn out. Printing Maintenance (3) Select Ink Group to check the print head condition. Group 2: Cyan (BCI-6C...

i9900 Quick Start Guide
Page 59
... (BCI-6M), and Yellow (BCI-6Y). (4) Click OK. Print head deep cleaning starts when the Power lamp starts blinking. Important Do not perform any other operation until the print head cleaning finishes. Note If the print head nozzles are still not clean, check that there are sufficient ink levels...the confirmation message is displayed, click OK. If this does not solve the problem, the print head may be worn out. Contact the Customer Care Center. 55 Note The items to perform another print head deep cleaning 24 hours after turning off the printer. This takes about two...
... (BCI-6M), and Yellow (BCI-6Y). (4) Click OK. Print head deep cleaning starts when the Power lamp starts blinking. Important Do not perform any other operation until the print head cleaning finishes. Note If the print head nozzles are still not clean, check that there are sufficient ink levels...the confirmation message is displayed, click OK. If this does not solve the problem, the print head may be worn out. Contact the Customer Care Center. 55 Note The items to perform another print head deep cleaning 24 hours after turning off the printer. This takes about two...
i9900 Quick Start Guide
Page 68
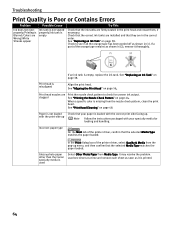
..., clean the print head. If an ink tank is misaligned Align the print head. See "Aligning the Print Head" on page 44. See "Printing the Nozzle Check Pattern" on page 56. Check to check for loading and handling. Troubleshooting Print Quality is Poor or Contains Errors Problem Possible Cause Ink... is used Select Other Photo Paper from Media Type. Glossy photo paper other than the Canon specialty media is printed. 64 See "Print Head Cleaning" on page 48. Print head nozzles are clogged Print the nozzle check pattern to see if all the orange tape has been peeled off as...
..., clean the print head. If an ink tank is misaligned Align the print head. See "Aligning the Print Head" on page 44. See "Printing the Nozzle Check Pattern" on page 56. Check to check for loading and handling. Troubleshooting Print Quality is Poor or Contains Errors Problem Possible Cause Ink... is used Select Other Photo Paper from Media Type. Glossy photo paper other than the Canon specialty media is printed. 64 See "Print Head Cleaning" on page 48. Print head nozzles are clogged Print the nozzle check pattern to see if all the orange tape has been peeled off as...

i9900 Quick Start Guide
Page 70
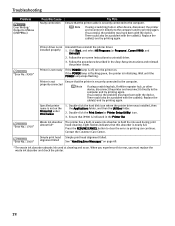
...-click i9900 displayed under Name in the Utilities folder. 3. Delete undesired print jobs, if there are any. Select Applications from the Start Menu" on the printer or viceversa, which created a second printer icon. Troubleshooting Troubleshooting Printer Hardware Problem Printer Does Not Start or Printer Stops During Print Jobs Possible Cause Try This Print head has overheated...
...-click i9900 displayed under Name in the Utilities folder. 3. Delete undesired print jobs, if there are any. Select Applications from the Start Menu" on the printer or viceversa, which created a second printer icon. Troubleshooting Troubleshooting Printer Hardware Problem Printer Does Not Start or Printer Stops During Print Jobs Possible Cause Try This Print head has overheated...

i9900 Quick Start Guide
Page 74
... paper output tray has been exposed to a strong light source preventing correct print head alignment. Press the RESUME/CANCEL button. See "Aligning the Print Head" on page 56 for information on how to align the print head again. Disconnect the printer cable from the printer, and then turn the printer... back on the manual print head alignment. See "Printing the Nozzle Check Pattern" on page 44, for information on after leaving it about 10 minutes. If the problem remains, contact the...
... paper output tray has been exposed to a strong light source preventing correct print head alignment. Press the RESUME/CANCEL button. See "Aligning the Print Head" on page 56 for information on how to align the print head again. Disconnect the printer cable from the printer, and then turn the printer... back on the manual print head alignment. See "Printing the Nozzle Check Pattern" on page 44, for information on after leaving it about 10 minutes. If the problem remains, contact the...
i9900 Quick Start Guide
Page 76
... printing again. Printer driver is indicated in the Printer list. If successful, the problem may have been with the device. Ensure that i9900 is not installed properly Uninstall then reinstall the printer driver. 1. Click Start, and select All Programs (or Programs), Canon i9900... Care Center. "Error No.: 2500" Simple print head Simple print head alignment failed. alignment failed See "Handling Error Messages" on page 69. * The waste ink absorber absorbs ink used during print head cleaning. Troubleshooting Problem Error Writing/ Output to USBxxx (USBPRNxx) Possible...
... printing again. Printer driver is indicated in the Printer list. If successful, the problem may have been with the device. Ensure that i9900 is not installed properly Uninstall then reinstall the printer driver. 1. Click Start, and select All Programs (or Programs), Canon i9900... Care Center. "Error No.: 2500" Simple print head Simple print head alignment failed. alignment failed See "Handling Error Messages" on page 69. * The waste ink absorber absorbs ink used during print head cleaning. Troubleshooting Problem Error Writing/ Output to USBxxx (USBPRNxx) Possible...
i9900 Quick Start Guide
Page 77
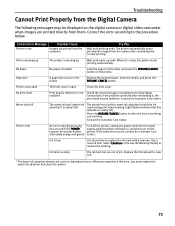
...Error Message Possible Cause Printer in waste ink absorber to replace the ink tank with a new one . No print head Print head is defective or not Install the print head again according to the procedure below. Waste tank full The waste ink tank (waste ink absorber*) is warning ... must replace the waste ink absorber and check the printer. 73 When it , the print head may be defective. If the problem continues after completing the current printing. Troubleshooting Cannot Print Properly from the Digital Camera The following messages may be displayed on the digital camera or...
...Error Message Possible Cause Printer in waste ink absorber to replace the ink tank with a new one . No print head Print head is defective or not Install the print head again according to the procedure below. Waste tank full The waste ink tank (waste ink absorber*) is warning ... must replace the waste ink absorber and check the printer. 73 When it , the print head may be defective. If the problem continues after completing the current printing. Troubleshooting Cannot Print Properly from the Digital Camera The following messages may be displayed on the digital camera or...


