
i9900 Quick Start Guide
Page 5
...Printing with Windows 9 Printing with Macintosh 12 Advanced Printing Printing Photographs Directly from a Digital Camera 15 Accessing the Printer Driver 20 Adjusting the Print Quality for Photographs 21 Using the Printer Driver Options 29 Using the Bundled Software 31 Printing Borderless Photographs with Windows 32 Printing Borderless Photographs with Macintosh 35 Printing... Error Messages 69 An Error Message Appears on the Screen 71 Cannot Print Properly from the Digital Camera 73 Appendix Installing the Printer Driver When Using Mac OS 9.x 75 User's Guide Table of Contents 76...
...Printing with Windows 9 Printing with Macintosh 12 Advanced Printing Printing Photographs Directly from a Digital Camera 15 Accessing the Printer Driver 20 Adjusting the Print Quality for Photographs 21 Using the Printer Driver Options 29 Using the Bundled Software 31 Printing Borderless Photographs with Windows 32 Printing Borderless Photographs with Macintosh 35 Printing... Error Messages 69 An Error Message Appears on the Screen 71 Cannot Print Properly from the Digital Camera 73 Appendix Installing the Printer Driver When Using Mac OS 9.x 75 User's Guide Table of Contents 76...

i9900 Quick Start Guide
Page 11
Select Plain Paper from the software applications, refer to the Photo Application Guide. 7 Canon Specialty Media Basic Printing Media Type Paper Rest Load Limit Photo Paper Pro 13" x 19": 1 sheet Letter: up to 10 sheets* 4" x 6": up to 20 sheets Photo Paper Pro (Perforated) 4" x 6": ..." x 19": up to 20 sheets 11" x 17": up to 50 sheets Letter: up to 80 sheets T-Shirt Transfers 1 sheet Transparencies Up to 30 sheets Printer Driver Setting for Media Type Photo Paper Pro Photo Paper Pro** Photo Paper Plus Glossy Photo Paper Plus Glossy Matte Photo Paper Glossy Photo Paper High...
Select Plain Paper from the software applications, refer to the Photo Application Guide. 7 Canon Specialty Media Basic Printing Media Type Paper Rest Load Limit Photo Paper Pro 13" x 19": 1 sheet Letter: up to 10 sheets* 4" x 6": up to 20 sheets Photo Paper Pro (Perforated) 4" x 6": ..." x 19": up to 20 sheets 11" x 17": up to 50 sheets Letter: up to 80 sheets T-Shirt Transfers 1 sheet Transparencies Up to 30 sheets Printer Driver Setting for Media Type Photo Paper Pro Photo Paper Pro** Photo Paper Plus Glossy Photo Paper Plus Glossy Matte Photo Paper Glossy Photo Paper High...
i9900 Quick Start Guide
Page 14
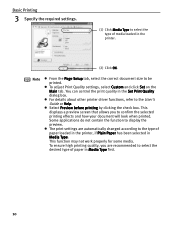
...Media Type. Basic Printing 3 Specify the required settings. (1) Click Media Type to select the type of media loaded in Media Type first. 10 Some applications do not contain the function to the User's Guide or Help. Note (2) Click OK. For details about other printer driver functions, refer ...to display the preview. This displays a preview screen that allows you are automatically changed according to the type of paper loaded in the printer, if Plain Paper has been selected in the Set Print Quality dialog box. From the ...
...Media Type. Basic Printing 3 Specify the required settings. (1) Click Media Type to select the type of media loaded in Media Type first. 10 Some applications do not contain the function to the User's Guide or Help. Note (2) Click OK. For details about other printer driver functions, refer ...to display the preview. This displays a preview screen that allows you are automatically changed according to the type of paper loaded in the printer, if Plain Paper has been selected in the Set Print Quality dialog box. From the ...
i9900 Quick Start Guide
Page 18
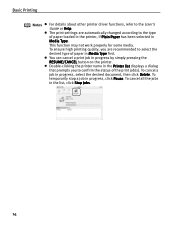
... For details about other printer driver functions, refer to the type of paper loaded in the printer, if Plain Paper has been selected in Media Type. To cancel all the jobs in progress, select the desired document, then click Delete. To ensure high printing quality, you to confirm the status ... are automatically changed according to the User's Guide or Help. To cancel a job in the list, click Stop Jobs. 14 You can cancel a print job in progress, click Pause. This function may not work properly for some media. To temporarily stop a job in progress by simply pressing the RESUME...
... For details about other printer driver functions, refer to the type of paper loaded in the printer, if Plain Paper has been selected in Media Type. To cancel all the jobs in progress, select the desired document, then click Delete. To ensure high printing quality, you to confirm the status ... are automatically changed according to the User's Guide or Help. To cancel a job in the list, click Stop Jobs. 14 You can cancel a print job in progress, click Pause. This function may not work properly for some media. To temporarily stop a job in progress by simply pressing the RESUME...

i9900 Quick Start Guide
Page 24
...vary depending on your application. For non-XP Windows, click Start, select Settings, and then Printers. 2 Select the Canon i9900 icon. 3 Open the File menu and select Printing Preferences (or Properties). The Printer Properties dialog box opens. 20 The Printer Properties dialog box opens. Opening the Printer... Properties Dialog Box Directly from the Start Menu This method is selected. Advanced Printing Accessing the Printer Driver The Printer Properties dialog box can usually be opened by selecting Print from the Start menu, additional tabs appear.
...vary depending on your application. For non-XP Windows, click Start, select Settings, and then Printers. 2 Select the Canon i9900 icon. 3 Open the File menu and select Printing Preferences (or Properties). The Printer Properties dialog box opens. 20 The Printer Properties dialog box opens. Opening the Printer... Properties Dialog Box Directly from the Start Menu This method is selected. Advanced Printing Accessing the Printer Driver The Printer Properties dialog box can usually be opened by selecting Print from the Start menu, additional tabs appear.

i9900 Quick Start Guide
Page 25
... for Photographs Improving the Quality of Printed Images Two important factors control the quality and output of your printed images: Paper and Ink Using recommended Canon paper, specialty media and inks for printing photographs can significantly improve the quality of these features are covered in this printer. Many...settings to know more detailed information, see the i9900 User's Guide on ). You can also access the online help in either of your printed images can be controlled with the printer driver. in the Page Setup dialog box or the Print dialog box. For more about. • ...
... for Photographs Improving the Quality of Printed Images Two important factors control the quality and output of your printed images: Paper and Ink Using recommended Canon paper, specialty media and inks for printing photographs can significantly improve the quality of these features are covered in this printer. Many...settings to know more detailed information, see the i9900 User's Guide on ). You can also access the online help in either of your printed images can be controlled with the printer driver. in the Page Setup dialog box or the Print dialog box. For more about. • ...
i9900 Quick Start Guide
Page 30
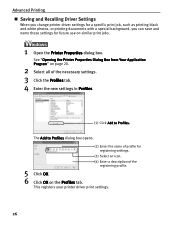
The Add to Profiles. Advanced Printing Saving and Recalling Driver Settings When you change printer driver settings for a specific print job, such as printing black and white photos, or printing documents with a special background, you can save and name these settings for registering settings. (3) Select an .... (4) Enter a description of the registering profile. 5 Click OK. 6 Click OK on similar print jobs. 1 Open the Printer Properties dialog box. This registers your printer driver print settings. 26 See "Opening the Printer Properties Dialog Box from Your Application Program" on page 20...
The Add to Profiles. Advanced Printing Saving and Recalling Driver Settings When you change printer driver settings for a specific print job, such as printing black and white photos, or printing documents with a special background, you can save and name these settings for registering settings. (3) Select an .... (4) Enter a description of the registering profile. 5 Click OK. 6 Click OK on similar print jobs. 1 Open the Printer Properties dialog box. This registers your printer driver print settings. 26 See "Opening the Printer Properties Dialog Box from Your Application Program" on page 20...

i9900 Quick Start Guide
Page 31
... Help and refer to the topic of the necessary settings. 3 Register the new printer driver settings. (1) Click Save As... This registers your settings. 4 Click OK. Advanced Printing Note You can retrieve or delete the print settings profile at any time. See "Printing with Macintosh" on page 12. 2 Select all of this function. 1 Open the...
... Help and refer to the topic of the necessary settings. 3 Register the new printer driver settings. (1) Click Save As... This registers your settings. 4 Click OK. Advanced Printing Note You can retrieve or delete the print settings profile at any time. See "Printing with Macintosh" on page 12. 2 Select all of this function. 1 Open the...
i9900 Quick Start Guide
Page 32
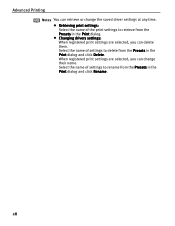
Advanced Printing Notes You can retrieve or change their name. Changing drivers settings: When registered print settings are selected, you can change the saved driver settings at any time. Select the name of settings to delete from the Presets in the Print dialog and click Delete. Select the name of settings to retrieve from the Presets in the Print dialog. Retrieving print settings: Select the name of the print settings to rename from the Presets in the Print dialog and click Rename. 28 When registered print settings are selected, you can delete them.
Advanced Printing Notes You can retrieve or change their name. Changing drivers settings: When registered print settings are selected, you can change the saved driver settings at any time. Select the name of settings to delete from the Presets in the Print dialog and click Delete. Select the name of settings to retrieve from the Presets in the Print dialog. Retrieving print settings: Select the name of the print settings to rename from the Presets in the Print dialog and click Rename. 28 When registered print settings are selected, you can delete them.

i9900 Quick Start Guide
Page 33
... provide you with Digital Camera Smoothing the Rough Edges of images and documents. Note For detailed descriptions of the printer driver functions, refer to many features that allow you to print a wide range of Certain Images Automatically Resizing the Image to Fit the Page 29 The illustrations below provide a basic introduction to...
... provide you with Digital Camera Smoothing the Rough Edges of images and documents. Note For detailed descriptions of the printer driver functions, refer to many features that allow you to print a wide range of Certain Images Automatically Resizing the Image to Fit the Page 29 The illustrations below provide a basic introduction to...

i9900 Quick Start Guide
Page 44
...click the hard disk icon where the printer driver was installed, the Applications folder, and then the Utilities folder. (2) Double-click the Print Center (or Printer Setup Utility) icon. (3) Select i9900 from the Name list and click Configure. (4) Select i9900 from the Product list and click Select. ...(5) Click About ink on BJ Printer Utility. [!] indicates a low ink level. Printing will resume as soon as ...
...click the hard disk icon where the printer driver was installed, the Applications folder, and then the Utilities folder. (2) Double-click the Print Center (or Printer Setup Utility) icon. (3) Select i9900 from the Name list and click Configure. (4) Select i9900 from the Product list and click Select. ...(5) Click About ink on BJ Printer Utility. [!] indicates a low ink level. Printing will resume as soon as ...

i9900 Quick Start Guide
Page 47
... does not solve the problem, contact the Customer Care Center. 43 Printing Maintenance When Printing Becomes Faint or Colors are Incorrect When printing becomes faint or colors are incorrect, even if ink remains in the printer driver settings. If the printing is faint, or the color is out of the ink tank has... been peeled off. If the ruled lines are shifted Step 1 See "Printing the Nozzle Check Pattern" on page 44 If white stripes appear...
... does not solve the problem, contact the Customer Care Center. 43 Printing Maintenance When Printing Becomes Faint or Colors are Incorrect When printing becomes faint or colors are incorrect, even if ink remains in the printer driver settings. If the printing is faint, or the color is out of the ink tank has... been peeled off. If the ruled lines are shifted Step 1 See "Printing the Nozzle Check Pattern" on page 44 If white stripes appear...

i9900 Quick Start Guide
Page 49
... Open the BJ Printer Utility dialog box. (1) Double-click the hard disk icon where the printer driver is installed, then the Applications folder, and then the Utilities folder. (2) Double-click the Print Center (or Printer Setup Utility) icon. (3) Select your printer from the Name list and click... Configure. (4) Select your printer from the Product list and click Select. 3 Print the Nozzle Check Pattern. (1) Select Test Print from the pull-down menu. (2) Click Nozzle Check. (3) Click Print Check Pattern. (4) Check the message, then click OK. (5) Confirm the nozzle check pattern. ...
... Open the BJ Printer Utility dialog box. (1) Double-click the hard disk icon where the printer driver is installed, then the Applications folder, and then the Utilities folder. (2) Double-click the Print Center (or Printer Setup Utility) icon. (3) Select your printer from the Name list and click... Configure. (4) Select your printer from the Product list and click Select. 3 Print the Nozzle Check Pattern. (1) Select Test Print from the pull-down menu. (2) Click Nozzle Check. (3) Click Print Check Pattern. (4) Check the message, then click OK. (5) Confirm the nozzle check pattern. ...

i9900 Quick Start Guide
Page 54
Printing Maintenance Note Cleaning dialog box of step 3-(3) directly appears when you click Cleaning on Pattern Check dialog box. 1 Ensure that the printer is on. 2 Open the BJ Printer Utility dialog box. (1) Double-click the hard disk icon where the printer driver is installed, then the ...Applications folder, and then the Utilities folder. (2) Double-click the Print Center (or Printer Setup Utility) icon. (3) Select your printer from the Name list and click Configure...
Printing Maintenance Note Cleaning dialog box of step 3-(3) directly appears when you click Cleaning on Pattern Check dialog box. 1 Ensure that the printer is on. 2 Open the BJ Printer Utility dialog box. (1) Double-click the hard disk icon where the printer driver is installed, then the ...Applications folder, and then the Utilities folder. (2) Double-click the Print Center (or Printer Setup Utility) icon. (3) Select your printer from the Name list and click Configure...

i9900 Quick Start Guide
Page 58
Printing Maintenance 1 Ensure that the printer is on. 2 Open the BJ Printer Utility dialog box. (1) Double-click the hard disk icon where the printer driver is installed, the Applications folder, and then the Utilities folder. (2) Double-click the Print Center (or Printer Setup Utility) icon. (3) Select your printer from the Name list and click Configure. (4) Select your printer from the Product list and click Maintenance. 3 Start Print Head Deep Cleaning. (1) Select Cleaning from the pull-down menu. (2) Click Deep Cleaning. 54
Printing Maintenance 1 Ensure that the printer is on. 2 Open the BJ Printer Utility dialog box. (1) Double-click the hard disk icon where the printer driver is installed, the Applications folder, and then the Utilities folder. (2) Double-click the Print Center (or Printer Setup Utility) icon. (3) Select your printer from the Name list and click Configure. (4) Select your printer from the Product list and click Maintenance. 3 Start Print Head Deep Cleaning. (1) Select Cleaning from the pull-down menu. (2) Click Deep Cleaning. 54

i9900 Quick Start Guide
Page 63
... in the printer. 2 Open the BJ Printer Utility dialog box. (1) Double-click the hard disk icon where the printer driver is displayed, click OK. (3) Select Test Print from the pull-down menu. (2) Select Align heads manually check box, and then click Send. When the confirmation message is... installed, the Applications folder, and then the Utilities folder. (2) Double-click the Print Center (or Printer Setup Utility) icon. (3) Select your printer from the Name list and click Configure. (4) Select your printer from the Product...
... in the printer. 2 Open the BJ Printer Utility dialog box. (1) Double-click the hard disk icon where the printer driver is displayed, click OK. (3) Select Test Print from the pull-down menu. (2) Select Align heads manually check box, and then click Send. When the confirmation message is... installed, the Applications folder, and then the Utilities folder. (2) Double-click the Print Center (or Printer Setup Utility) icon. (3) Select your printer from the Name list and click Configure. (4) Select your printer from the Product...

i9900 Quick Start Guide
Page 65
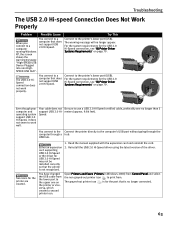
.... Troubleshooting usually falls into one of the following categories. • "Cannot Install the Printer Driver" on page 62. • "The USB 2.0 Hi-speed Connection Does Not Work Properly" on page 63. • "Print Quality is Poor or Contains Errors" on page 64. • "Troubleshooting Printer Hardware" on page 66.... • "Handling Error Messages" on page 69. • "An Error Message Appears on the Screen" on page 71. • "Cannot Print Properly from the Digital Camera" on your operating system. 61 When an Error Occurs The BJ Status Monitor opens and displays a message when an error...
.... Troubleshooting usually falls into one of the following categories. • "Cannot Install the Printer Driver" on page 62. • "The USB 2.0 Hi-speed Connection Does Not Work Properly" on page 63. • "Print Quality is Poor or Contains Errors" on page 64. • "Troubleshooting Printer Hardware" on page 66.... • "Handling Error Messages" on page 69. • "An Error Message Appears on the Screen" on page 71. • "Cannot Print Properly from the Digital Camera" on your operating system. 61 When an Error Occurs The BJ Status Monitor opens and displays a message when an error...
i9900 Quick Start Guide
Page 67
...USB 2.0 Hi-Speed. For the system requirements for the port that the printer is for the USB 2.0 Hi-Speed connection, see "BJ Printer Driver Systems Requirements" on page 79. Your cable does not support USB 2.0 HiSpeed. USB hub. Read the manual supplied with the expansion card and reinstall..., see "BJ Printer Driver Systems Requirements" on the printer or viceversa, which created a second printer icon. 1. You have changed the USB cable from . Open Printers and Faxes (Printers in Windows 2000) from Control Panel and select the non grayed-out printer icon to print from the lower port ...
...USB 2.0 Hi-Speed. For the system requirements for the port that the printer is for the USB 2.0 Hi-Speed connection, see "BJ Printer Driver Systems Requirements" on page 79. Your cable does not support USB 2.0 HiSpeed. USB hub. Read the manual supplied with the expansion card and reinstall..., see "BJ Printer Driver Systems Requirements" on the printer or viceversa, which created a second printer icon. 1. You have changed the USB cable from . Open Printers and Faxes (Printers in Windows 2000) from Control Panel and select the non grayed-out printer icon to print from the lower port ...
i9900 Quick Start Guide
Page 68
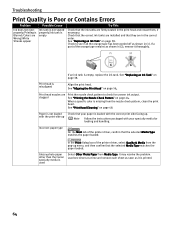
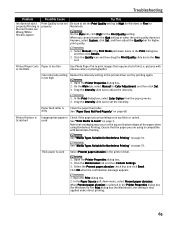
... Photo Paper from the nozzle check pattern, clean the print head. See "Print Head Cleaning" on page 44. Glossy photo paper other than the Canon specialty media is missing from Media Type. Print head is empty, replace the ink tank. See "Printing the Nozzle Check Pattern" on page 48. Load one... tanks are installed and that the selected Media Type matches the paper loaded. Check to check for loading and handling. In the Print dialog box of the printer driver, select Quality & Media from the pop-up menu, and then confirm that they are in (1). See "Replacing an Ink Tank...
... Photo Paper from the nozzle check pattern, clean the print head. See "Print Head Cleaning" on page 44. Glossy photo paper other than the Canon specialty media is missing from Media Type. Print head is empty, replace the ink tank. See "Printing the Nozzle Check Pattern" on page 48. Load one... tanks are installed and that the selected Media Type matches the paper loaded. Check to check for loading and handling. In the Print dialog box of the printer driver, select Quality & Media from the pop-up menu, and then confirm that they are in (1). See "Replacing an Ink Tank...
i9900 Quick Start Guide
Page 69
...colors or photographs). Thick paper is used Check if the paper you are printing on page 32. When Prevent paper abrasion is selected in the printer driver. 1. Click the Quality icon and then drag the Print Quality slide bar to adjust the intensity. On the Main tab, select ...68. See "Media Types Suitable for higher print quality. 1. In the Paper Source pull-down menu in the printer driver and try printing again. Drag the Intensity slide bar to Avoid" on page 3. See "Print Media to set the Print Quality setting to print images that the paper you cannot choose ...
...colors or photographs). Thick paper is used Check if the paper you are printing on page 32. When Prevent paper abrasion is selected in the printer driver. 1. Click the Quality icon and then drag the Print Quality slide bar to adjust the intensity. On the Main tab, select ...68. See "Media Types Suitable for higher print quality. 1. In the Paper Source pull-down menu in the printer driver and try printing again. Drag the Intensity slide bar to Avoid" on page 3. See "Print Media to set the Print Quality setting to print images that the paper you cannot choose ...


