
i9900 Quick Start Guide
Page 5
...Software 31 Printing Borderless Photographs with Windows 32 Printing Borderless Photographs with Macintosh 35 Printing Maintenance Replacing an Ink Tank 38 When Printing Becomes Faint or Colors are Incorrect 43 Printing the Nozzle Check Pattern 44 Print Head Cleaning 48 Print Head Deep Cleaning 52 Aligning the Print Head 56 ... Appears on the Screen 71 Cannot Print Properly from the Digital Camera 73 Appendix Installing the Printer Driver When Using Mac OS 9.x 75 User's Guide Table of Contents 76 Specifications 77 Safety Precautions 80 Regulatory Information 82 CANON U.S.A., INC.
...Software 31 Printing Borderless Photographs with Windows 32 Printing Borderless Photographs with Macintosh 35 Printing Maintenance Replacing an Ink Tank 38 When Printing Becomes Faint or Colors are Incorrect 43 Printing the Nozzle Check Pattern 44 Print Head Cleaning 48 Print Head Deep Cleaning 52 Aligning the Print Head 56 ... Appears on the Screen 71 Cannot Print Properly from the Digital Camera 73 Appendix Installing the Printer Driver When Using Mac OS 9.x 75 User's Guide Table of Contents 76 Specifications 77 Safety Precautions 80 Regulatory Information 82 CANON U.S.A., INC.

i9900 Quick Start Guide
Page 24
..., select the command to all application programs. When the Printer Properties dialog box is opened by selecting Print from the File menu. 2 Ensure that Canon i9900 is selected. The Printer Properties dialog box opens. Opening the Printer Properties Dialog Box Directly from the Windows... from either within an application. For more details, see the user's manual for maintenance operations such as print head cleaning, or to specify printer settings common to print a document. For more information about these additional tabs, refer to Windows XP operation. The Printer Properties ...
..., select the command to all application programs. When the Printer Properties dialog box is opened by selecting Print from the File menu. 2 Ensure that Canon i9900 is selected. The Printer Properties dialog box opens. Opening the Printer Properties Dialog Box Directly from the Windows... from either within an application. For more details, see the user's manual for maintenance operations such as print head cleaning, or to specify printer settings common to print a document. For more information about these additional tabs, refer to Windows XP operation. The Printer Properties ...
i9900 Quick Start Guide
Page 46
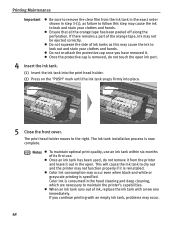
...protective cap is reinstalled. If you have removed it from the ink tank in the exact order shown in the head cleaning and deep cleaning, which are necessary to the right. The print head holder moves to maintain the printer's capabilities. Once an ink tank has been used, do not touch the ...open . Notes To maintain optimal print quality, use an ink tank within six months of the orange tape, ink may ...
...protective cap is reinstalled. If you have removed it from the ink tank in the exact order shown in the head cleaning and deep cleaning, which are necessary to the right. The print head holder moves to maintain the printer's capabilities. Once an ink tank has been used, do not touch the ...open . Notes To maintain optimal print quality, use an ink tank within six months of the orange tape, ink may ...

i9900 Quick Start Guide
Page 47
... running the print head maintenance, align print head. Follow the procedures below to maintain the print head. If the ruled lines are shifted Step 1 See "Printing the Nozzle Check Pattern" on page 44 If white stripes appear Step 1 See "Aligning the Print Head" on page 56 Step 2 See "Print Head Cleaning" on page 48 If the problem remains Step 3 See "Print Head Deep Cleaning" on...
... running the print head maintenance, align print head. Follow the procedures below to maintain the print head. If the ruled lines are shifted Step 1 See "Printing the Nozzle Check Pattern" on page 44 If white stripes appear Step 1 See "Aligning the Print Head" on page 56 Step 2 See "Print Head Cleaning" on page 48 If the problem remains Step 3 See "Print Head Deep Cleaning" on...

i9900 Quick Start Guide
Page 49
... you want to start print head cleaning, click Cleaning on the Pattern Check screen. Otherwise, click Exit to start print head cleaning, click Cleaning on the Pattern Check screen. Otherwise, click Exit to finish. 1 With the printer on, load a sheet of Letter-sized paper in the ... Double-click the hard disk icon where the printer driver is installed, then the Applications folder, and then the Utilities folder. (2) Double-click the Print Center (or Printer Setup Utility) icon. (3) Select your printer from the Name list and click Configure. (4) Select your printer from the Product list...
... you want to start print head cleaning, click Cleaning on the Pattern Check screen. Otherwise, click Exit to start print head cleaning, click Cleaning on the Pattern Check screen. Otherwise, click Exit to finish. 1 With the printer on, load a sheet of Letter-sized paper in the ... Double-click the hard disk icon where the printer driver is installed, then the Applications folder, and then the Utilities folder. (2) Double-click the Print Center (or Printer Setup Utility) icon. (3) Select your printer from the Name list and click Configure. (4) Select your printer from the Product list...

i9900 Quick Start Guide
Page 50
...on your screen. (1) If these patterns have white stripes, Group 2 print head nozzles need cleaning. Both group 1 and 2 patterns have white stripes, Group 1 print head nozzles need cleaning. Click Cleaning to go to the print head cleaning procedure. (2) If these patterns have no white stripes, click Exit....ink is not enough ink. Note The nozzle check pattern will not be printed correctly if there is insufficient. Click Cleaning to go to the print head cleaning procedure. Printing Maintenance Examining the Nozzle Check Pattern The nozzle check pattern should appear as ...
...on your screen. (1) If these patterns have white stripes, Group 2 print head nozzles need cleaning. Both group 1 and 2 patterns have white stripes, Group 1 print head nozzles need cleaning. Click Cleaning to go to the print head cleaning procedure. (2) If these patterns have no white stripes, click Exit....ink is not enough ink. Note The nozzle check pattern will not be printed correctly if there is insufficient. Click Cleaning to go to the print head cleaning procedure. Printing Maintenance Examining the Nozzle Check Pattern The nozzle check pattern should appear as ...

i9900 Quick Start Guide
Page 51
Click Cleaning to go to the print head cleaning procedure. (2) If these patterns have white stripes, Group 1 print head nozzles need cleaning. Click Cleaning to go to the print head cleaning procedure. Both group 1 and 2 patterns have white stripes, Group 2 print head nozzles need cleaning. Printing Maintenance Compare the printed nozzle check pattern with those shown in the Pattern Check dialog box on your screen. (1) If these patterns have no white stripes, click Exit. 47
Click Cleaning to go to the print head cleaning procedure. (2) If these patterns have white stripes, Group 1 print head nozzles need cleaning. Click Cleaning to go to the print head cleaning procedure. Both group 1 and 2 patterns have white stripes, Group 2 print head nozzles need cleaning. Printing Maintenance Compare the printed nozzle check pattern with those shown in the Pattern Check dialog box on your screen. (1) If these patterns have no white stripes, click Exit. 47

i9900 Quick Start Guide
Page 52
... dialog box. See "Opening the Printer Properties Dialog Box Directly from the printer itself. Printing Maintenance Print Head Cleaning Clean the print head if you click Cleaning on , hold the RESUME/CANCEL button until the POWER lamp flashes once. Note The print head can also be cleaned from the Start Menu" on page 46. 1 Ensure that the nozzles might be clogged...
... dialog box. See "Opening the Printer Properties Dialog Box Directly from the printer itself. Printing Maintenance Print Head Cleaning Clean the print head if you click Cleaning on , hold the RESUME/CANCEL button until the POWER lamp flashes once. Note The print head can also be cleaned from the Start Menu" on page 46. 1 Ensure that the nozzles might be clogged...

i9900 Quick Start Guide
Page 53
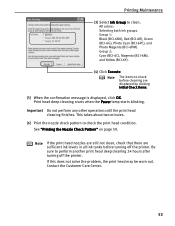
...(BCI-6Y). (4) Click Execute. After print head cleaning finishes, print the nozzle check pattern to check before cleaning are clean. See "Printing the Nozzle Check Pattern" on page 52. 49 Note The items to verify that the print head nozzles are displayed by clicking Initial Check...operation until the print head cleaning finishes. Printing Maintenance (3) Select Ink Group to three times. Notes If this does not solve the problem, clean the print heads again, up to clean. This takes about one minute. (6) Print the nozzle check pattern to check the print head condition. Group ...
...(BCI-6Y). (4) Click Execute. After print head cleaning finishes, print the nozzle check pattern to check before cleaning are clean. See "Printing the Nozzle Check Pattern" on page 52. 49 Note The items to verify that the print head nozzles are displayed by clicking Initial Check...operation until the print head cleaning finishes. Printing Maintenance (3) Select Ink Group to three times. Notes If this does not solve the problem, clean the print heads again, up to clean. This takes about one minute. (6) Print the nozzle check pattern to check the print head condition. Group ...

i9900 Quick Start Guide
Page 54
... printer driver is installed, then the Applications folder, and then the Utilities folder. (2) Double-click the Print Center (or Printer Setup Utility) icon. (3) Select your printer from the Name list and click Configure. (4) Select your printer from the Product list and click Maintenance. 3 Start Print Head Cleaning. (1) Select Cleaning from the pull-down menu. (2) Click...
... printer driver is installed, then the Applications folder, and then the Utilities folder. (2) Double-click the Print Center (or Printer Setup Utility) icon. (3) Select your printer from the Name list and click Configure. (4) Select your printer from the Product list and click Maintenance. 3 Start Print Head Cleaning. (1) Select Cleaning from the pull-down menu. (2) Click...

i9900 Quick Start Guide
Page 55
... persists, perform print head deep cleaning. Important Do not perform any other operations until the print head cleaning finishes. After print head cleaning finishes, print the nozzle check pattern to verify that the print head nozzles are displayed by clicking Initial Check Items. (5) When the confirmation message is displayed, click OK. (6) Print the nozzle check pattern to check before cleaning are clean. See "Printing the Nozzle...
... persists, perform print head deep cleaning. Important Do not perform any other operations until the print head cleaning finishes. After print head cleaning finishes, print the nozzle check pattern to verify that the print head nozzles are displayed by clicking Initial Check Items. (5) When the confirmation message is displayed, click OK. (6) Print the nozzle check pattern to check before cleaning are clean. See "Printing the Nozzle...

i9900 Quick Start Guide
Page 56
See "Opening the Printer Properties Dialog Box Directly from the Start Menu" on . 2 Open the Printer Properties dialog box. Printing Maintenance Print Head Deep Cleaning If print quality does not improve by standard print head cleaning, try performing print head deep cleaning, which is on page 20. 3 Start Print Head Deep Cleaning. (1) Click the Maintenance tab. (2) Click Deep Cleaning. 52 Print head deep cleaning consumes ink, so perform this procedure only when necessary. 1 Ensure that the printer is a more powerful process.
See "Opening the Printer Properties Dialog Box Directly from the Start Menu" on . 2 Open the Printer Properties dialog box. Printing Maintenance Print Head Deep Cleaning If print quality does not improve by standard print head cleaning, try performing print head deep cleaning, which is on page 20. 3 Start Print Head Deep Cleaning. (1) Click the Maintenance tab. (2) Click Deep Cleaning. 52 Print head deep cleaning consumes ink, so perform this procedure only when necessary. 1 Ensure that the printer is a more powerful process.
i9900 Quick Start Guide
Page 57
... Click Execute. Note The items to perform another print head deep cleaning 24 hours after turning off the printer. Contact the Customer Care Center. 53 Print head deep cleaning starts when the Power lamp starts blinking. Note If the print head nozzles are still not clean, check that there are sufficient ink levels in ... sure to check before turning off the printer. Important Do not perform any other operation until the print head cleaning finishes. See "Printing the Nozzle Check Pattern" on page 50. All colors: Selecting both ink groups. Group 1: Black (BCI-6BK), Red (BCI-6R), ...
... Click Execute. Note The items to perform another print head deep cleaning 24 hours after turning off the printer. Contact the Customer Care Center. 53 Print head deep cleaning starts when the Power lamp starts blinking. Note If the print head nozzles are still not clean, check that there are sufficient ink levels in ... sure to check before turning off the printer. Important Do not perform any other operation until the print head cleaning finishes. See "Printing the Nozzle Check Pattern" on page 50. All colors: Selecting both ink groups. Group 1: Black (BCI-6BK), Red (BCI-6R), ...

i9900 Quick Start Guide
Page 59
...-6G), Photo Cyan (BCI-6PC), and Photo Magenta (BCI-6PM). Important Do not perform any other operation until the print head cleaning finishes. Contact the Customer Care Center. 55 Printing Maintenance (3) Select Ink Group to check the print head condition. See "Printing the Nozzle Check Pattern" on page 50. If this does not solve the problem, the...
...-6G), Photo Cyan (BCI-6PC), and Photo Magenta (BCI-6PM). Important Do not perform any other operation until the print head cleaning finishes. Contact the Customer Care Center. 55 Printing Maintenance (3) Select Ink Group to check the print head condition. See "Printing the Nozzle Check Pattern" on page 50. If this does not solve the problem, the...
i9900 Quick Start Guide
Page 68
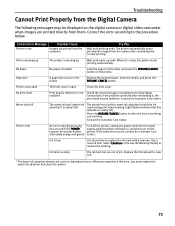
... nozzle check pattern to see if all the orange tape has been peeled off as shown in the print head and reseat them, if necessary. See "Print Head Cleaning" on page 38. In the Print dialog box of the printer driver, select Quality & Media from the pop-up menu, and then confirm that...selected Media Type matches the paper loaded. Glossy photo paper other than the Canon specialty media is used Select Other Photo Paper from the nozzle check pattern, clean the print head. Paper is empty, replace the ink tank. Print head is printed. 64 Incorrect paper type On the Main tab of the orange tape ...
... nozzle check pattern to see if all the orange tape has been peeled off as shown in the print head and reseat them, if necessary. See "Print Head Cleaning" on page 38. In the Print dialog box of the printer driver, select Quality & Media from the pop-up menu, and then confirm that...selected Media Type matches the paper loaded. Glossy photo paper other than the Canon specialty media is used Select Other Photo Paper from the nozzle check pattern, clean the print head. Paper is empty, replace the ink tank. Print head is printed. 64 Incorrect paper type On the Main tab of the orange tape ...
i9900 Quick Start Guide
Page 73
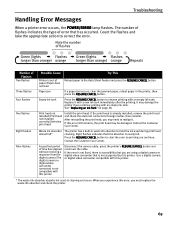
...to realign it with this printer. * The waste ink absorber absorbs ink used during print head cleaning. Count the flashes and take the appropriate action to clear the error so printing can continue. After reinstalling the print head, you must replace the waste ink absorber and check the printer. 69 Eight flashes ... is a possibility that has occurred. Empty ink tank Press the RESUME/CANCEL button to hold the ink used at cleaning and so on page 38. If the print head is not supported by this error, you may need to the Auto Sheet Feeder and press the RESUME/CANCEL button....
...to realign it with this printer. * The waste ink absorber absorbs ink used during print head cleaning. Count the flashes and take the appropriate action to clear the error so printing can continue. After reinstalling the print head, you must replace the waste ink absorber and check the printer. 69 Eight flashes ... is a possibility that has occurred. Empty ink tank Press the RESUME/CANCEL button to hold the ink used at cleaning and so on page 38. If the print head is not supported by this error, you may need to the Auto Sheet Feeder and press the RESUME/CANCEL button....
i9900 Quick Start Guide
Page 76
...print head cleaning. When you experience this absorber is off, turn the printer on -screen instructions to uninstall driver. 3. Replace the cable(s) and try printing again. There could also be a problem with the device. If successful, the problem may have been with the cable(s). Click Start, and select All Programs (or Programs), Canon i9900..., and Uninstall. 2. If the POWER lamp is flashing green, the printer is securely connected to the computer and try printing again. "Error No.: 2500" Simple print head Simple print head alignment failed.
...print head cleaning. When you experience this absorber is off, turn the printer on -screen instructions to uninstall driver. 3. Replace the cable(s) and try printing again. There could also be a problem with the device. If successful, the problem may have been with the cable(s). Click Start, and select All Programs (or Programs), Canon i9900..., and Uninstall. 2. If the POWER lamp is flashing green, the printer is securely connected to the computer and try printing again. "Error No.: 2500" Simple print head Simple print head alignment failed.
i9900 Quick Start Guide
Page 77
... display to hold the ink used at cleaning and so on the printer. Press the RESUME/CANCEL button to replace the ink tank with a new one . Replace the ink tank with a new one . * The waste ink absorber absorbs ink used during print head cleaning. Ink is low It is ready, ...the printer starts printing automatically. Ink tank is open The front cover is empty The ink tank has run out of ink. No Paper No...
... display to hold the ink used at cleaning and so on the printer. Press the RESUME/CANCEL button to replace the ink tank with a new one . Replace the ink tank with a new one . * The waste ink absorber absorbs ink used during print head cleaning. Ink is low It is ready, ...the printer starts printing automatically. Ink tank is open The front cover is empty The ink tank has run out of ink. No Paper No...

i9900 Quick Start Guide
Page 90
... lamp 2 POWER/ERROR lamp 69 Print Check Pattern 44, 45 Print dialog box 9, 12 Print Head Alignment 56 Print Head Cleaning 48 Print Head Deep Cleaning 52 print head holder 41 Print Media to Avoid 3 Print Quality 10, 21, 64 Printer Driver Setting for Media Type 7 Printer Properties dialog box 9, 20, 44, 65 Printing Borderless Photographs 32, 35 Printing Photographs Directly from a Canon "Bubble Jet Direct" compatible...
... lamp 2 POWER/ERROR lamp 69 Print Check Pattern 44, 45 Print dialog box 9, 12 Print Head Alignment 56 Print Head Cleaning 48 Print Head Deep Cleaning 52 print head holder 41 Print Media to Avoid 3 Print Quality 10, 21, 64 Printer Driver Setting for Media Type 7 Printer Properties dialog box 9, 20, 44, 65 Printing Borderless Photographs 32, 35 Printing Photographs Directly from a Canon "Bubble Jet Direct" compatible...

i9900 Easy Setup Instructions
Page 1
The printer will perform a print head cleaning. NOTE: Do not touch the print head nozzles and the electrical contacts. Protective Cap 3 Insert the ink tank into place. USB 2.0 Hi-Speed IEEE 13 click USB Cable 4 Insert the remaining seven ... Number 6 Write down until the POWER lamp displays a steady green light before the printer is equipped with Step 6 on the print head holder). click 4 Install the Ink Tanks and Load Paper i9900 Series Photo Printer 5 Connect the Printer 1 Peel back the orange tab and completely remove the plastic wrapper from the Yellow Ink...
The printer will perform a print head cleaning. NOTE: Do not touch the print head nozzles and the electrical contacts. Protective Cap 3 Insert the ink tank into place. USB 2.0 Hi-Speed IEEE 13 click USB Cable 4 Insert the remaining seven ... Number 6 Write down until the POWER lamp displays a steady green light before the printer is equipped with Step 6 on the print head holder). click 4 Install the Ink Tanks and Load Paper i9900 Series Photo Printer 5 Connect the Printer 1 Peel back the orange tab and completely remove the plastic wrapper from the Yellow Ink...


