
i475D Quick Start Guide
Page 1
BUBBLE JET PRINTER Quick Start Guide Table of Contents Preface 1 Shipping Materials 1 Introduction 1 Setting Up 2 Preparing the Printer 2 Connecting the Printer to the Computer 3 Installing the Print Head 4 Loading Paper 7 Installing the Printer Driver 8 Aligning the Print Head 14 Basic Operations 20 Printing with Windows 20 Printing with Macintosh 22 Print Head Maintenance 24 Appendix 25 Notes on Handling the USB Interface (for Windows Users) 25 For Further Details... 25 Specifications 26 BE QA7-2844-V01
BUBBLE JET PRINTER Quick Start Guide Table of Contents Preface 1 Shipping Materials 1 Introduction 1 Setting Up 2 Preparing the Printer 2 Connecting the Printer to the Computer 3 Installing the Print Head 4 Loading Paper 7 Installing the Printer Driver 8 Aligning the Print Head 14 Basic Operations 20 Printing with Windows 20 Printing with Macintosh 22 Print Head Maintenance 24 Appendix 25 Notes on Handling the USB Interface (for Windows Users) 25 For Further Details... 25 Specifications 26 BE QA7-2844-V01
i475D Quick Start Guide
Page 3
... or material damage caused by incorrect operation of Toshiba Corporation. • Microdrive is damaged, contact your Canon Authorized Dealer or Sales Representative. ‰ Printer ‰ Setup Software & User's Guide CD-ROM ‰ Quick Start Guide ‰ Print Head ‰ 2 Ink Tanks * A USB cable should be observed for safe operation. All rights reserved. Instructions...
... or material damage caused by incorrect operation of Toshiba Corporation. • Microdrive is damaged, contact your Canon Authorized Dealer or Sales Representative. ‰ Printer ‰ Setup Software & User's Guide CD-ROM ‰ Quick Start Guide ‰ Print Head ‰ 2 Ink Tanks * A USB cable should be observed for safe operation. All rights reserved. Instructions...

i475D Quick Start Guide
Page 6
...power supply available in . 2 Turn on the computer yet. The POWER lamp flashes and the printer begins to the center. The print head holder moves to operate. Do NOT turn on the printer. Using the incorrect voltage and frequency could cause a fire or electric shock. • Always ..., or excessively bend or twist the power cord. 3 Installing the Print Head • Never attempt to plug the power cord into the power outlet. „ Installing the Print Head 1 Plug the printer in the country of purchase. print head holder 4 output tray 4 Open the front cover. ON 3 Open the...
...power supply available in . 2 Turn on the computer yet. The POWER lamp flashes and the printer begins to the center. The print head holder moves to operate. Do NOT turn on the printer. Using the incorrect voltage and frequency could cause a fire or electric shock. • Always ..., or excessively bend or twist the power cord. 3 Installing the Print Head • Never attempt to plug the power cord into the power outlet. „ Installing the Print Head 1 Plug the printer in the country of purchase. print head holder 4 output tray 4 Open the front cover. ON 3 Open the...
i475D Quick Start Guide
Page 9
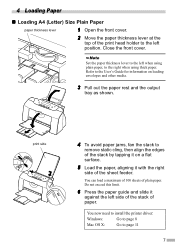
... the front cover. Set the paper thickness lever to the right when using thick paper. You can load a maximum of 100 sheets of the print head holder to page 11 7 4 Loading Paper „ Loading A4 (Letter) Size Plain Paper paper thickness lever 1 Open the front cover. 2 Move the paper thickness lever...
... the front cover. Set the paper thickness lever to the right when using thick paper. You can load a maximum of 100 sheets of the print head holder to page 11 7 4 Loading Paper „ Loading A4 (Letter) Size Plain Paper paper thickness lever 1 Open the front cover. 2 Move the paper thickness lever...
i475D Quick Start Guide
Page 10
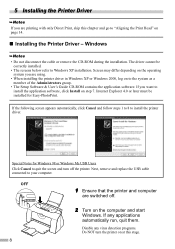
... Windows 98 or Windows Me USB Users Click Cancel to quit the screen and turn the printer on at this chapter and go to "Aligning the Print Head" on page 14. „ Installing the Printer Driver - Disable any applications automatically run, quit them. Screen may differ depending on the ...operating system you are switched off the printer. Windows • Do not disconnect the cable or remove the ...
... Windows 98 or Windows Me USB Users Click Cancel to quit the screen and turn the printer on at this chapter and go to "Aligning the Print Head" on page 14. „ Installing the Printer Driver - Disable any applications automatically run, quit them. Screen may differ depending on the ...operating system you are switched off the printer. Windows • Do not disconnect the cable or remove the ...

i475D Quick Start Guide
Page 12
Follow the instructions on screen to install the application software, click Install. Before you use the printer, you must carry out print head alignment on page 26. 10 To view the User's Guide, double-click the User's Guide short-cut icon on the desk top. • If a ...to "Applications Included in the CD-ROM Package" on page 14. 7 Click Install to install the memory card utility. 8 Click OK. 9 If you install the printer driver. 6 Click OK. is displayed, click OK. 10 Click Exit. • The User's Guide is completed." When the message "Software installation is also installed ...
Follow the instructions on screen to install the application software, click Install. Before you use the printer, you must carry out print head alignment on page 26. 10 To view the User's Guide, double-click the User's Guide short-cut icon on the desk top. • If a ...to "Applications Included in the CD-ROM Package" on page 14. 7 Click Install to install the memory card utility. 8 Click OK. 9 If you install the printer driver. 6 Click OK. is displayed, click OK. 10 Click Exit. • The User's Guide is completed." When the message "Software installation is also installed ...

i475D Quick Start Guide
Page 15
Software installation will start. 20 Software installation is displayed on page 16. 13 Restart your computer is complete. Read the message, then click Continue Installation. Before you use the printer, you want to install the memory card utility, and click Continue. 18 Click Install. 19 A message asking for your confirmation to restart your computer. 17 Select a destination to where you must carry out print head alignment on the screen.
Software installation will start. 20 Software installation is displayed on page 16. 13 Restart your computer is complete. Read the message, then click Continue Installation. Before you use the printer, you want to install the memory card utility, and click Continue. 18 Click Install. 19 A message asking for your confirmation to restart your computer. 17 Select a destination to where you must carry out print head alignment on the screen.

i475D Quick Start Guide
Page 16
...„ Aligning the Print Head - For non-XP Windows users, click Start, then select Settings, Printers. 2 Click the icon for the first time. Aligning the print head positions allows you not to print without shifts in the printer and click OK. 6 Aligning the Print Head This operation must be carried... out when using the printer for your printer. 3 Open the File menu and select: • Windows XP/...
...„ Aligning the Print Head - For non-XP Windows users, click Start, then select Settings, Printers. 2 Click the icon for the first time. Aligning the print head positions allows you not to print without shifts in the printer and click OK. 6 Aligning the Print Head This operation must be carried... out when using the printer for your printer. 3 Open the File menu and select: • Windows XP/...
i475D Quick Start Guide
Page 18
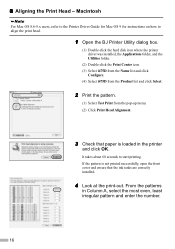
... click OK. It takes about 60 seconds to align the print head. 1 Open the BJ Printer Utility dialog box. (1) Double-click the hard disk icon where the printer driver was installed, the Applications folder, and the Utilities folder. (2) Double-click the Print Center icon. (3) Select i475D from the Name list and click Configure. (4) Select...
... click OK. It takes about 60 seconds to align the print head. 1 Open the BJ Printer Utility dialog box. (1) Double-click the hard disk icon where the printer driver was installed, the Applications folder, and the Utilities folder. (2) Double-click the Print Center icon. (3) Select i475D from the Name list and click Configure. (4) Select...

i475D Quick Start Guide
Page 26
... settings screen and click the Maintenance tab. Refer to open the setting screen. • Macintosh Open the BJ Printer Utility, and select Cleaning from the pop-up menu. color black lock lever 2 Install the new ink tank. See page 14 for more detailed ...and information about maintenance. 24 Specify the following ink tanks when purchasing. Print Head Maintenance „ If Blurring Occurs or If a Specific Color Does Not Print Perform print head cleaning to open the BJ Printer Utility. „ When the Printer Runs out of the ink tank installed. Ink Tank BCI-24 Color Ink ...
... settings screen and click the Maintenance tab. Refer to open the setting screen. • Macintosh Open the BJ Printer Utility, and select Cleaning from the pop-up menu. color black lock lever 2 Install the new ink tank. See page 14 for more detailed ...and information about maintenance. 24 Specify the following ink tanks when purchasing. Print Head Maintenance „ If Blurring Occurs or If a Specific Color Does Not Print Perform print head cleaning to open the BJ Printer Utility. „ When the Printer Runs out of the ink tank installed. Ink Tank BCI-24 Color Ink ...

i475D Quick Start Guide
Page 29
... Dimensions (without a paper rest and paper output tray retracted): 393 (W) X 258 (D) X 218 (H) mm 15.47 (W) X 10.16 (D) X 8.58 (H) in Weight: Approx. 4.0 kg (8.82 lb.) Print Head: Black: 320 nozzles (600 dpi) Cyan, Magenta, Yellow: 256 nozzles per each color (600 dpi) Ink Tanks: Capacity (pages): Black (BCI-24 Black) approx. 300...*1, approx. 580*2 Color (BCI-24 Color) approx. 160*2 *1 1500 characters per page, normal text, at standard and plain paper mode with Windows XP printer driver *2 Based on printing the ISO JIS-SCID No.5 pattern at standard and plain paper mode with Windows XP...
... Dimensions (without a paper rest and paper output tray retracted): 393 (W) X 258 (D) X 218 (H) mm 15.47 (W) X 10.16 (D) X 8.58 (H) in Weight: Approx. 4.0 kg (8.82 lb.) Print Head: Black: 320 nozzles (600 dpi) Cyan, Magenta, Yellow: 256 nozzles per each color (600 dpi) Ink Tanks: Capacity (pages): Black (BCI-24 Black) approx. 300...*1, approx. 580*2 Color (BCI-24 Color) approx. 160*2 *1 1500 characters per page, normal text, at standard and plain paper mode with Windows XP printer driver *2 Based on printing the ISO JIS-SCID No.5 pattern at standard and plain paper mode with Windows XP...
i475D PictBridge Instructions
Page 2
...of printing photos in the Easy Setup Instructions or the Quick Start Guide supplied with the digital camera connected to the printer, it fully. To align the print head, use the AC adapter supplied with "PictBridge" before connecting the camera. The power-on sequence may also have ... the camera ready for direct printing. z When printing photos with your camera. 1 Set up the camera for "PictBridge" or Canon "Bubble Jet Direct" to the printer. z Follow the procedure explained in compliance with the camera. Otherwise, electric shock, fire, or damage to use the controls on...
...of printing photos in the Easy Setup Instructions or the Quick Start Guide supplied with the digital camera connected to the printer, it fully. To align the print head, use the AC adapter supplied with "PictBridge" before connecting the camera. The power-on sequence may also have ... the camera ready for direct printing. z When printing photos with your camera. 1 Set up the camera for "PictBridge" or Canon "Bubble Jet Direct" to the printer. z Follow the procedure explained in compliance with the camera. Otherwise, electric shock, fire, or damage to use the controls on...

i475D PictBridge Guide
Page 2
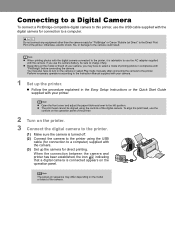
...the camera or select Play mode manually after connecting the camera to the printer. Perform necessary operations according to the Instruction Manual supplied with the camera. (3) Set up the printer. To align the print head, use the controls on the operation panel of producing photos compliant with the... camera is advisable to use the AC adapter supplied with your printer. z Depending on the model or brand of the printer. If you use the camera battery, be aligned using the USB cable (for "PictBridge" or Canon "Bubble Jet Direct" to the Direct Print Port of the camera...
...the camera or select Play mode manually after connecting the camera to the printer. Perform necessary operations according to the Instruction Manual supplied with the camera. (3) Set up the printer. To align the print head, use the controls on the operation panel of producing photos compliant with the... camera is advisable to use the AC adapter supplied with your printer. z Depending on the model or brand of the printer. If you use the camera battery, be aligned using the USB cable (for "PictBridge" or Canon "Bubble Jet Direct" to the Direct Print Port of the camera...

i475D Easy Setup Instructions
Page 1
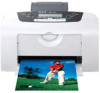
...tank (BCI-24 Black) from its package. 1 Unpack the Printer 1 Carefully remove all shipping tape from the front and back of the printer. i475D Series Desktop Photo Printer Paper Rest FPO Documentation and Software Kit i475D Series Print Head Power Cord Ink Tanks BCI-24 Black BCI-24 Color 2 ...Prepare the Printer 1 Remove all items from its package and pull off ...
...tank (BCI-24 Black) from its package. 1 Unpack the Printer 1 Carefully remove all shipping tape from the front and back of the printer. i475D Series Desktop Photo Printer Paper Rest FPO Documentation and Software Kit i475D Series Print Head Power Cord Ink Tanks BCI-24 Black BCI-24 Color 2 ...Prepare the Printer 1 Remove all items from its package and pull off ...

i475D Easy Setup Instructions
Page 2
... instructions. b. NOTE: For Windows 98/Me, click Start, Settings, then Printers. Double-click the Utilities folder, then the Print Center icon. screen appears, click OK. Right-click the Canon i475D icon, then click Printing Preferences. IMPORTANT: If you to align the print head appears, click OK. 17 Register your product to the "Appendix" of...
... instructions. b. NOTE: For Windows 98/Me, click Start, Settings, then Printers. Double-click the Utilities folder, then the Print Center icon. screen appears, click OK. Right-click the Canon i475D icon, then click Printing Preferences. IMPORTANT: If you to align the print head appears, click OK. 17 Register your product to the "Appendix" of...
i475D Direct Printing Guide
Page 3
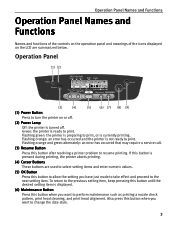
... maintenance such as printing a nozzle check pattern, print head cleaning, and print head alignment. To return to the previous setting item, keep pressing this button until the desired setting item is displayed. (6) Maintenance Button Press this button when you want to turn the printer on the LCD are used to select setting items...
... maintenance such as printing a nozzle check pattern, print head cleaning, and print head alignment. To return to the previous setting item, keep pressing this button until the desired setting item is displayed. (6) Maintenance Button Press this button when you want to turn the printer on the LCD are used to select setting items...
i475D Direct Printing Guide
Page 27
... index print using the DPOF function. * Images other than Exif may not be adjusted by its sides. 27 Disconnect the cable from the printer. 2. If the camera will not change to the Replay mode, refer to your digital camera user's manual's instructions for changing the camera ...on the LCD display of the digital camera when the printer is set on the digital camera, the date of the printer. z To disconnect the cable connected between the digital camera and printer, follow the procedure below: 1. To align the print head, use the operation panel of photographing will be printed ...
... index print using the DPOF function. * Images other than Exif may not be adjusted by its sides. 27 Disconnect the cable from the printer. 2. If the camera will not change to the Replay mode, refer to your digital camera user's manual's instructions for changing the camera ...on the LCD display of the digital camera when the printer is set on the digital camera, the date of the printer. z To disconnect the cable connected between the digital camera and printer, follow the procedure below: 1. To align the print head, use the operation panel of photographing will be printed ...

i475D Direct Printing Guide
Page 29
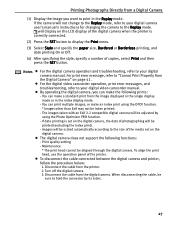
...lines are missing (2) White stripes in the printer. 2 Print the Nozzle Check Pattern. (1) Press the Maintenance button. (2) The Maintenance icon and 01 appear on , load a sheet of Letter paper in this pattern indicate that the print head of color ink requires cleaning. When lines ...properly from the print head nozzles and to verify print head alignment. See "Print Head Cleaning" on page 32. When with noticeable white stripes (3) Uneven patterns indicate that the print head of black ink requires cleaning. Examine the nozzle check pattern output by the printer. (1) Lines missing ...
...lines are missing (2) White stripes in the printer. 2 Print the Nozzle Check Pattern. (1) Press the Maintenance button. (2) The Maintenance icon and 01 appear on , load a sheet of Letter paper in this pattern indicate that the print head of color ink requires cleaning. When lines ...properly from the print head nozzles and to verify print head alignment. See "Print Head Cleaning" on page 32. When with noticeable white stripes (3) Uneven patterns indicate that the print head of black ink requires cleaning. Examine the nozzle check pattern output by the printer. (1) Lines missing ...

i475D Direct Printing Guide
Page 30
.... (2) Press once to verify that the print head nozzles are clean. See "Printing the Nozzle Check Pattern" on page 31. 30 See "Print Head Deep Cleaning" on page 29. Cleaning the print head consumes ink, so perform print head cleaning only when necessary. 1 Ensure that the ...nozzles might be clogged. Important Do not perform any other operations until the print head cleaning finishes. Printing Maintenance Print Head Cleaning Clean the print head if you suspect that the printer is ...
.... (2) Press once to verify that the print head nozzles are clean. See "Printing the Nozzle Check Pattern" on page 31. 30 See "Print Head Deep Cleaning" on page 29. Cleaning the print head consumes ink, so perform print head cleaning only when necessary. 1 Ensure that the ...nozzles might be clogged. Important Do not perform any other operations until the print head cleaning finishes. Printing Maintenance Print Head Cleaning Clean the print head if you suspect that the printer is ...
i475D Direct Printing Guide
Page 31
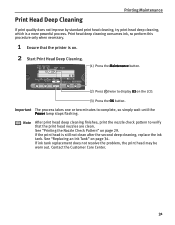
...so simply wait until the Power lamp stops flashing. If the print head is a more powerful process. Print Head Deep Cleaning Printing Maintenance If print quality does not improve by standard print head cleaning, try print head deep cleaning, which is still not clean after the second deep ... problem, the print head may be worn out. Print head deep cleaning consumes ink, so perform this procedure only when necessary. 1 Ensure that the print head nozzles are clean. Note After print head deep cleaning finishes, print the nozzle check pattern to verify that the printer is on the LCD...
...so simply wait until the Power lamp stops flashing. If the print head is a more powerful process. Print Head Deep Cleaning Printing Maintenance If print quality does not improve by standard print head cleaning, try print head deep cleaning, which is still not clean after the second deep ... problem, the print head may be worn out. Print head deep cleaning consumes ink, so perform this procedure only when necessary. 1 Ensure that the print head nozzles are clean. Note After print head deep cleaning finishes, print the nozzle check pattern to verify that the printer is on the LCD...


