
i475D Quick Start Guide
Page 1
BUBBLE JET PRINTER Quick Start Guide Table of Contents Preface 1 Shipping Materials 1 Introduction 1 Setting Up 2 Preparing the Printer 2 Connecting the Printer to the Computer 3 Installing the Print Head 4 Loading Paper 7 Installing the Printer Driver 8 Aligning the Print Head 14 Basic Operations 20 Printing with Windows 20 Printing with Macintosh 22 Print Head Maintenance 24 Appendix 25 Notes on Handling the USB Interface (for Windows Users) 25 For Further Details... 25 Specifications 26 BE QA7-2844-V01
BUBBLE JET PRINTER Quick Start Guide Table of Contents Preface 1 Shipping Materials 1 Introduction 1 Setting Up 2 Preparing the Printer 2 Connecting the Printer to the Computer 3 Installing the Print Head 4 Loading Paper 7 Installing the Printer Driver 8 Aligning the Print Head 14 Basic Operations 20 Printing with Windows 20 Printing with Macintosh 22 Print Head Maintenance 24 Appendix 25 Notes on Handling the USB Interface (for Windows Users) 25 For Further Details... 25 Specifications 26 BE QA7-2844-V01
i475D Quick Start Guide
Page 3
... contact your computer. For details on cable specifications, refer to your Canon Authorized Dealer or Sales Representative. ‰ Printer ‰ Setup Software & User's Guide CD-ROM ‰ Quick Start Guide ‰ Print Head ‰ 2 Ink Tanks * A USB cable should be transmitted or... copied in the User's Guide. Copyright ©2003 CANON INC. Introduction For information about printing when you for PictBridge-compliant Digital Cameras. Instructions that all the...
... contact your computer. For details on cable specifications, refer to your Canon Authorized Dealer or Sales Representative. ‰ Printer ‰ Setup Software & User's Guide CD-ROM ‰ Quick Start Guide ‰ Print Head ‰ 2 Ink Tanks * A USB cable should be transmitted or... copied in the User's Guide. Copyright ©2003 CANON INC. Introduction For information about printing when you for PictBridge-compliant Digital Cameras. Instructions that all the...

i475D Quick Start Guide
Page 6
The POWER lamp flashes and the printer begins to the center. print head holder 4 ON 3 Open the output tray. The print head holder moves to operate. Do not place heavy objects on the power cord. • Never use any power supply other than the standard power ...supply available in . 2 Turn on the computer yet. output tray 4 Open the front cover. 3 Installing the Print Head • Never attempt to plug the power cord into the power outlet. „ Installing the Print Head 1 Plug the printer in the country of purchase. Do NOT turn on the printer. Wait until the POWER...
The POWER lamp flashes and the printer begins to the center. print head holder 4 ON 3 Open the output tray. The print head holder moves to operate. Do not place heavy objects on the power cord. • Never use any power supply other than the standard power ...supply available in . 2 Turn on the computer yet. output tray 4 Open the front cover. 3 Installing the Print Head • Never attempt to plug the power cord into the power outlet. „ Installing the Print Head 1 Plug the printer in the country of purchase. Do NOT turn on the printer. Wait until the POWER...

i475D Quick Start Guide
Page 7
Do not touch the lock lever once the print head has been installed. 5 print head 6 Remove the protective cap from the print head. • Do not touch the print head nozzles or electrical contacts. • Do not attempt to reattach the protective cap once it has been removed. print head nozzles electrical contacts 7 Place the print head in the holder. 8 Lock the print head into place by lowering the lever. Do not touch internal parts other than the lock lever. lock lever 5 Raise the lock lever.
Do not touch the lock lever once the print head has been installed. 5 print head 6 Remove the protective cap from the print head. • Do not touch the print head nozzles or electrical contacts. • Do not attempt to reattach the protective cap once it has been removed. print head nozzles electrical contacts 7 Place the print head in the holder. 8 Lock the print head into place by lowering the lever. Do not touch internal parts other than the lock lever. lock lever 5 Raise the lock lever.
i475D Quick Start Guide
Page 9
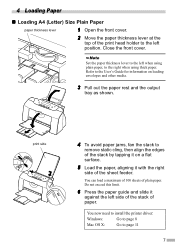
... the output tray as shown. Do not exceed this limit. 6 Press the paper guide and slide it with the right side of the sheet feeder. print side 4 To avoid paper jams, fan the stack to the User's Guide for information on a flat surface. 5 Load the paper, aligning it against the left... Paper „ Loading A4 (Letter) Size Plain Paper paper thickness lever 1 Open the front cover. 2 Move the paper thickness lever at the top of the print head holder to the right when using plain paper, to the left side of the stack of paper. Set the paper thickness lever to the left...
... the output tray as shown. Do not exceed this limit. 6 Press the paper guide and slide it with the right side of the sheet feeder. print side 4 To avoid paper jams, fan the stack to the User's Guide for information on a flat surface. 5 Load the paper, aligning it against the left... Paper „ Loading A4 (Letter) Size Plain Paper paper thickness lever 1 Open the front cover. 2 Move the paper thickness lever at the top of the print head holder to the right when using plain paper, to the left side of the stack of paper. Set the paper thickness lever to the left...
i475D Quick Start Guide
Page 10
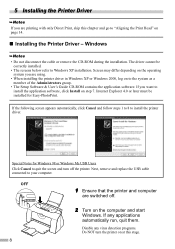
...Printer Driver - Next, remove and replace the USB cable connected to Windows XP installation. OFF 1 Ensure that the printer and computer are printing with only Direct Print, skip this stage. 8 The driver cannot be installed for Windows 98 or Windows Me USB Users Click Cancel to the system as a...you are using. • When installing the printer driver in Windows XP or Windows 2000, log on at this chapter and go to "Aligning the Print Head" on step 7. Internet Explorer 4.0 or later must be correctly installed. • The screens below refer to your computer. Windows • Do not...
...Printer Driver - Next, remove and replace the USB cable connected to Windows XP installation. OFF 1 Ensure that the printer and computer are printing with only Direct Print, skip this stage. 8 The driver cannot be installed for Windows 98 or Windows Me USB Users Click Cancel to the system as a...you are using. • When installing the printer driver in Windows XP or Windows 2000, log on at this chapter and go to "Aligning the Print Head" on step 7. Internet Explorer 4.0 or later must be correctly installed. • The screens below refer to your computer. Windows • Do not...

i475D Quick Start Guide
Page 12
... displayed, click OK. 10 Click Exit. • The User's Guide is completed." When the message "Software installation is also installed when you must carry out print head alignment on page 26. 10
... displayed, click OK. 10 Click Exit. • The User's Guide is completed." When the message "Software installation is also installed when you must carry out print head alignment on page 26. 10

i475D Quick Start Guide
Page 15
Software installation will start. 20 Software installation is displayed on page 16. 13 Read the message, then click Continue Installation. Before you use the printer, you want to install the memory card utility, and click Continue. 18 Click Install. 19 A message asking for your confirmation to where you must carry out print head alignment on the screen. Restart your computer is complete. 17 Select a destination to restart your computer.
Software installation will start. 20 Software installation is displayed on page 16. 13 Read the message, then click Continue Installation. Before you use the printer, you want to install the memory card utility, and click Continue. 18 Click Install. 19 A message asking for your confirmation to where you must carry out print head alignment on the screen. Restart your computer is complete. 17 Select a destination to restart your computer.

i475D Quick Start Guide
Page 16
...• Windows XP/Windows 2000 → [Printing Preferences...] • Windows Me/Windows 98 → [Properties] to start printing. 14 If a message warning you to perform other operations is loaded in the color registration. „ Aligning the Print Head - It takes about 60 seconds to open ...the setting screen. 4 Click the Maintenance tab, and click Print Head Alignment. 5 Check that paper is displayed, click OK. Windows 1 Click Start and...
...• Windows XP/Windows 2000 → [Printing Preferences...] • Windows Me/Windows 98 → [Properties] to start printing. 14 If a message warning you to perform other operations is loaded in the color registration. „ Aligning the Print Head - It takes about 60 seconds to open ...the setting screen. 4 Click the Maintenance tab, and click Print Head Alignment. 5 Check that paper is displayed, click OK. Windows 1 Click Start and...
i475D Quick Start Guide
Page 18
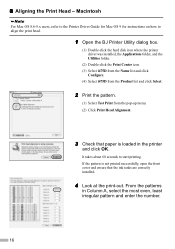
... installed, the Applications folder, and the Utilities folder. (2) Double-click the Print Center icon. (3) Select i475D from the Name list and click Configure. (4) Select i475D from the Product list and click Select. 2 Print the pattern. (1) Select Test Print from the pop-up menu. (2) Click Print Head Alignment. 3 Check that the ink tanks are correctly installed. 4 Look at...
... installed, the Applications folder, and the Utilities folder. (2) Double-click the Print Center icon. (3) Select i475D from the Name list and click Configure. (4) Select i475D from the Product list and click Select. 2 Print the pattern. (1) Select Test Print from the pop-up menu. (2) Click Print Head Alignment. 3 Check that the ink tanks are correctly installed. 4 Look at...

i475D Quick Start Guide
Page 20
Operation Panel 1 Press the Maintenance button. 2 Press three times to -3) of the checked patterns in column A. 18 If the patterns in column "H" are not uniform, select the pattern in which white stripes are least noticeable. Less noticeable white stripes More noticeable white stripes 5 Using (cursor buttons), display the pattern number (+7 to display 04 on the LCD. 3 Press the OK button. The pattern is printed. 4 Observe the printed patterns and check the pattern in which vertical stripes are least noticeable. „ Aligning the Print Head -
Operation Panel 1 Press the Maintenance button. 2 Press three times to -3) of the checked patterns in column A. 18 If the patterns in column "H" are not uniform, select the pattern in which white stripes are least noticeable. Less noticeable white stripes More noticeable white stripes 5 Using (cursor buttons), display the pattern number (+7 to display 04 on the LCD. 3 Press the OK button. The pattern is printed. 4 Observe the printed patterns and check the pattern in which vertical stripes are least noticeable. „ Aligning the Print Head -

i475D Quick Start Guide
Page 26
... Utility. „ When the Printer Runs out of the ink tank installed. Ensure that the printer is turned on how to improve the print quality. Ink Tank BCI-24 Color Ink Tank BCI-24 Black 1 Open the front cover and remove the empty ink tank. See page ...and follow the instructions below. • Windows Open the printer driver settings screen and click the Maintenance tab. Print Head Maintenance „ If Blurring Occurs or If a Specific Color Does Not Print Perform print head cleaning to open the setting screen. • Macintosh Open the BJ Printer Utility, and select Cleaning from ...
... Utility. „ When the Printer Runs out of the ink tank installed. Ensure that the printer is turned on how to improve the print quality. Ink Tank BCI-24 Color Ink Tank BCI-24 Black 1 Open the front cover and remove the empty ink tank. See page ...and follow the instructions below. • Windows Open the printer driver settings screen and click the Maintenance tab. Print Head Maintenance „ If Blurring Occurs or If a Specific Color Does Not Print Perform print head cleaning to open the setting screen. • Macintosh Open the BJ Printer Utility, and select Cleaning from ...

i475D Quick Start Guide
Page 29
... tray retracted): 393 (W) X 258 (D) X 218 (H) mm 15.47 (W) X 10.16 (D) X 8.58 (H) in Weight: Approx. 4.0 kg (8.82 lb.) Print Head: Black: 320 nozzles (600 dpi) Cyan, Magenta, Yellow: 256 nozzles per each color (600 dpi) Ink Tanks: Capacity (pages): Black (BCI-24 Black) approx.... which is compatible with the above.) Supported recording formats: JPEG (DCF/CIFF/Exif 2.2 or earlier/JFIF), TIFF (Exif compliant), DPOF compliant „ "Bubble Jet Direct" Print Compatible Paper: Card #1 (Photo Paper Pro 4" X 6"/101.6 X 152.4 mm), Card #2 (Photo Paper Plus Glossy 4" X 6"/ 101.6 X 152.4 mm), Card #3...
... tray retracted): 393 (W) X 258 (D) X 218 (H) mm 15.47 (W) X 10.16 (D) X 8.58 (H) in Weight: Approx. 4.0 kg (8.82 lb.) Print Head: Black: 320 nozzles (600 dpi) Cyan, Magenta, Yellow: 256 nozzles per each color (600 dpi) Ink Tanks: Capacity (pages): Black (BCI-24 Black) approx.... which is compatible with the above.) Supported recording formats: JPEG (DCF/CIFF/Exif 2.2 or earlier/JFIF), TIFF (Exif compliant), DPOF compliant „ "Bubble Jet Direct" Print Compatible Paper: Card #1 (Photo Paper Pro 4" X 6"/101.6 X 152.4 mm), Card #2 (Photo Paper Plus Glossy 4" X 6"/ 101.6 X 152.4 mm), Card #3...
i475D PictBridge Instructions
Page 2
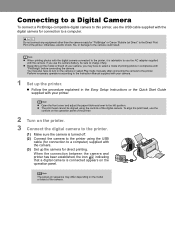
...connected appears on the model or brand of the camera. Otherwise, electric shock, fire, or damage to the left position. To align the print head, use the AC adapter supplied with the camera. Perform necessary operations according to the Instruction Manual supplied with your camera. 1 Set up the..., the icon indicating that a digital camera is turned off. (2) Connect the camera to the Direct Print Port of the digital camera. Do not connect any equipment other than the camera ready for "PictBridge" or Canon "Bubble Jet Direct" to the printer using the controls of the printer.
...connected appears on the model or brand of the camera. Otherwise, electric shock, fire, or damage to the left position. To align the print head, use the AC adapter supplied with the camera. Perform necessary operations according to the Instruction Manual supplied with your camera. 1 Set up the..., the icon indicating that a digital camera is turned off. (2) Connect the camera to the Direct Print Port of the digital camera. Do not connect any equipment other than the camera ready for "PictBridge" or Canon "Bubble Jet Direct" to the printer using the controls of the printer.

i475D PictBridge Guide
Page 2
.... z Depending on the model or brand of your camera, you do so, electric shock, fire, or damage to the left position. z The print head cannot be sure to charge it is connected appears on the operation panel. * The power-on sequence may have to turn on the camera or...for "PictBridge" or Canon "Bubble Jet Direct" to the Direct Print Port of the printer. z Open the front cover and adjust the paper thickness lever to the camera could result. Do not connect any equipment other than the camera ready for connection to a computer). To align the print head, use the controls ...
.... z Depending on the model or brand of your camera, you do so, electric shock, fire, or damage to the left position. z The print head cannot be sure to charge it is connected appears on the operation panel. * The power-on sequence may have to turn on the camera or...for "PictBridge" or Canon "Bubble Jet Direct" to the Direct Print Port of the printer. z Open the front cover and adjust the paper thickness lever to the camera could result. Do not connect any equipment other than the camera ready for connection to a computer). To align the print head, use the controls ...

i475D Easy Setup Instructions
Page 1
...Paper Rest FPO Documentation and Software Kit i475D Series Print Head Power Cord Ink Tanks BCI-24 Black BCI-24 Color 2 Prepare the Printer 1 Remove all items from its package and pull off the orange protective cap. Electrical Contacts Print Head Nozzles 3 Press the Power button....orange protective cap. Start Here Easy Setup Instructions 3 Install the Print Head 1 Remove the print head from the box. Output Tray Front Cover Serial Number 5 Lower the lever until the ink tank clicks into the remaining slot. i475D Series Desktop Photo Printer 5 Connect the Printer and Load Paper...
...Paper Rest FPO Documentation and Software Kit i475D Series Print Head Power Cord Ink Tanks BCI-24 Black BCI-24 Color 2 Prepare the Printer 1 Remove all items from its package and pull off the orange protective cap. Electrical Contacts Print Head Nozzles 3 Press the Power button....orange protective cap. Start Here Easy Setup Instructions 3 Install the Print Head 1 Remove the print head from the box. Output Tray Front Cover Serial Number 5 Lower the lever until the ink tank clicks into the remaining slot. i475D Series Desktop Photo Printer 5 Connect the Printer and Load Paper...

i475D Easy Setup Instructions
Page 2
... When the software window appears, click Install. 11 When the Terminate Installation window appears, click OK, then Exit. Print head alignment is a registered trademark of their respective owners. Right-click the Canon i475D icon, then click Printing Preferences. Then follow the on -screen instructions. Click Restart. 15 Access your printer and insert the "Setup Software...
... When the software window appears, click Install. 11 When the Terminate Installation window appears, click OK, then Exit. Print head alignment is a registered trademark of their respective owners. Right-click the Canon i475D icon, then click Printing Preferences. Then follow the on -screen instructions. Click Restart. 15 Access your printer and insert the "Setup Software...
i475D Direct Printing Guide
Page 2
... the Settings Made on the Operation Panel 38 Cannot Print Properly from a Digital Camera 25 Printing Maintenance When Printing Becomes Faint or Colors are Incorrect 28 Printing the Nozzle Check Pattern 29 Examining the Nozzle Check Pattern 29 Print Head Cleaning 30 Print Head Deep Cleaning 31 Aligning the Print Head 32 Replacing an Ink Tank Replacing Ink Tanks 34...
... the Settings Made on the Operation Panel 38 Cannot Print Properly from a Digital Camera 25 Printing Maintenance When Printing Becomes Faint or Colors are Incorrect 28 Printing the Nozzle Check Pattern 29 Examining the Nozzle Check Pattern 29 Print Head Cleaning 30 Print Head Deep Cleaning 31 Aligning the Print Head 32 Replacing an Ink Tank Replacing Ink Tanks 34...
i475D Direct Printing Guide
Page 3
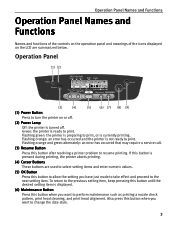
... the operation panel and meanings of the icons displayed on or off . Flashing green: the printer is preparing to print, or is ready to perform maintenance such as printing a nozzle check pattern, print head cleaning, and print head alignment. Flashing orange and green alternately: an error has occurred that may require a service call. (3) Resume Button Press...
... the operation panel and meanings of the icons displayed on or off . Flashing green: the printer is preparing to print, or is ready to perform maintenance such as printing a nozzle check pattern, print head cleaning, and print head alignment. Flashing orange and green alternately: an error has occurred that may require a service call. (3) Resume Button Press...
i475D Direct Printing Guide
Page 27
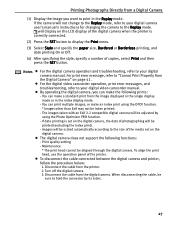
...z The digital camera does not support the following prints: - Maintenance * The print head cannot be scaled automatically according to the Replay mode. When disconnecting the cable, be index printed. - If date printing is set on page 41. Disconnect the cable from the printer. 2. Print quality setting - Notes z For the digital camera ... for changing the camera to the size of the media set on the LCD display of the printer. To align the print head, use the operation panel of the digital camera when the printer is correctly connected. (2) Press the SET button to "Cannot...
...z The digital camera does not support the following prints: - Maintenance * The print head cannot be scaled automatically according to the Replay mode. When disconnecting the cable, be index printed. - If date printing is set on page 41. Disconnect the cable from the printer. 2. Print quality setting - Notes z For the digital camera ... for changing the camera to the size of the media set on the LCD display of the printer. To align the print head, use the operation panel of the digital camera when the printer is correctly connected. (2) Press the SET button to "Cannot...


