

i455 Quick Start Guide
Page 4
... STAR® guidelines for Borderless Printing (4" x 6"/20 sheets) Photo Paper Pro (8.5" x 11"/15 sheets) Transparencies (8.5" x 11"/50 sheets) 7074A005 1033A011 7981A004 7980A007 7980A006 5699A005 1029A014 1029A004 1043A004 Call 1-800-OK-CANON to locate a dealer near you, or visit the Canon eStore at www.estore.usa.canon.com. ©2003 Canon U.S.A., Inc. Ordering Information For additional...
... STAR® guidelines for Borderless Printing (4" x 6"/20 sheets) Photo Paper Pro (8.5" x 11"/15 sheets) Transparencies (8.5" x 11"/50 sheets) 7074A005 1033A011 7981A004 7980A007 7980A006 5699A005 1029A014 1029A004 1043A004 Call 1-800-OK-CANON to locate a dealer near you, or visit the Canon eStore at www.estore.usa.canon.com. ©2003 Canon U.S.A., Inc. Ordering Information For additional...

i455 Quick Start Guide
Page 5
... the Bundle Software 23 Printing Borderless Photographs with Windows 24 Printing Borderless Photographs with Macintosh 26 Printing Maintenance When Printing Becomes Faint or Colors are Incorrect 29 Printing the Nozzle Check Pattern 30 Print Head Cleaning 33 Print Head Deep Cleaning 35 Aligning the Print Head 37 Replacing an ...Printer Hardware 50 Paper Does Not Feed Properly 51 Handling Error Messages 52 An Error Message Appears on the Screen 53 Cannot Print Properly from the Digital Camera 55 Appendix Installing the Printer Driver when using Mac OS 9.x 57 User's Guide Table of ...
... the Bundle Software 23 Printing Borderless Photographs with Windows 24 Printing Borderless Photographs with Macintosh 26 Printing Maintenance When Printing Becomes Faint or Colors are Incorrect 29 Printing the Nozzle Check Pattern 30 Print Head Cleaning 33 Print Head Deep Cleaning 35 Aligning the Print Head 37 Replacing an ...Printer Hardware 50 Paper Does Not Feed Properly 51 Handling Error Messages 52 An Error Message Appears on the Screen 53 Cannot Print Properly from the Digital Camera 55 Appendix Installing the Printer Driver when using Mac OS 9.x 57 User's Guide Table of ...

i455 Quick Start Guide
Page 6
... while the printer warms up and changes to know more information, view the i455 User's Guide on the Printer 1 Press the POWER button. Basic Printing Basic Printing Note This Quick Start Guide describes some of the features of your i455 printer and how to use the online help within your printer driver interface: While...
... while the printer warms up and changes to know more information, view the i455 User's Guide on the Printer 1 Press the POWER button. Basic Printing Basic Printing Note This Quick Start Guide describes some of the features of your i455 printer and how to use the online help within your printer driver interface: While...
i455 Quick Start Guide
Page 7
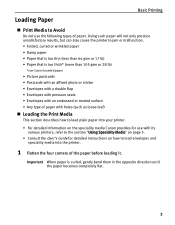
...8226; Envelopes with an embossed or treated surface • Any type of paper with holes (such as loose-leaf) „ Loading the Print Media This section describes how to load plain paper into the printer. 1 Flatten the four corners of paper. Using such paper will not ...in the opposite direction until the paper becomes completely flat. 3 Loading Paper Basic Printing „ Print Media to load envelopes and speciality media into your printer. • For detailed information on the speciality media Canon provides for use with its various printers, refer to the section "Using Speciality ...
...8226; Envelopes with an embossed or treated surface • Any type of paper with holes (such as loose-leaf) „ Loading the Print Media This section describes how to load plain paper into the printer. 1 Flatten the four corners of paper. Using such paper will not ...in the opposite direction until the paper becomes completely flat. 3 Loading Paper Basic Printing „ Print Media to load envelopes and speciality media into your printer. • For detailed information on the speciality media Canon provides for use with its various printers, refer to the section "Using Speciality ...

i455 Quick Start Guide
Page 8
... Limit Mark. (3) Pinch the paper guide and slide it against the right side of paper. For specific drying times, refer to the instructions packaged with print side facing up. (2) Align the paper stack against the left position for the media in use. Note Do not touch the... printed surface until the ink dries. Basic Printing 2 Prepare to load paper. (1) Attach the paper rest. (2) Open the cover and pull out the paper output tray. (3) Open the front cover and adjust...
... Limit Mark. (3) Pinch the paper guide and slide it against the right side of paper. For specific drying times, refer to the instructions packaged with print side facing up. (2) Align the paper stack against the left position for the media in use. Note Do not touch the... printed surface until the ink dries. Basic Printing 2 Prepare to load paper. (1) Attach the paper rest. (2) Open the cover and pull out the paper output tray. (3) Open the front cover and adjust...

i455 Quick Start Guide
Page 9
Basic Printing Using Speciality Media Canon recommends that you use genuine Canon media to ensure optimal print quality. „ Photo Quality Media • Photo Paper Pro • Photo Paper Plus Glossy • Matte Photo Paper • Glossy Photo Paper • High Resolution Paper „ Media Suited to Business Documents • High Resolution Paper • Transparencies 5
Basic Printing Using Speciality Media Canon recommends that you use genuine Canon media to ensure optimal print quality. „ Photo Quality Media • Photo Paper Pro • Photo Paper Plus Glossy • Matte Photo Paper • Glossy Photo Paper • High Resolution Paper „ Media Suited to Business Documents • High Resolution Paper • Transparencies 5

i455 Quick Start Guide
Page 10
Basic Printing „ Canon Speciality Media Media Name Photo Paper Pro Photo Paper Pro Perforated Photo Paper Plus Glossy Paper Rest Load Limit Paper Thickness Lever Position Letter: up ... Left Transparency Note z When using plain paper, up to select if you use the applications included on how to print from the software applications, refer to the left and select Plain Paper from sticking together. ** Print settings are much easier to 100 sheets can be fed normally, load the necessary number of...
Basic Printing „ Canon Speciality Media Media Name Photo Paper Pro Photo Paper Pro Perforated Photo Paper Plus Glossy Paper Rest Load Limit Paper Thickness Lever Position Letter: up ... Left Transparency Note z When using plain paper, up to select if you use the applications included on how to print from the software applications, refer to the left and select Plain Paper from sticking together. ** Print settings are much easier to 100 sheets can be fed normally, load the necessary number of...

i455 Quick Start Guide
Page 11
Note In Windows 2000, click the Main tab in the Print dialog box. 7 z The steps described in this section are using. Basic Printing Printing with Windows Note z The menu screens and dialog boxes that appear may vary, depending on the software application you are for printing in Windows XP. 1 Create a document or open a file to print. 2 Open Printer Properties dialog box. (1) Select Print from the application software's File menu. (2) Ensure that Canon i455 is selected. (3) Click Preferences or Properties.
Note In Windows 2000, click the Main tab in the Print dialog box. 7 z The steps described in this section are using. Basic Printing Printing with Windows Note z The menu screens and dialog boxes that appear may vary, depending on the software application you are for printing in Windows XP. 1 Create a document or open a file to print. 2 Open Printer Properties dialog box. (1) Select Print from the application software's File menu. (2) Ensure that Canon i455 is selected. (3) Click Preferences or Properties.
i455 Quick Start Guide
Page 12
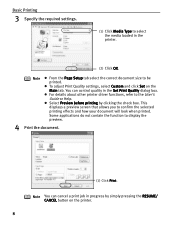
...a preview screen that allows you to the User's Guide or Help. Some applications do not contain the function to be printed. z Select Preview before printing by simply pressing the RESUME/ CANCEL button on the Main tab. Note You can control quality in the printer. (2) ... From the Page Setup tab select the correct document size to display the preview. 4 Print the document. (1) Click Print. z To adjust Print Quality settings, select Custom and click Set on the printer. 8 Basic Printing 3 Specify the required settings. (1) Click Media Type to select the media loaded in the...
...a preview screen that allows you to the User's Guide or Help. Some applications do not contain the function to be printed. z Select Preview before printing by simply pressing the RESUME/ CANCEL button on the Main tab. Note You can control quality in the printer. (2) ... From the Page Setup tab select the correct document size to display the preview. 4 Print the document. (1) Click Print. z To adjust Print Quality settings, select Custom and click Set on the printer. 8 Basic Printing 3 Specify the required settings. (1) Click Media Type to select the media loaded in the...
i455 Quick Start Guide
Page 13
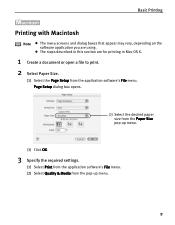
... menu screens and dialog boxes that appear may vary, depending on the software application you are for printing in this section are using. z The steps described in Mac OS X. 1 Create a document or open a file to print. 2 Select Paper Size. (1) Select the Page Setup from the pop-up menu. 9 Page Setup dialog ...box opens. (2) Select the desired paper size from the Paper Size pop-up menu. (3) Click OK. 3 Specify the required settings. (1) Select Print from the application software's File menu. (2) Select Quality & Media from the application software's File menu.
... menu screens and dialog boxes that appear may vary, depending on the software application you are for printing in this section are using. z The steps described in Mac OS X. 1 Create a document or open a file to print. 2 Select Paper Size. (1) Select the Page Setup from the pop-up menu. 9 Page Setup dialog ...box opens. (2) Select the desired paper size from the Paper Size pop-up menu. (3) Click OK. 3 Specify the required settings. (1) Select Print from the application software's File menu. (2) Select Quality & Media from the application software's File menu.

i455 Quick Start Guide
Page 14
... and graphics (illustrations) with strong color definition. Note z When you have selected. Printing a top-quality photo: Select when printing documents consisting mainly of Media Type you select the print mode appropriate to your document from the Print Mode, the document will be printed in progress by simply pressing the RESUME/CANCEL button on the printer...
... and graphics (illustrations) with strong color definition. Note z When you have selected. Printing a top-quality photo: Select when printing documents consisting mainly of Media Type you select the print mode appropriate to your document from the Print Mode, the document will be printed in progress by simply pressing the RESUME/CANCEL button on the printer...
i455 Quick Start Guide
Page 15
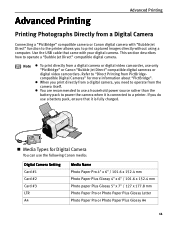
...Paper Pro or Photo Paper Plus Glossy A4 11 Advanced Printing Advanced Printing Printing Photographs Directly from a Digital Camera Connecting a "PictBridge" compatible camera or Canon digital camera with your digital camera. Refer to "Direct Printing from PictBridgecompatible Digital Cameras" for Digital Camera You can...the camera when it is connected to use only "PictBridge" or Canon "Bubble Jet Direct" compatible digital cameras or digital video camcorders. Note z To print directly from a digital camera, you print directly from a digital camera or digital video camcorder, use a ...
...Paper Pro or Photo Paper Plus Glossy A4 11 Advanced Printing Advanced Printing Printing Photographs Directly from a Digital Camera Connecting a "PictBridge" compatible camera or Canon digital camera with your digital camera. Refer to "Direct Printing from PictBridgecompatible Digital Cameras" for Digital Camera You can...the camera when it is connected to use only "PictBridge" or Canon "Bubble Jet Direct" compatible digital cameras or digital video camcorders. Note z To print directly from a digital camera, you print directly from a digital camera or digital video camcorder, use a ...
i455 Quick Start Guide
Page 16
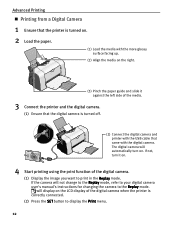
...camera when the printer is turned on. 2 Load the paper. (1) Load the media with the digital camera. will display on . 4 Start printing using the print function of the media. 3 Connect the printer and the digital camera. (1) Ensure that the digital camera is turned off. (2) Connect the ...digital camera and printer with the USB cable that the printer is correctly connected. (2) Press the SET button to display the Print menu. 12 Advanced Printing „ Printing from a Digital Camera 1 Ensure that came with the more glossy surface facing up. (2) Align the media on . If the ...
...camera when the printer is turned on. 2 Load the paper. (1) Load the media with the digital camera. will display on . 4 Start printing using the print function of the media. 3 Connect the printer and the digital camera. (1) Ensure that the digital camera is turned off. (2) Connect the ...digital camera and printer with the USB cable that the printer is correctly connected. (2) Press the SET button to display the Print menu. 12 Advanced Printing „ Printing from a Digital Camera 1 Ensure that came with the more glossy surface facing up. (2) Align the media on . If the ...
i455 Quick Start Guide
Page 17
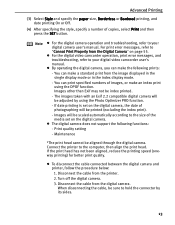
.... - Images other than Exif may not be aligned through the digital camera. z The digital camera does not support the following prints: - Print quality setting - Connect the printer to your digital camera user's manual. z To disconnect the cable connected between the digital camera and...55. z By operating the digital camera, you can make the following functions: - If the print head has not been aligned, reduce the printing speed (oneway printing) for better print quality. Images will be scaled automatically according to hold the connector by using the DPOF function. ...
.... - Images other than Exif may not be aligned through the digital camera. z The digital camera does not support the following prints: - Print quality setting - Connect the printer to your digital camera user's manual. z To disconnect the cable connected between the digital camera and...55. z By operating the digital camera, you can make the following functions: - If the print head has not been aligned, reduce the printing speed (oneway printing) for better print quality. Images will be scaled automatically according to hold the connector by using the DPOF function. ...
i455 Quick Start Guide
Page 18
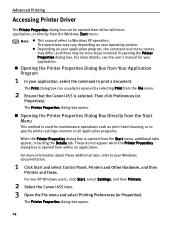
... the Printer Properties dialog box. For non-XP Windows users, click Start, select Settings, and then Printers. 2 Select the Canon i455 icon. 3 Open the File menu and select Printing Preferences (or Properties). The Print dialog box can be opened from either within an application. Note z This manual refers to all application programs. When the...
... the Printer Properties dialog box. For non-XP Windows users, click Start, select Settings, and then Printers. 2 Select the Canon i455 icon. 3 Open the File menu and select Printing Preferences (or Properties). The Print dialog box can be opened from either within an application. Note z This manual refers to all application programs. When the...
i455 Quick Start Guide
Page 19
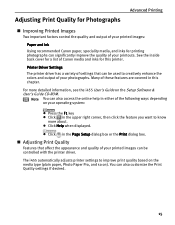
... CD-ROM. The i455 automatically adjusts printer settings to improve print quality based on the media type (plain paper, Photo Paper Pro, and so on). Advanced Printing Adjusting Print Quality for Photographs „ Improving Printed Images Two important factors control the quality and output of your printed images: Paper and Ink Using recommended Canon paper, speciality media...
... CD-ROM. The i455 automatically adjusts printer settings to improve print quality based on the media type (plain paper, Photo Paper Pro, and so on). Advanced Printing Adjusting Print Quality for Photographs „ Improving Printed Images Two important factors control the quality and output of your printed images: Paper and Ink Using recommended Canon paper, speciality media...
i455 Quick Start Guide
Page 20
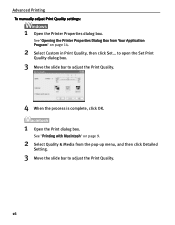
See "Printing with Macintosh" on page 9. 2 Select Quality & Media from Your Application Program" on page 14. 2 Select Custom in Print Quality, then click Set... to open the Set Print Quality dialog box. 3 Move the slide bar to adjust the Print Quality. 16 See"Opening the Printer Properties Dialog Box from the pop-up menu, and then click Detailed Setting. 3 Move the slide bar to adjust the Print Quality. 4 When the process is complete, click OK. 1 Open the Print dialog box. Advanced Printing To manually adjust Print Quality settings: 1 Open the Printer Properties dialog box.
See "Printing with Macintosh" on page 9. 2 Select Quality & Media from Your Application Program" on page 14. 2 Select Custom in Print Quality, then click Set... to open the Set Print Quality dialog box. 3 Move the slide bar to adjust the Print Quality. 16 See"Opening the Printer Properties Dialog Box from the pop-up menu, and then click Detailed Setting. 3 Move the slide bar to adjust the Print Quality. 4 When the process is complete, click OK. 1 Open the Print dialog box. Advanced Printing To manually adjust Print Quality settings: 1 Open the Printer Properties dialog box.

i455 Quick Start Guide
Page 21
To automatically optimize the image: Photo Optimizer PRO automatically adjusts the photographic image created with a digital camera. See"Opening the Printer Properties Dialog Box from Your Application Program" on page 14. 2 Click the Effects tab. 3 Select the Photo Optimizer PRO check box. 4 Click OK. 17 or underexposure before printing. 1 Open the Printer Properties dialog box. Advanced Printing 4 When the process is complete, click OK. Use this feature to compensate for unsatisfactory color balance and over-
To automatically optimize the image: Photo Optimizer PRO automatically adjusts the photographic image created with a digital camera. See"Opening the Printer Properties Dialog Box from Your Application Program" on page 14. 2 Click the Effects tab. 3 Select the Photo Optimizer PRO check box. 4 Click OK. 17 or underexposure before printing. 1 Open the Printer Properties dialog box. Advanced Printing 4 When the process is complete, click OK. Use this feature to compensate for unsatisfactory color balance and over-

i455 Quick Start Guide
Page 22
To use Vivid Photo option: Vivid Photo intensifies landscape like fields, trees, oceans and skies, while maintaining natural skin tones in the images. Advanced Printing To use Vivid Photo, select the Vivid Photo check box under Special Effects. 18 To use Vivid Photo, select the Vivid Photo check box on the Effects tab. Note In Windows Me or Windows 98 If Background Printing has been disabled, the Vivid Photo function is not available.
To use Vivid Photo option: Vivid Photo intensifies landscape like fields, trees, oceans and skies, while maintaining natural skin tones in the images. Advanced Printing To use Vivid Photo, select the Vivid Photo check box under Special Effects. 18 To use Vivid Photo, select the Vivid Photo check box on the Effects tab. Note In Windows Me or Windows 98 If Background Printing has been disabled, the Vivid Photo function is not available.

i455 Quick Start Guide
Page 23
Advanced Printing To reduce noise from images captured with a digital camera: Photo Noise Reduction function reduces noise from blue portions, such as the sky and dark portions of the images captured with your digital camera. To use Photo Noise Reduction, select the Photo Noise Reduction check box under Special Effects. 19 To use Photo Noise Reduction, select the Photo Noise Reduction check box on the Effects tab. Note In Windows Me or Windows 98 If Background Printing has been disabled, the Photo Noise Reduction function is not available.
Advanced Printing To reduce noise from images captured with a digital camera: Photo Noise Reduction function reduces noise from blue portions, such as the sky and dark portions of the images captured with your digital camera. To use Photo Noise Reduction, select the Photo Noise Reduction check box under Special Effects. 19 To use Photo Noise Reduction, select the Photo Noise Reduction check box on the Effects tab. Note In Windows Me or Windows 98 If Background Printing has been disabled, the Photo Noise Reduction function is not available.


