i350 Quick Start Guide
Page 1
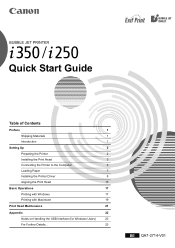
BUBBLE JET PRINTER Quick Start Guide Table of Contents Preface 1 Shipping Materials 1 Introduction 1 Setting Up 2 Preparing the Printer 2 Installing the Print Head 3 Connecting the Printer to the Computer 6 Loading Paper 7 Installing the Printer Driver 8 Aligning the Print Head 13 Basic Operations 17 Printing with Windows 17 Printing with Macintosh 19 Print Head Maintenance 21 Appendix 22 Notes on Handling the USB Interface (for Windows Users) 23 For Further Details... 23 BE QA7-2714-V01
BUBBLE JET PRINTER Quick Start Guide Table of Contents Preface 1 Shipping Materials 1 Introduction 1 Setting Up 2 Preparing the Printer 2 Installing the Print Head 3 Connecting the Printer to the Computer 6 Loading Paper 7 Installing the Printer Driver 8 Aligning the Print Head 13 Basic Operations 17 Printing with Windows 17 Printing with Macintosh 19 Print Head Maintenance 21 Appendix 22 Notes on Handling the USB Interface (for Windows Users) 23 For Further Details... 23 BE QA7-2714-V01
i350 Quick Start Guide
Page 2
... used and optimized, yielding extremely high quality prints. Their standards and logos are as computers, monitors, printers, faxes and copiers. International ENERGY STAR® Program As an ENERGY STAR® Partner, Canon Inc. Cet appareil numérique respecte les limites de bruits radio...products are office equipment such as follows: AC 100-127V, 50/60Hz AC 220-240V, 50/60Hz Printer Model: K10228 (i350/i250) The program backs the development and dissemination of the Industry Canada. Canadian Radio Interference Regulations This digital apparatus does not exceed the ...
... used and optimized, yielding extremely high quality prints. Their standards and logos are as computers, monitors, printers, faxes and copiers. International ENERGY STAR® Program As an ENERGY STAR® Partner, Canon Inc. Cet appareil numérique respecte les limites de bruits radio...products are office equipment such as follows: AC 100-127V, 50/60Hz AC 220-240V, 50/60Hz Printer Model: K10228 (i350/i250) The program backs the development and dissemination of the Industry Canada. Canadian Radio Interference Regulations This digital apparatus does not exceed the ...
i350 Quick Start Guide
Page 3
...are exactly the same with the i250. Always observe the instructions indicated by incorrect operation of Microsoft Corporation in the box. Introduction This Quick Start Guide uses the following items are in the U.S. These must be observed for purchasing a Canon Bubble Jet Printer. These must.... Check that , if ignored, could result in this guide refer to your Canon Authorized Dealer or Sales Representative. ‰ Printer ‰ Setup Software & User's Guide CD-ROM ‰ Quick Start Guide ‰ Print Head ‰ 2 Ink Tanks * A USB cable should be transmitted or copied...
...are exactly the same with the i250. Always observe the instructions indicated by incorrect operation of Microsoft Corporation in the box. Introduction This Quick Start Guide uses the following items are in the U.S. These must be observed for purchasing a Canon Bubble Jet Printer. These must.... Check that , if ignored, could result in this guide refer to your Canon Authorized Dealer or Sales Representative. ‰ Printer ‰ Setup Software & User's Guide CD-ROM ‰ Quick Start Guide ‰ Print Head ‰ 2 Ink Tanks * A USB cable should be transmitted or copied...
i350 Quick Start Guide
Page 5
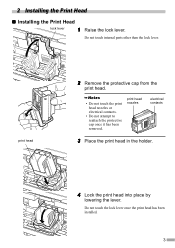
Do not touch the lock lever once the print head has been installed. 3 Do not touch internal parts other than the lock lever. print head nozzles electrical contacts 3 Place the print head in the holder. 4 Lock the print head into place by lowering the lever. print head 2 Remove the protective cap from the print head. • Do not touch the print head nozzles or electrical contacts. • Do not attempt to reattach the protective cap once it has been removed. 2 Installing the Print Head „ Installing the Print Head lock lever 1 Raise the lock lever.
Do not touch the lock lever once the print head has been installed. 3 Do not touch internal parts other than the lock lever. print head nozzles electrical contacts 3 Place the print head in the holder. 4 Lock the print head into place by lowering the lever. print head 2 Remove the protective cap from the print head. • Do not touch the print head nozzles or electrical contacts. • Do not attempt to reattach the protective cap once it has been removed. 2 Installing the Print Head „ Installing the Print Head lock lever 1 Raise the lock lever.

i350 Quick Start Guide
Page 7
If an ink tank is installed improperly, the warning message appears when you try to reinstall ink tanks. 5 Follow the above instructions in Steps 3 to 6 to print.
If an ink tank is installed improperly, the warning message appears when you try to reinstall ink tanks. 5 Follow the above instructions in Steps 3 to 6 to print.
i350 Quick Start Guide
Page 9
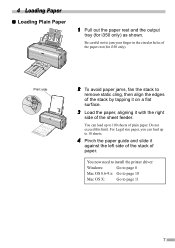
Print side 2 To avoid paper jams, fan the stack to remove static cling, then align the edges of the stack by tapping it on a flat surface. 3 ...
Print side 2 To avoid paper jams, fan the stack to remove static cling, then align the edges of the stack by tapping it on a flat surface. 3 ...
i350 Quick Start Guide
Page 11
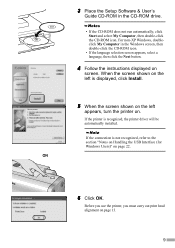
.... 5 When the screen shown on the left is recognized, the printer driver will be automatically installed. Before you use the printer, you must carry out print head alignment on screen. For non-XP Windows, doubleclick My Computer in the CD-ROM drive. • If the CD-ROM does not run automatically...
.... 5 When the screen shown on the left is recognized, the printer driver will be automatically installed. Before you use the printer, you must carry out print head alignment on screen. For non-XP Windows, doubleclick My Computer in the CD-ROM drive. • If the CD-ROM does not run automatically...
i350 Quick Start Guide
Page 12
... application folder, then double-click the Easy-PhotoPrint folder and then Installer. When the message "Software installation is completed." If you want to import and print image data.
... application folder, then double-click the Easy-PhotoPrint folder and then Installer. When the message "Software installation is completed." If you want to import and print image data.
i350 Quick Start Guide
Page 13
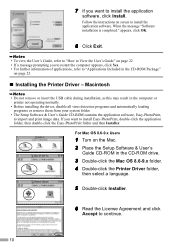
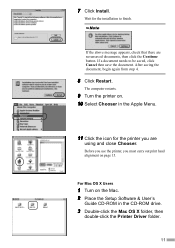
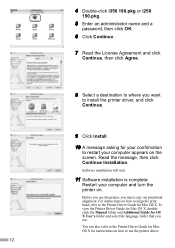
... CD-ROM drive. 3 Double-click the Mac OS X folder, then double-click the Printer Driver folder. 11 Wait for the printer you must carry out print head alignment on the Mac. 2 Place the Setup Software & User's Guide CD-ROM in the Apple Menu. 11 Click the icon for the installation to...
... CD-ROM drive. 3 Double-click the Mac OS X folder, then double-click the Printer Driver folder. 11 Wait for the printer you must carry out print head alignment on the Mac. 2 Place the Setup Software & User's Guide CD-ROM in the Apple Menu. 11 Click the icon for the installation to...
i350 Quick Start Guide
Page 14
4 Double-click i350 190.pkg or i250 190.pkg. 5 Enter an administrator name and a password, then click OK. 6 Click Continue. 7 Read the License Agreement and click Continue, then click Agree. 8 Select a destination ... is complete. Read the message, then click Continue Installation. Before you use the printer driver. 12 Restart your computer appears on how to align the print head, refer to use the printer, you must carry out...
4 Double-click i350 190.pkg or i250 190.pkg. 5 Enter an administrator name and a password, then click OK. 6 Click Continue. 7 Read the License Agreement and click Continue, then click Agree. 8 Select a destination ... is complete. Read the message, then click Continue Installation. Before you use the printer driver. 12 Restart your computer appears on how to align the print head, refer to use the printer, you must carry out...
i350 Quick Start Guide
Page 15
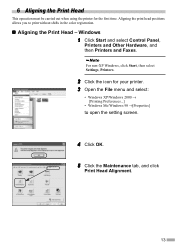
... the first time. Windows 1 Click Start and select Control Panel, Printers and Other Hardware, and then Printers and Faxes. 6 Aligning the Print Head This operation must be carried out when using the printer for your printer. 3 Open the File menu and select: • Windows XP.../Windows 2000 → [Printing Preferences...] • Windows Me/Windows 98 →[Properties] to print without shifts in the color registration. „ Aligning the Print Head - Aligning the print head positions allows you to open the setting screen. 4 Click OK. 5 ...
... the first time. Windows 1 Click Start and select Control Panel, Printers and Other Hardware, and then Printers and Faxes. 6 Aligning the Print Head This operation must be carried out when using the printer for your printer. 3 Open the File menu and select: • Windows XP.../Windows 2000 → [Printing Preferences...] • Windows Me/Windows 98 →[Properties] to print without shifts in the color registration. „ Aligning the Print Head - Aligning the print head positions allows you to open the setting screen. 4 Click OK. 5 ...
i350 Quick Start Guide
Page 16
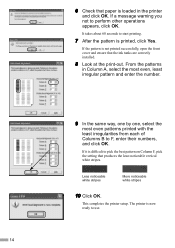
... least irregular pattern and enter the number. 9 In the same way, one by one, select the most even patterns printed with the least irregularities from each of Columns B to start printing. 7 After the pattern is now ready to pick the best pattern on Column F, pick the setting that produces the ...least noticeable vertical white stripes. This completes the printer setup. The printer is printed, click Yes. From the patterns in the printer and click OK. It takes about 60 seconds to F, enter their numbers, and click OK. ...
... least irregular pattern and enter the number. 9 In the same way, one by one, select the most even patterns printed with the least irregularities from each of Columns B to start printing. 7 After the pattern is now ready to pick the best pattern on Column F, pick the setting that produces the ...least noticeable vertical white stripes. This completes the printer setup. The printer is printed, click Yes. From the patterns in the printer and click OK. It takes about 60 seconds to F, enter their numbers, and click OK. ...
i350 Quick Start Guide
Page 17
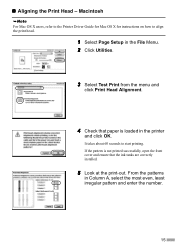
... in the File Menu. 2 Click Utilities. 3 Select Test Print from the menu and click Print Head Alignment. 4 Check that paper is not printed successfully, open the front cover and ensure that the ink tanks are correctly installed. 5 Look at the print-out. From the patterns in the printer and click OK. ...„ Aligning the Print Head - If the pattern is loaded in Column A, select the most even, least irregular pattern and enter the number...
... in the File Menu. 2 Click Utilities. 3 Select Test Print from the menu and click Print Head Alignment. 4 Check that paper is not printed successfully, open the front cover and ensure that the ink tanks are correctly installed. 5 Look at the print-out. From the patterns in the printer and click OK. ...„ Aligning the Print Head - If the pattern is loaded in Column A, select the most even, least irregular pattern and enter the number...
i350 Quick Start Guide
Page 18
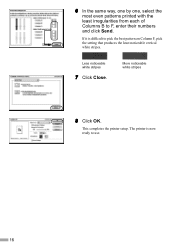
This completes the printer setup. 6 In the same way, one by one, select the most even patterns printed with the least irregularities from each of Columns B to use. 16 The printer is difficult to pick the best pattern on Column F, pick the setting that produces the least noticeable vertical white stripes. More noticeable white stripes 8 Click OK. If it is now ready to F, enter their numbers and click Send. Less noticeable white stripes 7 Click Close.
This completes the printer setup. 6 In the same way, one by one, select the most even patterns printed with the least irregularities from each of Columns B to use. 16 The printer is difficult to pick the best pattern on Column F, pick the setting that produces the least noticeable vertical white stripes. More noticeable white stripes 8 Click OK. If it is now ready to F, enter their numbers and click Send. Less noticeable white stripes 7 Click Close.
i350 Quick Start Guide
Page 19
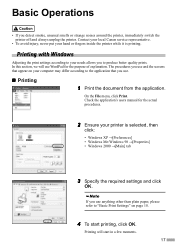
...Basic Operations • If you to produce better quality prints. If you use anything other than plain paper, please refer to "Basic Print Settings" on page 18. 4 To start in a few moments. 17 Printing with Windows Adjusting the print settings according to the application that appear on your hand ... 98 →[Properties] • Windows 2000 →[Main] tab 3 Specify the required settings and click OK. On the File menu, click Print. Contact your local Canon service representative. • To avoid injury, never put your computer may differ according to your printer is...
...Basic Operations • If you to produce better quality prints. If you use anything other than plain paper, please refer to "Basic Print Settings" on page 18. 4 To start in a few moments. 17 Printing with Windows Adjusting the print settings according to the application that appear on your hand ... 98 →[Properties] • Windows 2000 →[Main] tab 3 Specify the required settings and click OK. On the File menu, click Print. Contact your local Canon service representative. • To avoid injury, never put your computer may differ according to your printer is...
i350 Quick Start Guide
Page 20
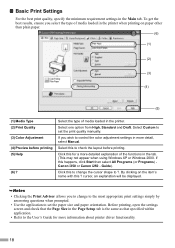
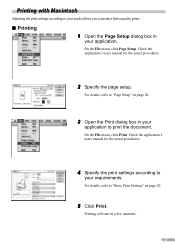
... the item's name with this happens, click Start then select All Programs (or Programs) Canon i350 or Canon i250 - Click this to check the layout before printing (5) Help (6) ? „ Basic Print Settings For the best print quality, specify the minimum requirement settings in the Page Setup tab is the same as that specified within application. •...
... the item's name with this happens, click Start then select All Programs (or Programs) Canon i350 or Canon i250 - Click this to check the layout before printing (5) Help (6) ? „ Basic Print Settings For the best print quality, specify the minimum requirement settings in the Page Setup tab is the same as that specified within application. •...
i350 Quick Start Guide
Page 21
... manual for the actual procedures. 2 Specify the page setup. Printing will start in a few moments. 19 Printing with Macintosh Adjusting the print settings according to your needs allows you to produce better quality prints. „ Printing 1 Open the Page Setup dialog box in your application to print the document. For details, refer to your requirements. On...
... manual for the actual procedures. 2 Specify the page setup. Printing will start in a few moments. 19 Printing with Macintosh Adjusting the print settings according to your needs allows you to produce better quality prints. „ Printing 1 Open the Page Setup dialog box in your application to print the document. For details, refer to your requirements. On...
i350 Quick Start Guide
Page 22
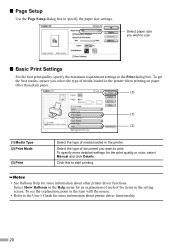
... the items in the Help menu for more information about other than plain paper. (3) (1) Media Type (2) Print Mode (3) Print (1) (2) Select the type of document you wish to the User's Guide for the print quality or color, select Manual and click Details. Select the type of media loaded in the...about printer driver functionality. 20 To see the explanation, point to the item with the mouse. • Refer to use. „ Basic Print Settings For the best print quality, specify the minimum requirement settings in the printer. „ Page Setup Use the Page Setup dialog box to...
... the items in the Help menu for more information about other than plain paper. (3) (1) Media Type (2) Print Mode (3) Print (1) (2) Select the type of document you wish to the User's Guide for the print quality or color, select Manual and click Details. Select the type of media loaded in the...about printer driver functionality. 20 To see the explanation, point to the item with the mouse. • Refer to use. „ Basic Print Settings For the best print quality, specify the minimum requirement settings in the printer. „ Page Setup Use the Page Setup dialog box to...
i350 Quick Start Guide
Page 23
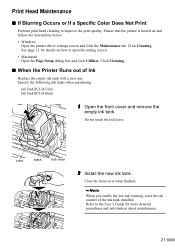
... 21 Ink Tank BCI-24 Color Ink Tank BCI-24 Black 1 Open the front cover and remove the empty ink tank. Refer to improve the print quality. When you enable the low ink warning, reset the ink counter of Ink Replace the empty ink tank with a new one. Click Cleaning. ... when finished. color black lock lever 2 Install the new ink tank. Do not touch the lock lever. Print Head Maintenance „ If Blurring Occurs or If a Specific Color Does Not Print Perform print head cleaning to the User's Guide for details on and follow the instructions below. • Windows Open the...
... 21 Ink Tank BCI-24 Color Ink Tank BCI-24 Black 1 Open the front cover and remove the empty ink tank. Refer to improve the print quality. When you enable the low ink warning, reset the ink counter of Ink Replace the empty ink tank with a new one. Click Cleaning. ... when finished. color black lock lever 2 Install the new ink tank. Do not touch the lock lever. Print Head Maintenance „ If Blurring Occurs or If a Specific Color Does Not Print Perform print head cleaning to the User's Guide for details on and follow the instructions below. • Windows Open the...
i350 Quick Start Guide
Page 24
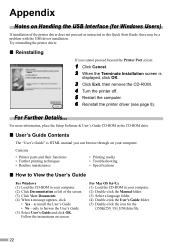
... - Appendix Notes on Handling the USB Interface (for the i350&i250_UG_ENG.htm file. 22 Contents • Printer parts and their functions • Further printing techniques • Routine maintenance • Printing media • Troubleshooting • Specifications „ How to browse the User's Guide (5) Select User's Guide and click OK. to install the User...
... - Appendix Notes on Handling the USB Interface (for the i350&i250_UG_ENG.htm file. 22 Contents • Printer parts and their functions • Further printing techniques • Routine maintenance • Printing media • Troubleshooting • Specifications „ How to browse the User's Guide (5) Select User's Guide and click OK. to install the User...


