
XL H1S / XL H1A Instruction Manual
Page 5
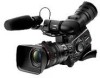
...800 TV lines, the highest in HDV standard. The camcorder offers 23 customizable parameters you want. Enhanced customization Custom functions ( 104) and custom display ( 110) options give it with two sets of Canon's video processing engine ensures optimal video quality and color ... IS III is equipped with the XL H1S / XL H1A. Advanced Professional Features Pro level connectivity An industry-standard HD/SD SDI terminal for video recordings compliant with a total of 1.67 mega pixels and 1,440x1,080 effective pixels), the camcorder offers a horizontal resolution of professional ...
...800 TV lines, the highest in HDV standard. The camcorder offers 23 customizable parameters you want. Enhanced customization Custom functions ( 104) and custom display ( 110) options give it with two sets of Canon's video processing engine ensures optimal video quality and color ... IS III is equipped with the XL H1S / XL H1A. Advanced Professional Features Pro level connectivity An industry-standard HD/SD SDI terminal for video recordings compliant with a total of 1.67 mega pixels and 1,440x1,080 effective pixels), the camcorder offers a horizontal resolution of professional ...

XL H1S / XL H1A Instruction Manual
Page 6
...refer to the model shown in the icon. Illustrations in this Manual : Precautions related to the camcorder's operation. : Additional topics that matches your time zone and press the SET button. About this Manual ... that applies only to buttons on the camcorder or the wireless controller. Brackets [ ] and capital letters are used in boldface indicate the default setting. The supplied lens, Canon HD Video Lens 20x Zoom XL 5.4-108 mm L IS III, is... time zone, date and time when you use the camcorder and retain it for purchasing the Canon XL H1S / XL H1A.
...refer to the model shown in the icon. Illustrations in this Manual : Precautions related to the camcorder's operation. : Additional topics that matches your time zone and press the SET button. About this Manual ... that applies only to buttons on the camcorder or the wireless controller. Brackets [ ] and capital letters are used in boldface indicate the default setting. The supplied lens, Canon HD Video Lens 20x Zoom XL 5.4-108 mm L IS III, is... time zone, date and time when you use the camcorder and retain it for purchasing the Canon XL H1S / XL H1A.

XL H1S / XL H1A Instruction Manual
Page 8
Contents Introduction The XL H1S / XL H1A - A Broad Range of Capabilities 5 About this Manual ...6 Checking the Supplied Accessories ...10 Components Guide ...11 Preparations Preparing the Power Supply ...17 Preparing the Camcorder ...21 Preparing the Lens ...27 Using the Wireless Controller ...30 Loading/Removing a Cassette ...31 ...the Focus...44 Using the ND Filter ...49 Selecting the Frame Rate ...50 Setting the Time Code ...52 Synchronizing the Camcorder's Time Code 54 Setting the User Bit ...56 Audio Recording...57 Image Stabilizer...61 Using the Programmed AE Modes...62 Recording...
Contents Introduction The XL H1S / XL H1A - A Broad Range of Capabilities 5 About this Manual ...6 Checking the Supplied Accessories ...10 Components Guide ...11 Preparations Preparing the Power Supply ...17 Preparing the Camcorder ...21 Preparing the Lens ...27 Using the Wireless Controller ...30 Loading/Removing a Cassette ...31 ...the Focus...44 Using the ND Filter ...49 Selecting the Frame Rate ...50 Setting the Time Code ...52 Synchronizing the Camcorder's Time Code 54 Setting the User Bit ...56 Audio Recording...57 Image Stabilizer...61 Using the Programmed AE Modes...62 Recording...

XL H1S / XL H1A Instruction Manual
Page 10
... Video Cable External Monitor Cable Adjustment Band (for the external Adapter Holder Unit microphone holder) Tripod Adapter Base SS-1100 Shoulder Strap Camcorder Dust Cap Canon HD Video Lens 20x Zoom XL 5.4-108 mm L IS III (incl. soft case) Lens Cap and Dust Cap Lens Hood The serial number of this book as... theft. Write down the number and other information here and retain this product can be found at the battery attachment unit of Purchase: Model Name: XL H1S A / XL H1A A Purchased From: Serial No.: Dealer Address Dealer Phone No.: 10 Date of the camcorder.
... Video Cable External Monitor Cable Adjustment Band (for the external Adapter Holder Unit microphone holder) Tripod Adapter Base SS-1100 Shoulder Strap Camcorder Dust Cap Canon HD Video Lens 20x Zoom XL 5.4-108 mm L IS III (incl. soft case) Lens Cap and Dust Cap Lens Hood The serial number of this book as... theft. Write down the number and other information here and retain this product can be found at the battery attachment unit of Purchase: Model Name: XL H1S A / XL H1A A Purchased From: Serial No.: Dealer Address Dealer Phone No.: 10 Date of the camcorder.

XL H1S / XL H1A Instruction Manual
Page 14
... (0.2 in.) as this may cause damage to the terminal. Operation cannot be guaranteed for connections with mounting screws longer than the buttons on the camcorder. 14 About the Terminal (LANC) stands for the optional TA-100 Tripod Adapter ( 155) or the supplied tripod adapter base Tripod socket Viewfinder cable ( 21... lamp ( 109) Remote sensor ( 30, 118) Grip belt ( 25) Attachment sockets for Local Application Control Bus System. Connect only devices with the mark to the camcorder.
... (0.2 in.) as this may cause damage to the terminal. Operation cannot be guaranteed for connections with mounting screws longer than the buttons on the camcorder. 14 About the Terminal (LANC) stands for the optional TA-100 Tripod Adapter ( 155) or the supplied tripod adapter base Tripod socket Viewfinder cable ( 21... lamp ( 109) Remote sensor ( 30, 118) Grip belt ( 25) Attachment sockets for Local Application Control Bus System. Connect only devices with the mark to the camcorder.

XL H1S / XL H1A Instruction Manual
Page 17
... clicks. 3. Unplug the power cord from the compact power adapter. Attaching the Battery Pack 1. RELEASE button pressed down, slide the battery pack down to the camcorder. The indicator will stay on when the charging is completed, remove the battery pack from the compact power adapter before charging. Align the battery pack...
... clicks. 3. Unplug the power cord from the compact power adapter. Attaching the Battery Pack 1. RELEASE button pressed down, slide the battery pack down to the camcorder. The indicator will stay on when the charging is completed, remove the battery pack from the compact power adapter before charging. Align the battery pack...
XL H1S / XL H1A Instruction Manual
Page 18
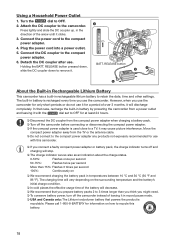
... times longer than 75%: Flashes 3 times per second More than you think you use . RELEASE button About the Built-in Rechargeable Lithium Battery This camcorder has a built-in record pause mode. USA and Canada only: The Lithium ion/polymer battery that case, recharge the built-in battery...leaving it with this battery. 18 Plug the power cord into a power outlet. 5. RELEASE button pressed down, slide the DC coupler down to the camcorder. Holding the BATT. Press lightly and slide the DC coupler up, in temperatures between 10 °C and 30 °C (50 °F and ...
... times longer than 75%: Flashes 3 times per second More than you think you use . RELEASE button About the Built-in Rechargeable Lithium Battery This camcorder has a built-in record pause mode. USA and Canada only: The Lithium ion/polymer battery that case, recharge the built-in battery...leaving it with this battery. 18 Plug the power cord into a power outlet. 5. RELEASE button pressed down, slide the DC coupler down to the camcorder. Holding the BATT. Press lightly and slide the DC coupler up, in temperatures between 10 °C and 30 °C (50 °F and ...

XL H1S / XL H1A Instruction Manual
Page 21
Detaching the Viewfinder Unit 1. Loosen the lock screw and slide the viewfinder unit off the bracket. 21 Preparations Preparing the Camcorder Attaching and Detaching the Color Viewfinder Unit Attaching the Color Viewfinder Unit 1. Detach the viewfinder cable. 2. Slide the viewfinder unit onto ...the bracket and tighten the lock screw. 2. Connect the viewfinder cable to the EVF2 socket on the camcorder. Hook the viewfinder cable onto the cable clamp. To use the optional FU-1000 Monochrome CRT Viewfinder Unit, connect it to the EVF1 socket...
Detaching the Viewfinder Unit 1. Loosen the lock screw and slide the viewfinder unit off the bracket. 21 Preparations Preparing the Camcorder Attaching and Detaching the Color Viewfinder Unit Attaching the Color Viewfinder Unit 1. Detach the viewfinder cable. 2. Slide the viewfinder unit onto ...the bracket and tighten the lock screw. 2. Connect the viewfinder cable to the EVF2 socket on the camcorder. Hook the viewfinder cable onto the cable clamp. To use the optional FU-1000 Monochrome CRT Viewfinder Unit, connect it to the EVF1 socket...

XL H1S / XL H1A Instruction Manual
Page 23
...tripod, or during its transportation. Do not let the viewfinder be changed (right/left and tighten the screw. When storing the camcorder in the optional HC-3200 System Case, adjust the viewfinder to direct sunlight or other strong light sources. Pay special attention when ...mounting the camcorder on the camcorder and adjust the dioptric adjustment lever. Preparations 23 Adjusting the Position of the light by the lens. Forward/Backward Adjustment Loosen...
...tripod, or during its transportation. Do not let the viewfinder be changed (right/left and tighten the screw. When storing the camcorder in the optional HC-3200 System Case, adjust the viewfinder to direct sunlight or other strong light sources. Pay special attention when ...mounting the camcorder on the camcorder and adjust the dioptric adjustment lever. Preparations 23 Adjusting the Position of the light by the lens. Forward/Backward Adjustment Loosen...

XL H1S / XL H1A Instruction Manual
Page 25
... microphone holder to close securely, attach first the supplied adjustment band to the microphone holder and then insert the microphone. Be careful not to the camcorder's FRONT MIC terminals. Loosen the microphone lock screw on the microphone holder and tighten the lock screw. 3. Fastening the Grip Belt Adjust the grip belt... the ends through the strap mount and adjust the length of the strap. Preparations Attaching the Microphone Unit 1. Plug the microphone cable to drop the camcorder when adjusting the strap or the grip belt. 25
... microphone holder to close securely, attach first the supplied adjustment band to the microphone holder and then insert the microphone. Be careful not to the camcorder's FRONT MIC terminals. Loosen the microphone lock screw on the microphone holder and tighten the lock screw. 3. Fastening the Grip Belt Adjust the grip belt... the ends through the strap mount and adjust the length of the strap. Preparations Attaching the Microphone Unit 1. Plug the microphone cable to drop the camcorder when adjusting the strap or the grip belt. 25

XL H1S / XL H1A Instruction Manual
Page 27
... lens mount and the interior of the mount, or expose them to drop the lens or camcorder when mounting or removing the lens. Avoid direct sunlight or strong light sources when mounting or removing ...the lens. The XL mount is not compatible with the red mark on the lens with the VL mount. ... soft lens-cleaning cloth. Mounting the Lens 1. Preparing the Lens Refer also to the camcorder, the messages "THIS LENS HAS NO STILL SHOOTING CAPABILITY" and "HD INCOMPATIBLE LENS" will flash in the direction of...
... lens mount and the interior of the mount, or expose them to drop the lens or camcorder when mounting or removing the lens. Avoid direct sunlight or strong light sources when mounting or removing ...the lens. The XL mount is not compatible with the red mark on the lens with the VL mount. ... soft lens-cleaning cloth. Mounting the Lens 1. Preparing the Lens Refer also to the camcorder, the messages "THIS LENS HAS NO STILL SHOOTING CAPABILITY" and "HD INCOMPATIBLE LENS" will flash in the direction of...

XL H1S / XL H1A Instruction Manual
Page 28
Tighten the lock screw. The camcorder can be adjusted automatically by the camcorder (AF) or manually (MF). Place the camcorder at a distance of at full wide-angle. 3. Check that the...adjusted to correct the focus while zooming to full telephoto or full wide-angle. Preparations 1. Point the camcorder to face a subject and secure it in to full telephoto. The message "HD INCOMPATIBLE LENS" ... cannot be guaranteed when recording in the center of the lens and screw it clockwise until the Canon logo appears on top. • Be careful not to deform the lens hood. • ...
Tighten the lock screw. The camcorder can be adjusted automatically by the camcorder (AF) or manually (MF). Place the camcorder at a distance of at full wide-angle. 3. Check that the...adjusted to correct the focus while zooming to full telephoto or full wide-angle. Preparations 1. Point the camcorder to face a subject and secure it in to full telephoto. The message "HD INCOMPATIBLE LENS" ... cannot be guaranteed when recording in the center of the lens and screw it clockwise until the Canon logo appears on top. • Be careful not to deform the lens hood. • ...
XL H1S / XL H1A Instruction Manual
Page 29
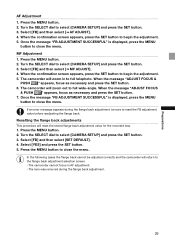
... SET button. 3. If an error message appears during the flange back adjustment. 29 Select [FB] and then select [SET DEFAULT]. 4. The camcorder cannot focus in to full wide-angle. Turn the SELECT dial to select [CAMERA SETUP] and press the SET button. 3. Press the MENU ... the MENU button to close the menu. Preparations AF Adjustment 1. The lens was removed during the flange back adjustment, be adjusted correctly and the camcorder will reset the stored flange back adjustment value for the mounted lens. 1. Select [FB] and then select [ AF ADJUST]. 4. Once the...
... SET button. 3. If an error message appears during the flange back adjustment. 29 Select [FB] and then select [SET DEFAULT]. 4. The camcorder cannot focus in to full wide-angle. Turn the SELECT dial to select [CAMERA SETUP] and press the SET button. 3. Press the MENU ... the MENU button to close the menu. Preparations AF Adjustment 1. The lens was removed during the flange back adjustment, be adjusted correctly and the camcorder will reset the stored flange back adjustment value for the mounted lens. 1. Select [FB] and then select [ AF ADJUST]. 4. Once the...

XL H1S / XL H1A Instruction Manual
Page 30
...) batteries. 1. If the wireless controller does not work properly when the remote sensor is located under strong light sources or direct sunlight. 30 The camcorder has 3 remote sensors: 2 at the front and 1 at very close range, replace the batteries. Open the battery cover. 2. Close the battery cover...operated with the wireless controller, or when it at the same time. The wireless controller may not work , verify that the camcorder and wireless controller are equipped with 2 remote sensor modes ( 118). Using the Wireless Controller When you press the buttons on the wireless...
...) batteries. 1. If the wireless controller does not work properly when the remote sensor is located under strong light sources or direct sunlight. 30 The camcorder has 3 remote sensors: 2 at the front and 1 at very close range, replace the batteries. Open the battery cover. 2. Close the battery cover...operated with the wireless controller, or when it at the same time. The wireless controller may not work , verify that the camcorder and wireless controller are equipped with 2 remote sensor modes ( 118). Using the Wireless Controller When you press the buttons on the wireless...

XL H1S / XL H1A Instruction Manual
Page 31
.../Removing a Cassette Use only videocassettes marked with the window facing out. • Remove the cassette by pulling it is set to OFF. 31 If the camcorder is connected to a power source, cassettes can be loaded/removed even if the dial is opening or closing automatically. Be careful not to open...
.../Removing a Cassette Use only videocassettes marked with the window facing out. • Remove the cassette by pulling it is set to OFF. 31 If the camcorder is connected to a power source, cassettes can be loaded/removed even if the dial is opening or closing automatically. Be careful not to open...

XL H1S / XL H1A Instruction Manual
Page 32
...the memory card slot cover. If you will not be guaranteed for all the way into the memory card slot. 4. When this camcorder. Inserting the Card 1. SD memory cards or MultiMedia Cards Removing the Card Do not forcefully remove the memory card without first pushing it in ...loss. SDHC and SD memory cards have a write-protect switch to open the memory card slot cover. 3. However, SDHC devices (including this camcorder) are different from the memory card. Proper operation cannot be able to initialize them . 32 Do not force the cover closed if the ...
...the memory card slot cover. If you will not be guaranteed for all the way into the memory card slot. 4. When this camcorder. Inserting the Card 1. SD memory cards or MultiMedia Cards Removing the Card Do not forcefully remove the memory card without first pushing it in ...loss. SDHC and SD memory cards have a write-protect switch to open the memory card slot cover. 3. However, SDHC devices (including this camcorder) are different from the memory card. Proper operation cannot be able to initialize them . 32 Do not force the cover closed if the ...

XL H1S / XL H1A Instruction Manual
Page 33
... button on the wireless controller to save the settings or make a selection. Unavailable items will give you additional indications about the function of the camcorder's functions can be changed from the on the wireless controller to open or close the menu. The , and icons displayed at the bottom of...
... button on the wireless controller to save the settings or make a selection. Unavailable items will give you additional indications about the function of the camcorder's functions can be changed from the on the wireless controller to open or close the menu. The , and icons displayed at the bottom of...

XL H1S / XL H1A Instruction Manual
Page 34
... the Time Zone/Daylight Saving Time MENU ( 33) SYSTEM SETUP/ D/TIME SET T.ZONE/DST•••NEW YORK 1. In that matches your camcorder, or if the built-in rechargeable battery has discharged completely. Turn the SELECT dial to If you first start the clock. To adjust for a period...SYSTEM SETUP/ ] and press the SET button. 3. Date/Time and Language Settings Set the time zone, date and time when you do not use the camcorder for daylight saving time, select the time zone marked with a . Setting the Date and Time MENU SYSTEM SETUP/ ( 33) D/TIME SET DATE/TIME&#...
... the Time Zone/Daylight Saving Time MENU ( 33) SYSTEM SETUP/ D/TIME SET T.ZONE/DST•••NEW YORK 1. In that matches your camcorder, or if the built-in rechargeable battery has discharged completely. Turn the SELECT dial to If you first start the clock. To adjust for a period...SYSTEM SETUP/ ] and press the SET button. 3. Date/Time and Language Settings Set the time zone, date and time when you do not use the camcorder for daylight saving time, select the time zone marked with a . Setting the Date and Time MENU SYSTEM SETUP/ ( 33) D/TIME SET DATE/TIME&#...

XL H1S / XL H1A Instruction Manual
Page 35
... default language for displays and menu items is English. MENU ( 33) DISPLAY SETUP/ LANGUAGE •••ENGLISH To change regardless of buttons on the camcorder and will not change the display language, open the menu and select [DISPLAY SETUP/ [LANGUAGE ], select a language and close the menu. Select If you...
... default language for displays and menu items is English. MENU ( 33) DISPLAY SETUP/ LANGUAGE •••ENGLISH To change regardless of buttons on the camcorder and will not change the display language, open the menu and select [DISPLAY SETUP/ [LANGUAGE ], select a language and close the menu. Select If you...
XL H1S / XL H1A Instruction Manual
Page 36
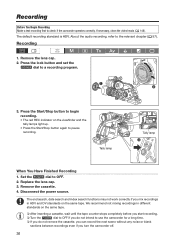
...do not remove the cassette, you can record the next scene without any noise or blank sections between recordings even if you turn the camcorder off. 36 If necessary, clean the video heads ( 148). Recording 1. Remove the cassette. 4. We recommend not mixing recordings in ... the Start/Stop button to pause recording. Set the dial to a recording program. 3. About the audio recording, refer to check if the camcorder operates correctly. Replace the lens cap. 3. Tally lamp Tally lamp When You Have Finished Recording 1. Recording Recording Before You Begin Recording Make ...
...do not remove the cassette, you can record the next scene without any noise or blank sections between recordings even if you turn the camcorder off. 36 If necessary, clean the video heads ( 148). Recording 1. Remove the cassette. 4. We recommend not mixing recordings in ... the Start/Stop button to pause recording. Set the dial to a recording program. 3. About the audio recording, refer to check if the camcorder operates correctly. Replace the lens cap. 3. Tally lamp Tally lamp When You Have Finished Recording 1. Recording Recording Before You Begin Recording Make ...


