XL H1S / XL H1A Instruction Manual
Page 2
... the user is intended to alert the user to provide reasonable protection against harmful interference in the manual. HD Video Camera Recorder, XL H1S A / XL H1A A Systems. This device complies with the instructions, may cause undesired operation. Tel No. (516)328-5600 CAUTION: TO PREVENT ...Introduction Usage Instructions WARNING: TO REDUCE THE RISK OF FIRE OR ELECTRIC SHOCK, DO NOT EXPOSE THIS PRODUCT TO RAIN OR MOISTURE. Canon U.S.A. The exclamation point, within an equilateral triangle, is no guarantee that may cause harmful interference to stop operation of FCC Rules. ...
... the user is intended to alert the user to provide reasonable protection against harmful interference in the manual. HD Video Camera Recorder, XL H1S A / XL H1A A Systems. This device complies with the instructions, may cause undesired operation. Tel No. (516)328-5600 CAUTION: TO PREVENT ...Introduction Usage Instructions WARNING: TO REDUCE THE RISK OF FIRE OR ELECTRIC SHOCK, DO NOT EXPOSE THIS PRODUCT TO RAIN OR MOISTURE. Canon U.S.A. The exclamation point, within an equilateral triangle, is no guarantee that may cause harmful interference to stop operation of FCC Rules. ...

XL H1S / XL H1A Instruction Manual
Page 3
... placed upon or against voltage surges and built-up static charges. The product may be cleaned only as battery power, refer to the Canon HD Video Camera Recorder XL H1S A / XL H1A A and all servicing to lightning and power-line surges. 15. The CA-920 Compact Power Adapter should be adhered to be operated...
... placed upon or against voltage surges and built-up static charges. The product may be cleaned only as battery power, refer to the Canon HD Video Camera Recorder XL H1S A / XL H1A A and all servicing to lightning and power-line surges. 15. The CA-920 Compact Power Adapter should be adhered to be operated...

XL H1S / XL H1A Instruction Manual
Page 4
... under the following conditions: a. e. When replacement parts are covered by a qualified technician to restore the product to the responsible nearest Canon Service Center and please replace it to its normal operation. b.If any service or repairs to this product from the wall outlet and... Parts - When replacement of any liquid has been spilled onto, or objects have the same characteristics as the original part. Contact your Canon dealer for information about plug adapter for service. 20. Damage Requiring Service - Upon completion of power supply is damaged. d.If the ...
... under the following conditions: a. e. When replacement parts are covered by a qualified technician to restore the product to the responsible nearest Canon Service Center and please replace it to its normal operation. b.If any service or repairs to this product from the wall outlet and... Parts - When replacement of any liquid has been spilled onto, or objects have the same characteristics as the original part. Contact your Canon dealer for information about plug adapter for service. 20. Damage Requiring Service - Upon completion of power supply is damaged. d.If the ...

XL H1S / XL H1A Instruction Manual
Page 5
...and improved functionality Push AE ( 66) • Gain fine-tuning in HDV standard. Introduction The XL H1S / XL H1A - DIGIC DV II image processor The next generation of Canon's video processing engine ensures optimal video quality and color reproduction for uncompressed HD signal output, embedded ... • Selective NR ( 77) • Audio output level selection ( 90) • and more freedom to be part of the camcorder's operation. The camcorder offers 23 customizable parameters you want. A Broad Range of Capabilities Ultimate HD Quality New and improved lens The HD 20x L IS III is...
...and improved functionality Push AE ( 66) • Gain fine-tuning in HDV standard. Introduction The XL H1S / XL H1A - DIGIC DV II image processor The next generation of Canon's video processing engine ensures optimal video quality and color reproduction for uncompressed HD signal output, embedded ... • Selective NR ( 77) • Audio output level selection ( 90) • and more freedom to be part of the camcorder's operation. The camcorder offers 23 customizable parameters you want. A Broad Range of Capabilities Ultimate HD Quality New and improved lens The HD 20x L IS III is...

XL H1S / XL H1A Instruction Manual
Page 6
... matches your camcorder fail to operate correctly, refer to the model shown in the icon. Illustrations in boldface indicate the default setting. The supplied lens, Canon HD Video Lens 20x Zoom XL 5.4-108 mm L IS III, is New York. 4. Please read this Manual Thank you for purchasing the Canon XL H1S / XL H1A. Setting the...
... matches your camcorder fail to operate correctly, refer to the model shown in the icon. Illustrations in boldface indicate the default setting. The supplied lens, Canon HD Video Lens 20x Zoom XL 5.4-108 mm L IS III, is New York. 4. Please read this Manual Thank you for purchasing the Canon XL H1S / XL H1A. Setting the...

XL H1S / XL H1A Instruction Manual
Page 7
About the HD/HDV and SD/DV Specifications In the manual, a distinction is made between video signal standards (camera section) and recording standards (recorder section). the recording standard on the tape will be set to HD (high definition) or SD (standard definition) specifications; The video signal can be HDV or DV, respectively. Camera Section HD/SD Recorder Section HDV/DV HD/SD SDI Terminal HD/SD ( HDV/DV Terminal HDV/DV only) Playback Signal HDV/DV Introduction 7
About the HD/HDV and SD/DV Specifications In the manual, a distinction is made between video signal standards (camera section) and recording standards (recorder section). the recording standard on the tape will be set to HD (high definition) or SD (standard definition) specifications; The video signal can be HDV or DV, respectively. Camera Section HD/SD Recorder Section HDV/DV HD/SD SDI Terminal HD/SD ( HDV/DV Terminal HDV/DV only) Playback Signal HDV/DV Introduction 7

XL H1S / XL H1A Instruction Manual
Page 8
...this Manual ...6 Checking the Supplied Accessories ...10 Components Guide ...11 Preparations Preparing the Power Supply ...17 Preparing the Camcorder ...21 Preparing the Lens ...27 Using the Wireless Controller ...30 Loading/Removing a Cassette ...31 Inserting/Removing a Memory... Using the ND Filter ...49 Selecting the Frame Rate ...50 Setting the Time Code ...52 Synchronizing the Camcorder's Time Code 54 Setting the User Bit ...56 Audio Recording...57 Image Stabilizer...61 Using the Programmed AE... Color Bars/Audio Reference Signal...83 Faders ...83 8 Contents Introduction The XL H1S / XL H1A -
...this Manual ...6 Checking the Supplied Accessories ...10 Components Guide ...11 Preparations Preparing the Power Supply ...17 Preparing the Camcorder ...21 Preparing the Lens ...27 Using the Wireless Controller ...30 Loading/Removing a Cassette ...31 Inserting/Removing a Memory... Using the ND Filter ...49 Selecting the Frame Rate ...50 Setting the Time Code ...52 Synchronizing the Camcorder's Time Code 54 Setting the User Bit ...56 Audio Recording...57 Image Stabilizer...61 Using the Programmed AE... Color Bars/Audio Reference Signal...83 Faders ...83 8 Contents Introduction The XL H1S / XL H1A -
XL H1S / XL H1A Instruction Manual
Page 9
Introduction External Connections Video Signal Output Standards ...84 Connecting to a Monitor/TV ...85 Audio Output ...90 Digital Video Control...92 Recording an External Video Signal (HDV/DV In, Analog Line-In 93 Converting Analog Signals into Digital Signals (Analog-Digital Converter 94 Connecting to a Computer...95 Customization Custom Preset Settings ...96 Customized Functions ...104 Customized On-Screen Displays ...110 Playback Playing Back a Tape ...114 Returning to a Pre-marked Position...116 Index Search ...116 Date Search...117 Data Code ...117 Remote Sensor Mode ...118 Using a ...
Introduction External Connections Video Signal Output Standards ...84 Connecting to a Monitor/TV ...85 Audio Output ...90 Digital Video Control...92 Recording an External Video Signal (HDV/DV In, Analog Line-In 93 Converting Analog Signals into Digital Signals (Analog-Digital Converter 94 Connecting to a Computer...95 Customization Custom Preset Settings ...96 Customized Functions ...104 Customized On-Screen Displays ...110 Playback Playing Back a Tape ...114 Returning to a Pre-marked Position...116 Index Search ...116 Date Search...117 Data Code ...117 Remote Sensor Mode ...118 Using a ...

XL H1S / XL H1A Instruction Manual
Page 10
... Video Cable External Monitor Cable Adjustment Band (for the external Adapter Holder Unit microphone holder) Tripod Adapter Base SS-1100 Shoulder Strap Camcorder Dust Cap Canon HD Video Lens 20x Zoom XL 5.4-108 mm L IS III (incl. Write down the number and other information here and retain this product can be found at... Cap and Dust Cap Lens Hood The serial number of this book as a permanent record of your purchase to aid identification in case of the camcorder. Date of Purchase: Model Name: XL H1S A / XL H1A A Purchased From: Serial No.: Dealer Address Dealer Phone No.: 10
... Video Cable External Monitor Cable Adjustment Band (for the external Adapter Holder Unit microphone holder) Tripod Adapter Base SS-1100 Shoulder Strap Camcorder Dust Cap Canon HD Video Lens 20x Zoom XL 5.4-108 mm L IS III (incl. Write down the number and other information here and retain this product can be found at... Cap and Dust Cap Lens Hood The serial number of this book as a permanent record of your purchase to aid identification in case of the camcorder. Date of Purchase: Model Name: XL H1S A / XL H1A A Purchased From: Serial No.: Dealer Address Dealer Phone No.: 10
XL H1S / XL H1A Instruction Manual
Page 11
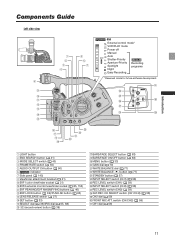
LOCK button ( 69)/PUSH AE button ( 66) LENS RELEASE switch ( 27) SET button ( 33) SELECT dial ( 33)/IRIS dial ( 65, 68) (record review) button ( 39) BARS/FADE SELECT button ( 83) BARS/FADE ON/OFF button ( 83) MENU button ( 33) GAIN dial ( 70) WHITE BALANCE dial ( 71) WHITE BALANCE button ( 71) STANDBY button ( 37) INPUT SELECT switch (CH1) ( 58) REC LEVEL switch (CH1) ( 59) INPUT SELECT switch (CH2) ( 58) REC LEVEL switch (CH2) ( 59) XLR REC CH SELECT switch (CH1/CH2) ( 58) CH2 dial ( 59) FRONT MIC ATT. Introduction LIGHT button END SEARCH button ( 41) MODE SELECT switch ( 40) FRAME ...
LOCK button ( 69)/PUSH AE button ( 66) LENS RELEASE switch ( 27) SET button ( 33) SELECT dial ( 33)/IRIS dial ( 65, 68) (record review) button ( 39) BARS/FADE SELECT button ( 83) BARS/FADE ON/OFF button ( 83) MENU button ( 33) GAIN dial ( 70) WHITE BALANCE dial ( 71) WHITE BALANCE button ( 71) STANDBY button ( 37) INPUT SELECT switch (CH1) ( 58) REC LEVEL switch (CH1) ( 59) INPUT SELECT switch (CH2) ( 58) REC LEVEL switch (CH2) ( 59) XLR REC CH SELECT switch (CH1/CH2) ( 58) CH2 dial ( 59) FRONT MIC ATT. Introduction LIGHT button END SEARCH button ( 41) MODE SELECT switch ( 40) FRAME ...

XL H1S / XL H1A Instruction Manual
Page 12
Left side view Viewfinder unit/Microphone unit HD 20x L IS III lens Eye cup ( 22) Dioptric adjustment lever ( 23) Color viewfinder ( 21-24) STEREO/MONO microphone selector ( 58) Lock screw ( 23) Viewfinder cable ( 21) Lock release button ( 24) Iris ring ( 65, 68) Zoom ring ( 42) Lens hood ( 28) Focus ring ( 44) RESET button ( 150) Memory card slot ( 32) ND filter operating ring ( 49) ND filter unlock button ( 49) STABILIZER ON/OFF switch ( 61) POSITION PRESET switch ( 43) AF switch ( 44)/ POSITION PRESET ON/SET switch ( 43) Focus mode switch ( 45) 12
Left side view Viewfinder unit/Microphone unit HD 20x L IS III lens Eye cup ( 22) Dioptric adjustment lever ( 23) Color viewfinder ( 21-24) STEREO/MONO microphone selector ( 58) Lock screw ( 23) Viewfinder cable ( 21) Lock release button ( 24) Iris ring ( 65, 68) Zoom ring ( 42) Lens hood ( 28) Focus ring ( 44) RESET button ( 150) Memory card slot ( 32) ND filter operating ring ( 49) ND filter unlock button ( 49) STABILIZER ON/OFF switch ( 61) POSITION PRESET switch ( 43) AF switch ( 44)/ POSITION PRESET ON/SET switch ( 43) Focus mode switch ( 45) 12

XL H1S / XL H1A Instruction Manual
Page 13
Right side view Introduction S-video terminal ( 88) VIDEO OUT terminal (BNC) ( 88) VIDEO IN/OUT terminal (RCA) ( 88) OUT terminals (CH1/CH2, RCA) ( 90) IN terminals (CH1/CH2, RCA) ( 58) Terminal cover Battery attachment unit ( 17) BATT. RELEASE button ( 17) HD/SD SDI terminal* ( 86) GENLOCK terminal* ( 54) TC-OUT terminal* ( 54) * only. button ( 108) Cassette compartment ( 31) 13 TC-IN terminal* ( 54) Serial number Screw hole for adapter holder ( 26) AE SHIFT dial ( 69) LOCK switch ( 37) FRONT MIC terminals ( 25) Lens hood lock screw ( 28) Grip zoom lever ( 42) PHOTO button ( 121) / MAGN....
Right side view Introduction S-video terminal ( 88) VIDEO OUT terminal (BNC) ( 88) VIDEO IN/OUT terminal (RCA) ( 88) OUT terminals (CH1/CH2, RCA) ( 90) IN terminals (CH1/CH2, RCA) ( 58) Terminal cover Battery attachment unit ( 17) BATT. RELEASE button ( 17) HD/SD SDI terminal* ( 86) GENLOCK terminal* ( 54) TC-OUT terminal* ( 54) * only. button ( 108) Cassette compartment ( 31) 13 TC-IN terminal* ( 54) Serial number Screw hole for adapter holder ( 26) AE SHIFT dial ( 69) LOCK switch ( 37) FRONT MIC terminals ( 25) Lens hood lock screw ( 28) Grip zoom lever ( 42) PHOTO button ( 121) / MAGN....

XL H1S / XL H1A Instruction Manual
Page 14
... terminal. Operation cannot be guaranteed for connections with mounting screws longer than 5.5 mm (0.2 in.) as this may operate differently than the buttons on the camcorder. 14 About the Terminal (LANC) stands for Local Application Control Bus System. Front view Back view Tally lamp ( 109) Remote sensor ( 30, 118) Grip belt... base. To use tripods with devices not bearing the mark. Some buttons of connected devices may not operate or may cause damage to the camcorder.
... terminal. Operation cannot be guaranteed for connections with mounting screws longer than 5.5 mm (0.2 in.) as this may operate differently than the buttons on the camcorder. 14 About the Terminal (LANC) stands for Local Application Control Bus System. Front view Back view Tally lamp ( 109) Remote sensor ( 30, 118) Grip belt... base. To use tripods with devices not bearing the mark. Some buttons of connected devices may not operate or may cause damage to the camcorder.

XL H1S / XL H1A Instruction Manual
Page 15
button ( 108) START/STOP button ( 36) Hot shoe ( 126) Microphone ( 25) Viewfinder lock screw ( 21) Handle zoom lever ( 42) EJECT switch ( 31) CUSTOM KEYS ( 79) EVF DISPLAY button ( 39) CUSTOM PRESET ON/OFF button ( 99) CUSTOM PRESET SELECT button ( 99) Remote sensor ( 30, 118) Tally lamp ( 109) Screw holes for adapter holder ( 26) REC (record) button ( 93) (fast forward) button ( 114) / + button ( 100, 127) (play) button ( 114) / SLIDESHOW button ( 127) (rewind) button ( 114) / - button ( 100,127) (stop) button ( 114,117) / (metering mode) button ( 125) (pause) button ( 114) / DRIVE MODE ...
button ( 108) START/STOP button ( 36) Hot shoe ( 126) Microphone ( 25) Viewfinder lock screw ( 21) Handle zoom lever ( 42) EJECT switch ( 31) CUSTOM KEYS ( 79) EVF DISPLAY button ( 39) CUSTOM PRESET ON/OFF button ( 99) CUSTOM PRESET SELECT button ( 99) Remote sensor ( 30, 118) Tally lamp ( 109) Screw holes for adapter holder ( 26) REC (record) button ( 93) (fast forward) button ( 114) / + button ( 100, 127) (play) button ( 114) / SLIDESHOW button ( 127) (rewind) button ( 114) / - button ( 100,127) (stop) button ( 114,117) / (metering mode) button ( 125) (pause) button ( 114) / DRIVE MODE ...

XL H1S / XL H1A Instruction Manual
Page 16
button ( 127) CARD + button ( 127) MIX BALANCE buttons ( 90) / buttons ( 116, 117) PLAY button ( 114) FF button ( 114) button ( 114) STOP button ( 114) button ( 114) SLOW button ( 114) 16 WL-D5000 Wireless Controller PHOTO button ( 121) START/STOP button ( 36) MENU button ( 33) TV SCREEN button ( 80) SLIDESHOW button ( 127) DATA CODE button ( 117) INDEX WRITE button ( 80) AUDIO MONITOR button ( 90) END SEARCH button ( 41) SEARCH SELECT button ( 116, 117) REC PAUSE button ( 93) REW button ( 114) ZERO SET MEMORY button ( 116) button ( 114) PAUSE button ( 114) REMOTE SET button ( 118) AV DV ...
button ( 127) CARD + button ( 127) MIX BALANCE buttons ( 90) / buttons ( 116, 117) PLAY button ( 114) FF button ( 114) button ( 114) STOP button ( 114) button ( 114) SLOW button ( 114) 16 WL-D5000 Wireless Controller PHOTO button ( 121) START/STOP button ( 36) MENU button ( 33) TV SCREEN button ( 80) SLIDESHOW button ( 127) DATA CODE button ( 117) INDEX WRITE button ( 80) AUDIO MONITOR button ( 90) END SEARCH button ( 41) SEARCH SELECT button ( 116, 117) REC PAUSE button ( 93) REW button ( 114) ZERO SET MEMORY button ( 116) button ( 114) PAUSE button ( 114) REMOTE SET button ( 118) AV DV ...

XL H1S / XL H1A Instruction Manual
Page 17
... the Power Supply Charging the Battery Pack Disconnect the DC coupler from the compact power adapter. Attaching the Battery Pack 1. Turn the dial to the camcorder. Align the battery pack with the guideline and press lightly. RELEASE button pressed down, slide the battery pack down to the compact power adapter. 2. The...
... the Power Supply Charging the Battery Pack Disconnect the DC coupler from the compact power adapter. Attaching the Battery Pack 1. Turn the dial to the camcorder. Align the battery pack with the guideline and press lightly. RELEASE button pressed down, slide the battery pack down to the compact power adapter. 2. The...
XL H1S / XL H1A Instruction Manual
Page 18
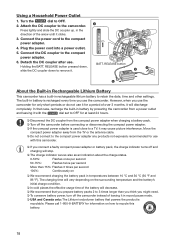
... use it . Move the compact power adapter away from the compact power adapter when charging a battery pack. Turn off the camcorder before connecting or disconnecting the compact power adapter. If the compact power adapter is recharged every time you connect a faulty compact ...arrow until it clicks. 3. Connect the DC coupler to the compact power adapter. 4. RELEASE button pressed down, slide the DC coupler down to the camcorder. Using a Household Power Outlet 1. Press lightly and slide the DC coupler up, in temperatures between 10 °C and 30 °C (50 &#...
... use it . Move the compact power adapter away from the compact power adapter when charging a battery pack. Turn off the camcorder before connecting or disconnecting the compact power adapter. If the compact power adapter is recharged every time you connect a faulty compact ...arrow until it clicks. 3. Connect the DC coupler to the compact power adapter. 4. RELEASE button pressed down, slide the DC coupler down to the camcorder. Using a Household Power Outlet 1. Press lightly and slide the DC coupler up, in temperatures between 10 °C and 30 °C (50 &#...

XL H1S / XL H1A Instruction Manual
Page 19
HDV Maximum Recording Time HD 20x L IS III Lens Supplied color viewfinder FU-1000 monochrome viewfinder2 HD 20x L IS II Lens Supplied color viewfinder FU-1000 monochrome viewfinder2 HD 6x L Lens Supplied color viewfinder FU-1000 monochrome viewfinder2 HDV Typical Recording Time1 HD 20x L IS III Lens Supplied color viewfinder FU-1000 monochrome viewfinder2 HD 20x L IS II Lens Supplied color viewfinder FU-1000 monochrome viewfinder2 HD 6x L Lens Supplied color viewfinder FU-1000 monochrome viewfinder2 HDV Playback Time (supplied color viewfinder) 130 min. 100 min. 130 min. 100 ...
HDV Maximum Recording Time HD 20x L IS III Lens Supplied color viewfinder FU-1000 monochrome viewfinder2 HD 20x L IS II Lens Supplied color viewfinder FU-1000 monochrome viewfinder2 HD 6x L Lens Supplied color viewfinder FU-1000 monochrome viewfinder2 HDV Typical Recording Time1 HD 20x L IS III Lens Supplied color viewfinder FU-1000 monochrome viewfinder2 HD 20x L IS II Lens Supplied color viewfinder FU-1000 monochrome viewfinder2 HD 6x L Lens Supplied color viewfinder FU-1000 monochrome viewfinder2 HDV Playback Time (supplied color viewfinder) 130 min. 100 min. 130 min. 100 ...

XL H1S / XL H1A Instruction Manual
Page 20
HD 20x L IS III Lens Supplied color viewfinder FU-1000 monochrome viewfinder2 90 min. 130 min. 190 min. 260 min. 65 min. 105 min. 145 min. 195 min. FU-1000 monochrome viewfinder2 DV Playback Time (supplied color viewfinder) 70 min. 110 min. 150 min. 205 min. 195 min. 290 min. 410 min. 560 min. 1 Approximate times for recording with repeated operations such as start/stop, zooming, power on/off. Actual time may be shorter. 2 Optional. 20 FU-1000 monochrome viewfinder2 115 min. 180 min. 250 min. 340 min. HD 6x L Lens Supplied color viewfinder 75 min. 115 min. 165 min. 230 min. ...
HD 20x L IS III Lens Supplied color viewfinder FU-1000 monochrome viewfinder2 90 min. 130 min. 190 min. 260 min. 65 min. 105 min. 145 min. 195 min. FU-1000 monochrome viewfinder2 DV Playback Time (supplied color viewfinder) 70 min. 110 min. 150 min. 205 min. 195 min. 290 min. 410 min. 560 min. 1 Approximate times for recording with repeated operations such as start/stop, zooming, power on/off. Actual time may be shorter. 2 Optional. 20 FU-1000 monochrome viewfinder2 115 min. 180 min. 250 min. 340 min. HD 6x L Lens Supplied color viewfinder 75 min. 115 min. 165 min. 230 min. ...

XL H1S / XL H1A Instruction Manual
Page 21
.... 2. Detaching the Viewfinder Unit 1. Insert the cable plug straight into the camcorder's socket. 3. To use the optional FU-1000 Monochrome CRT Viewfinder Unit, connect it to the EVF1 socket on the camcorder instead. Slide the viewfinder unit onto the bracket and tighten the lock screw.... 2. Preparations Preparing the Camcorder Attaching and Detaching the Color Viewfinder Unit Attaching the Color Viewfinder Unit 1. ...
.... 2. Detaching the Viewfinder Unit 1. Insert the cable plug straight into the camcorder's socket. 3. To use the optional FU-1000 Monochrome CRT Viewfinder Unit, connect it to the EVF1 socket on the camcorder instead. Slide the viewfinder unit onto the bracket and tighten the lock screw.... 2. Preparations Preparing the Camcorder Attaching and Detaching the Color Viewfinder Unit Attaching the Color Viewfinder Unit 1. ...
