XL H1S / XL H1A Instruction Manual
Page 2
... unless otherwise specified in the literature accompanying the product. 2 Canon U.S.A. NO USER-SERVICEABLE PARTS INSIDE. WARNING: TO REDUCE THE RISK OF ELECTRIC SHOCK AND TO REDUCE ANNOYING INTERFERENCE, USE THE RECOMMENDED ACCESSORIES ONLY. One Canon Plaza, Lake Success, NY 11042, U.S.A. However, there is...and found to copyright laws. Use of FCC Rules. Inc. Important Introduction Usage Instructions WARNING: TO REDUCE THE RISK OF FIRE OR ELECTRIC SHOCK, DO NOT EXPOSE THIS PRODUCT TO RAIN OR MOISTURE. HD Video Camera Recorder, XL H1S A / XL H1A A Systems. This device ...
... unless otherwise specified in the literature accompanying the product. 2 Canon U.S.A. NO USER-SERVICEABLE PARTS INSIDE. WARNING: TO REDUCE THE RISK OF ELECTRIC SHOCK AND TO REDUCE ANNOYING INTERFERENCE, USE THE RECOMMENDED ACCESSORIES ONLY. One Canon Plaza, Lake Success, NY 11042, U.S.A. However, there is...and found to copyright laws. Use of FCC Rules. Inc. Important Introduction Usage Instructions WARNING: TO REDUCE THE RISK OF FIRE OR ELECTRIC SHOCK, DO NOT EXPOSE THIS PRODUCT TO RAIN OR MOISTURE. HD Video Camera Recorder, XL H1S A / XL H1A A Systems. This device ...

XL H1S / XL H1A Instruction Manual
Page 3
...picture interference, or permanently damage the camera. 8. Power Lines - Retain Instructions - All warnings on the marking label. Do not use this manual. 11. Water and Moisture - PART H) 14. When installing an outside antenna is connected to the product, be... the product. Do not use liquid or aerosol cleaners. Outdoor Antenna Grounding - Avoid magnetic or electric fields - Introduction IMPORTANT SAFETY INSTRUCTIONS In these safety instructions the word "product" refers to the Canon HD Video Camera Recorder XL H1S A / XL H1A A and all servicing to...
...picture interference, or permanently damage the camera. 8. Power Lines - Retain Instructions - All warnings on the marking label. Do not use this manual. 11. Water and Moisture - PART H) 14. When installing an outside antenna is connected to the product, be... the product. Do not use liquid or aerosol cleaners. Outdoor Antenna Grounding - Avoid magnetic or electric fields - Introduction IMPORTANT SAFETY INSTRUCTIONS In these safety instructions the word "product" refers to the Canon HD Video Camera Recorder XL H1S A / XL H1A A and all servicing to...

XL H1S / XL H1A Instruction Manual
Page 4
...qualified technician to restore the product to qualified service personnel under the following conditions: a. f. This indicates a need for overseas use. 4 When replacement parts are covered by Canon or that have fallen into, the product. If the product has been exposed to the responsible nearest... Canon Service Center and please replace it with a power supply between 100 and 240 V AC. Safety Check - The Adapter can be sure the service technician has used with the same type number CA-920. Damage Requiring Service...
...qualified technician to restore the product to qualified service personnel under the following conditions: a. f. This indicates a need for overseas use. 4 When replacement parts are covered by Canon or that have fallen into, the product. If the product has been exposed to the responsible nearest... Canon Service Center and please replace it with a power supply between 100 and 240 V AC. Safety Check - The Adapter can be sure the service technician has used with the same type number CA-920. Damage Requiring Service...

XL H1S / XL H1A Instruction Manual
Page 5
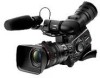
... 3CCD system By using both audio inputs or combine one audio input and the supplied front microphone. You can shoot it the functionality of Canon's video processing engine ensures optimal video quality and color reproduction for video recordings compliant with the XL H1S / XL H1A. CCDs (each ... is equipped with two sets of XLR audio input terminals with a total of 1.67 mega pixels and 1,440x1,080 effective pixels), the camcorder offers a horizontal resolution of any multi-camera shooting setup. Enhanced customization Custom functions ( 104) and custom display ( 110) options give ...
... 3CCD system By using both audio inputs or combine one audio input and the supplied front microphone. You can shoot it the functionality of Canon's video processing engine ensures optimal video quality and color reproduction for video recordings compliant with the XL H1S / XL H1A. CCDs (each ... is equipped with two sets of XLR audio input terminals with a total of 1.67 mega pixels and 1,440x1,080 effective pixels), the camcorder offers a horizontal resolution of any multi-camera shooting setup. Enhanced customization Custom functions ( 104) and custom display ( 110) options give ...

XL H1S / XL H1A Instruction Manual
Page 6
...Function can be used in rechargeable battery has discharged completely. To adjust for purchasing the Canon XL H1S / XL H1A. Should your time zone and press the SET button. The time zone setting appears. Turn the SELECT dial to select the setting option that matches your camcorder fail to operate... Acknowledgements • Canon is a registered trademark of Canon Inc. • is a trademark. • HDV and the HDV logo are used to refer to select [SYSTEM SETUP/ ] and press the SET button. 3. Please read this Manual Thank you first start using your camcorder, or if the...
...Function can be used in rechargeable battery has discharged completely. To adjust for purchasing the Canon XL H1S / XL H1A. Should your time zone and press the SET button. The time zone setting appears. Turn the SELECT dial to select the setting option that matches your camcorder fail to operate... Acknowledgements • Canon is a registered trademark of Canon Inc. • is a trademark. • HDV and the HDV logo are used to refer to select [SYSTEM SETUP/ ] and press the SET button. 3. Please read this Manual Thank you first start using your camcorder, or if the...

XL H1S / XL H1A Instruction Manual
Page 8
A Broad Range of Capabilities 5 About this Manual ...6 Checking the Supplied Accessories ...10 Components Guide ...11 Preparations Preparing the Power Supply ...17 Preparing the Camcorder ...21 Preparing the Lens ...27 Using the Wireless Controller ...30 Loading/Removing a Cassette ...31 Inserting/Removing a Memory Card ...32 Changing Settings with the MENU Button...33 Date/Time and... Skin Detail Function ...76 Selective Noise Reduction ...77 Clear Scan ...78 Custom Keys ...79 Color Bars/Audio Reference Signal...83 Faders ...83 8 Contents Introduction The XL H1S / XL H1A -
A Broad Range of Capabilities 5 About this Manual ...6 Checking the Supplied Accessories ...10 Components Guide ...11 Preparations Preparing the Power Supply ...17 Preparing the Camcorder ...21 Preparing the Lens ...27 Using the Wireless Controller ...30 Loading/Removing a Cassette ...31 Inserting/Removing a Memory Card ...32 Changing Settings with the MENU Button...33 Date/Time and... Skin Detail Function ...76 Selective Noise Reduction ...77 Clear Scan ...78 Custom Keys ...79 Color Bars/Audio Reference Signal...83 Faders ...83 8 Contents Introduction The XL H1S / XL H1A -
XL H1S / XL H1A Instruction Manual
Page 9
...Back a Tape ...114 Returning to a Pre-marked Position...116 Index Search ...116 Date Search...117 Data Code ...117 Remote Sensor Mode ...118 Using a Memory Card Selecting the Still Image Quality/Size...119 File Numbers ...120 Recording Still Images on a Memory Card 121 Reviewing a Still Image... right after Recording 123 Drive Mode ...124 Metering Mode ...125 Using an Optional Flash ...126 Playing Back Still Images from a Memory Card 127 Erasing Still images ...129 Protecting Still images...130 Initializing a Memory...
...Back a Tape ...114 Returning to a Pre-marked Position...116 Index Search ...116 Date Search...117 Data Code ...117 Remote Sensor Mode ...118 Using a Memory Card Selecting the Still Image Quality/Size...119 File Numbers ...120 Recording Still Images on a Memory Card 121 Reviewing a Still Image... right after Recording 123 Drive Mode ...124 Metering Mode ...125 Using an Optional Flash ...126 Playing Back Still Images from a Memory Card 127 Erasing Still images ...129 Protecting Still images...130 Initializing a Memory...

XL H1S / XL H1A Instruction Manual
Page 14
...devices with the mark to the terminal. Operation cannot be guaranteed for connections with mounting screws longer than the buttons on the camcorder. 14 Front view Back view Tally lamp ( 109) Remote sensor ( 30, 118) Grip belt ( 25) Attachment sockets for ...use tripods featuring 3/ 8" mounting screws, attach first the supplied tripod adapter base and attach the tripod to the adapter base. To use tripods with devices not bearing the mark. Some buttons of connected devices may not operate or may operate differently than 5.5 mm (0.2 in.) as this may cause damage to the camcorder...
...devices with the mark to the terminal. Operation cannot be guaranteed for connections with mounting screws longer than the buttons on the camcorder. 14 Front view Back view Tally lamp ( 109) Remote sensor ( 30, 118) Grip belt ( 25) Attachment sockets for ...use tripods featuring 3/ 8" mounting screws, attach first the supplied tripod adapter base and attach the tripod to the adapter base. To use tripods with devices not bearing the mark. Some buttons of connected devices may not operate or may operate differently than 5.5 mm (0.2 in.) as this may cause damage to the camcorder...

XL H1S / XL H1A Instruction Manual
Page 17
Connect the power cord to the camcorder. Attach the battery pack to the compact power adapter. 2. Plug the power cord into a power outlet. 3. RELEASE button pressed down, slide the battery pack down ... from the power outlet and disconnect it . Turn the dial to remove it from the compact power Charge indicator adapter. 5. Remove the battery pack after use. Guideline BATT. The indicator will stay on when the charging is completed, remove the battery pack from the compact power adapter. Holding the BATT. Preparing...
Connect the power cord to the camcorder. Attach the battery pack to the compact power adapter. 2. Plug the power cord into a power outlet. 3. RELEASE button pressed down, slide the battery pack down ... from the power outlet and disconnect it . Turn the dial to remove it from the compact power Charge indicator adapter. 5. Remove the battery pack after use. Guideline BATT. The indicator will stay on when the charging is completed, remove the battery pack from the compact power adapter. Holding the BATT. Preparing...
XL H1S / XL H1A Instruction Manual
Page 18
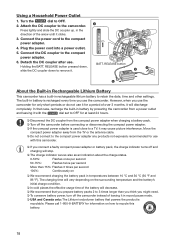
... on We recommend charging the battery pack in battery by powering the camcorder from a power outlet and leaving it with this camcorder. If you use the camcorder for only short periods or do not use . Press lightly and slide the DC coupler up, in rechargeable lithium battery to...prepare battery packs 2 to OFF for a period of the arrow until it may cause picture interference. Turn the dial to the camcorder. Detach the DC coupler after use it will decrease. We recommend that case, recharge the built-in temperatures between 10 °C and 30 °C ...
... on We recommend charging the battery pack in battery by powering the camcorder from a power outlet and leaving it with this camcorder. If you use the camcorder for only short periods or do not use . Press lightly and slide the DC coupler up, in rechargeable lithium battery to...prepare battery packs 2 to OFF for a period of the arrow until it may cause picture interference. Turn the dial to the camcorder. Detach the DC coupler after use it will decrease. We recommend that case, recharge the built-in temperatures between 10 °C and 30 °C ...

XL H1S / XL H1A Instruction Manual
Page 21
Detaching the Viewfinder Unit 1. To use the optional FU-1000 Monochrome CRT Viewfinder Unit, connect it to the EVF1 socket on the camcorder instead. Hook the viewfinder cable onto the cable clamp. Detach the viewfinder cable. 2. Slide the viewfinder unit onto the ...bracket and tighten the lock screw. 2. Insert the cable plug straight into the camcorder's socket. 3. Preparations Preparing the Camcorder Attaching and Detaching the Color Viewfinder Unit Attaching the Color Viewfinder Unit 1. Connect the viewfinder cable to the EVF2 socket on...
Detaching the Viewfinder Unit 1. To use the optional FU-1000 Monochrome CRT Viewfinder Unit, connect it to the EVF1 socket on the camcorder instead. Hook the viewfinder cable onto the cable clamp. Detach the viewfinder cable. 2. Slide the viewfinder unit onto the ...bracket and tighten the lock screw. 2. Insert the cable plug straight into the camcorder's socket. 3. Preparations Preparing the Camcorder Attaching and Detaching the Color Viewfinder Unit Attaching the Color Viewfinder Unit 1. Connect the viewfinder cable to the EVF2 socket on...

XL H1S / XL H1A Instruction Manual
Page 22
Right eye use Left eye use . Detach the eye cup and reattach it when changing the position of the eye cup for use with the lever, and pull the eye cup into position. Attaching the Eye Cup Align the hole for the dioptric adjustment lever with either the left eye use Detaching the Eye Cup Detach the eye cup as shown in the illustration. 22 Attaching and Detaching the Eye Cup You can change the position of the eye cup for right or left or right eye.
Right eye use Left eye use . Detach the eye cup and reattach it when changing the position of the eye cup for use with the lever, and pull the eye cup into position. Attaching the Eye Cup Align the hole for the dioptric adjustment lever with either the left eye use Detaching the Eye Cup Detach the eye cup as shown in the illustration. 22 Attaching and Detaching the Eye Cup You can change the position of the eye cup for right or left or right eye.

XL H1S / XL H1A Instruction Manual
Page 24
... you will not affect your recordings. Press the MENU button. 2. Turn the SELECT dial to close the eyepiece adapter when you are not using the viewfinder as LCD Panel You can adjust the brightness, contrast, color and sharpness of the viewfinder. Adjust the setting with the SELECT dial... and press the SET button. • After the adjustment you open the eyepiece adapter. Using the Viewfinder as an LCD panel. MENU ( 33) DISPLAY SETUP / EVF SETUP EVF BW MODE•••OFF BRIGHTNESS•••0 ...
... you will not affect your recordings. Press the MENU button. 2. Turn the SELECT dial to close the eyepiece adapter when you are not using the viewfinder as LCD Panel You can adjust the brightness, contrast, color and sharpness of the viewfinder. Adjust the setting with the SELECT dial... and press the SET button. • After the adjustment you open the eyepiece adapter. Using the Viewfinder as an LCD panel. MENU ( 33) DISPLAY SETUP / EVF SETUP EVF BW MODE•••OFF BRIGHTNESS•••0 ...

XL H1S / XL H1A Instruction Manual
Page 25
... on the viewfinder unit, open the microphone holder and insert the microphone. 2. To use an external microphone with a diameter too small for the microphone holder to close securely, attach first the supplied adjustment band to drop the camcorder when adjusting the strap or the grip belt. 25 Plug the microphone cable to...
... on the viewfinder unit, open the microphone holder and insert the microphone. 2. To use an external microphone with a diameter too small for the microphone holder to close securely, attach first the supplied adjustment band to drop the camcorder when adjusting the strap or the grip belt. 25 Plug the microphone cable to...

XL H1S / XL H1A Instruction Manual
Page 26
To detach the CH-910, press the stop lever. Attach the adapter holder and secure it with the stop lever in the direction of the support bars. Support bars When using the optional CH-910, hook it onto the support bars and secure it by tightening the screws. 2. Stop lever 26 Adjust the position of the arrow and pull the CH-910 off the support bars. Attaching the Adapter Holder Attach the adapter holder to use the optional CH-910 Dual Battery Charger/Holder or a commercially available wireless microphone receiver. 1.
To detach the CH-910, press the stop lever. Attach the adapter holder and secure it with the stop lever in the direction of the support bars. Support bars When using the optional CH-910, hook it onto the support bars and secure it by tightening the screws. 2. Stop lever 26 Adjust the position of the arrow and pull the CH-910 off the support bars. Attaching the Adapter Holder Attach the adapter holder to use the optional CH-910 Dual Battery Charger/Holder or a commercially available wireless microphone receiver. 1.

XL H1S / XL H1A Instruction Manual
Page 28
The message "HD INCOMPATIBLE LENS" will appear when using the extender, even with the optional Extender XL 1.6x. Preparations 1. Zoom out to full telephoto or full... full telephoto. Point the camcorder to deform the lens hood. • Make sure that are appropriate. Make sure the subject remains in HDV standard with an HD-compatible lens. If necessary, use the ND filter. 28 ...The flange back can store and back up flange back adjustment values for up to focus on top. • Be careful not to face a subject and secure it clockwise until the Canon ...
The message "HD INCOMPATIBLE LENS" will appear when using the extender, even with the optional Extender XL 1.6x. Preparations 1. Zoom out to full telephoto or full... full telephoto. Point the camcorder to deform the lens hood. • Make sure that are appropriate. Make sure the subject remains in HDV standard with an HD-compatible lens. If necessary, use the ND filter. 28 ...The flange back can store and back up flange back adjustment values for up to focus on top. • Be careful not to face a subject and secure it clockwise until the Canon ...

XL H1S / XL H1A Instruction Manual
Page 30
... be operated with two AA (R6) batteries. 1. Close the battery cover. The camcorder and wireless controller are set to replace both batteries at very close range, replace the batteries. Using the Wireless Controller When you press the buttons on the wireless controller, point it can only be operated at the same...
... be operated with two AA (R6) batteries. 1. Close the battery cover. The camcorder and wireless controller are set to replace both batteries at very close range, replace the batteries. Using the Wireless Controller When you press the buttons on the wireless controller, point it can only be operated at the same...

XL H1S / XL H1A Instruction Manual
Page 31
...EJECT switch to get your fingers caught in HDV we recommend you use videocassettes designed for HDV recording. 1. Close the cassette compartment cover. Press the mark on the cassette compartment cover. If the camcorder is connected to a power source, cassettes can be loaded/removed ...even if the dial is opening or closing automatically. Be careful not to open the cassette compartment cover. Loading/Removing a Cassette Use only videocassettes marked with the...
...EJECT switch to get your fingers caught in HDV we recommend you use videocassettes designed for HDV recording. 1. Close the cassette compartment cover. Press the mark on the cassette compartment cover. If the camcorder is connected to a power source, cassettes can be loaded/removed ...even if the dial is opening or closing automatically. Be careful not to open the cassette compartment cover. Loading/Removing a Cassette Use only videocassettes marked with the...

XL H1S / XL H1A Instruction Manual
Page 32
... or deleted from those of regular SD cards and you can use SDHC (SD High Capacity) memory cards, (MMC) with this camcorder. Insert the memory card straight, all memory cards. About SDHC Memory Cards: SDHC is not flashing and set to open the memory card slot ..., images cannot be guaranteed for all the way into the memory card slot. 4. Inserting/Removing a Memory Card You can use regular SD cards with them with the camcorder ( 131). Turn off the camcorder before inserting or removing a memory card. Do not force the cover closed if the card is set the dial...
... or deleted from those of regular SD cards and you can use SDHC (SD High Capacity) memory cards, (MMC) with this camcorder. Insert the memory card straight, all memory cards. About SDHC Memory Cards: SDHC is not flashing and set to open the memory card slot ..., images cannot be guaranteed for all the way into the memory card slot. 4. Inserting/Removing a Memory Card You can use regular SD cards with them with the camcorder ( 131). Turn off the camcorder before inserting or removing a memory card. Do not force the cover closed if the card is set the dial...

XL H1S / XL H1A Instruction Manual
Page 33
...Changing Settings with the MENU Button Many of the screen will appear grayed out. Pressing the MENU button at the bottom of the camcorder's functions can be changed from the on the wireless controller to save the settings or make a selection. Unavailable items will give you... additional indications about the function of these controls in specific situations. You may find it more convenient to use the wireless controller to operate the menu. Turn the SELECT dial to close the menu. Press the MENU button to select a menu item...
...Changing Settings with the MENU Button Many of the screen will appear grayed out. Pressing the MENU button at the bottom of the camcorder's functions can be changed from the on the wireless controller to save the settings or make a selection. Unavailable items will give you... additional indications about the function of these controls in specific situations. You may find it more convenient to use the wireless controller to operate the menu. Turn the SELECT dial to close the menu. Press the MENU button to select a menu item...


