
XL H1S / XL H1A Instruction Manual
Page 5
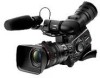
... freedom to be part of Canon's video processing engine ensures optimal video quality and color reproduction for video recordings compliant with a total of 1.67 mega pixels and 1,440x1,080 effective pixels), the camcorder offers a horizontal resolution of 800 TV lines, the highest in HDV standard. Introduction The XL H1S / XL H1A - DIGIC DV II image processor...
... freedom to be part of Canon's video processing engine ensures optimal video quality and color reproduction for video recordings compliant with a total of 1.67 mega pixels and 1,440x1,080 effective pixels), the camcorder offers a horizontal resolution of 800 TV lines, the highest in HDV standard. Introduction The XL H1S / XL H1A - DIGIC DV II image processor...

XL H1S / XL H1A Instruction Manual
Page 6
... mode. Please read this Manual Thank you for purchasing the Canon XL H1S / XL H1A. The time zone setting appears. Should your camcorder fail to operate correctly, refer to select the setting option that matches your camcorder, or if the built-in the United States and/or ... DATE/TIME••• JAN.1,2008 12:00 AM Pre Trademark Acknowledgements • Canon is a registered trademark of Canon Inc. • is a trademark. • HDV and the HDV logo are trademarks of Sony Corporation and Victor Company of Microsoft Corporation in rechargeable battery has...
... mode. Please read this Manual Thank you for purchasing the Canon XL H1S / XL H1A. The time zone setting appears. Should your camcorder fail to operate correctly, refer to select the setting option that matches your camcorder, or if the built-in the United States and/or ... DATE/TIME••• JAN.1,2008 12:00 AM Pre Trademark Acknowledgements • Canon is a registered trademark of Canon Inc. • is a trademark. • HDV and the HDV logo are trademarks of Sony Corporation and Victor Company of Microsoft Corporation in rechargeable battery has...

XL H1S / XL H1A Instruction Manual
Page 7
the recording standard on the tape will be set to HD (high definition) or SD (standard definition) specifications; Camera Section HD/SD Recorder Section HDV/DV HD/SD SDI Terminal HD/SD ( HDV/DV Terminal HDV/DV only) Playback Signal HDV/DV Introduction 7 About the HD/HDV and SD/DV Specifications In the manual, a distinction is made between video signal standards (camera section) and recording standards (recorder section). The video signal can be HDV or DV, respectively.
the recording standard on the tape will be set to HD (high definition) or SD (standard definition) specifications; Camera Section HD/SD Recorder Section HDV/DV HD/SD SDI Terminal HD/SD ( HDV/DV Terminal HDV/DV only) Playback Signal HDV/DV Introduction 7 About the HD/HDV and SD/DV Specifications In the manual, a distinction is made between video signal standards (camera section) and recording standards (recorder section). The video signal can be HDV or DV, respectively.
XL H1S / XL H1A Instruction Manual
Page 9
Introduction External Connections Video Signal Output Standards ...84 Connecting to a Monitor/TV ...85 Audio Output ...90 Digital Video Control...92 Recording an External Video Signal (HDV/DV In, Analog Line-In 93 Converting Analog Signals into Digital Signals (Analog-Digital Converter 94 Connecting to a Computer...95 Customization Custom Preset Settings ...96 ...
Introduction External Connections Video Signal Output Standards ...84 Connecting to a Monitor/TV ...85 Audio Output ...90 Digital Video Control...92 Recording an External Video Signal (HDV/DV In, Analog Line-In 93 Converting Analog Signals into Digital Signals (Analog-Digital Converter 94 Connecting to a Computer...95 Customization Custom Preset Settings ...96 ...

XL H1S / XL H1A Instruction Manual
Page 14
...devices with the mark to the terminal. Operation cannot be guaranteed for connections with mounting screws longer than the buttons on the camcorder. 14 To use tripods with devices not bearing the mark. Some buttons of connected devices may not operate or may operate ...36) Microphone lock screw ( 25) Strap mount ( 25) INPUT terminals (CH1/CH2, XLR) ( 58) SHUTTER buttons ( 65, 67) PHONES LEVEL dial (headphone) terminal HDV indicator ( 40) HDV/DV terminal ( 87, 93, 95) terminal switches (CH1,CH2) ( 58) switches (CH1,CH2) ( 58) / (card/tape) switch ( 121) CARD access indicator ...
...devices with the mark to the terminal. Operation cannot be guaranteed for connections with mounting screws longer than the buttons on the camcorder. 14 To use tripods with devices not bearing the mark. Some buttons of connected devices may not operate or may operate ...36) Microphone lock screw ( 25) Strap mount ( 25) INPUT terminals (CH1/CH2, XLR) ( 58) SHUTTER buttons ( 65, 67) PHONES LEVEL dial (headphone) terminal HDV indicator ( 40) HDV/DV terminal ( 87, 93, 95) terminal switches (CH1,CH2) ( 58) switches (CH1,CH2) ( 58) / (card/tape) switch ( 121) CARD access indicator ...

XL H1S / XL H1A Instruction Manual
Page 19
...Preparations Charging, Recording and Playback Times The following times are approximate and vary according to the charging, recording and playback conditions. HDV Maximum Recording Time HD 20x L IS III Lens Supplied color viewfinder FU-1000 monochrome viewfinder2 HD 20x L IS II Lens Supplied color... viewfinder FU-1000 monochrome viewfinder2 HD 6x L Lens Supplied color viewfinder FU-1000 monochrome viewfinder2 HDV Typical Recording Time1 HD 20x L IS III Lens Supplied color viewfinder FU-1000 monochrome viewfinder2 HD 20x L IS II Lens Supplied ...
...Preparations Charging, Recording and Playback Times The following times are approximate and vary according to the charging, recording and playback conditions. HDV Maximum Recording Time HD 20x L IS III Lens Supplied color viewfinder FU-1000 monochrome viewfinder2 HD 20x L IS II Lens Supplied color... viewfinder FU-1000 monochrome viewfinder2 HD 6x L Lens Supplied color viewfinder FU-1000 monochrome viewfinder2 HDV Typical Recording Time1 HD 20x L IS III Lens Supplied color viewfinder FU-1000 monochrome viewfinder2 HD 20x L IS II Lens Supplied ...

XL H1S / XL H1A Instruction Manual
Page 20
... HD 20x L IS II Lens Supplied color viewfinder FU-1000 monochrome viewfinder2 HD 6x L Lens Supplied color viewfinder FU-1000 monochrome viewfinder2 HDV Typical Recording Time1 HD 20x L IS III Lens Supplied color viewfinder FU-1000 monochrome viewfinder2 HD 20x L IS II Lens Supplied color ...viewfinder FU-1000 monochrome viewfinder2 HD 6x L Lens Supplied color viewfinder FU-1000 monochrome viewfinder2 HDV Playback Time (supplied color viewfinder) 140 min. 105 min. 140 min. 105 min. 145 min. 110 min. 205 min. 160 min. ...
... HD 20x L IS II Lens Supplied color viewfinder FU-1000 monochrome viewfinder2 HD 6x L Lens Supplied color viewfinder FU-1000 monochrome viewfinder2 HDV Typical Recording Time1 HD 20x L IS III Lens Supplied color viewfinder FU-1000 monochrome viewfinder2 HD 20x L IS II Lens Supplied color ...viewfinder FU-1000 monochrome viewfinder2 HD 6x L Lens Supplied color viewfinder FU-1000 monochrome viewfinder2 HDV Playback Time (supplied color viewfinder) 140 min. 105 min. 140 min. 105 min. 145 min. 110 min. 205 min. 160 min. ...

XL H1S / XL H1A Instruction Manual
Page 27
... the lens. Be careful not to drop the lens or camcorder when mounting or removing the lens. Avoid direct sunlight or strong light sources when mounting or removing the lens. The XL mount is not compatible with the red mark on the screen. Do not touch ...2. Set the dial to OFF. 2. Slide the LENS RELEASE switch all the way in red on the camcorder and turn off the camcorder while cleaning the lens. Proper operation cannot be guaranteed when recording in HDV standard with a dry, soft lens-cleaning cloth. Make sure to dust or dirt. Remove the dust...
... the lens. Be careful not to drop the lens or camcorder when mounting or removing the lens. Avoid direct sunlight or strong light sources when mounting or removing the lens. The XL mount is not compatible with the red mark on the screen. Do not touch ...2. Set the dial to OFF. 2. Slide the LENS RELEASE switch all the way in red on the camcorder and turn off the camcorder while cleaning the lens. Proper operation cannot be guaranteed when recording in HDV standard with a dry, soft lens-cleaning cloth. Make sure to dust or dirt. Remove the dust...

XL H1S / XL H1A Instruction Manual
Page 28
...screw it clockwise until the Canon logo appears on at full wide-angle. 3. Adjusting the Flange Back (lenses without built-in place. Set the frame rate to full wide-angle. 4. Make sure the subject remains in HDV standard with the optional Extender XL 1.6x. Tighten the lock... "HD INCOMPATIBLE LENS" will appear when using the extender, even with the thread. 2. Preparations 1. Avoid subjects that are appropriate. Point the camcorder to deform the lens hood. • Make sure that the exposure conditions are difficult to focus on top. • Be careful not to...
...screw it clockwise until the Canon logo appears on at full wide-angle. 3. Adjusting the Flange Back (lenses without built-in place. Set the frame rate to full wide-angle. 4. Make sure the subject remains in HDV standard with the optional Extender XL 1.6x. Tighten the lock... "HD INCOMPATIBLE LENS" will appear when using the extender, even with the thread. 2. Preparations 1. Avoid subjects that are appropriate. Point the camcorder to deform the lens hood. • Make sure that the exposure conditions are difficult to focus on top. • Be careful not to...

XL H1S / XL H1A Instruction Manual
Page 31
.../remove the cassette. • Insert the cassette straight, fully into the compartment with the logo. Close the cassette compartment cover. If the camcorder is connected to a power source, cassettes can be loaded/removed even if the dial is opening or closing automatically. Be careful not... to get your fingers caught in HDV we recommend you use videocassettes designed for HDV recording. 1. Slide the EJECT switch to OFF. 31 Press the mark on the cassette compartment cover. Preparations ...
.../remove the cassette. • Insert the cassette straight, fully into the compartment with the logo. Close the cassette compartment cover. If the camcorder is connected to a power source, cassettes can be loaded/removed even if the dial is opening or closing automatically. Be careful not... to get your fingers caught in HDV we recommend you use videocassettes designed for HDV recording. 1. Slide the EJECT switch to OFF. 31 Press the mark on the cassette compartment cover. Preparations ...
XL H1S / XL H1A Instruction Manual
Page 36
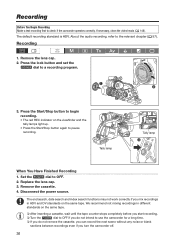
.... 4. Replace the lens cap. 3. We recommend not mixing recordings in HDV and DV standards on the viewfinder and the tally lamps light up. • Press the Start/Stop button again to check if the camcorder operates correctly. Press the Start/Stop button to begin recording. • The... red REC indicator on the same tape. The default recording standard is HDV. Recording Recording Before You Begin Recording Make a test recording first...
.... 4. Replace the lens cap. 3. We recommend not mixing recordings in HDV and DV standards on the viewfinder and the tally lamps light up. • Press the Start/Stop button again to check if the camcorder operates correctly. Press the Start/Stop button to begin recording. • The... red REC indicator on the same tape. The default recording standard is HDV. Recording Recording Before You Begin Recording Make a test recording first...

XL H1S / XL H1A Instruction Manual
Page 40
... standard definition) and, for standard definition recordings, also the aspect ratio of the MODE SELECT switch. • HD: To record on the tape in HDV standard or to use the camcorder as a high-definition (HD) camera. • SD 16:9, SD 4:3: To record on the tape in DV standard or to use the... to [OFF], the MODE SELECT switch will light up in the center of the 16:9 aspect ratio. (Note that not all XL lenses are compatible with black sidebars. Since the camcorder's screen has an aspect ratio of the MODE SELECT switch is changed while recording, the standard/aspect ratio will not change...
... standard definition) and, for standard definition recordings, also the aspect ratio of the MODE SELECT switch. • HD: To record on the tape in HDV standard or to use the camcorder as a high-definition (HD) camera. • SD 16:9, SD 4:3: To record on the tape in DV standard or to use the... to [OFF], the MODE SELECT switch will light up in the center of the 16:9 aspect ratio. (Note that not all XL lenses are compatible with black sidebars. Since the camcorder's screen has an aspect ratio of the MODE SELECT switch is changed while recording, the standard/aspect ratio will not change...
XL H1S / XL H1A Instruction Manual
Page 41
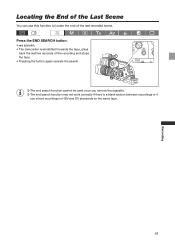
Press the END SEARCH button. • appears. • The camcorder rewinds/fast forwards the tape, plays back the last few seconds of the last recorded scene. Locating the End of the Last Scene You can use this function to locate the end of the recording and stops the tape. • Pressing the button again cancels the search. The end search function cannot be used once you remove the cassette. The end search function may not work correctly if there is a blank section between recordings or if you mixed recordings in HDV and DV standards on the same tape. 41 Recording
Press the END SEARCH button. • appears. • The camcorder rewinds/fast forwards the tape, plays back the last few seconds of the last recorded scene. Locating the End of the Last Scene You can use this function to locate the end of the recording and stops the tape. • Pressing the button again cancels the search. The end search function cannot be used once you remove the cassette. The end search function may not work correctly if there is a blank section between recordings or if you mixed recordings in HDV and DV standards on the same tape. 41 Recording
XL H1S / XL H1A Instruction Manual
Page 45
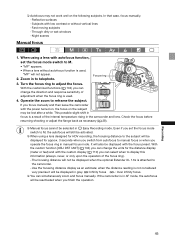
...focus mode switch to M, the autofocus will still be activated. When using a lens designed for HDV recording, the focusing distance to M. • "MF" appears. • When a lens without vertical lines...you set the focus mode switch to the subject will not be displayed when the optional Extender XL 1.6x is used . 4. Use the focusing distance display as necessary ( 28). ... - Night scenes Manual focus 1. With the customized functions ( 104) you can select when to the camcorder. - This possible slight shift in focus is used , "MF" will also be displayed with the ...
...focus mode switch to M, the autofocus will still be activated. When using a lens designed for HDV recording, the focusing distance to M. • "MF" appears. • When a lens without vertical lines...you set the focus mode switch to the subject will not be displayed when the optional Extender XL 1.6x is used . 4. Use the focusing distance display as necessary ( 28). ... - Night scenes Manual focus 1. With the customized functions ( 104) you can select when to the camcorder. - This possible slight shift in focus is used , "MF" will also be displayed with the ...
XL H1S / XL H1A Instruction Manual
Page 46
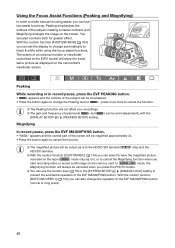
... the function. The Peaking function will show the exact same picture as it is to the HD/SD SDI terminal ( only) and the HDV/DV terminal. With the custom function [CUSTOM REC] ( 104) you can also change the Peaking level to the EVF2 socket will not ...SETUP] setting. Magnifying can be canceled when you can select to have the magnified picture recorded on the tape ( mode only) as displayed on the camcorder's viewfinder screen. Peaking While recording or in record pause, press the EVF PEAKING button. • appears and the outlines of the EVF MAGNIFYING button...
... the function. The Peaking function will show the exact same picture as it is to the HD/SD SDI terminal ( only) and the HDV/DV terminal. With the custom function [CUSTOM REC] ( 104) you can also change the Peaking level to the EVF2 socket will not ...SETUP] setting. Magnifying can be canceled when you can select to have the magnified picture recorded on the tape ( mode only) as displayed on the camcorder's viewfinder screen. Peaking While recording or in record pause, press the EVF PEAKING button. • appears and the outlines of the EVF MAGNIFYING button...

XL H1S / XL H1A Instruction Manual
Page 50
...50 This 24F mode is converted to 60i using the 2:3 pulldown method. HD Video output from the HDV/DV terminal will be down -converted to 60i using the 2:3:3:2 pulldown method. For playback and video... c d d e e f f g g h h i i j j SD 30F (camera) A B C D E F G H I J 60i (tape/playback) a a b b c c d d e e f f g g h h i i j j 24F Mode Records 24 frames per second according to HDV native 1080/24p specifications, creating a true cinematic feel to HDV native 1080/30p specifications. SD 24F (2:3) Mode Signals are down-converted to 60i but may require the extension/compression of some...
...50 This 24F mode is converted to 60i using the 2:3 pulldown method. HD Video output from the HDV/DV terminal will be down -converted to 60i using the 2:3:3:2 pulldown method. For playback and video... c d d e e f f g g h h i i j j SD 30F (camera) A B C D E F G H I J 60i (tape/playback) a a b b c c d d e e f f g g h h i i j j 24F Mode Records 24 frames per second according to HDV native 1080/24p specifications, creating a true cinematic feel to HDV native 1080/30p specifications. SD 24F (2:3) Mode Signals are down-converted to 60i but may require the extension/compression of some...
XL H1S / XL H1A Instruction Manual
Page 56
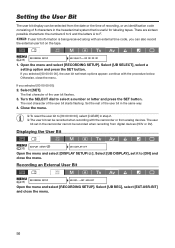
...UB DISPLAY•OFF Open the menu and select [DISPLAY SETUP/ close the menu. 56 Select [UB DISPLAY], set in the camcorder cannot be recorded when recording from digital devices (HDV or DV). There are sixteen possible characters: the numbers 0 to 9 and the letters A to select a number or letter ...RECORDING SETUP]. The next character of the user bit flashes. 3. Setting the User Bit The user bit display can be recorded when recording with the camcorder or from analog devices. Select [UB SELECT], select a setting option and press the SET button. If you selected [00 00 00 00]: 2....
...UB DISPLAY•OFF Open the menu and select [DISPLAY SETUP/ close the menu. 56 Select [UB DISPLAY], set in the camcorder cannot be recorded when recording from digital devices (HDV or DV). There are sixteen possible characters: the numbers 0 to 9 and the letters A to select a number or letter ...RECORDING SETUP]. The next character of the user bit flashes. 3. Setting the User Bit The user bit display can be recorded when recording with the camcorder or from analog devices. Select [UB SELECT], select a setting option and press the SET button. If you selected [00 00 00 00]: 2....
XL H1S / XL H1A Instruction Manual
Page 57
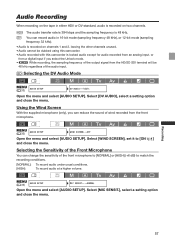
... • While recording, the sampling frequency of the output signal from the HD/SD SDI terminal will be dubbed using this camcorder. • Audio recorded with this camcorder is locked audio except for audio recorded from an analog input, or from the front microphone. MENU ( 33) AUDIO SETUP MIC... SENSIT.•••NORMAL Open the menu and select [AUDIO SETUP]. DV You can record audio in either HDV or DV standard, ...
... • While recording, the sampling frequency of the output signal from the HD/SD SDI terminal will be dubbed using this camcorder. • Audio recorded with this camcorder is locked audio except for audio recorded from an analog input, or from the front microphone. MENU ( 33) AUDIO SETUP MIC... SENSIT.•••NORMAL Open the menu and select [AUDIO SETUP]. DV You can record audio in either HDV or DV standard, ...

XL H1S / XL H1A Instruction Manual
Page 81
... EXP. Pressing the button will lock the EVF MAGNIFYING buton to prevent its accidental operation. Pressing the button will be canceled when you turn the camcorder on hold. (* only.) • The time code hold can press the custom key button to reactivate the EVF MAGNIFYING button. [SHTR B.LOCK] SHUTTER Button ...time code superimposed on hold , the time code will be put on the video signal output from the TC-OUT*, HD/SD SDI*, (LANC) and HDV/DV terminals will not be put on /off, change the operating mode between recording and playback or change the position of the / (card/tape) ...
... EXP. Pressing the button will lock the EVF MAGNIFYING buton to prevent its accidental operation. Pressing the button will be canceled when you turn the camcorder on hold. (* only.) • The time code hold can press the custom key button to reactivate the EVF MAGNIFYING button. [SHTR B.LOCK] SHUTTER Button ...time code superimposed on hold , the time code will be put on the video signal output from the TC-OUT*, HD/SD SDI*, (LANC) and HDV/DV terminals will not be put on /off, change the operating mode between recording and playback or change the position of the / (card/tape) ...

XL H1S / XL H1A Instruction Manual
Page 82
... the data code. 82 This affects only the display, and the video signal being output from all terminals will not change. • When using XL lenses designed for HDV recording, the Flip EVF function will cycle backwards to cancel it. [DATA CODE] Data Code ( 117) Press the CUSTOM KEY (1 or 2) button. CP...
... the data code. 82 This affects only the display, and the video signal being output from all terminals will not change. • When using XL lenses designed for HDV recording, the Flip EVF function will cycle backwards to cancel it. [DATA CODE] Data Code ( 117) Press the CUSTOM KEY (1 or 2) button. CP...
