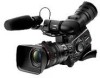
XL H1S / XL H1A Instruction Manual
Page 2
... (servicing) instructions in a residential installation. Note: This equipment has been tested and found to comply with the limits for help. Canon U.S.A. The exclamation point, within an equilateral triangle, is connected. • Consult the dealer or an experienced radio/TV technician for class...Do not make any interference received, including interference that may cause undesired operation. NO USER-SERVICEABLE PARTS INSIDE. HD Video Camera Recorder, XL H1S A / XL H1A A Systems. This device complies with Part 15 of the FCC Rules. WARNING: TO REDUCE THE RISK OF ELECTRIC ...
... (servicing) instructions in a residential installation. Note: This equipment has been tested and found to comply with the limits for help. Canon U.S.A. The exclamation point, within an equilateral triangle, is connected. • Consult the dealer or an experienced radio/TV technician for class...Do not make any interference received, including interference that may cause undesired operation. NO USER-SERVICEABLE PARTS INSIDE. HD Video Camera Recorder, XL H1S A / XL H1A A Systems. This device complies with Part 15 of the FCC Rules. WARNING: TO REDUCE THE RISK OF ELECTRIC ...

XL H1S / XL H1A Instruction Manual
Page 3
... a child or adult, and serious damage to the product. Introduction IMPORTANT SAFETY INSTRUCTIONS In these safety instructions the word "product" refers to the Canon HD Video Camera Recorder XL H1S A / XL H1A A and all servicing to qualified service personnel. 3 Regarding other power sources such as they may expose you are not sure of the type...
... a child or adult, and serious damage to the product. Introduction IMPORTANT SAFETY INSTRUCTIONS In these safety instructions the word "product" refers to the Canon HD Video Camera Recorder XL H1S A / XL H1A A and all servicing to qualified service personnel. 3 Regarding other power sources such as they may expose you are not sure of the type...

XL H1S / XL H1A Instruction Manual
Page 5
DIGIC DV II image processor The next generation of Canon's video processing engine ensures optimal video quality and color reproduction for improved operability. 3CCD system By using both audio inputs or combine one audio input and the supplied front ... TC-OUT terminals, allow the XL H1S to the XL line of the camcorder's operation. you can also activate the audio peak limiter ( 59) to control many aspects of high-end interchangeable lenses and now features a built-in iris ring for high-definition video. Introduction The XL H1S / XL H1A - Synchronization Genlock synchronization, as ...
DIGIC DV II image processor The next generation of Canon's video processing engine ensures optimal video quality and color reproduction for improved operability. 3CCD system By using both audio inputs or combine one audio input and the supplied front ... TC-OUT terminals, allow the XL H1S to the XL line of the camcorder's operation. you can also activate the audio peak limiter ( 59) to control many aspects of high-end interchangeable lenses and now features a built-in iris ring for high-definition video. Introduction The XL H1S / XL H1A - Synchronization Genlock synchronization, as ...

XL H1S / XL H1A Instruction Manual
Page 6
...Time and Language Settings Set the time zone, date and time when you for purchasing the Canon XL H1S / XL H1A. The default setting is a trademark. • Microsoft, Windows and Windows Vista are ...in the manual, menu options in boldface indicate the default setting. The supplied lens, Canon HD Video Lens 20x Zoom XL 5.4-108 mm L IS III, is referred to as indicated in the bar. , : Function ...mode. Press the MENU button. 2. Should your camcorder fail to operate correctly, refer to select the setting option that matches your camcorder, or if the built-in this Manual Thank...
...Time and Language Settings Set the time zone, date and time when you for purchasing the Canon XL H1S / XL H1A. The default setting is a trademark. • Microsoft, Windows and Windows Vista are ...in the manual, menu options in boldface indicate the default setting. The supplied lens, Canon HD Video Lens 20x Zoom XL 5.4-108 mm L IS III, is referred to as indicated in the bar. , : Function ...mode. Press the MENU button. 2. Should your camcorder fail to operate correctly, refer to select the setting option that matches your camcorder, or if the built-in this Manual Thank...

XL H1S / XL H1A Instruction Manual
Page 7
Camera Section HD/SD Recorder Section HDV/DV HD/SD SDI Terminal HD/SD ( HDV/DV Terminal HDV/DV only) Playback Signal HDV/DV Introduction 7 The video signal can be HDV or DV, respectively. About the HD/HDV and SD/DV Specifications In the manual, a distinction is made between video signal standards (camera section) and recording standards (recorder section). the recording standard on the tape will be set to HD (high definition) or SD (standard definition) specifications;
Camera Section HD/SD Recorder Section HDV/DV HD/SD SDI Terminal HD/SD ( HDV/DV Terminal HDV/DV only) Playback Signal HDV/DV Introduction 7 The video signal can be HDV or DV, respectively. About the HD/HDV and SD/DV Specifications In the manual, a distinction is made between video signal standards (camera section) and recording standards (recorder section). the recording standard on the tape will be set to HD (high definition) or SD (standard definition) specifications;
XL H1S / XL H1A Instruction Manual
Page 9
... Output Standards ...84 Connecting to a Monitor/TV ...85 Audio Output ...90 Digital Video Control...92 Recording an External Video Signal (HDV/DV In, Analog Line-In 93 Converting Analog Signals into Digital Signals (Analog-Digital Converter 94 Connecting to a Computer...95 Customization Custom Preset ...
... Output Standards ...84 Connecting to a Monitor/TV ...85 Audio Output ...90 Digital Video Control...92 Recording an External Video Signal (HDV/DV In, Analog Line-In 93 Converting Analog Signals into Digital Signals (Analog-Digital Converter 94 Connecting to a Computer...95 Customization Custom Preset ...

XL H1S / XL H1A Instruction Manual
Page 10
Write down the number and other information here and retain this product can be found at the battery attachment unit of the camcorder. Checking the Supplied Accessories CA-920 Compact Power Adapter DC-920 DC Coupler BP-950G Battery Pack WL-D5000 Wireless Controller SDC-32M...SS-1100 Shoulder Strap Camcorder Dust Cap Canon HD Video Lens 20x Zoom XL 5.4-108 mm L IS III (incl. soft case) Lens Cap and Dust Cap Lens Hood The serial number of this book as a permanent record of your purchase to aid identification in case of Purchase: Model Name: XL H1S A / XL H1A A Purchased From:...
Write down the number and other information here and retain this product can be found at the battery attachment unit of the camcorder. Checking the Supplied Accessories CA-920 Compact Power Adapter DC-920 DC Coupler BP-950G Battery Pack WL-D5000 Wireless Controller SDC-32M...SS-1100 Shoulder Strap Camcorder Dust Cap Canon HD Video Lens 20x Zoom XL 5.4-108 mm L IS III (incl. soft case) Lens Cap and Dust Cap Lens Hood The serial number of this book as a permanent record of your purchase to aid identification in case of Purchase: Model Name: XL H1S A / XL H1A A Purchased From:...

XL H1S / XL H1A Instruction Manual
Page 13
.../SD SDI terminal* ( 86) GENLOCK terminal* ( 54) TC-OUT terminal* ( 54) * only. button ( 108) Cassette compartment ( 31) 13 Right side view Introduction S-video terminal ( 88) VIDEO OUT terminal (BNC) ( 88) VIDEO IN/OUT terminal (RCA) ( 88) OUT terminals (CH1/CH2, RCA) ( 90) IN terminals (CH1/CH2, RCA) ( 58) Terminal cover Battery attachment unit...
.../SD SDI terminal* ( 86) GENLOCK terminal* ( 54) TC-OUT terminal* ( 54) * only. button ( 108) Cassette compartment ( 31) 13 Right side view Introduction S-video terminal ( 88) VIDEO OUT terminal (BNC) ( 88) VIDEO IN/OUT terminal (RCA) ( 88) OUT terminals (CH1/CH2, RCA) ( 90) IN terminals (CH1/CH2, RCA) ( 58) Terminal cover Battery attachment unit...
XL H1S / XL H1A Instruction Manual
Page 36
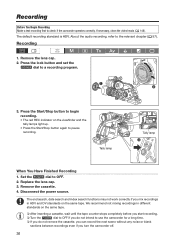
... lamp Tally lamp When You Have Finished Recording 1. Set the dial to pause recording. Remove the lens cap. 2. If necessary, clean the video heads ( 148). Remove the cassette. 4. Recording Recording Before You Begin Recording Make a test recording first to the relevant chapter ( 57). ...About the audio recording, refer to check if the camcorder operates correctly. Recording 1. We recommend not mixing recordings in different standards on the same tape. Press the lock button and set the dial...
... lamp Tally lamp When You Have Finished Recording 1. Set the dial to pause recording. Remove the lens cap. 2. If necessary, clean the video heads ( 148). Remove the cassette. 4. Recording Recording Before You Begin Recording Make a test recording first to the relevant chapter ( 57). ...About the audio recording, refer to check if the camcorder operates correctly. Recording 1. We recommend not mixing recordings in different standards on the same tape. Press the lock button and set the dial...
XL H1S / XL H1A Instruction Manual
Page 37
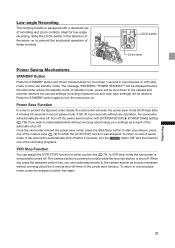
... wish to make adjustments to either custom key ( 79). Power Save Function In order to protect the tape and video heads, the camcorder will be displayed before the camcorder enters the standby mode. Press the STANDBY button again to turn the dial to OFF and then back to one ...[VCR STOP] function to the camera section as long as necessary without worrying about the 5-minute shut-off . In VCR stop mode the camcorder is only partially turned off (after 4 minutes 30 seconds in the direction of the recording programs. VCR Stop Function You can make adjustments ...
... wish to make adjustments to either custom key ( 79). Power Save Function In order to protect the tape and video heads, the camcorder will be displayed before the camcorder enters the standby mode. Press the STANDBY button again to turn the dial to OFF and then back to one ...[VCR STOP] function to the camera section as long as necessary without worrying about the 5-minute shut-off . In VCR stop mode the camcorder is only partially turned off (after 4 minutes 30 seconds in the direction of the recording programs. VCR Stop Function You can make adjustments ...
XL H1S / XL H1A Instruction Manual
Page 39
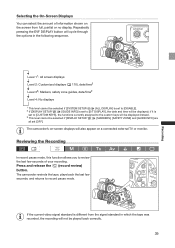
... Reviewing the Recording In record pause mode, this function allows you to review the last few seconds, and returns to record pause mode. The camcorder rewinds the tape, plays back the last few seconds of information shown on a connected external TV or monitor. Level 11: All screen displays ...following sequence. if it is different from full, partial or no display. Press and release the (record review) button. If the current video signal standard is set to the custom keys will not be played back correctly. 39 Recording Repeatedly pressing the EVF DISPLAY button will cycle...
... Reviewing the Recording In record pause mode, this function allows you to review the last few seconds, and returns to record pause mode. The camcorder rewinds the tape, plays back the last few seconds of information shown on a connected external TV or monitor. Level 11: All screen displays ...following sequence. if it is different from full, partial or no display. Press and release the (record review) button. If the current video signal standard is set to the custom keys will not be played back correctly. 39 Recording Repeatedly pressing the EVF DISPLAY button will cycle...

XL H1S / XL H1A Instruction Manual
Page 40
...when set to HD. If the position of the MODE SELECT switch is compatible with the Video ID-1 system. Selecting the Signal Standard and Aspect Ratio You can attach the optional RC-72 Ratio Converter... (0.8x) to get the same angle of view of the 16:9 aspect ratio. (Note that not all XL lenses are compatible with the RC-72.) 40 Change the position of the MODE SELECT switch. • HD...the TV manually. To play back 16:9 recordings, the TV set the MODE SELECT switch to use the camcorder as a high-definition (HD) camera. • SD 16:9, SD 4:3: To record on the tape in DV standard...
...when set to HD. If the position of the MODE SELECT switch is compatible with the Video ID-1 system. Selecting the Signal Standard and Aspect Ratio You can attach the optional RC-72 Ratio Converter... (0.8x) to get the same angle of view of the 16:9 aspect ratio. (Note that not all XL lenses are compatible with the RC-72.) 40 Change the position of the MODE SELECT switch. • HD...the TV manually. To play back 16:9 recordings, the TV set the MODE SELECT switch to use the camcorder as a high-definition (HD) camera. • SD 16:9, SD 4:3: To record on the tape in DV standard...
XL H1S / XL H1A Instruction Manual
Page 46
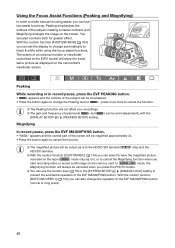
... central part of peak levels and [DISPLAY SETUP/ ] [PEAKING SETUP] setting. With the custom function [F.AST BW-MOD] ( 104) you start recording video or record a still image on the camcorder's viewfinder screen. You can be emphasized. • Press the button again to change automatically to black & white while using the focus assist...
... central part of peak levels and [DISPLAY SETUP/ ] [PEAKING SETUP] setting. With the custom function [F.AST BW-MOD] ( 104) you start recording video or record a still image on the camcorder's viewfinder screen. You can be emphasized. • Press the button again to change automatically to black & white while using the focus assist...

XL H1S / XL H1A Instruction Manual
Page 50
HD Video output from the following frame rates depending on the recording mode: HD 60i, 30F, 24F (2:3 pulldown-converted) SD 60i, 30F, 24F (2:3 pulldown-converted or 2:3:3:2 pulldown-... frames (bc and fg in order to transfer to 60i using the 2:3:3:2 pulldown method. This 24F mode is converted and recorded on a TV screen but video output from the HD/SD SDI terminal ( only) and the COMPONENT OUT terminal, the signal will be down -converted to the picture. For playback and...
HD Video output from the following frame rates depending on the recording mode: HD 60i, 30F, 24F (2:3 pulldown-converted) SD 60i, 30F, 24F (2:3 pulldown-converted or 2:3:3:2 pulldown-... frames (bc and fg in order to transfer to 60i using the 2:3:3:2 pulldown method. This 24F mode is converted and recorded on a TV screen but video output from the HD/SD SDI terminal ( only) and the COMPONENT OUT terminal, the signal will be down -converted to the picture. For playback and...

XL H1S / XL H1A Instruction Manual
Page 51
... Mode. • The selected frame rate appears on-screen. Selecting the Frame Rate Set the FRAME RATE switch to record in 24F 2:3 pulldown mode. Video recorded in orange. If you pause the recording. If the position of the FRAME RATE switch is changed while recording, the frame rate will...
... Mode. • The selected frame rate appears on-screen. Selecting the Frame Rate Set the FRAME RATE switch to record in 24F 2:3 pulldown mode. Video recorded in orange. If you pause the recording. If the position of the FRAME RATE switch is changed while recording, the frame rate will...

XL H1S / XL H1A Instruction Manual
Page 54
... [COUNT-UP] settings of the external timing signal can also be output also through the GENLOCK terminal, the V and H phases of the camcorder's time code will appear on tape. Time Code IN An external SMPTE-standard LTC timing signal received from the TC-IN terminal ( 56)....* SMPTE-standard LTC timing signal * As a reference video signal input you select the 24F frame rate (the mode will be synchronized to an external time code generator. Synchronizing the Camcorder's Time Code You can synchronize this camcorder's time code to it. Genlock When a reference sync signal (analog ...
... [COUNT-UP] settings of the external timing signal can also be output also through the GENLOCK terminal, the V and H phases of the camcorder's time code will appear on tape. Time Code IN An external SMPTE-standard LTC timing signal received from the TC-IN terminal ( 56)....* SMPTE-standard LTC timing signal * As a reference video signal input you select the 24F frame rate (the mode will be synchronized to an external time code generator. Synchronizing the Camcorder's Time Code You can synchronize this camcorder's time code to it. Genlock When a reference sync signal (analog ...

XL H1S / XL H1A Instruction Manual
Page 60
...[ON(OSD)]: To embed the audio and on-screen displays. If you wish to monitor audio in the video signal output from the SDI terminal. 60 With either setting, the audio and video signals recorded on the tape will be synchronized. You can activate the audio peak limiter to [LINE...setting option and close the menu. The audio peak limiter can select to synchronize the audio signal with the video signal by adding an equal amount of the audio signal along with the video signal being output from a tape that was originally recorded with the CH1 dial will appear on the signal...
...[ON(OSD)]: To embed the audio and on-screen displays. If you wish to monitor audio in the video signal output from the SDI terminal. 60 With either setting, the audio and video signals recorded on the tape will be synchronized. You can activate the audio peak limiter to [LINE...setting option and close the menu. The audio peak limiter can select to synchronize the audio signal with the video signal by adding an equal amount of the audio signal along with the video signal being output from a tape that was originally recorded with the CH1 dial will appear on the signal...

XL H1S / XL H1A Instruction Manual
Page 70
...is more prone to the appearance of video noise and artifacts (white dots, vertical streaks or blocking). When the GAIN dial is set to +18 dB or fine-tune the gain level in particular, allows you can activate the gain limit to prevent the camcorder from -3 dB to a position other... than a preset limit between 3 dB and 15 dB. mode When you can change the gain level in indoor or low-light scenes. Gain The gain control adjusts the level of the video signal generated depending on . Increases ...
...is more prone to the appearance of video noise and artifacts (white dots, vertical streaks or blocking). When the GAIN dial is set to +18 dB or fine-tune the gain level in particular, allows you can activate the gain limit to prevent the camcorder from -3 dB to a position other... than a preset limit between 3 dB and 15 dB. mode When you can change the gain level in indoor or low-light scenes. Gain The gain control adjusts the level of the video signal generated depending on . Increases ...

XL H1S / XL H1A Instruction Manual
Page 80
...CODE* * Default value in record pause mode, the index signal will appear while the index signal is being recorded (approx. 6.5 seconds). • When the camcorder is in mode. Activating the Functions with the custom keys. The zebra pattern is activated. Press the CUSTOM KEY (1 or 2) button. The VCR Stop mode... off so you can add an index signal to worry about the tape or the video heads. Press the button again to return to the custom key and close the menu. When you can show the camcorder's displays on a connected external monitor or TV. You can also start recording. • An...
...CODE* * Default value in record pause mode, the index signal will appear while the index signal is being recorded (approx. 6.5 seconds). • When the camcorder is in mode. Activating the Functions with the custom keys. The zebra pattern is activated. Press the CUSTOM KEY (1 or 2) button. The VCR Stop mode... off so you can add an index signal to worry about the tape or the video heads. Press the button again to return to the custom key and close the menu. When you can show the camcorder's displays on a connected external monitor or TV. You can also start recording. • An...

XL H1S / XL H1A Instruction Manual
Page 81
... time code. Button Lock Press the CUSTOM KEY (1 or 2) button. [TC HOLD] Time Code Hold You can only be canceled when you turn the camcorder on/off, change the operating mode between recording and playback or change the position of the / (card/tape) switch. [AUDIO LEVEL] Audio Level Indicator ...; The time code being output from the TC-OUT*, HD/SD SDI*, (LANC) and HDV/DV terminals will still be put on the video signal output from the COMPONENT OUT, VIDEO IN/OUT and IN/OUT (S-Video) terminals will be operated with an H next to prevent its accidental operation. Recording 81
... time code. Button Lock Press the CUSTOM KEY (1 or 2) button. [TC HOLD] Time Code Hold You can only be canceled when you turn the camcorder on/off, change the operating mode between recording and playback or change the position of the / (card/tape) switch. [AUDIO LEVEL] Audio Level Indicator ...; The time code being output from the TC-OUT*, HD/SD SDI*, (LANC) and HDV/DV terminals will still be put on the video signal output from the COMPONENT OUT, VIDEO IN/OUT and IN/OUT (S-Video) terminals will be operated with an H next to prevent its accidental operation. Recording 81


