Console Software Operations Manual
Page 2
...Canon camcorder compatible with CONSOLE iii Required Accessories iii System Requirements iii Preparation (Installation, Connection, Launch, Activation) Installing the Software and the Designated Drivers 1-1 Installing the AV/C Camera Storage Subunit-WIA Driver 1-2 Connecting the Camcorder 1-3 Connecting the Camcorder... Main Panel 2-1 Menu Bar ...2-1 Camcorder Status 2-2 Toolbar...2-2 Workspace 2-3 Camcorder Screen 2-3 [Option settings] and [Performance check] Video Folder and Recording Settings 3-1 [General] Tab ...3-1 [DV Rec] Tab ...3-2 [HDV Rec] Tab...3-2 [Performance check 3-3...
...Canon camcorder compatible with CONSOLE iii Required Accessories iii System Requirements iii Preparation (Installation, Connection, Launch, Activation) Installing the Software and the Designated Drivers 1-1 Installing the AV/C Camera Storage Subunit-WIA Driver 1-2 Connecting the Camcorder 1-3 Connecting the Camcorder... Main Panel 2-1 Menu Bar ...2-1 Camcorder Status 2-2 Toolbar...2-2 Workspace 2-3 Camcorder Screen 2-3 [Option settings] and [Performance check] Video Folder and Recording Settings 3-1 [General] Tab ...3-1 [DV Rec] Tab ...3-2 [HDV Rec] Tab...3-2 [Performance check 3-3...
Console Software Operations Manual
Page 4
... output the picture recorded on the tape. - Use an editing software that supports the HDV standard. This software can start /stop button - EJECT switch - Camcorder XL H1 XL2 Mode EXT.CONT. CONSOLE is available for directly controlling the camcorder. - When the camcorder is CONSOLE? mode, only the following limitations apply to the computer. With CONSOLE...
... output the picture recorded on the tape. - Use an editing software that supports the HDV standard. This software can start /stop button - EJECT switch - Camcorder XL H1 XL2 Mode EXT.CONT. CONSOLE is available for directly controlling the camcorder. - When the camcorder is CONSOLE? mode, only the following limitations apply to the computer. With CONSOLE...
Console Software Operations Manual
Page 8
... the location of the camcorder can be used. - HDV/DV terminal on the camcorder DV cable IEEE1394 port on the computer • When the camcorder is set to the Computer 1 Turn the camcorder's power on the camcorder mode, (Camcorder icon) and (Camera icon) appear under [My Computer]. Open [My Computer] and check if the [Canon Camera Storage Device...
... the location of the camcorder can be used. - HDV/DV terminal on the camcorder DV cable IEEE1394 port on the computer • When the camcorder is set to the Computer 1 Turn the camcorder's power on the camcorder mode, (Camcorder icon) and (Camera icon) appear under [My Computer]. Open [My Computer] and check if the [Canon Camera Storage Device...
Console Software Operations Manual
Page 17
... AVI type that is compatible with the same file name as the recording file will be changed . 4 Select whether or not you need to the camcorder. When [All pictures] or [I picture and P picture] is selected, data dropping ( 5-5) may occur. Select the AVI type that is ... the picture displayed in the preview. When using the editing software, load all the sound files. The recorded [MPEG2ES] picture cannot be recorded in HDV. 11 1 2 22 3 4 1 Select the recording file type. When using the editing software, load all the sound files. 1 Select the recording file...
... AVI type that is compatible with the same file name as the recording file will be changed . 4 Select whether or not you need to the camcorder. When [All pictures] or [I picture and P picture] is selected, data dropping ( 5-5) may occur. Select the AVI type that is ... the picture displayed in the preview. When using the editing software, load all the sound files. The recorded [MPEG2ES] picture cannot be recorded in HDV. 11 1 2 22 3 4 1 Select the recording file type. When using the editing software, load all the sound files. 1 Select the recording file...
Console Software Operations Manual
Page 19
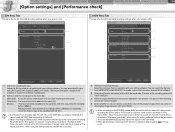
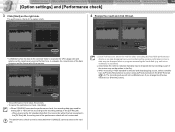
When receiving the DV standard data from the camcorder while [Frame] is selected in the [DV Rec] tab, the ...and the frame rate of the performance check will be according to the file). When recording in the [HDV Rec] tab. ( 3-2) The recording picture will not be affected even if you change the [Preview resolution] or...is selected and data dropping occurs, select a smaller size at [Preview Resolution] or [I picture only] at [Preview picture] in HDV standard is activated. A bar below the red line indicates that data may be executed. CONSOLE Windows [Option settings] ...
When receiving the DV standard data from the camcorder while [Frame] is selected in the [DV Rec] tab, the ...and the frame rate of the performance check will be according to the file). When recording in the [HDV Rec] tab. ( 3-2) The recording picture will not be affected even if you change the [Preview resolution] or...is selected and data dropping occurs, select a smaller size at [Preview Resolution] or [I picture only] at [Preview picture] in HDV standard is activated. A bar below the red line indicates that data may be executed. CONSOLE Windows [Option settings] ...
Console Software Operations Manual
Page 21
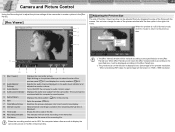
... also change the size of the preview window with the mouse. Displays the audio level output from the camcorder. When the preview is set to HDV, the computer takes a few seconds to display the camcorder picture in [Full Screen] mode, click the mouse to return to the previous size. 4 11 10... 4 Audio Level Indicator 5 Zebra Pattern 6 Split 7 Color/Monochrome 8 Interval Counter 9 Time Code 10 Recording Indicator 11 File Name Displays the camcorder picture. Right-clicking on the picture allows you to select the size of the file. Splits the preview ( 4-5). When the recording mode is ...
... also change the size of the preview window with the mouse. Displays the audio level output from the camcorder. When the preview is set to HDV, the computer takes a few seconds to display the camcorder picture in [Full Screen] mode, click the mouse to return to the previous size. 4 11 10... 4 Audio Level Indicator 5 Zebra Pattern 6 Split 7 Color/Monochrome 8 Interval Counter 9 Time Code 10 Recording Indicator 11 File Name Displays the camcorder picture. Right-clicking on the picture allows you to select the size of the file. Splits the preview ( 4-5). When the recording mode is ...

Console Software Operations Manual
Page 34
...Image File]: [Play Viewer]: Applies the same settings as the current image. Displays a selected still image file. The setting of the camcorder returns to the camcorder, and refreshes the window. Tabs of different categories of the selected image to original settings. A still reference image. Closes the [...the still image so the whole image will be displayed in DV and HDV mode, the color bars will be displayed on the candidate image highlights the corresponding setting. Placing the mouse cursor on the camcorder screen. The images used for the first time in a frame...
...Image File]: [Play Viewer]: Applies the same settings as the current image. Displays a selected still image file. The setting of the camcorder returns to the camcorder, and refreshes the window. Tabs of different categories of the selected image to original settings. A still reference image. Closes the [...the still image so the whole image will be displayed in DV and HDV mode, the color bars will be displayed on the candidate image highlights the corresponding setting. Placing the mouse cursor on the camcorder screen. The images used for the first time in a frame...

Console Software Operations Manual
Page 36
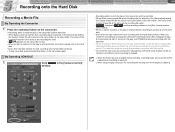
...not recorded during recording: - We recommend defragmenting the drive on which the video folder is 4 channels Checked Unchecked Checked Unchecked Checked Unchecked Checked Unchecked Camcorder's Audio Settings 2CH 4CH Not Limited Not Limited 3 hours 3 hours Not Limited Not Limited 3 hours 3 hours 4 hours 30 minutes Not ... disk during recording. - as well. Data may not operate correctly. - During option settings or performance check. - Standard DV HDV File Type AVI-Type1 AVI-Type2 MXF MPEG2TS MPEG2ES Creating WAV audio file for recording to a single file depends on both the ...
...not recorded during recording: - We recommend defragmenting the drive on which the video folder is 4 channels Checked Unchecked Checked Unchecked Checked Unchecked Checked Unchecked Camcorder's Audio Settings 2CH 4CH Not Limited Not Limited 3 hours 3 hours Not Limited Not Limited 3 hours 3 hours 4 hours 30 minutes Not ... disk during recording. - as well. Data may not operate correctly. - During option settings or performance check. - Standard DV HDV File Type AVI-Type1 AVI-Type2 MXF MPEG2TS MPEG2ES Creating WAV audio file for recording to a single file depends on both the ...
Console Software Operations Manual
Page 37
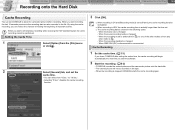
... same folder as the video folder. The name of the Custom Preset file is the same as the recording file name. •[ ] appears on the camcorder screen. • When no tape is inserted, or the tape is write-protected, recording is saved only on the hard disk. • Even when the... as the recording file name. • changes to record on the tape, and CONSOLE will keep recording onto the hard disk. • When recording in HDV standard on the camcorder again.
... same folder as the video folder. The name of the Custom Preset file is the same as the recording file name. •[ ] appears on the camcorder screen. • When no tape is inserted, or the tape is write-protected, recording is saved only on the hard disk. • Even when the... as the recording file name. • changes to record on the tape, and CONSOLE will keep recording onto the hard disk. • When recording in HDV standard on the camcorder again.
Console Software Operations Manual
Page 38
When you start the software. 2 Start the recording. ( 5-2) • CONSOLE records the cached picture and the camcorder picture onto the hard disk. • The cached picture will not be performed. When the recording mode is switched from to one of important scenes...and [Recording mode] is set to [Frame], the cache recording function is disabled. When recording in HDV, the cache recording time is actually longer than the time set CONSOLE to store the camcorder picture before recording. When the recording standard is changed . - When you start recording, the last 10 seconds ...
When you start the software. 2 Start the recording. ( 5-2) • CONSOLE records the cached picture and the camcorder picture onto the hard disk. • The cached picture will not be performed. When the recording mode is switched from to one of important scenes...and [Recording mode] is set to [Frame], the cache recording function is disabled. When recording in HDV, the cache recording time is actually longer than the time set CONSOLE to store the camcorder picture before recording. When the recording standard is changed . - When you start recording, the last 10 seconds ...
Console Software Operations Manual
Page 39
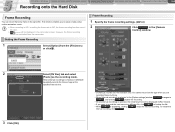
...the specified interval time. • CONSOLE records onto the hard disk only. Setting the Frame Recording 1 Select [Option] from the camcorder. To restart the interval recording, click . This function enables you to easily create a stop motion animation movie. When recording in... HDV or setting the frame rate to finalize the file. • While is appearing, clicking stops the interval recording. however, the frame recording cannot be displayed in the camcorder screen; You cannot record on the tape when you are...
...the specified interval time. • CONSOLE records onto the hard disk only. Setting the Frame Recording 1 Select [Option] from the camcorder. To restart the interval recording, click . This function enables you to easily create a stop motion animation movie. When recording in... HDV or setting the frame rate to finalize the file. • While is appearing, clicking stops the interval recording. however, the frame recording cannot be displayed in the camcorder screen; You cannot record on the tape when you are...
Console Software Operations Manual
Page 40
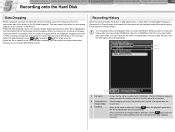
... in DV, a number of dropped frames and when recording in the [Information] tab of the [Camera Control] window. Dropping one block in HDV recording corresponds to dropping from a few seconds. • When the file is created on dropped data is selected: Clicking plays back the file ...Recording onto the Hard Disk Data Dropping • When a program accesses the hard disk during recording, a part of the data input from the camcorder may happen also when the processing capacity of the computer is insufficient. • When the data dropping occurs, the number of data droppings occurred...
... in DV, a number of dropped frames and when recording in the [Information] tab of the [Camera Control] window. Dropping one block in HDV recording corresponds to dropping from a few seconds. • When the file is created on dropped data is selected: Clicking plays back the file ...Recording onto the Hard Disk Data Dropping • When a program accesses the hard disk during recording, a part of the data input from the camcorder may happen also when the processing capacity of the computer is insufficient. • When the data dropping occurs, the number of data droppings occurred...
Console Software Operations Manual
Page 42
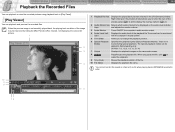
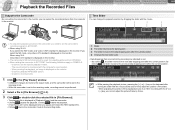
...playback position. 6 Special Playback Specifies the playback speed (Special Playback Modes). When the preview image is no Modes sound during special playback. DV/HDV: 1/3, 1/2.5, 1/2, 1x, 2x, 4x 7 Output Displays the playback images on the preview window allows you to select the size of the ...image may be improved by hiding the [Rec Panel] or [Rec Viewer], not displaying the camcorder picture. 1 2 3 4 1 Playback Preview Displays the played back pictures selected in the [File Browser] window. Selects which audio channel to be ...
...playback position. 6 Special Playback Specifies the playback speed (Special Playback Modes). When the preview image is no Modes sound during special playback. DV/HDV: 1/3, 1/2.5, 1/2, 1x, 2x, 4x 7 Output Displays the playback images on the preview window allows you to select the size of the ...image may be improved by hiding the [Rec Panel] or [Rec Viewer], not displaying the camcorder picture. 1 2 3 4 1 Playback Preview Displays the played back pictures selected in the [File Browser] window. Selects which audio channel to be ...
Console Software Operations Manual
Page 43
... the receiving mode. • While the camcorder is set the camcorder's recording program to EXT.CONT. When using XL2: Only video in HDV standard is displayed on the monitor; When pausing the playback, no image is displayed on the monitor. When using XL H1: If you select the HDV mode, only video in DV standard...
... the receiving mode. • While the camcorder is set the camcorder's recording program to EXT.CONT. When using XL2: Only video in HDV standard is displayed on the monitor; When pausing the playback, no image is displayed on the monitor. When using XL H1: If you select the HDV mode, only video in DV standard...
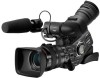
XL H1 Instruction Manual
Page 5
... item showing at its default position Setting the Time Zone, Date and Time Set the time zone, date and time when you for purchasing the Canon XL H1. Turn the SELECT dial to an SD memory card or a MultiMediaCard (MMC). Select [D/TIME SET ] and then select [T.ZONE/DST] and press... in this mode. : Function cannot be trademarks or registered trademarks of Canon Inc. • is New York. 4. The default setting is a trademark. • HDV and the logo are indicated as "HD 20x L IS Lens". The illustrations show the camcorder with the HD 20x L IS Lens attached. "Screen" ...
... item showing at its default position Setting the Time Zone, Date and Time Set the time zone, date and time when you for purchasing the Canon XL H1. Turn the SELECT dial to an SD memory card or a MultiMediaCard (MMC). Select [D/TIME SET ] and then select [T.ZONE/DST] and press... in this mode. : Function cannot be trademarks or registered trademarks of Canon Inc. • is New York. 4. The default setting is a trademark. • HDV and the logo are indicated as "HD 20x L IS Lens". The illustrations show the camcorder with the HD 20x L IS Lens attached. "Screen" ...
XL H1 Instruction Manual
Page 6
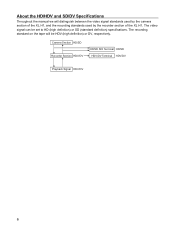
Camera Section HD/SD Recorder Section HDV/DV HD/SD SDI Terminal HD/SD HDV/DV Terminal HDV/DV Playback Signal HDV/DV 6 The recording standard on the tape will distinguish between the video signal standards used by the camera section of the XL H1, and the recording standards used by the recorder section of the XL H1. The video signal can be HDV (high definition) or DV, respectively. About the HD/HDV and SD/DV Specifications Throughout the manual we will be set to HD (high definition) or SD (standard definition) specifications.
Camera Section HD/SD Recorder Section HDV/DV HD/SD SDI Terminal HD/SD HDV/DV Terminal HDV/DV Playback Signal HDV/DV 6 The recording standard on the tape will distinguish between the video signal standards used by the camera section of the XL H1, and the recording standards used by the recorder section of the XL H1. The video signal can be HDV (high definition) or DV, respectively. About the HD/HDV and SD/DV Specifications Throughout the manual we will be set to HD (high definition) or SD (standard definition) specifications.
XL H1 Instruction Manual
Page 8
... Search ...106 Date Search ...107 Displaying the Data Code...108 Changing the Remote Sensor Mode ...109 Editing Recording an External Video Signal (Analog Line-In, HDV/DV In 110 Converting Analog Signals into Digital Signals (Analog-Digital Converter 112 Connecting to a Computer (IEEE1394) ...113 Using a Memory Card Selecting the Image Quality...
... Search ...106 Date Search ...107 Displaying the Data Code...108 Changing the Remote Sensor Mode ...109 Editing Recording an External Video Signal (Analog Line-In, HDV/DV In 110 Converting Analog Signals into Digital Signals (Analog-Digital Converter 112 Connecting to a Computer (IEEE1394) ...113 Using a Memory Card Selecting the Image Quality...
XL H1 Instruction Manual
Page 13
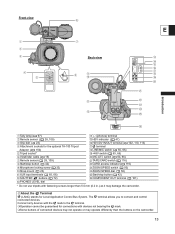
... the mark. Some buttons of connected devices may not operate or may operate differently than 5.5 mm (0.2 in.) as it may damage the camcorder. About the Terminal (LANC) stands for Local Application Control Bus System. The terminal allows you to the terminal. Operation cannot be guaranteed for...Start/stop button ( 42) Microphone locking screw ( 22) Strap mount ( 23) XLR input terminals ( 65, 66) SHUTTER buttons ( 72) PHONES LEVEL dial (phones) terminal HDV indicator ( 47) HDV/DV IN/OUT terminal ( 102, 110, 113) terminal LINE/MIC switch ( 65, 66) +48V switch ( 65, 66) MIC ATT.
... the mark. Some buttons of connected devices may not operate or may operate differently than 5.5 mm (0.2 in.) as it may damage the camcorder. About the Terminal (LANC) stands for Local Application Control Bus System. The terminal allows you to the terminal. Operation cannot be guaranteed for...Start/stop button ( 42) Microphone locking screw ( 22) Strap mount ( 23) XLR input terminals ( 65, 66) SHUTTER buttons ( 72) PHONES LEVEL dial (phones) terminal HDV indicator ( 47) HDV/DV IN/OUT terminal ( 102, 110, 113) terminal LINE/MIC switch ( 65, 66) +48V switch ( 65, 66) MIC ATT.
XL H1 Instruction Manual
Page 18
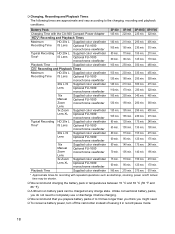
...375 min. 510 min. * Approximate times for recording with the CA-920 Compact Power Adapter HDV Recording and Playback Times Maximum HD 20x L Supplied color viewfinder Recording Time IS Lens Optional FU... Manual Zoom Lens Optional FU-1000 monochrome viewfinder 3x Zoom Supplied color viewfinder Lens XL Optional FU-1000 monochrome viewfinder Typical Recording HD 20x L Supplied color viewfinder Time*... with repeated operations such as start/stop, zooming, power on/off the camcorder instead of leaving it before charging. We recommend that you prepare battery packs 2 to...
...375 min. 510 min. * Approximate times for recording with the CA-920 Compact Power Adapter HDV Recording and Playback Times Maximum HD 20x L Supplied color viewfinder Recording Time IS Lens Optional FU... Manual Zoom Lens Optional FU-1000 monochrome viewfinder 3x Zoom Supplied color viewfinder Lens XL Optional FU-1000 monochrome viewfinder Typical Recording HD 20x L Supplied color viewfinder Time*... with repeated operations such as start/stop, zooming, power on/off the camcorder instead of leaving it before charging. We recommend that you prepare battery packs 2 to...
XL H1 Instruction Manual
Page 24
... instruction manual of the mount, or expose them to drop the lens or camcorder when mounting or removing the lens. Avoid direct sunlight or strong light sources when mounting or removing the lens. The XL mount is not HDV compatible, the messages "THIS LENS HAS NO STILL SHOOTING CAPABILITY" and "HD...
... instruction manual of the mount, or expose them to drop the lens or camcorder when mounting or removing the lens. Avoid direct sunlight or strong light sources when mounting or removing the lens. The XL mount is not HDV compatible, the messages "THIS LENS HAS NO STILL SHOOTING CAPABILITY" and "HD...
