
Instruction Manual
Page 13
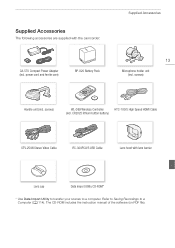
power cord and ferrite core) BP-820 Battery Pack Supplied Accessories 13 Microphone holder unit (incl. screws) WL-D89 Wireless Controller HTC-100/S High Speed HDMI ... Saving Recordings to a computer. CR2025 lithium button battery) STV-250N Stereo Video Cable IFC-300PCU/S USB Cable Lens hood with the camcorder: CA-570 Compact Power Adapter (incl. The CD-ROM includes the instruction manual of the software (on PDF file). screws) Handle unit (incl. Supplied Accessories The following accessories are supplied...
power cord and ferrite core) BP-820 Battery Pack Supplied Accessories 13 Microphone holder unit (incl. screws) WL-D89 Wireless Controller HTC-100/S High Speed HDMI ... Saving Recordings to a computer. CR2025 lithium button battery) STV-250N Stereo Video Cable IFC-300PCU/S USB Cable Lens hood with the camcorder: CA-570 Compact Power Adapter (incl. The CD-ROM includes the instruction manual of the software (on PDF file). screws) Handle unit (incl. Supplied Accessories The following accessories are supplied...

Instruction Manual
Page 21
... terminal. Pass the cable through the center of the compact power adapter cable. DC IN terminal 4 Attach the battery pack to the camcorder. • Press the battery pack softly into a power outlet. 3 Connect the compact power adapter to the cable about 6 cm (2.4 in place. Charging the... Battery Pack The camcorder can be powered with a fully charged battery pack, refer to Charging, Recording and Playback Times (A 175). 1 Connect the power cord to the compact power adapter. 2 Plug the power cord into the battery attachment unit and slide it forward until it...
... terminal. Pass the cable through the center of the compact power adapter cable. DC IN terminal 4 Attach the battery pack to the camcorder. • Press the battery pack softly into a power outlet. 3 Connect the compact power adapter to the cable about 6 cm (2.4 in place. Charging the... Battery Pack The camcorder can be powered with a fully charged battery pack, refer to Charging, Recording and Playback Times (A 175). 1 Connect the power cord to the compact power adapter. 2 Plug the power cord into the battery attachment unit and slide it forward until it...

Instruction Manual
Page 22
...down. 2 Slide the battery pack and then pull it out. After you turn on , the green POWER/CHG indicator will go out when you can power the camcorder using the compact power adapter so the battery pack will not be charged only when the camcorder is fully charged. 22 •... • To prevent equipment breakdowns and excessive heating, do not connect the supplied compact power adapter to Troubleshooting (A 158). The red POWER/CHG indicator will go out when the battery pack is off. • If the power supply was on in temperatures between 10 °C and 30 °C (50 °...
...down. 2 Slide the battery pack and then pull it out. After you turn on , the green POWER/CHG indicator will go out when you can power the camcorder using the compact power adapter so the battery pack will not be charged only when the camcorder is fully charged. 22 •... • To prevent equipment breakdowns and excessive heating, do not connect the supplied compact power adapter to Troubleshooting (A 158). The red POWER/CHG indicator will go out when the battery pack is off. • If the power supply was on in temperatures between 10 °C and 30 °C (50 °...

Instruction Manual
Page 38
... one of the camcorder. Do not remove the memory card. • Turn off the camcorder before using the compact power adapter. • Do not disconnect the power source or turn off the camcorder until it contains. Be sure to release it all the way out. To remove ...the double memory card slot cover. 38 3 Insert the memory card straight, with this camcorder. 1 Turn off the camcorder. • Make sure the POWER/CHG indicator is flashing. Using a Memory Card Inserting and Removing a Memory Card Make sure to initialize (A 38) all memory cards before inserting or removing ...
... one of the camcorder. Do not remove the memory card. • Turn off the camcorder before using the compact power adapter. • Do not disconnect the power source or turn off the camcorder until it contains. Be sure to release it all the way out. To remove ...the double memory card slot cover. 38 3 Insert the memory card straight, with this camcorder. 1 Turn off the camcorder. • Make sure the POWER/CHG indicator is flashing. Using a Memory Card Inserting and Removing a Memory Card Make sure to initialize (A 38) all memory cards before inserting or removing ...
Instruction Manual
Page 107
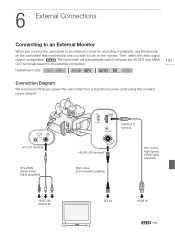
... OUT and HDMI OUT terminals based on the monitor. Operating modes: 107 Connection Diagram We recommend that matches the one you power the camcorder from a household power outlet using the compact power adapter. 6 External Connections External Connections Connecting to an External Monitor Connecting to an External Monitor When you connect the camcorder to an...
... OUT and HDMI OUT terminals based on the monitor. Operating modes: 107 Connection Diagram We recommend that matches the one you power the camcorder from a household power outlet using the compact power adapter. 6 External Connections External Connections Connecting to an External Monitor Connecting to an External Monitor When you connect the camcorder to an...

Instruction Manual
Page 114
... scene (either AVCHD or MP4 format) split because of the 4 GB maximum file size restriction and save your choice. Connection Diagram We recommend that you power the camcorder from a household power outlet using the compact power adapter.
... scene (either AVCHD or MP4 format) split because of the 4 GB maximum file size restriction and save your choice. Connection Diagram We recommend that you power the camcorder from a household power outlet using the compact power adapter.
Instruction Manual
Page 115
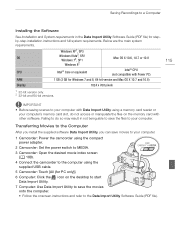
... Installing the Software See Installation and System requirements in not being able to save movies to your computer. 1 Camcorder: Power the camcorder using the compact power adapter. 2 Camcorder: Set the power switch to MEDIA. 3 Camcorder: Open the desired movie index screen (A 100). 4 Connect the camcorder to your computer...After you install the supplied software Data Import Utility, you can save the files to the computer using a memory card reader or your computer with Power PC) RAM 1 GB (2 GB for Windows 7 and 8, 64-bit version and Mac OS X 10.7 and 10.8) Display 1024 x 768 ...
... Installing the Software See Installation and System requirements in not being able to save movies to your computer. 1 Camcorder: Power the camcorder using the compact power adapter. 2 Camcorder: Set the power switch to MEDIA. 3 Camcorder: Open the desired movie index screen (A 100). 4 Connect the camcorder to your computer...After you install the supplied software Data Import Utility, you can save the files to the computer using a memory card reader or your computer with Power PC) RAM 1 GB (2 GB for Windows 7 and 8, 64-bit version and Mac OS X 10.7 and 10.8) Display 1024 x 768 ...
Instruction Manual
Page 119
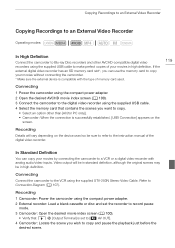
...on the screen. Recording 1 Camcorder: Power the camcorder using the supplied USB cable. 4 Select the memory card that q > [Output Terminal] is compatible with analog audio/video inputs. Connecting 1 Power the camcorder using the compact power adapter. 2 Open the desired AVCHD movie ...index screen (A 100). 3 Connect the camcorder to the digital video recorder using the compact power adapter. 2 External recorder: Load a blank cassette or disc...
...on the screen. Recording 1 Camcorder: Power the camcorder using the supplied USB cable. 4 Select the memory card that q > [Output Terminal] is compatible with analog audio/video inputs. Connecting 1 Power the camcorder using the compact power adapter. 2 Open the desired AVCHD movie ...index screen (A 100). 3 Connect the camcorder to the digital video recorder using the compact power adapter. 2 External recorder: Load a blank cassette or disc...

Instruction Manual
Page 150
...this setting will automatically change to on , the illumination sensor will detect the surrounding brightness and the camcorder will not turn the Powered IS function on in advance. [Powered IS Button]: Determines the operation mode of the assignable button set to one of two brightness levels. When set to [Ä... on the screen horizontally when you to one of the battery pack. • When demo mode is not on or activated and the compact power adapter is connected, this to make the screen brighter if it to the camcorder in these cases. You can verify the battery charge (as a ...
...this setting will automatically change to on , the illumination sensor will detect the surrounding brightness and the camcorder will not turn the Powered IS function on in advance. [Powered IS Button]: Determines the operation mode of the assignable button set to one of two brightness levels. When set to [Ä... on the screen horizontally when you to one of the battery pack. • When demo mode is not on or activated and the compact power adapter is connected, this to make the screen brighter if it to the camcorder in these cases. You can verify the battery charge (as a ...

Instruction Manual
Page 151
... more details, refer to Viewing GPS Information in the receiver's instruction manual. [GPS Information Display]: When the optional GP-E2 GPS Receiver is powered with the compact power adapter if you to view GPS information. This menu option is attached to the camcorder, you can verify the standard of the camcorder's settings. 151...
... more details, refer to Viewing GPS Information in the receiver's instruction manual. [GPS Information Display]: When the optional GP-E2 GPS Receiver is powered with the compact power adapter if you to view GPS information. This menu option is attached to the camcorder, you can verify the standard of the camcorder's settings. 151...

Instruction Manual
Page 156
... correctly set it contain any recordings? The battery may have the simplest of solutions - Is the compact power adapter correctly connected to the camcorder? (A 21) Recording • Did you turn the camcorder on or it turns off by Canon for use with this camcorder, there may be charged using a battery pack recommended by...
... correctly set it contain any recordings? The battery may have the simplest of solutions - Is the compact power adapter correctly connected to the camcorder? (A 21) Recording • Did you turn the camcorder on or it turns off by Canon for use with this camcorder, there may be charged using a battery pack recommended by...

Instruction Manual
Page 158
...103, 113) to free some space or replace the memory card. 6/7 lights up in red. - Turn off repeatedly. - Consult a Canon Service Center. Disconnect the power source and reconnect it again. - Select the [All Scenes] or [All Photos] option instead of the battery pack is exhausted. Replace or... Onscreen Displays lights up in red. - The battery pack is faulty. Use a different battery pack. - Charging has stopped because the compact power adapter or the battery pack is damaged. Picture and Sound The screen appears too dark. - Replace or charge the battery pack. - Remove the ...
...103, 113) to free some space or replace the memory card. 6/7 lights up in red. - Turn off repeatedly. - Consult a Canon Service Center. Disconnect the power source and reconnect it again. - Select the [All Scenes] or [All Photos] option instead of the battery pack is exhausted. Replace or... Onscreen Displays lights up in red. - The battery pack is faulty. Use a different battery pack. - Charging has stopped because the compact power adapter or the battery pack is damaged. Picture and Sound The screen appears too dark. - Replace or charge the battery pack. - Remove the ...
Instruction Manual
Page 160
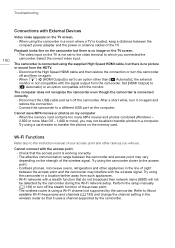
... a different USB port on the memory card. Set [HDMI Output] to the access point. - The wireless router is located, keep a distance between the compact power adapter and the power or antenna cables of sight between the camcorder and access point may vary depending on the TV screen. - Try using the camcorder closer to...
... a different USB port on the memory card. Set [HDMI Output] to the access point. - The wireless router is located, keep a distance between the compact power adapter and the power or antenna cables of sight between the camcorder and access point may vary depending on the TV screen. - Try using the camcorder closer to...

Instruction Manual
Page 164
...time you must use a memory card rated SD Speed Class 10. - Wait until the operation ends and do not disconnect the compact power adapter or remove the battery pack. Troubleshooting 164 Need to free some space. Change the position of scenes already at maximum - Change the ...Save your recordings (A 114) and initialize the memory card (A 38). Scene recorded using slow & fast motion, you turn on the camcorder if power supply was accidentally interrupted while the camcorder was writing on the memory card. - Cannot copy the scene. Scene recorded using another device and cannot...
...time you must use a memory card rated SD Speed Class 10. - Wait until the operation ends and do not disconnect the compact power adapter or remove the battery pack. Troubleshooting 164 Need to free some space. Change the position of scenes already at maximum - Change the ...Save your recordings (A 114) and initialize the memory card (A 38). Scene recorded using slow & fast motion, you turn on the camcorder if power supply was accidentally interrupted while the camcorder was writing on the memory card. - Cannot copy the scene. Scene recorded using another device and cannot...

Instruction Manual
Page 170
... Do not use memory cards in places subject to strong magnetic fields. • Do not leave memory cards in lithium battery: Connect the compact power adapter to keep the date/time and other settings. To recharge the built-in places subject to high humidity and high temperature. • Do not disassemble...Secure Digital (SD) memory cards have a physical switch to prevent writing on the memory card onto your safety, battery packs that are not genuine Canon battery packs, will appear and the remaining battery time will not be charged even if you do not expose them to this camcorder or to...
... Do not use memory cards in places subject to strong magnetic fields. • Do not leave memory cards in lithium battery: Connect the compact power adapter to keep the date/time and other settings. To recharge the built-in places subject to high humidity and high temperature. • Do not disassemble...Secure Digital (SD) memory cards have a physical switch to prevent writing on the memory card onto your safety, battery packs that are not genuine Canon battery packs, will appear and the remaining battery time will not be charged even if you do not expose them to this camcorder or to...
Instruction Manual
Page 173
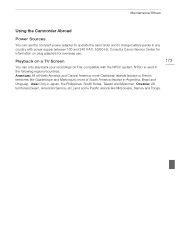
... between 100 and 240 V AC, 50/60 Hz. most of North America and Central America; Consult a Canon Service Center for overseas use the compact power adapter to operate the camcorder and to charge battery packs in any country with the NTSC system. Asia: Only in the following regions/countries: Americas: All ...
... between 100 and 240 V AC, 50/60 Hz. most of North America and Central America; Consult a Canon Service Center for overseas use the compact power adapter to operate the camcorder and to charge battery packs in any country with the NTSC system. Asia: Only in the following regions/countries: Americas: All ...

Instruction Manual
Page 174
... optional accessories are described in more detail in the following pages. 174 BP-820, BP-828 Battery Pack CG-800 Battery Charger CA-570 Compact Power Adapter TL-H58 Tele-converter WA-H58 Wide Attachment Protect Filter 58 mm, ND4L Filter 58 mm, ND8L Filter 58 mm HTC-100/S High Speed HDMI...
... optional accessories are described in more detail in the following pages. 174 BP-820, BP-828 Battery Pack CG-800 Battery Charger CA-570 Compact Power Adapter TL-H58 Tele-converter WA-H58 Wide Attachment Protect Filter 58 mm, ND4L Filter 58 mm, ND8L Filter 58 mm HTC-100/S High Speed HDMI...
Instruction Manual
Page 181
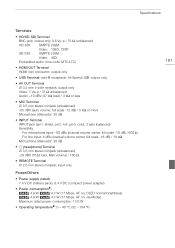
...load, Max volume) / 100 Ω • REMOTE Terminal ∅ 2.5 mm stereo minijack; input only Power/Others • Power supply (rated) 7.4 V DC (battery pack), 8.4 V DC (compact power adapter) • Power consumption: 4.8 W 4.7 W (17 Mbps, AF on, OLED normal brightness) 4.9 W 4.7 W (...17 Mbps, AF on, viewfinder) Maximum rated power consumption: 13.6 W • Operating temperature: 0 - 40 °C...
...load, Max volume) / 100 Ω • REMOTE Terminal ∅ 2.5 mm stereo minijack; input only Power/Others • Power supply (rated) 7.4 V DC (battery pack), 8.4 V DC (compact power adapter) • Power consumption: 4.8 W 4.7 W (17 Mbps, AF on, OLED normal brightness) 4.9 W 4.7 W (...17 Mbps, AF on, viewfinder) Maximum rated power consumption: 13.6 W • Operating temperature: 0 - 40 °C...
Instruction Manual
Page 182
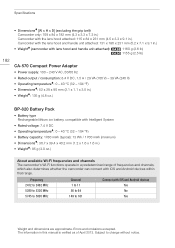
... attached: 131 x 180 x 231 mm (5.2 x 7.1 x 9.1 in.) • Weight (camcorder with lens hood and handle unit attached): 1160 g (2.6 lb) 1155 g (2.5 lb) 182 CA-570 Compact Power Adapter • Power supply: 100 - 240 V AC, 50/60 Hz • Rated output / consumption: 8.4 V DC, 1.5 A / 29 VA (100 V) - 39 VA (240 V) • Operating temperature: 0 - 40 °...
... attached: 131 x 180 x 231 mm (5.2 x 7.1 x 9.1 in.) • Weight (camcorder with lens hood and handle unit attached): 1160 g (2.6 lb) 1155 g (2.5 lb) 182 CA-570 Compact Power Adapter • Power supply: 100 - 240 V AC, 50/60 Hz • Rated output / consumption: 8.4 V DC, 1.5 A / 29 VA (100 V) - 39 VA (240 V) • Operating temperature: 0 - 40 °...
Instruction Manual
Page 183
... Built-in backup battery 170 Built-in microphone 79 C Capturing photos from a movie 102 CINEMA mode 52 Cinema-look filters 52 Color bars 90 Compact power adapter 21 Condensation 172 Connection to an external monitor 107 Converting movies to MP4 format 118 Copying recordings to a memory card . . . . 116 CUSTOM button 96 CUSTOM...
... Built-in backup battery 170 Built-in microphone 79 C Capturing photos from a movie 102 CINEMA mode 52 Cinema-look filters 52 Color bars 90 Compact power adapter 21 Condensation 172 Connection to an external monitor 107 Converting movies to MP4 format 118 Copying recordings to a memory card . . . . 116 CUSTOM button 96 CUSTOM...


