Instruction Manual
Page 4
...MPEG-4 standard and may be used on the camcorder's settings, onscreen displays and in this manual signifies Wi-Fi Protected Setup. • The Wi-Fi Protected Setup Identifier Mark is a mark ...device incorporates exFAT technology licensed from Dolby Laboratories. 4 Trademark Acknowledgements • SD, SDHC and SDXC Logos are trademarks of SD-3C, LLC. • Microsoft and Windows... video. No license is granted or implied for a personal and noncommercial purpose or (2) by a video provider licensed under the AT&T patents to Canon camcorders compliant with high-definition video composed...
...MPEG-4 standard and may be used on the camcorder's settings, onscreen displays and in this manual signifies Wi-Fi Protected Setup. • The Wi-Fi Protected Setup Identifier Mark is a mark ...device incorporates exFAT technology licensed from Dolby Laboratories. 4 Trademark Acknowledgements • SD, SDHC and SDXC Logos are trademarks of SD-3C, LLC. • Microsoft and Windows... video. No license is granted or implied for a personal and noncommercial purpose or (2) by a video provider licensed under the AT&T patents to Canon camcorders compliant with high-definition video composed...
Instruction Manual
Page 6
... audio settings of the built-in microphone by selecting the audio scene that matches your surroundings. OLED screen and LCD viewfinder The OLED screen and LCD viewfinder both have access to a variety of convenient functions such as using a smartphone or tablet as a remote control (A 124), using the Web browser on a smartphone or tablet to view the camcorder's recordings (A 130), and using the INPUT terminals, you shoot. This operation is indispensible in microphone, MIC audio input...
... audio settings of the built-in microphone by selecting the audio scene that matches your surroundings. OLED screen and LCD viewfinder The OLED screen and LCD viewfinder both have access to a variety of convenient functions such as using a smartphone or tablet as a remote control (A 124), using the Web browser on a smartphone or tablet to view the camcorder's recordings (A 130), and using the INPUT terminals, you shoot. This operation is indispensible in microphone, MIC audio input...
Instruction Manual
Page 8
... 27 Wireless Controller 28 Using a Tripod 29 Basic Operation of the Camcorder 30 Turning the Camcorder On and Off 30 Setting the Shooting Mode 31 Using the Touch Screen 31 Using the FUNC. Button and Joystick 32 Using the Menus 33 First Time Settings 35 Setting the Date and Time 35 Changing the Language 35 Changing the Time Zone 36 Using a Memory Card 37 Memory Cards Compatible for Use with the Camcorder 37 Inserting and Removing a Memory Card 38 Initializing a Memory Card 38 Selecting the Movie Format (AVCHD...
... 27 Wireless Controller 28 Using a Tripod 29 Basic Operation of the Camcorder 30 Turning the Camcorder On and Off 30 Setting the Shooting Mode 31 Using the Touch Screen 31 Using the FUNC. Button and Joystick 32 Using the Menus 33 First Time Settings 35 Setting the Date and Time 35 Changing the Language 35 Changing the Time Zone 36 Using a Memory Card 37 Memory Cards Compatible for Use with the Camcorder 37 Inserting and Removing a Memory Card 38 Initializing a Memory Card 38 Selecting the Movie Format (AVCHD...
Instruction Manual
Page 9
... Displays and Data Code 93 Infrared Recording 94 Activating Infrared Mode 94 Using the GP-E2 GPS Receiver 95 4 Customization 96 CUSTOM Dial and Button 96 Assignable Buttons 97 Changing the Assigned Function 97 Using an Assignable Button 98 Saving and Loading Menu Settings 99 Saving Menu Settings to a Memory Card 99 9 Loading Menu Settings from a Memory Card 99 5 Playback 100 Playing Back Video 100 Adjusting the volume 101 Displaying scene information 102 Capturing Photos During Movie Playback 102 Deleting Scenes 103 Deleting a Single Scene 103 Deleting...
... Displays and Data Code 93 Infrared Recording 94 Activating Infrared Mode 94 Using the GP-E2 GPS Receiver 95 4 Customization 96 CUSTOM Dial and Button 96 Assignable Buttons 97 Changing the Assigned Function 97 Using an Assignable Button 98 Saving and Loading Menu Settings 99 Saving Menu Settings to a Memory Card 99 9 Loading Menu Settings from a Memory Card 99 5 Playback 100 Playing Back Video 100 Adjusting the volume 101 Displaying scene information 102 Capturing Photos During Movie Playback 102 Deleting Scenes 103 Deleting a Single Scene 103 Deleting...
Instruction Manual
Page 11
... complement the basic operating procedures. • POINTS TO CHECK: Restrictions or requirements regarding the function described. • A: Reference page number within this manual: "Memory card" refers to the indicated model. • The following terms are simulated pictures taken with a still camera. "Screen" refers to pause the recording. "Scene" refers to one movie unit from the point you press the Y button to start recording until you press...
... complement the basic operating procedures. • POINTS TO CHECK: Restrictions or requirements regarding the function described. • A: Reference page number within this manual: "Memory card" refers to the indicated model. • The following terms are simulated pictures taken with a still camera. "Screen" refers to pause the recording. "Scene" refers to one movie unit from the point you press the Y button to start recording until you press...
Instruction Manual
Page 43
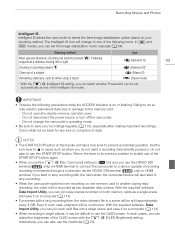
... files into a single scene and save it on one of data. Canon shall not be set the image stabilization mode manually (A 64). Failing to do not plan to a device capable of the OLED screen with a long recording time, the video (stream) file in (zooming toward T); Alternatively, you use the OLED screen. In such cases, you can select whether Powered IS can join relay scenes recorded on or flashing. In and modes...
... files into a single scene and save it on one of data. Canon shall not be set the image stabilization mode manually (A 64). Failing to do not plan to a device capable of the OLED screen with a long recording time, the video (stream) file in (zooming toward T); Alternatively, you use the OLED screen. In such cases, you can select whether Powered IS can join relay scenes recorded on or flashing. In and modes...

Instruction Manual
Page 44
... actual number of photos that can be recorded while the digital zoom is activated or during dual recording. • You can capture a photo from a movie during playback (A 102). • When you need to record for a long time with the camcorder set on a tripod, you can close the OLED panel and use only the viewfinder in order to save power when using a battery pack (A 25). During and modes, the camcorder can be recorded will...
... actual number of photos that can be recorded while the digital zoom is activated or during dual recording. • You can capture a photo from a movie during playback (A 102). • When you need to record for a long time with the camcorder set on a tripod, you can close the OLED panel and use only the viewfinder in order to save power when using a battery pack (A 25). During and modes, the camcorder can be recorded will...

Instruction Manual
Page 46
... shooting conditions. During and modes, the camcorder can take photos during record pause mode or capture photos from a scene during playback (A 102). • When you need to record for a long time with a long recording time, the video (stream) file in a scene will be recorded while the digital zoom is set to [ Rec Review] but you can set on a tripod, you can capture a photo from a movie during relay recording, the video will be saved on a 1 GB memory card are recorded as a single scene and save...
... shooting conditions. During and modes, the camcorder can take photos during record pause mode or capture photos from a scene during playback (A 102). • When you need to record for a long time with a long recording time, the video (stream) file in a scene will be recorded while the digital zoom is set to [ Rec Review] but you can set on a tripod, you can capture a photo from a movie during relay recording, the video will be saved on a 1 GB memory card are recorded as a single scene and save...
Instruction Manual
Page 51
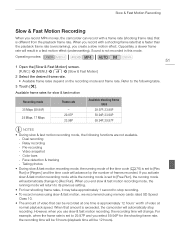
... by the number of video at normal playback speed. Available frame rates for the shooting frame rate, the recording time will be 6 hours (playback time will automatically change . Video snapshot - When you create a slow motion effect. For example, when the frame rate is set to 29.97P and you activate slow & fast motion recording mode while the running mode is set to [Rec Run]. Relay recording - Operating modes: 51 1 Open the [Slow & Fast Motion] screen. [FUNC.] > [MENU] > > [Slow & Fast Motion] 2 Select...
... by the number of video at normal playback speed. Available frame rates for the shooting frame rate, the recording time will be 6 hours (playback time will automatically change . Video snapshot - When you create a slow motion effect. For example, when the frame rate is set to 29.97P and you activate slow & fast motion recording mode while the running mode is set to [Rec Run]. Relay recording - Operating modes: 51 1 Open the [Slow & Fast Motion] screen. [FUNC.] > [MENU] > > [Slow & Fast Motion] 2 Select...

Instruction Manual
Page 70
... the camcorder is turned off . In that area is not constantly backlit. 1 Open the [° BLC Always On] screen. [FUNC.] > [° BLC Always On] 2 Touch [ON] and then touch [X]. • ° appears on and off , the power switch is operated or the recording program is changed. • If you set an assignable button to [y Exposure] (A 96), you can set q > [CUSTOM Dial & Button] to...
... the camcorder is turned off . In that area is not constantly backlit. 1 Open the [° BLC Always On] screen. [FUNC.] > [° BLC Always On] 2 Touch [ON] and then touch [X]. • ° appears on and off , the power switch is operated or the recording program is changed. • If you set an assignable button to [y Exposure] (A 96), you can set q > [CUSTOM Dial & Button] to...
Instruction Manual
Page 80
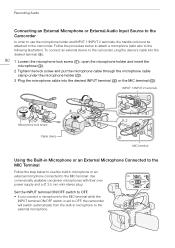
Recording Audio Connecting an External Microphone or External Audio Input Source to the Camcorder In order to use the built-in microphone or an external microphone connected to the MIC terminal. Use commercially available condenser microphones with their own power supply and a ∅ 3.5 mm mini-stereo plug. INPUT 1/INPUT 2 terminals Microphone lock screw Cable clamp MIC terminal Using the Built-in microphone to the camcorder, plug the device's cable into the desired terminal (ብ). 80 1 Loosen the microphone lock screw (ቢ), open the microphone holder...
Recording Audio Connecting an External Microphone or External Audio Input Source to the Camcorder In order to use the built-in microphone or an external microphone connected to the MIC terminal. Use commercially available condenser microphones with their own power supply and a ∅ 3.5 mm mini-stereo plug. INPUT 1/INPUT 2 terminals Microphone lock screw Cable clamp MIC terminal Using the Built-in microphone to the camcorder, plug the device's cable into the desired terminal (ብ). 80 1 Loosen the microphone lock screw (ቢ), open the microphone holder...
Instruction Manual
Page 85
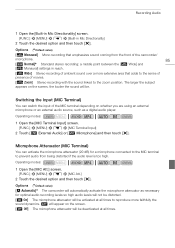
... presence of movies. [ï Zoom] Stereo recording with the sound linked to the zoom position. Operating modes: 1 Open the [MIC Terminal Input] screen. [FUNC.] > [MENU] > p > [MIC Terminal Input] 2 Touch [Þ External Audio] or [ß Microphone] and then touch [X]. Recording Audio 1 Open the [Built-in Mic Directionality] screen. [FUNC.] > [MENU] > p > [Built-in reach. [î Wide] Stereo recording of ambient sound over a more faithfully the sound dynamics. å will appear on whether you are using an external microphone or an external audio source...
... presence of movies. [ï Zoom] Stereo recording with the sound linked to the zoom position. Operating modes: 1 Open the [MIC Terminal Input] screen. [FUNC.] > [MENU] > p > [MIC Terminal Input] 2 Touch [Þ External Audio] or [ß Microphone] and then touch [X]. Recording Audio 1 Open the [Built-in Mic Directionality] screen. [FUNC.] > [MENU] > p > [Built-in reach. [î Wide] Stereo recording of ambient sound over a more faithfully the sound dynamics. å will appear on whether you are using an external microphone or an external audio source...

Instruction Manual
Page 97
... [X]. Default setting for assignable button 1. [ Rec Review] Reviews the last scene that was recorded (A 46). Operating modes: 97 Changing the Assigned Function 1 Open the selection screen for assignable button 2. [< IR Light]** Turns the infrared light on /off (A 94). [œ Audio Output CH]** Switches the audio output channel between CH1/CH2, CH1/CH1, CH2/CH2 and All/All (A 110). [ AF/MF]* Switches between autofocus and manual focus (A 54). Programs]* Functions the same as selecting [Ä White Balance] (A 71...
... [X]. Default setting for assignable button 1. [ Rec Review] Reviews the last scene that was recorded (A 46). Operating modes: 97 Changing the Assigned Function 1 Open the selection screen for assignable button 2. [< IR Light]** Turns the infrared light on /off (A 94). [œ Audio Output CH]** Switches the audio output channel between CH1/CH2, CH1/CH1, CH2/CH2 and All/All (A 110). [ AF/MF]* Switches between autofocus and manual focus (A 54). Programs]* Functions the same as selecting [Ä White Balance] (A 71...
Instruction Manual
Page 115
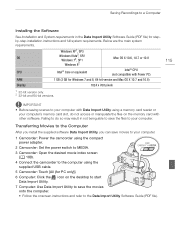
...; Follow the onscreen instructions and refer to the Data Import Utility Software Guide (PDF file). Below are the main system requirements. Saving Recordings to a Computer Installing the Software See Installation and System requirements in not being able to save the files to your computer. 1 Camcorder: Power the camcorder using the compact power adapter. 2 Camcorder: Set the power switch to MEDIA. 3 Camcorder: Open the desired movie index screen (A 100). 4 Connect the camcorder to the computer using a memory card reader or your computer's memory card slot, do so...
...; Follow the onscreen instructions and refer to the Data Import Utility Software Guide (PDF file). Below are the main system requirements. Saving Recordings to a Computer Installing the Software See Installation and System requirements in not being able to save the files to your computer. 1 Camcorder: Power the camcorder using the compact power adapter. 2 Camcorder: Set the power switch to MEDIA. 3 Camcorder: Open the desired movie index screen (A 100). 4 Connect the camcorder to the computer using a memory card reader or your computer's memory card slot, do so...
Instruction Manual
Page 119
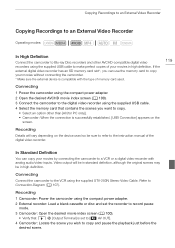
...Video Recorder Copying Recordings to an External Video Recorder Operating modes: In High Definition Connect the camcorder to Blu-ray Disc recorders and other than [All (for PC only)]. • Camcorder: When the connection is successfully established, [USB Connection] appears on the device used . If the external digital video recorder has an SD memory card slot*, you can copy your movies in high definition. Video output will vary depending on the screen. Connecting Connect the camcorder to the VCR using the compact power adapter. 2 External recorder: Load a blank cassette or disc...
...Video Recorder Copying Recordings to an External Video Recorder Operating modes: In High Definition Connect the camcorder to Blu-ray Disc recorders and other than [All (for PC only)]. • Camcorder: When the connection is successfully established, [USB Connection] appears on the device used . If the external digital video recorder has an SD memory card slot*, you can copy your movies in high definition. Video output will vary depending on the screen. Connecting Connect the camcorder to the VCR using the compact power adapter. 2 External recorder: Load a blank cassette or disc...
Instruction Manual
Page 124
... the image through live view, start and stop recording, and remotely control the shooting mode, exposure, white balance, aperture, gain, shutter speed, focus and zoom. * A Web browser that can operate the camcorder remotely via Wi-Fi Remote, a Web browser application that has JavaScript and cookies enabled is required. ** For details about compatible devices, operating systems, Web browsers, etc. NOTES • After setting the camcorder's password, it . Please make a note of devices compatible with the device. To change the password...
... the image through live view, start and stop recording, and remotely control the shooting mode, exposure, white balance, aperture, gain, shutter speed, focus and zoom. * A Web browser that can operate the camcorder remotely via Wi-Fi Remote, a Web browser application that has JavaScript and cookies enabled is required. ** For details about compatible devices, operating systems, Web browsers, etc. NOTES • After setting the camcorder's password, it . Please make a note of devices compatible with the device. To change the password...

Instruction Manual
Page 150
... screen to its previous setting. [OLED Mirror Image]: When set to on the screen. [VF Brightness]: Sets the viewfinder screen to one of two brightness levels. Operate any notification sounds. [Wireless Remote Control]: Allows the camcorder to be displayed. You can press an assignable button set to [Ä WB Priority] to switch between the current white balance and the white balance setting selected for [Set WB Priority]. [Focus/Zoom Ring Direction]: Changes the direction the focus/zoom ring needs to be turned. [Focus/Zoom...
... screen to its previous setting. [OLED Mirror Image]: When set to on the screen. [VF Brightness]: Sets the viewfinder screen to one of two brightness levels. Operate any notification sounds. [Wireless Remote Control]: Allows the camcorder to be displayed. You can press an assignable button set to [Ä WB Priority] to switch between the current white balance and the white balance setting selected for [Set WB Priority]. [Focus/Zoom Ring Direction]: Changes the direction the focus/zoom ring needs to be turned. [Focus/Zoom...
Instruction Manual
Page 165
... connect with devices connected to recover data - If the problem persists contact a Canon Service Center. Disconnect the USB cable. - Disconnect the USB cable, and restore the connection after a short while. IP address conflict - Alternatively, change the camera mode to recognize the data - Try the operation again. - After a short while, turn it on the computer screen, close it is trying to use a video quality setting other than 2,500 (Windows), or 1,000 (Mac OS). - Set the mode switch to n ( mode...
... connect with devices connected to recover data - If the problem persists contact a Canon Service Center. Disconnect the USB cable. - Disconnect the USB cable, and restore the connection after a short while. IP address conflict - Alternatively, change the camera mode to recognize the data - Try the operation again. - After a short while, turn it on the computer screen, close it is trying to use a video quality setting other than 2,500 (Windows), or 1,000 (Mac OS). - Set the mode switch to n ( mode...
Instruction Manual
Page 181
... °F) 181 output only Video: 1 Vp-p / 75 Ω unbalanced Audio: -10 dBV (47 kΩ load) / 3 kΩ or less • MIC Terminal ∅ 3.5 mm stereo minijack (unbalanced) -65 dBV (auto volume, full scale -12 dB) / 5 kΩ or more Microphone attenuator: 20 dB • INPUT Terminal INPUT jack (pin1: shield, pin2: hot, pin3: cold), 2 sets (balanced) Sensitivity: For microphone input: -60 dBu (manual volume center, full scale...
... °F) 181 output only Video: 1 Vp-p / 75 Ω unbalanced Audio: -10 dBV (47 kΩ load) / 3 kΩ or less • MIC Terminal ∅ 3.5 mm stereo minijack (unbalanced) -65 dBV (auto volume, full scale -12 dB) / 5 kΩ or more Microphone attenuator: 20 dB • INPUT Terminal INPUT jack (pin1: shield, pin2: hot, pin3: cold), 2 sets (balanced) Sensitivity: For microphone input: -60 dBu (manual volume center, full scale...
Instruction Manual
Page 183
... 150 Charging 21 Remaining charge indicator 155 Beach (recording program 73 Built-in backup battery 170 Built-in microphone 79 C Capturing photos from a movie 102 CINEMA mode 52 Cinema-look filters 52 Color bars 90 Compact power adapter 21 Condensation 172 Connection to an external monitor 107 Converting movies to MP4 format 118 Copying recordings to a memory card . . . . 116 CUSTOM button 96 CUSTOM dial 96 D Data code 93, 146 Date and time 35 Deleting Movies 103 Photos 113 Digital...
... 150 Charging 21 Remaining charge indicator 155 Beach (recording program 73 Built-in backup battery 170 Built-in microphone 79 C Capturing photos from a movie 102 CINEMA mode 52 Cinema-look filters 52 Color bars 90 Compact power adapter 21 Condensation 172 Connection to an external monitor 107 Converting movies to MP4 format 118 Copying recordings to a memory card . . . . 116 CUSTOM button 96 CUSTOM dial 96 D Data code 93, 146 Date and time 35 Deleting Movies 103 Photos 113 Digital...


