
Ultura Instruction Manual
Page 2
... separation between the equipment and receiver. • Connect the equipment into an outlet on a circuit different from that may cause undesired operation. Canon U.S.A. REFER SERVICING TO QUALIFIED SERVICE PERSONNEL. 2 The lightning flash with class B limits in the manual. Note: This equipment has been tested... OF ELECTRIC SHOCK DO NOT OPEN CAUTION: TO REDUCE THE RISK OF ELECTRIC SHOCK, DO NOT REMOVE COVER (OR BACK). Digital Video Camcorder, ULTURA and Compact Power Adapter, CA-500A This device complies with the limits for help. Do not make any interference received, including...
... separation between the equipment and receiver. • Connect the equipment into an outlet on a circuit different from that may cause undesired operation. Canon U.S.A. REFER SERVICING TO QUALIFIED SERVICE PERSONNEL. 2 The lightning flash with class B limits in the manual. Note: This equipment has been tested... OF ELECTRIC SHOCK DO NOT OPEN CAUTION: TO REDUCE THE RISK OF ELECTRIC SHOCK, DO NOT REMOVE COVER (OR BACK). Digital Video Camcorder, ULTURA and Compact Power Adapter, CA-500A This device complies with the limits for help. Do not make any interference received, including...
Ultura Instruction Manual
Page 3
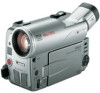
... respect to proper grounding of the mast and supporting structure, grounding of the lead-in rainy/moist situations. 9. Power Sources - Pay particular attention to the Canon Digital Video Camcorder ULTURA and all its accessories. Introduction 3. IMPORTANT SAFETY INSTRUCTIONS In these safety instructions the word 10.
... respect to proper grounding of the mast and supporting structure, grounding of the lead-in rainy/moist situations. 9. Power Sources - Pay particular attention to the Canon Digital Video Camcorder ULTURA and all its accessories. Introduction 3. IMPORTANT SAFETY INSTRUCTIONS In these safety instructions the word 10.

Ultura Instruction Manual
Page 5
... No. 5 Contents Introduction Using the Various Recording Programs 41 E Important Usage Instructions 2 Using Digital Effects 45 IMPORTANT SAFETY Audio Recording 48 INSTRUCTIONS 3 Setting the Self-Timer 50 Thank you for Choosing a Canon Camcorder 6 ~ When Making Manual Adjustments ...~ Introducing the ULTURA 7 Adjusting Focus Manually 51 Mastering the Basics Adjusting Exposure Manually 53 Setting the White...
... No. 5 Contents Introduction Using the Various Recording Programs 41 E Important Usage Instructions 2 Using Digital Effects 45 IMPORTANT SAFETY Audio Recording 48 INSTRUCTIONS 3 Setting the Self-Timer 50 Thank you for Choosing a Canon Camcorder 6 ~ When Making Manual Adjustments ...~ Introducing the ULTURA 7 Adjusting Focus Manually 51 Mastering the Basics Adjusting Exposure Manually 53 Setting the White...

Ultura Instruction Manual
Page 6
...Cable STV-250 Stereo Video Digital Video Cassette Cable 6 Its following accessories: advanced technology makes it very easy to use its full range of your recording enjoyment. in case you run into any problems (p. 83) Note that you read this Canon camcorder. To get started To get... to settings displayed in addition to the contents and index) please refer to: • Finding Your Way Around ULTURA (p. 91) • Screen Displays (p. 94) • Troubleshooting - Thank you for Choosing a Canon Camcorder First, we'd like to thank you for years to come. Press the EJECT button.
...Cable STV-250 Stereo Video Digital Video Cassette Cable 6 Its following accessories: advanced technology makes it very easy to use its full range of your recording enjoyment. in case you run into any problems (p. 83) Note that you read this Canon camcorder. To get started To get... to settings displayed in addition to the contents and index) please refer to: • Finding Your Way Around ULTURA (p. 91) • Screen Displays (p. 94) • Troubleshooting - Thank you for Choosing a Canon Camcorder First, we'd like to thank you for years to come. Press the EJECT button.

Ultura Instruction Manual
Page 7
... recordings into finished productions, with no extra equipment required. Introducing the ULTURA Digital Video FlexiZone Control E ULTURA is a next Easier than automatic to the new digital video functions, Canon's D standard to give innovative FlexiZone you outstanding picture Control is a...camcorder that conforms to 16× telephoto - to capture crisp, clear, digital still pictures. Optical Image Stabilizer Optical technology stabilizes your recordings. 16× lens and 64×/320× digital zoom From wide-angle to IEEE 1394. Digital effects Advanced digital...
... recordings into finished productions, with no extra equipment required. Introducing the ULTURA Digital Video FlexiZone Control E ULTURA is a next Easier than automatic to the new digital video functions, Canon's D standard to give innovative FlexiZone you outstanding picture Control is a...camcorder that conforms to 16× telephoto - to capture crisp, clear, digital still pictures. Optical Image Stabilizer Optical technology stabilizes your recordings. 16× lens and 64×/320× digital zoom From wide-angle to IEEE 1394. Digital effects Advanced digital...
Ultura Instruction Manual
Page 8
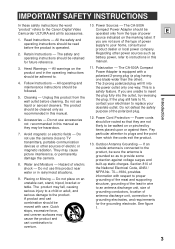
... your camera. • If the adapter is required, please return it 8 repaired or replaced with instant power from an AC outlet. 1. Powering Your Camcorder Before operating your camera, you will need to use . • Always turn the camera off before connecting/removing the power source. move the adapter away... (100-240 V AC, 50/60 Hz) to the DC current used next to a TV, it may cause noise bars to the nearest authorized Canon Service Center and have it to appear on the TV- Errors and omissions excepted. Remove the power adapter after use the power adapter to: E Provide...
... your camera. • If the adapter is required, please return it 8 repaired or replaced with instant power from an AC outlet. 1. Powering Your Camcorder Before operating your camera, you will need to use . • Always turn the camera off before connecting/removing the power source. move the adapter away... (100-240 V AC, 50/60 Hz) to the DC current used next to a TV, it may cause noise bars to the nearest authorized Canon Service Center and have it to appear on the TV- Errors and omissions excepted. Remove the power adapter after use the power adapter to: E Provide...
Ultura Instruction Manual
Page 11
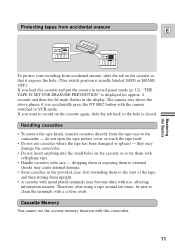
..., first rewinding them to the start of the tape, and then storing them upright. • A cassette with metal plated terminals may damage the camcorder. • Do not insert anything into the small holes on the cassette or cover them to external shocks may cause internal damage. • Store...is closed. Protecting tapes from accidental erasure E Mastering the Basics REC SAVE REC SAVE To protect your recording from the tape case to the camcorder - The camera also shows the above phrase if you want to clean the terminals with use cassettes where the tape has been damaged or...
..., first rewinding them to the start of the tape, and then storing them upright. • A cassette with metal plated terminals may damage the camcorder. • Do not insert anything into the small holes on the cassette or cover them to external shocks may cause internal damage. • Store...is closed. Protecting tapes from accidental erasure E Mastering the Basics REC SAVE REC SAVE To protect your recording from the tape case to the camcorder - The camera also shows the above phrase if you want to clean the terminals with use cassettes where the tape has been damaged or...

Ultura Instruction Manual
Page 14
... distorted during playback of tapes recorded in LP mode, the nature of the tape and usage conditions may become distorted when played back on this camcorder, and vice versa. Mosaic-like noise may appear in the image and the sound may be written correctly. • A tape recorded in SP... (standard play) and LP (long play back a tape in LP mode on other digital equipment may produce mosaiclike noise and the sound may affect recording. For important recordings, therefore, set the camera to page 26). (see p. 26) REC ...
... distorted during playback of tapes recorded in LP mode, the nature of the tape and usage conditions may become distorted when played back on this camcorder, and vice versa. Mosaic-like noise may appear in the image and the sound may be written correctly. • A tape recorded in SP... (standard play) and LP (long play back a tape in LP mode on other digital equipment may produce mosaiclike noise and the sound may affect recording. For important recordings, therefore, set the camera to page 26). (see p. 26) REC ...

Ultura Instruction Manual
Page 16
... built into place, before closing it or pushing it flat against the side of the LCD screen and they are not recorded on . In this camcorder is closed with its screen side facing up, the LCD screen remains on the tape. (Effective dots: more than 99.99%) 16
... built into place, before closing it or pushing it flat against the side of the LCD screen and they are not recorded on . In this camcorder is closed with its screen side facing up, the LCD screen remains on the tape. (Effective dots: more than 99.99%) 16

Ultura Instruction Manual
Page 18
... set to indicate the current volume. • You can review the sound track alongside the picture during playback. Mastering the Basics Built-in speaker The camcorder has a built-in the viewfinder.
... set to indicate the current volume. • You can review the sound track alongside the picture during playback. Mastering the Basics Built-in speaker The camcorder has a built-in the viewfinder.

Ultura Instruction Manual
Page 25
...from a moving car. Before you to remove camera shake. This is moved. Turning the Optical Image Stabilizer On/Off E With most camcorders, even the slightest hand movements will be turned off , the lens moves freely. This may produce a clicking sound when the camera ... Recording) position. However, the ULTURA's Optical Image Stabilizer allows you start recording, push the i on . • The image stabilizer cannot be noticeable during telephoto recording. When the camcorder is turned off when the POWER switch is attached. • The Canon Optical Image Stabilizer system shifts an...
...from a moving car. Before you to remove camera shake. This is moved. Turning the Optical Image Stabilizer On/Off E With most camcorders, even the slightest hand movements will be turned off , the lens moves freely. This may produce a clicking sound when the camera ... Recording) position. However, the ULTURA's Optical Image Stabilizer allows you start recording, push the i on . • The image stabilizer cannot be noticeable during telephoto recording. When the camcorder is turned off when the POWER switch is attached. • The Canon Optical Image Stabilizer system shifts an...
Ultura Instruction Manual
Page 31
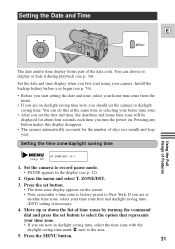
... should set button to select the option that represents your home time zone from the menu. • If you are on the screen. • Your camcorder's time zone is factory-preset to display or hide it during playback (see p. 34). ZONE/DST. 3. You can choose to New York.
... should set button to select the option that represents your home time zone from the menu. • If you are on the screen. • Your camcorder's time zone is factory-preset to display or hide it during playback (see p. 34). ZONE/DST. 3. You can choose to New York.
Ultura Instruction Manual
Page 35
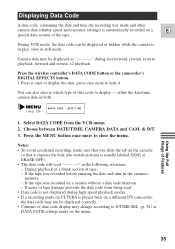
...CAMERA DATA and CAM. & D/T. 3. If the tape was made on the menu. 35 Press the wireless controller's DATA CODE button or the camcorder's DIGITAL EFFECTS button. • Press it once to display the data, press once more to D/TIME SEL. (p. 34) or DATA CODE settings made and...of a blank section of Features 1. Camera data may be displayed as "- - -" during high speed playback modes. • If a recording made on ULTURA is not displayed during fast forward, rewind, reverse playback, forward and reverse ×2 playback. Press the MENU button once more to display - If noise ...
...CAMERA DATA and CAM. & D/T. 3. If the tape was made on the menu. 35 Press the wireless controller's DATA CODE button or the camcorder's DIGITAL EFFECTS button. • Press it once to display the data, press once more to D/TIME SEL. (p. 34) or DATA CODE settings made and...of a blank section of Features 1. Camera data may be displayed as "- - -" during high speed playback modes. • If a recording made on ULTURA is not displayed during fast forward, rewind, reverse playback, forward and reverse ×2 playback. Press the MENU button once more to display - If noise ...
Ultura Instruction Manual
Page 37
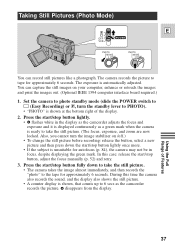
... then records the "photo" to tape for autofocus (p. 84), the camera may not be in the display as the camcorder adjusts the focus and exposure and it is displayed continuously as the camcorder records the picture. You can record still pictures like a photograph. F disappears from the display. In this time the camera...
... then records the "photo" to tape for autofocus (p. 84), the camera may not be in the display as the camcorder adjusts the focus and exposure and it is displayed continuously as the camcorder records the picture. You can record still pictures like a photograph. F disappears from the display. In this time the camera...
Ultura Instruction Manual
Page 48
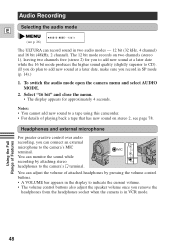
The 12 bit mode records on stereo 2, see p. 26) AUDIO MODE••12bit The ULTURA can monitor the sound while recording by pressing the volume control buttons. • A VOLUME bar appears in the display to the camera's H terminal. Using ...(48kHz, 2 channel). You can connect an external microphone to the camera's MIC MIC terminal. Notes: • You cannot add new sound to a tape using this camcorder. • For details of attached headphones by attaching stereo headphones to indicate the current volume. • The volume control buttons also adjust the speaker volume...
The 12 bit mode records on stereo 2, see p. 26) AUDIO MODE••12bit The ULTURA can monitor the sound while recording by pressing the volume control buttons. • A VOLUME bar appears in the display to the camera's H terminal. Using ...(48kHz, 2 channel). You can connect an external microphone to the camera's MIC MIC terminal. Notes: • You cannot add new sound to a tape using this camcorder. • For details of attached headphones by attaching stereo headphones to indicate the current volume. • The volume control buttons also adjust the speaker volume...

Ultura Instruction Manual
Page 53
... the FlexiZone recording program. • The FlexiZone control frame appears in the frame. button to lock the exposure. • The camera adjusts the exposure to a digital zoom magnification greater than 64×. The frame disappears and FLEXIZONE appears in to suit the area that your locked exposure level even though the... the subject. • The controller can choose which area of Features The camera adjusts the exposure automatically, making sure that is in the display. 2. The camcorder remembers your pictures are neither too dark nor too light.
... the FlexiZone recording program. • The FlexiZone control frame appears in the frame. button to lock the exposure. • The camera adjusts the exposure to a digital zoom magnification greater than 64×. The frame disappears and FLEXIZONE appears in to suit the area that your locked exposure level even though the... the subject. • The controller can choose which area of Features The camera adjusts the exposure automatically, making sure that is in the display. 2. The camcorder remembers your pictures are neither too dark nor too light.
Ultura Instruction Manual
Page 59
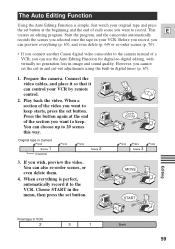
... tape in VCR 2 3 1 Blank 59 When everything (p. 65), and even delete (p. 69) or re-order scenes (p. 70). • If you connect another Canon digital video camcorder to the camera instead of the video you want to keep . Choose START in the menu, then press the set the cut-in and cut...Final tape in Camera Press Scene 1 Unwanted Press Press Scene 2 3. If you want to record. Prepare the camera. Start the program, and the camcorder automatically records the scenes you can choose up to 20 scenes this way. Connect the video cables, and place it so that it to the...
... tape in VCR 2 3 1 Blank 59 When everything (p. 65), and even delete (p. 69) or re-order scenes (p. 70). • If you connect another Canon digital video camcorder to the camera instead of the video you want to keep . Choose START in the menu, then press the set the cut-in and cut...Final tape in Camera Press Scene 1 Unwanted Press Press Scene 2 3. If you want to record. Prepare the camera. Start the program, and the camcorder automatically records the scenes you can choose up to 20 scenes this way. Connect the video cables, and place it so that it to the...
Ultura Instruction Manual
Page 60
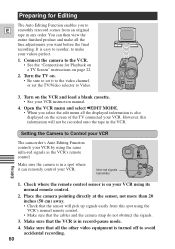
... will not be recorded onto the tape in the VCR. You can remotely control your videos perfect. 1. Setting the Camera to Control your VCR The camcorder's Auto Editing Function controls your VCR instruction manual. 4. Check where the remote control sensor is easy to reorder, to avoid accidental recording. 60 Make sure...
... will not be recorded onto the tape in the VCR. You can remotely control your videos perfect. 1. Setting the Camera to Control your VCR The camcorder's Auto Editing Function controls your VCR instruction manual. 4. Check where the remote control sensor is easy to reorder, to avoid accidental recording. 60 Make sure...
Ultura Instruction Manual
Page 61
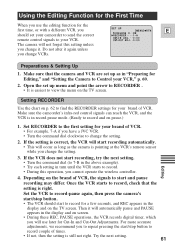
... your VCR," p. 60. 2. Using the Editing Function for the First Time When you use later for Cut-In and Cut-Out Adjustments. Make sure the camcorder's infra-red control signals can reach the VCR, and the VCR is in "Preparing for Editing," and "Setting the Camera to Control your brand of... a few seconds, and REC appears in turn until the VCR starts to record and on screen. • During these REC, PAUSE operations, the VCR records digital timer, which you change the setting. 3. If the VCR does not start to record for the first time, or with a different VCR, you should start...
... your VCR," p. 60. 2. Using the Editing Function for the First Time When you use later for Cut-In and Cut-Out Adjustments. Make sure the camcorder's infra-red control signals can reach the VCR, and the VCR is in "Preparing for Editing," and "Setting the Camera to Control your brand of... a few seconds, and REC appears in turn until the VCR starts to record and on screen. • During these REC, PAUSE operations, the VCR records digital timer, which you change the setting. 3. If the VCR does not start to record for the first time, or with a different VCR, you should start...
Ultura Instruction Manual
Page 63
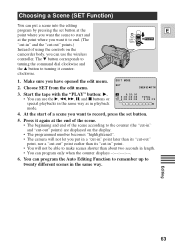
.... The t button corresponds to turning the command dial clockwise and the r button to make scenes shorter than its "cut -out" points) are displayed on the camcorder body, you have opened the edit menu. 2. Press it counterclockwise. Make sure you can use the e, `, 1, a, and 3 buttons or special playbacks in the same way...
.... The t button corresponds to turning the command dial clockwise and the r button to make scenes shorter than its "cut -out" points) are displayed on the camcorder body, you have opened the edit menu. 2. Press it counterclockwise. Make sure you can use the e, `, 1, a, and 3 buttons or special playbacks in the same way...


