
User Manual
Page 2
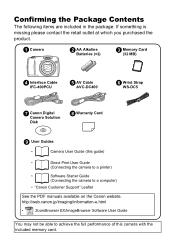
...e AV Cable AVC-DC400 f Wrist Strap WS-DC5 g Canon Digital Camera Solution Disk h Warranty Card i User Guides • Camera User Guide (this camera with the included memory card. http://web.canon.jp/imaging/information-e.html • ZoomBrowser EX/ImageBrowser Software User Guide You may not be able to achieve the full performance of this guide) • Direct Print User Guide (Connecting the camera to a printer) • Software Starter Guide (Connecting the camera to a computer) • "Canon Customer Support" Leaflet See the PDF manuals available on the Canon website...
...e AV Cable AVC-DC400 f Wrist Strap WS-DC5 g Canon Digital Camera Solution Disk h Warranty Card i User Guides • Camera User Guide (this camera with the included memory card. http://web.canon.jp/imaging/information-e.html • ZoomBrowser EX/ImageBrowser Software User Guide You may not be able to achieve the full performance of this guide) • Direct Print User Guide (Connecting the camera to a printer) • Software Starter Guide (Connecting the camera to a computer) • "Canon Customer Support" Leaflet See the PDF manuals available on the Canon website...
User Manual
Page 6
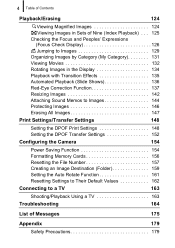
...Red-Eye Correction Function 137 Resizing Images 142 Attaching Sound Memos to Images 144 Protecting Images 146 Erasing All Images 147 Print Settings/Transfer Settings 148 Setting the DPOF Print Settings 148 Setting the DPOF Transfer Settings 152 Configuring the Camera 154 Power Saving Function 154 Formatting Memory Cards 156 Resetting the File Number 157 Creating an Image Destination (Folder 159 Setting the Auto Rotate Function 161 Resetting Settings to Their Default Values 162 Connecting to a TV 163 Shooting/Playback Using a TV 163 Troubleshooting 164 List of Messages...
...Red-Eye Correction Function 137 Resizing Images 142 Attaching Sound Memos to Images 144 Protecting Images 146 Erasing All Images 147 Print Settings/Transfer Settings 148 Setting the DPOF Print Settings 148 Setting the DPOF Transfer Settings 152 Configuring the Camera 154 Power Saving Function 154 Formatting Memory Cards 156 Resetting the File Number 157 Creating an Image Destination (Folder 159 Setting the Auto Rotate Function 161 Resetting Settings to Their Default Values 162 Connecting to a TV 163 Shooting/Playback Using a TV 163 Troubleshooting 164 List of Messages...
User Manual
Page 16
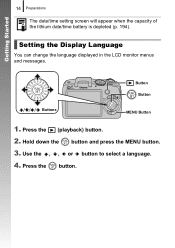
Getting Started 14 Preparations The date/time setting screen will appear when the capacity of the lithium date/time battery is depleted (p. 194). Press the (playback) button. 2. Use the , , or button to select a language. 4. Setting the Display Language You can change the language displayed in the LCD monitor menus and messages. Press the button. Hold down the button and press the MENU button. 3. Button Button Buttons MENU Button 1.
Getting Started 14 Preparations The date/time setting screen will appear when the capacity of the lithium date/time battery is depleted (p. 194). Press the (playback) button. 2. Use the , , or button to select a language. 4. Setting the Display Language You can change the language displayed in the LCD monitor menus and messages. Press the button. Hold down the button and press the MENU button. 3. Button Button Buttons MENU Button 1.
User Manual
Page 22
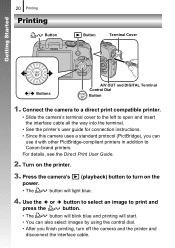
Connect the camera to a direct print compatible printer. • Slide the camera's terminal cover to the left to open and insert the interface cable all the way into the terminal. • See the printer's user guide for connection instructions. • Since this camera uses a standard protocol (PictBridge), you finish printing, turn on the printer. 3. Press the camera's power. (playback) button to print and press the button. • The button will blink blue and printing will light blue. 4. Use the or button to...
Connect the camera to a direct print compatible printer. • Slide the camera's terminal cover to the left to open and insert the interface cable all the way into the terminal. • See the printer's user guide for connection instructions. • Since this camera uses a standard protocol (PictBridge), you finish printing, turn on the printer. 3. Press the camera's power. (playback) button to print and press the button. • The button will blink blue and printing will light blue. 4. Use the or button to...
User Manual
Page 29
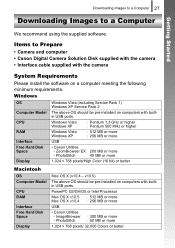
... Please install the software on computers with builtin USB ports. Downloading Images to a Computer 27 Downloading Images to Prepare • Camera and computer • Canon Digital Camera Solution Disk supplied with the camera • Interface cable supplied with builtin USB ports. Windows Vista Windows XP : Pentium 1.3 GHz or higher : Pentium 500 MHz or higher Windows Vista Windows XP : 512 MB or more : 256 MB or more USB Free Hard Disk Space Display • Canon Utilities...
... Please install the software on computers with builtin USB ports. Downloading Images to a Computer 27 Downloading Images to Prepare • Camera and computer • Canon Digital Camera Solution Disk supplied with the camera • Interface cable supplied with builtin USB ports. Windows Vista Windows XP : Pentium 1.3 GHz or higher : Pentium 500 MHz or higher Windows Vista Windows XP : 512 MB or more : 256 MB or more USB Free Hard Disk Space Display • Canon Utilities...

User Manual
Page 36
Getting Started 34 System Map System Map Supplied with Camera Interface Cable IFC-400PCU*1 Wrist Strap WS-DC5 Memory Card (32 MB) AV Cable AVC-DC400*1 AA-size Alkaline Batteries (×2) Canon Digital Camera Solution Disk Battery and Charger Kit CBK4-300*5 AC Adapter Kit ACK800 „ Battery Charger CB-5AH/CB5AHE „ AA-size NiMH batteries NB-3AH (×4) • NiMH Battery NB4-300 (set of 4 AA-size) also available separately. • Two batteries are used for this camera. „ Compact Power Adapter CA-PS800 „ Power Cord
Getting Started 34 System Map System Map Supplied with Camera Interface Cable IFC-400PCU*1 Wrist Strap WS-DC5 Memory Card (32 MB) AV Cable AVC-DC400*1 AA-size Alkaline Batteries (×2) Canon Digital Camera Solution Disk Battery and Charger Kit CBK4-300*5 AC Adapter Kit ACK800 „ Battery Charger CB-5AH/CB5AHE „ AA-size NiMH batteries NB-3AH (×4) • NiMH Battery NB4-300 (set of 4 AA-size) also available separately. • Two batteries are used for this camera. „ Compact Power Adapter CA-PS800 „ Power Cord
User Manual
Page 51
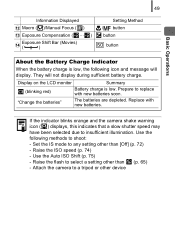
... device Set the IS mode to shoot: - Use the Auto ISO Shift (p. 75) - If the indicator blinks orange and the camera shake warning icon ( ) displays, this indicates that a slow shutter speed may have been selected due to a tripod or other than (p. 65) - Raise the ISO speed (p. 74) - They will display. Use the following icon and message will not display during sufficient battery charge. Basic Operations 49 Information Displayed l Macro ( )/Manual Focus ( ) m Exposure Compensation ( ... ) n Exposure ( ) Shift Bar (Movies) Setting Method / button button button...
... device Set the IS mode to shoot: - Use the Auto ISO Shift (p. 75) - If the indicator blinks orange and the camera shake warning icon ( ) displays, this indicates that a slow shutter speed may have been selected due to a tripod or other than (p. 65) - Raise the ISO speed (p. 74) - They will display. Use the following icon and message will not display during sufficient battery charge. Basic Operations 49 Information Displayed l Macro ( )/Manual Focus ( ) m Exposure Compensation ( ... ) n Exposure ( ) Shift Bar (Movies) Setting Method / button button button...
User Manual
Page 59
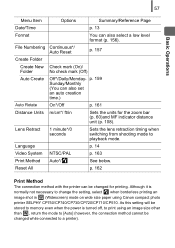
... lens retraction timing when switching from shooting mode to change the setting, select when borderless printing an image shot in Sets the units for printing. Reset All p. 162 Print Method The connection method with the printer can also set an auto creation time.) Auto Rotate On*/Off p. 161 Distance Units m/cm*/ ft/in (Widescreen) mode on wide size paper using an image size other than , return the mode to a printer). Basic Operations 57 Menu Item Options Summary/Reference Page Date/Time...
... lens retraction timing when switching from shooting mode to change the setting, select when borderless printing an image shot in Sets the units for printing. Reset All p. 162 Print Method The connection method with the printer can also set an auto creation time.) Auto Rotate On*/Off p. 161 Distance Units m/cm*/ ft/in (Widescreen) mode on wide size paper using an image size other than , return the mode to a printer). Basic Operations 57 Menu Item Options Summary/Reference Page Date/Time...
User Manual
Page 76
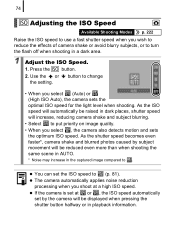
... ISO Speed. 1. z The camera automatically applies noise reduction processing when you wish to reduce the effects of camera shake or avoid blurry subjects, or to turn the flash off when shooting in the captured image compared to . z If the camera is set at a high ISO speed. Press the button. 2. 74 Adjusting the ISO Speed Available Shooting Modes p. 222 Raise the ISO speed to use a fast shutter speed when you shoot at or , the ISO speed automatically set...
... ISO Speed. 1. z The camera automatically applies noise reduction processing when you wish to reduce the effects of camera shake or avoid blurry subjects, or to turn the flash off when shooting in the captured image compared to . z If the camera is set at a high ISO speed. Press the button. 2. 74 Adjusting the ISO Speed Available Shooting Modes p. 222 Raise the ISO speed to use a fast shutter speed when you shoot at or , the ISO speed automatically set...
User Manual
Page 77
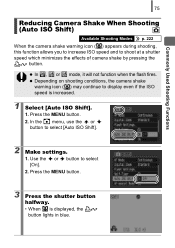
... shooting, this function allows you to increase ISO speed and to select [On]. 2. z In , or mode, it will not function when the flash fires. z Depending on shooting conditions, the camera shake warning icon ( ) may continue to select [Auto ISO Shift]. 2 Make settings. 1. Use the or button to shoot at a shutter speed which minimizes the effects of camera shake by pressing the button. In the menu, use the or button to display even if the ISO speed is displayed, the button lights...
... shooting, this function allows you to increase ISO speed and to select [On]. 2. z In , or mode, it will not function when the flash fires. z Depending on shooting conditions, the camera shake warning icon ( ) may continue to select [Auto ISO Shift]. 2 Make settings. 1. Use the or button to shoot at a shutter speed which minimizes the effects of camera shake by pressing the button. In the menu, use the or button to display even if the ISO speed is displayed, the button lights...
User Manual
Page 97
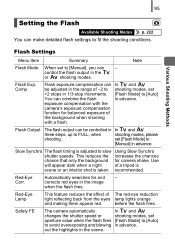
... shot is adjusted to slow Using Slow Synchro shutter speeds. Flash Output The flash output can make detailed flash settings to [Auto] You can - recommended. Automatically searches for camera shake. Red-Eye Lamp This feature reduces the effect of the background when shooting with the camera's exposure compensation function for balanced exposure of The red-eye reduction light reflecting back from the eyes lamp lights orange and making them appear red. before the flash fires. Flash Settings Menu Item Summary Note Flash Mode...
... shot is adjusted to slow Using Slow Synchro shutter speeds. Flash Output The flash output can make detailed flash settings to [Auto] You can - recommended. Automatically searches for camera shake. Red-Eye Lamp This feature reduces the effect of the background when shooting with the camera's exposure compensation function for balanced exposure of The red-eye reduction light reflecting back from the eyes lamp lights orange and making them appear red. before the flash fires. Flash Settings Menu Item Summary Note Flash Mode...
User Manual
Page 150
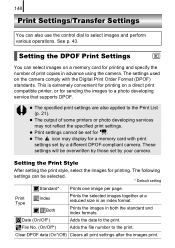
... the number of some printers or photo developing services may display for sending the images to select images and perform various operations. Setting the Print Style After setting the print style, select the images for . 148 Print Settings/Transfer Settings You can also use the control dial to a photo developing service that supports DPOF. The settings used on a direct print compatible printer, or for a memory card with the Digital Print Order Format (DPOF) standards. This is extremely convenient for printing on the camera comply with print settings set...
... the number of some printers or photo developing services may display for sending the images to select images and perform various operations. Setting the Print Style After setting the print style, select the images for . 148 Print Settings/Transfer Settings You can also use the control dial to a photo developing service that supports DPOF. The settings used on a direct print compatible printer, or for a memory card with the Digital Print Order Format (DPOF) standards. This is extremely convenient for printing on the camera comply with print settings set...
User Manual
Page 166
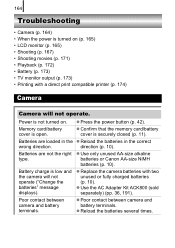
...open. Poor contact between camera and battery terminals. Memory card/battery cover is securely closed (p. 11). direction (p. 10). batteries or Canon AA-size NiMH batteries (p. 10). z Poor contact between camera and battery terminals. z Replace the camera batteries with a direct print compatible printer (p. 174) Camera Camera will not operate ("Change the batteries" message displays). Battery charge is low and the camera will not operate. Batteries are not the right z Use only unused AA-size alkaline type. Power is not turned on (p. 165) • LCD...
...open. Poor contact between camera and battery terminals. Memory card/battery cover is securely closed (p. 11). direction (p. 10). batteries or Canon AA-size NiMH batteries (p. 10). z Poor contact between camera and battery terminals. z Replace the camera batteries with a direct print compatible printer (p. 174) Camera Camera will not operate ("Change the batteries" message displays). Battery charge is low and the camera will not operate. Batteries are not the right z Use only unused AA-size alkaline type. Power is not turned on (p. 165) • LCD...

User Manual
Page 167
.... There is operating. The battery holder was is no malfunction. LCD monitor Nothing displays. [Power Saving] is set to write protect tab upward (p. 186). z Press any button other than the power button or change the camera orientation to turn the LCD monitor back on "Card locked!" The camera's horizontal/ z The camera's orientation mechanism vertical orientation was removed. changed. The SD memory card's or z When recording to, erasing from the camera interior. The lithium date battery z Replace the lithium date battery charge is a normal...
.... There is operating. The battery holder was is no malfunction. LCD monitor Nothing displays. [Power Saving] is set to write protect tab upward (p. 186). z Press any button other than the power button or change the camera orientation to turn the LCD monitor back on "Card locked!" The camera's horizontal/ z The camera's orientation mechanism vertical orientation was removed. changed. The SD memory card's or z When recording to, erasing from the camera interior. The lithium date battery z Replace the lithium date battery charge is a normal...
User Manual
Page 171
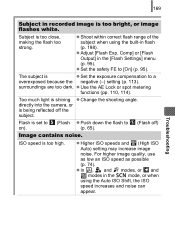
z Adjust [Flash Exp. The subject is z Set the exposure compensation to (p. 65). (Flash off the subject. Too much light is too close, making the flash too strong. z Higher ISO speeds and (High ISO Auto) setting may increase image noise. Subject is shining z Change the shooting angle. directly into the camera, or is too bright, or image flashes white. For higher image quality, use as low an ISO speed as possible (p. 74). z In , and modes, or and modes in...
z Adjust [Flash Exp. The subject is z Set the exposure compensation to (p. 65). (Flash off the subject. Too much light is too close, making the flash too strong. z Higher ISO speeds and (High ISO Auto) setting may increase image noise. Subject is shining z Change the shooting angle. directly into the camera, or is too bright, or image flashes white. For higher image quality, use as low an ISO speed as possible (p. 74). z In , and modes, or and modes in...
User Manual
Page 172
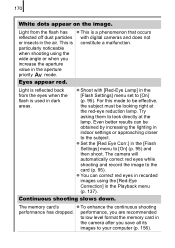
Eyes appear red. z Shoot with digital cameras and does not or insects in the Playback menu (p. 137). Continuous shooting slows down. particularly noticeable when shooting using the [Red-Eye Correction] in the air. For this mode to low level format the memory card in the camera after you increase the aperture value in the [Flash Settings] menu to [On] (p. 95). z Set the [Red Eye Corr.] in the aperture priority mode. performance, you are recommended to be effective, the...
Eyes appear red. z Shoot with digital cameras and does not or insects in the Playback menu (p. 137). Continuous shooting slows down. particularly noticeable when shooting using the [Red-Eye Correction] in the air. For this mode to low level format the memory card in the camera after you increase the aperture value in the [Flash Settings] menu to [On] (p. 95). z Set the [Red Eye Corr.] in the aperture priority mode. performance, you are recommended to be effective, the...
User Manual
Page 174
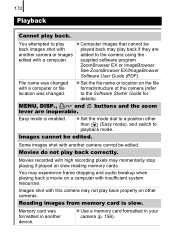
.../ImageBrowser Software User Guide (PDF). Easy mode is slow. Movies recorded with another device. File name was changed z Set the file name or location on slow reading memory cards. Some images shot with high recording pixels may experience frame dropping and audio breakup when playing back a movie on other than (Easy mode), and switch to the Software Starter Guide for details). Reading images from memory card is enabled. 172 Playback Cannot play back correctly. Movies do not play back. z Use a memory card formatted in another camera...
.../ImageBrowser Software User Guide (PDF). Easy mode is slow. Movies recorded with another device. File name was changed z Set the file name or location on slow reading memory cards. Some images shot with high recording pixels may experience frame dropping and audio breakup when playing back a movie on other than (Easy mode), and switch to the Software Starter Guide for details). Reading images from memory card is enabled. 172 Playback Cannot play back correctly. Movies do not play back. z Use a memory card formatted in another camera...
User Manual
Page 177
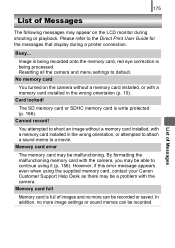
... to the Direct Print User Guide for the messages that display during shooting or playback. Cannot record! However, if this error message appears even when using it (p. 156). No memory card You turned on the LCD monitor during a printer connection. In addition, no more image settings or sound memos can be a problem with the camera. List of images and no more can be malfunctioning. Please refer to continue using the supplied memory card, contact your Canon Customer Support Help Desk as...
... to the Direct Print User Guide for the messages that display during shooting or playback. Cannot record! However, if this error message appears even when using it (p. 156). No memory card You turned on the LCD monitor during a printer connection. In addition, no more image settings or sound memos can be a problem with the camera. List of images and no more can be malfunctioning. Please refer to continue using the supplied memory card, contact your Canon Customer Support Help Desk as...

User Manual
Page 192
... not use the batteries until the LCD monitor displays the "Change the batteries" message. If this several times, battery performance will be able to fully charge the batteries due to lose capacity. If the battery usage time has considerably diminished - When charging the batteries (insert and remove the batteries two or three times before storing them , use batteries for Canon AA-size NiMH batteries. After doing this happens, after long periods of recordable images has...
... not use the batteries until the LCD monitor displays the "Change the batteries" message. If this several times, battery performance will be able to fully charge the batteries due to lose capacity. If the battery usage time has considerably diminished - When charging the batteries (insert and remove the batteries two or three times before storing them , use batteries for Canon AA-size NiMH batteries. After doing this happens, after long periods of recordable images has...
User Manual
Page 209
... Zoom 97 Aperture Value 84, 85, 87 Aquarium 81 Auto Category 121 Auto ISO Shift 75 Auto Mode 15 Auto Rotate 161 Av 85 B Battery Installing 10 Battery Capacity 202 Battery Charge Indicator ...........49 Beach 81 C Camera Shake Warning 48 Components Guide 40 Compression 71 Computer Connecting the Camera ........29 Downloading 27 System Requirements .......... 27 Continuous Shooting 93 Control Dial 43 Create Folder 159 D Date Battery 194 Date Stamp 22 Date/Time 13 Default Value 162 Digital Tele-Converter 61 Digital Zoom 61 Direct Print Compatible Printer...
... Zoom 97 Aperture Value 84, 85, 87 Aquarium 81 Auto Category 121 Auto ISO Shift 75 Auto Mode 15 Auto Rotate 161 Av 85 B Battery Installing 10 Battery Capacity 202 Battery Charge Indicator ...........49 Beach 81 C Camera Shake Warning 48 Components Guide 40 Compression 71 Computer Connecting the Camera ........29 Downloading 27 System Requirements .......... 27 Continuous Shooting 93 Control Dial 43 Create Folder 159 D Date Battery 194 Date Stamp 22 Date/Time 13 Default Value 162 Digital Tele-Converter 61 Digital Zoom 61 Direct Print Compatible Printer...


