

ZoomBrowser EX 6.5 for Windows Instruction Manual
Page 9
..., click [Downloads Images From Canon Camera using Canon CameraWindow], then click [OK]. 4. Double click . Click [Downloads Images From Canon Camera using Canon CameraWindow]. Things to Remember Mastering the Basics More Advanced Techniques Appendices Transferring Images Transferring Images by [Connect to Camera]. 1 Connect the camera to the computer with the supplied interface cable. 2 Turn on the camera power, set it to...
..., click [Downloads Images From Canon Camera using Canon CameraWindow], then click [OK]. 4. Double click . Click [Downloads Images From Canon Camera using Canon CameraWindow]. Things to Remember Mastering the Basics More Advanced Techniques Appendices Transferring Images Transferring Images by [Connect to Camera]. 1 Connect the camera to the computer with the supplied interface cable. 2 Turn on the camera power, set it to...
ZoomBrowser EX 6.5 for Windows Instruction Manual
Page 17
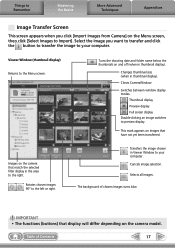
... on the camera that display will differ depending on the Menu screen, then click [Select Images to Import]. The background of Contents 17 Cancels image selection. IMPORTANT • The functions (buttons) that match the selected filter display in Viewer Window to the left or right. Table of chosen images turns blue. Things...
... on the camera that display will differ depending on the Menu screen, then click [Select Images to Import]. The background of Contents 17 Cancels image selection. IMPORTANT • The functions (buttons) that match the selected filter display in Viewer Window to the left or right. Table of chosen images turns blue. Things...
ZoomBrowser EX 6.5 for Windows Instruction Manual
Page 18
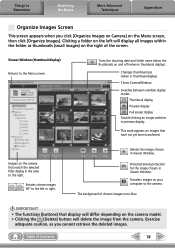
...Delete) button will display all images within the folder as you click [Organize Images on Camera] on the right of the screen. Rotates chosen images 90° to the camera. Protects/cancels protection for the image chosen in thumbnail display). Exercise adequate caution, as thumbnails... (small images) on the Menu screen, then click [Organize Images]. Table of chosen images turns blue. Turns the shooting date and folder ...
...Delete) button will display all images within the folder as you click [Organize Images on Camera] on the right of the screen. Rotates chosen images 90° to the camera. Protects/cancels protection for the image chosen in thumbnail display). Exercise adequate caution, as thumbnails... (small images) on the Menu screen, then click [Organize Images]. Table of chosen images turns blue. Turns the shooting date and folder ...
ZoomBrowser EX 6.5 for Windows Instruction Manual
Page 46
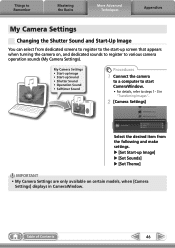
...; Start-up Sound • Shutter Sound • Operation Sound • Selftimer Sound Procedures 1 Connect the camera to a computer to start -up screen that appears when turning the camera on certain models, when [Camera Settings] displays in "Transferring Images". 2 [Camera Settings] Select the desired item from dedicated screens to register to the start CameraWindow. • For...
...; Start-up Sound • Shutter Sound • Operation Sound • Selftimer Sound Procedures 1 Connect the camera to a computer to start -up screen that appears when turning the camera on certain models, when [Camera Settings] displays in "Transferring Images". 2 [Camera Settings] Select the desired item from dedicated screens to register to the start CameraWindow. • For...

Personal Printing Guide
Page 3
Easy One-Touch Printing If your Canon camera, and turn the printer off and on -screen instructions . If an error message appears... Photos from other set -up. See next page for certain models. Simply connect to SELPHY printers to print photos 1 Connect Connect the camera to a SELPHY printer using computer ... printing, printing stops. Follow the on again and repeat the set -ups. Personal Printing Guide ! If "Print error" appears, turn them both on. 3 Print Make sure you select "Print" on the camera's screen and press the FUNC./SET button. * If you wish to print. 3
Easy One-Touch Printing If your Canon camera, and turn the printer off and on -screen instructions . If an error message appears... Photos from other set -up. See next page for certain models. Simply connect to SELPHY printers to print photos 1 Connect Connect the camera to a SELPHY printer using computer ... printing, printing stops. Follow the on again and repeat the set -ups. Personal Printing Guide ! If "Print error" appears, turn them both on. 3 Print Make sure you select "Print" on the camera's screen and press the FUNC./SET button. * If you wish to print. 3

Personal Printing Guide
Page 6
...image correction and printing effects! If this message appear when the set-up is correct, turn the printer off and on again. * If [Printer error] appears, turn off the printer, reconnect the cables and turn it on the printer is not printable. If an error message appears... Follow the ... when back-lit : Greener leaves on the printer model. If the Error light on again. Canon Inkjet Printers (PIXMA Series) Personal Printing Guide You can print with many types of paper from other cameras or images that is blinking or an error message appears, be printable. * If [Print Error...
...image correction and printing effects! If this message appear when the set-up is correct, turn the printer off and on again. * If [Printer error] appears, turn off the printer, reconnect the cables and turn it on the printer is not printable. If an error message appears... Follow the ... when back-lit : Greener leaves on the printer model. If the Error light on again. Canon Inkjet Printers (PIXMA Series) Personal Printing Guide You can print with many types of paper from other cameras or images that is blinking or an error message appears, be printable. * If [Print Error...
Software Starter Guide
Page 14
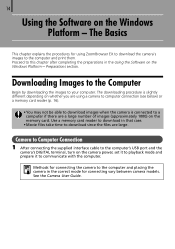
...Software on the memory card. Proceed to communicate with the computer. Camera to Computer Connection 1 After connecting the supplied interface cable to the computer's USB port and the camera's DIGITAL terminal, turn on the camera power, set it to playback mode and prepare it to this ...chapter after completing the preparations in the correct mode for using a camera to computer connection (see below) or a memory card reader...
...Software on the memory card. Proceed to communicate with the computer. Camera to Computer Connection 1 After connecting the supplied interface cable to the computer's USB port and the camera's DIGITAL terminal, turn on the camera power, set it to playback mode and prepare it to this ...chapter after completing the preparations in the correct mode for using a camera to computer connection (see below) or a memory card reader...
Software Starter Guide
Page 32
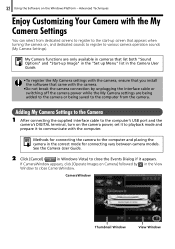
... came with the computer. CameraWindow Thumbnail Window View Window Adding My Camera Settings to the Camera 1 After connecting the supplied interface cable to the computer's USB port and the camera's DIGITAL terminal, turn on , and dedicated sounds to register to the computer and placing the camera in the "Set up screen that list both "Sound Options...
... came with the computer. CameraWindow Thumbnail Window View Window Adding My Camera Settings to the Camera 1 After connecting the supplied interface cable to the computer's USB port and the camera's DIGITAL terminal, turn on , and dedicated sounds to register to the computer and placing the camera in the "Set up screen that list both "Sound Options...
Software Starter Guide
Page 36
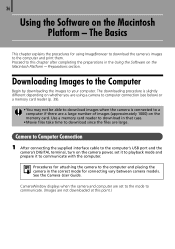
... reader to download in the Using the Software on the Macintosh Platform - Proceed to the computer's USB port and the camera's DIGITAL terminal, turn on the memory card. Preparations section. CameraWindow displays when the camera and computer are not downloaded at this chapter after completing the preparations in that case. • Movie files take...
... reader to download in the Using the Software on the Macintosh Platform - Proceed to the computer's USB port and the camera's DIGITAL terminal, turn on the memory card. Preparations section. CameraWindow displays when the camera and computer are not downloaded at this chapter after completing the preparations in that case. • Movie files take...
Software Starter Guide
Page 54
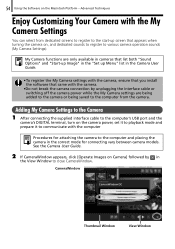
... connecting the supplied interface cable to the computer's USB port and the camera's DIGITAL terminal, turn on Camera] followed by unplugging the interface cable or switching off the camera power while the My Camera settings are only available in cameras that list both "Sound Options" and "Start-up Image" in the "Set up screen that came with...
... connecting the supplied interface cable to the computer's USB port and the camera's DIGITAL terminal, turn on Camera] followed by unplugging the interface cable or switching off the camera power while the My Camera settings are only available in cameras that list both "Sound Options" and "Start-up Image" in the "Set up screen that came with...
Software User Guide for Macintosh
Page 10
IMPORTANT • The instructions in the Dock (the bar at the bottom of the desktop). 1 Connect the camera to the computer with the supplied interface cable. 2 Turn on the camera power, set it to playback mode and prepare it to communicate with your product package for software installation procedures. • If CameraWindow fails to...
IMPORTANT • The instructions in the Dock (the bar at the bottom of the desktop). 1 Connect the camera to the computer with the supplied interface cable. 2 Turn on the camera power, set it to playback mode and prepare it to communicate with your product package for software installation procedures. • If CameraWindow fails to...

Software User Guide for Macintosh
Page 42
IMPORTANT • My Camera functions are being transmitted between the camera and computer when My Camera Settings are only available in cameras that appears when turning the camera on Camera], followed by . 4 Open the [Applications] folder, [Canon Utilities] folder, [CameraWindow] folder, and double-click the [MyCamera DC] icon. My Camera Settings • Start-up Image • Start-up Menu" list...
IMPORTANT • My Camera functions are being transmitted between the camera and computer when My Camera Settings are only available in cameras that appears when turning the camera on Camera], followed by . 4 Open the [Applications] folder, [Canon Utilities] folder, [CameraWindow] folder, and double-click the [MyCamera DC] icon. My Camera Settings • Start-up Image • Start-up Menu" list...

Software User Guide for Macintosh
Page 44
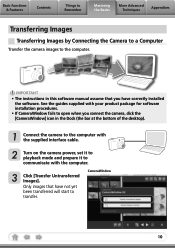
...to a computer can be able to play back movies transferred back to the camera if movies were taken with that camera. Procedures 1 Connect the camera to the computer. 2 Turn on the camera power, and set it to the camera. You may not be transferred back to playback mode. 3 Click [Operate ...screen below. However, movies cannot be transferred to camera models that use a memory card reader to write movies and images to the memory card. 4 Click (Send to Camera). • If the Browser Window is open CameraWindow by clicking the [Canon Camera] icon in "Specifications" near the end of ...
...to a computer can be able to play back movies transferred back to the camera if movies were taken with that camera. Procedures 1 Connect the camera to the computer. 2 Turn on the camera power, and set it to the camera. You may not be transferred back to playback mode. 3 Click [Operate ...screen below. However, movies cannot be transferred to camera models that use a memory card reader to write movies and images to the memory card. 4 Click (Send to Camera). • If the Browser Window is open CameraWindow by clicking the [Canon Camera] icon in "Specifications" near the end of ...

Software User Guide for Windows
Page 10
... Mastering the Basics More Advanced Techniques Appendices Transferring Images Transferring Images by [Connect to Camera]. 1 Connect the camera to the computer with the supplied interface cable. 2 Turn on the desktop to the computer. In this software manual assume that you have correctly... installed the software and driver software. IMPORTANT • The instructions in the AutoPlay window. 10 With Windows Vista, click [Downloads Images From Canon Camera using Canon CameraWindow]...
... Mastering the Basics More Advanced Techniques Appendices Transferring Images Transferring Images by [Connect to Camera]. 1 Connect the camera to the computer with the supplied interface cable. 2 Turn on the desktop to the computer. In this software manual assume that you have correctly... installed the software and driver software. IMPORTANT • The instructions in the AutoPlay window. 10 With Windows Vista, click [Downloads Images From Canon Camera using Canon CameraWindow]...

Software User Guide for Windows
Page 41
... on , and dedicated sounds to register to various camera operation sounds (My Camera Settings). IMPORTANT • My Camera functions are only available in cameras that appears when turning the camera on Camera], followed by . 4 Click [Start], followed by: [All Programs] or [Programs], [Canon Utilities], [CameraWindow], [MyCamera], [MyCamera]. 5 Click [Connect to Camera]. Basic Functions & Features Contents Things to Remember Mastering...
... on , and dedicated sounds to register to various camera operation sounds (My Camera Settings). IMPORTANT • My Camera functions are only available in cameras that appears when turning the camera on Camera], followed by . 4 Click [Start], followed by: [All Programs] or [Programs], [Canon Utilities], [CameraWindow], [MyCamera], [MyCamera]. 5 Click [Connect to Camera]. Basic Functions & Features Contents Things to Remember Mastering...

Software User Guide for Windows
Page 43
... reader to write movies and images to the memory card. Procedures 1 Connect the camera to the computer. 2 Turn on the camera power, and set it to playback mode. 3 Select [Canon CameraWindow] (with another camera. However, movies cannot be transferred to camera models that camera. You may not be able to play back movies transferred back to the...
... reader to write movies and images to the memory card. Procedures 1 Connect the camera to the computer. 2 Turn on the camera power, and set it to playback mode. 3 Select [Canon CameraWindow] (with another camera. However, movies cannot be transferred to camera models that camera. You may not be able to play back movies transferred back to the...

PowerShot SD960 IS / DIGITAL IXUS 110 IS Camera User Guide
Page 4
... ● Focus on faces 24, 64, 80 ● Shoot in places where I cannot use the flash (turn off the flash) 59 ● Shoot pictures with me in them too (self-timer 63, 64 ● Insert... pictures of subjects (macro shooting 68 ● Take close-up pictures of subjects using the zoom (digital macro shooting 69 ● Take sepia toned or black and white pictures 75 ● Change the ... continuously 74 ● Shoot without the effects of camera shake (image stabilization 133 ● Shoot without the effects of camera shake even in low light conditions (High ISO Auto 58, 72 4
... ● Focus on faces 24, 64, 80 ● Shoot in places where I cannot use the flash (turn off the flash) 59 ● Shoot pictures with me in them too (self-timer 63, 64 ● Insert... pictures of subjects (macro shooting 68 ● Take close-up pictures of subjects using the zoom (digital macro shooting 69 ● Take sepia toned or black and white pictures 75 ● Change the ... continuously 74 ● Shoot without the effects of camera shake (image stabilization 133 ● Shoot without the effects of camera shake even in low light conditions (High ISO Auto 58, 72 4

PowerShot SD960 IS / DIGITAL IXUS 110 IS Camera User Guide
Page 5
.../View Movies ● Shoot movies 32 ● View movies 34 2 Print ● Easily print pictures 30 Save ● Save images to a computer 35 3 Other ● Turn off sounds 49 ● Use the camera abroad 15, 127 5
.../View Movies ● Shoot movies 32 ● View movies 34 2 Print ● Easily print pictures 30 Save ● Save images to a computer 35 3 Other ● Turn off sounds 49 ● Use the camera abroad 15, 127 5

PowerShot SD960 IS / DIGITAL IXUS 110 IS Camera User Guide
Page 6
... and Commonly Used Functions 55 Shooting in Program AE 66 h Turning the Flash On 67 u Shooting Far Away Subjects (Infinity 67 e Shooting Close-ups (Macro) ....... 68 R Zooming In on Close Subjects (Digital Macro 69 Changing the Recording Pixels....... 70 Changing the Compression Ratio... you read each chapter. Basic Operations 48 Changing the Sound Settings ......... 49 Changing the Screen Brightness .... 50 Returning the Camera to a Computer.35 Accessories 38 Separately Sold Accessories ...........40 2 Learning More 41 Components Guide 42 Information Displayed on the Screen 44...
... and Commonly Used Functions 55 Shooting in Program AE 66 h Turning the Flash On 67 u Shooting Far Away Subjects (Infinity 67 e Shooting Close-ups (Macro) ....... 68 R Zooming In on Close Subjects (Digital Macro 69 Changing the Recording Pixels....... 70 Changing the Compression Ratio... you read each chapter. Basic Operations 48 Changing the Sound Settings ......... 49 Changing the Screen Brightness .... 50 Returning the Camera to a Computer.35 Accessories 38 Separately Sold Accessories ...........40 2 Learning More 41 Components Guide 42 Information Displayed on the Screen 44...

PowerShot SD960 IS / DIGITAL IXUS 110 IS Camera User Guide
Page 9
...to the equipment. • Be sure to also check the guides included with the camera interior, immediately turn the camera power off and remove the battery. • Use only recommended power sources. Warning Camera • Do not trigger the flash in asphyxiation. Exposure to human eyes. If ...that is operated correctly. • The safety precautions noted on the following pages are intended to prevent injuries to enter the camera. This could result in close proximity to the intense light produced by the flash may damage eyesight. Caution Denotes the possibility of...
...to the equipment. • Be sure to also check the guides included with the camera interior, immediately turn the camera power off and remove the battery. • Use only recommended power sources. Warning Camera • Do not trigger the flash in asphyxiation. Exposure to human eyes. If ...that is operated correctly. • The safety precautions noted on the following pages are intended to prevent injuries to enter the camera. This could result in close proximity to the intense light produced by the flash may damage eyesight. Caution Denotes the possibility of...


