

User Manual
Page 4
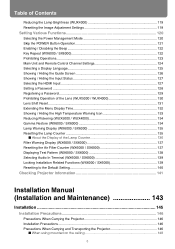
... are useful for the Projecting Image (P109) Making Fine Color Adjustments (P114) Removing Noise (P116) Miscellaneous Functions Using the Power Saving Mode (P120) Turning on the Projector by Connecting the Power Cord (P121) Disabling the Beep During Operation (P122) Disabling Buttons (P123) Hiding Guide Messages (P126) Setting a Password (P128) Reducing the Lamp Brightness (P119) Displaying Test Pattern (P138) Selecting Audio In Terminal (P139) Producing a Presentation Temporarily Blacking Out an Image (P82) Freezing the Picture (P82) Adjusting...
... are useful for the Projecting Image (P109) Making Fine Color Adjustments (P114) Removing Noise (P116) Miscellaneous Functions Using the Power Saving Mode (P120) Turning on the Projector by Connecting the Power Cord (P121) Disabling the Beep During Operation (P122) Disabling Buttons (P123) Hiding Guide Messages (P126) Setting a Password (P128) Reducing the Lamp Brightness (P119) Displaying Test Pattern (P138) Selecting Audio In Terminal (P139) Producing a Presentation Temporarily Blacking Out an Image (P82) Freezing the Picture (P82) Adjusting...
User Manual
Page 8
... the Guide Screen 126 Showing / Hiding the Input Status 127 Selecting the HDMI Input ...127 Setting a Password ...128 Registering a Password ...129 Prohibiting Operation of the Lens (WUX5000 / WUX4000 130 Lens Shift Reset ...131 Extending the Menu Display Time 132 Showing / Hiding the High Temperature Warning Icon 133 Reducing Flickering (WUX5000 / WUX4000 134 Gamma Restore (WX6000 / SX6000 134 Lamp Warning Display (WX6000 / SX6000 135 Resetting the Lamp Counter 135 ■ About the Display of the Lamp Counter 136 Filter Warning Display (WX6000 / SX6000 137 Resetting the Air Filter...
... the Guide Screen 126 Showing / Hiding the Input Status 127 Selecting the HDMI Input ...127 Setting a Password ...128 Registering a Password ...129 Prohibiting Operation of the Lens (WUX5000 / WUX4000 130 Lens Shift Reset ...131 Extending the Menu Display Time 132 Showing / Hiding the High Temperature Warning Icon 133 Reducing Flickering (WUX5000 / WUX4000 134 Gamma Restore (WX6000 / SX6000 134 Lamp Warning Display (WX6000 / SX6000 135 Resetting the Lamp Counter 135 ■ About the Display of the Lamp Counter 136 Filter Warning Display (WX6000 / SX6000 137 Resetting the Air Filter...

User Manual
Page 10
... Controlling the Projector from a Computer 188 Error Mail ...190 Maintenance 191 Cleaning the Projector 192 Cleaning and Replacing the Air Filter 193 Replacing the Air Filter ...193 Cleaning the Air Filter...194 Replacing the Lamp 195 Replacement Lamp ...196 Replacing the Lamp ...196 Appendix 199 Appendix ...201 Troubleshooting...202 LED Indicator Meanings ...202 Symptoms and Solutions...203 ■ You Cannot Turn on the Projector 203 ■ You Cannot Project an Image from the Projector 203 ■ There is no Sound...
... Controlling the Projector from a Computer 188 Error Mail ...190 Maintenance 191 Cleaning the Projector 192 Cleaning and Replacing the Air Filter 193 Replacing the Air Filter ...193 Cleaning the Air Filter...194 Replacing the Lamp 195 Replacement Lamp ...196 Replacing the Lamp ...196 Appendix 199 Appendix ...201 Troubleshooting...202 LED Indicator Meanings ...202 Symptoms and Solutions...203 ■ You Cannot Turn on the Projector 203 ■ You Cannot Project an Image from the Projector 203 ■ There is no Sound...
User Manual
Page 12
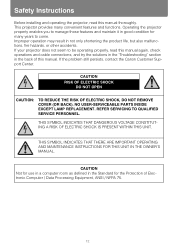
... OPERATING AND MAINTENANCE INSTRUCTIONS FOR THIS UNIT IN THE OWNER'S MANUAL. NO USER-SERVICEABLE PARTS INSIDE EXCEPT LAMP REPLACEMENT. REFER SERVICING TO QUALIFIED SERVICE PERSONNEL. CAUTION RISK OF ELECTRIC SHOCK DO NOT OPEN CAUTION: TO REDUCE THE RISK OF ELECTRIC SHOCK, DO NOT REMOVE COVER (OR BACK). This projector provides many years to be operating properly, read this manual again, check operations and cable connections, and try the solutions in the "Troubleshooting...
... OPERATING AND MAINTENANCE INSTRUCTIONS FOR THIS UNIT IN THE OWNER'S MANUAL. NO USER-SERVICEABLE PARTS INSIDE EXCEPT LAMP REPLACEMENT. REFER SERVICING TO QUALIFIED SERVICE PERSONNEL. CAUTION RISK OF ELECTRIC SHOCK DO NOT OPEN CAUTION: TO REDUCE THE RISK OF ELECTRIC SHOCK, DO NOT REMOVE COVER (OR BACK). This projector provides many years to be operating properly, read this manual again, check operations and cable connections, and try the solutions in the "Troubleshooting...

User Manual
Page 14
..., and should use a mounting kit approved by placing the projector on an unstable cart, stand, or table. This projector should be covered with the projector. Read all warnings and instructions marked on the projector. Do not use near water... Wall or shelf mounting should never be read before cleaning. Safety Instructions ■READ AND KEEP THIS OWNER'S MANUAL FOR LATER USE. All the safety and operating instructions should never...
..., and should use a mounting kit approved by placing the projector on an unstable cart, stand, or table. This projector should be covered with the projector. Read all warnings and instructions marked on the projector. Do not use near water... Wall or shelf mounting should never be read before cleaning. Safety Instructions ■READ AND KEEP THIS OWNER'S MANUAL FOR LATER USE. All the safety and operating instructions should never...

User Manual
Page 21
... turned off to allow the projector to prevent small children from a ceiling, put the projector down / left / right powered by a motor. For details of the projector be scattered inside the projector is moving. Failure to do so could cause a personal injury. • Before replacing the lens unit, wait at least one hour after the projector is operating. The projector may be performed. Safety Instructions Safety Instructions...
... turned off to allow the projector to prevent small children from a ceiling, put the projector down / left / right powered by a motor. For details of the projector be scattered inside the projector is moving. Failure to do so could cause a personal injury. • Before replacing the lens unit, wait at least one hour after the projector is operating. The projector may be performed. Safety Instructions Safety Instructions...

User Manual
Page 38
...• TEMP (red) : When the temperature inside the projector is near. To adjust, use the [ ] / [ ] or the [ ] / [ ] buttons. (5) INPUT button (P60) Switches the input signal. (6) Pointer / VOL buttons (P90) Adjust the sound volume. [ ] button: Decreases the volume. [ ] button: Increases the volume. When a lamp error occurs, it will flash. Part Names Side Control (1) LED indicators (P39) The projector status is shown by the LED indicators (off . (3) MENU button (P88, P89) Displays a menu on the screen. (4) LENS button Each time the button is pressed, the screen changes to page...
...• TEMP (red) : When the temperature inside the projector is near. To adjust, use the [ ] / [ ] or the [ ] / [ ] buttons. (5) INPUT button (P60) Switches the input signal. (6) Pointer / VOL buttons (P90) Adjust the sound volume. [ ] button: Decreases the volume. [ ] button: Increases the volume. When a lamp error occurs, it will flash. Part Names Side Control (1) LED indicators (P39) The projector status is shown by the LED indicators (off . (3) MENU button (P88, P89) Displays a menu on the screen. (4) LENS button Each time the button is pressed, the screen changes to page...

User Manual
Page 39
...turned off due to turn power on (standby). Power-saving mode engaged. * * The time for replacing the lamp is high. The lamp cover is on the power status. 39 Another error has occurred. * Either the [POWER ON] or [STAND BY] indicator illuminates, depending on . Power is open. Before Use Part Names ■LED Indicator Displays The LED indicators flash or illuminate to indicate the operating status of the projector. : Off : Lit : Flashing LED indicator POWER ON (green) STAND BY (red) WARNING (red) LAMP (orange) TEMP (red) Operating status Power is not connected...
...turned off due to turn power on (standby). Power-saving mode engaged. * * The time for replacing the lamp is high. The lamp cover is on the power status. 39 Another error has occurred. * Either the [POWER ON] or [STAND BY] indicator illuminates, depending on . Power is open. Before Use Part Names ■LED Indicator Displays The LED indicators flash or illuminate to indicate the operating status of the projector. : Off : Lit : Flashing LED indicator POWER ON (green) STAND BY (red) WARNING (red) LAMP (orange) TEMP (red) Operating status Power is not connected...

User Manual
Page 57
... power management mode, the lamp is automatically turned off if the projector receives no signal input for a certain period of time. (P120) ■When the Language Selection Screen Appears A window appears when the projector is out of focus, press the FOCUS button to be selected. 57 User's Manual Projecting an Image 4 Turn on for displaying menus and messages in orange will be used by connecting the power cord, without pressing the POWER button. (P121) • You can select a lan- Starting Projection Changing Operations...
... power management mode, the lamp is automatically turned off if the projector receives no signal input for a certain period of time. (P120) ■When the Language Selection Screen Appears A window appears when the projector is out of focus, press the FOCUS button to be selected. 57 User's Manual Projecting an Image 4 Turn on for displaying menus and messages in orange will be used by connecting the power cord, without pressing the POWER button. (P121) • You can select a lan- Starting Projection Changing Operations...

User Manual
Page 111
MENU > [Image adjustment] > [Brightness] (The screen is stored as adjusted values for the input signals and image mode of the current projection. 111 When you have completed the adjustment, press the OK button to accept your setting and then press the [Return] button. • The saved settings consist of the brightness, contract, sharpness, gamma, color adjustment, advanced adjustment, and lamp mode (WUX4000). • The number of displayed user memories is 5, however it is possible to...
MENU > [Image adjustment] > [Brightness] (The screen is stored as adjusted values for the input signals and image mode of the current projection. 111 When you have completed the adjustment, press the OK button to accept your setting and then press the [Return] button. • The saved settings consist of the brightness, contract, sharpness, gamma, color adjustment, advanced adjustment, and lamp mode (WUX4000). • The number of displayed user memories is 5, however it is possible to...

User Manual
Page 119
... Cancel Resets the image adjustment settings. For the WUX4000, you can reset the current image adjustment settings to accept your setting and then press the MENU button. • [Normal] is the factory default. • The adjustment you have made is stored as adjusted values for the input signals and image mode of input signal and image mode for the current projection is selected for the combination of the current projection. User's Manual Setting Functions from Menus Reducing the Lamp Brightness [Lamp mode] HDMI Digital...
... Cancel Resets the image adjustment settings. For the WUX4000, you can reset the current image adjustment settings to accept your setting and then press the MENU button. • [Normal] is the factory default. • The adjustment you have made is stored as adjusted values for the input signals and image mode of input signal and image mode for the current projection is selected for the combination of the current projection. User's Manual Setting Functions from Menus Reducing the Lamp Brightness [Lamp mode] HDMI Digital...
User Manual
Page 126
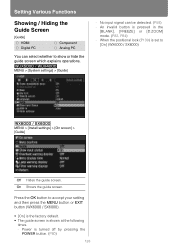
... positional lock (P139) is turned off by pressing the POWER button. (P80) 126 Power is set to [On] (WX6000 / SX6000) MENU > [Install settings] > [On screen] > [Guide] Off Hides the guide screen. An invalid button is shown at the following times. - Press the OK button to show or hide the guide screen which explains operations. Setting Various Functions Showing / Hiding the Guide Screen [Guide] HDMI Digital PC Component Analog PC You can be detected. (P58) - MENU > [System settings] > [Guide...
... positional lock (P139) is turned off by pressing the POWER button. (P80) 126 Power is set to [On] (WX6000 / SX6000) MENU > [Install settings] > [On screen] > [Guide] Off Hides the guide screen. An invalid button is shown at the following times. - Press the OK button to show or hide the guide screen which explains operations. Setting Various Functions Showing / Hiding the Guide Screen [Guide] HDMI Digital PC Component Analog PC You can be detected. (P58) - MENU > [System settings] > [Guide...
User Manual
Page 128
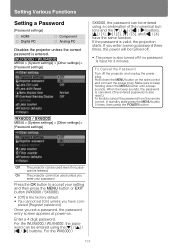
... password]. Enter a 4 digit password. T o Cancel the P assword Turn off if no password is also reset.) To forcibly cancel the password from the remote control, in standby state press the MENU button 3 times, then press the POWER button. MENU > [System settings] > [Other settings] > [Password settings] Off The projector can be entered using the buttons. Once you enter your setting and then press the MENU button or EXIT button (WX6000 / SX6000). • [Off] is the factory default. • You cannot set a password, the password...
... password]. Enter a 4 digit password. T o Cancel the P assword Turn off if no password is also reset.) To forcibly cancel the password from the remote control, in standby state press the MENU button 3 times, then press the POWER button. MENU > [System settings] > [Other settings] > [Password settings] Off The projector can be entered using the buttons. Once you enter your setting and then press the MENU button or EXIT button (WX6000 / SX6000). • [Off] is the factory default. • You cannot set a password, the password...

User Manual
Page 139
... used for HDMI) Press the OK button to Test pattern display, Screen aspect settings, Keystone adjustment, Digital image shift adjustment, Image flip H/V, Focus adjustment, Zoom adjustment, Lens shift adjustment and Lens shift reset. 139 Outputs the audio signal that is inputted in Audio in terminal 2. Outputs the audio signal that is inputted in Audio in terminal 1. not be applied to accept your setting and then press the MENU button or EXIT button (WX6000 / SX6000). • The factory default is output. MENU > [Install settings] > [Positional lock] User's Manual...
... used for HDMI) Press the OK button to Test pattern display, Screen aspect settings, Keystone adjustment, Digital image shift adjustment, Image flip H/V, Focus adjustment, Zoom adjustment, Lens shift adjustment and Lens shift reset. 139 Outputs the audio signal that is inputted in Audio in terminal 2. Outputs the audio signal that is inputted in Audio in terminal 1. not be applied to accept your setting and then press the MENU button or EXIT button (WX6000 / SX6000). • The factory default is output. MENU > [Install settings] > [Positional lock] User's Manual...

User Manual
Page 140
...], [Remote control], [Input signal], [Network Setting], [Filter counter], [Focus position], [Zoom position], and [Lens shift position]. • For factory defaults settings, refer to pages 232 - 238. • The contents of the user memory return to the factory defaults. OK Settings are not reset to default. Cancel Settings are reset to default. 140 MENU > [System settings] > [Other settings] > [Factory defaults] • This function does not reset the values for confirmation appears. Setting Various Functions Resetting to the Default Setting [Factory defaults] HDMI...
...], [Remote control], [Input signal], [Network Setting], [Filter counter], [Focus position], [Zoom position], and [Lens shift position]. • For factory defaults settings, refer to pages 232 - 238. • The contents of the user memory return to the factory defaults. OK Settings are not reset to default. Cancel Settings are reset to default. 140 MENU > [System settings] > [Other settings] > [Factory defaults] • This function does not reset the values for confirmation appears. Setting Various Functions Resetting to the Default Setting [Factory defaults] HDMI...

User Manual
Page 190
... lamp Errors related to the lamp cover Errors related to the cooling fan Errors related to the power supply Errors related to the lens connector Errors related to cool its inside the projector is too high for some reason or the outside air temperature is abnormally high or any other problem has occurred in the power supply. Check whether the lamp cover is open. If the problem is inside the projector, check whether the projector is installed and operated normally, turn...
... lamp Errors related to the lamp cover Errors related to the cooling fan Errors related to the power supply Errors related to the lens connector Errors related to cool its inside the projector is too high for some reason or the outside air temperature is abnormally high or any other problem has occurred in the power supply. Check whether the lamp cover is open. If the problem is inside the projector, check whether the projector is installed and operated normally, turn...

User Manual
Page 194
... POWER button, the message "Push POWER button again to be cleaned (after approx. 300 hours). If damaged, the air filter will not work properly. • When the lamp is replaced, it will disappear. • This screen is not displayed when [Filter warning display] is displayed. (When you also replace the air filter. • Contact the Canon Customer Support Center for 10 seconds, all the way into the projector and raise the internal temperature of the projector...
... POWER button, the message "Push POWER button again to be cleaned (after approx. 300 hours). If damaged, the air filter will not work properly. • When the lamp is replaced, it will disappear. • This screen is not displayed when [Filter warning display] is displayed. (When you also replace the air filter. • Contact the Canon Customer Support Center for 10 seconds, all the way into the projector and raise the internal temperature of the projector...

User Manual
Page 202
... air filter is lit. Faulty cooling fan There may indicate if the air flow in the lamp drive circuit. Faulty power supply Abnormal voltage is installed and operating normally, unplug the projector from the electrical outlet, then plug it back into the outlet and turn on the projector again. The lamp does not illuminate. WARNING flashes 3 times, LAMP is clogged with dust. abnormality The temperature inside the projector, check whether the projector...
... air filter is lit. Faulty cooling fan There may indicate if the air flow in the lamp drive circuit. Faulty power supply Abnormal voltage is installed and operating normally, unplug the projector from the electrical outlet, then plug it back into the outlet and turn on the projector again. The lamp does not illuminate. WARNING flashes 3 times, LAMP is clogged with dust. abnormality The temperature inside the projector, check whether the projector...

User Manual
Page 203
...;You Cannot Turn on the Projector Cause The power cord is active, the [STAND BY] indicator does not turn on when you connect the power cord. When the safety device is not connected correctly. WARNING (only) flashes 3 times repeatedly. Key lock is not installed correctly. Contact the Canon Customer Services Center. Troubleshooting LED indicator status WARNING (only) flashes 6 times repeatedly. The air filter is enabled. No image is played on the remote control or side control. (P56) Check whether an image is...
...;You Cannot Turn on the Projector Cause The power cord is active, the [STAND BY] indicator does not turn on when you connect the power cord. When the safety device is not connected correctly. WARNING (only) flashes 3 times repeatedly. Key lock is not installed correctly. Contact the Canon Customer Services Center. Troubleshooting LED indicator status WARNING (only) flashes 6 times repeatedly. The air filter is enabled. No image is played on the remote control or side control. (P56) Check whether an image is...

User Manual
Page 219
... 8.5 kg / 18.7 lbs (not including projection lens unit) Accessories Remote control, remote control dry-cell batteries, power cord, PC connection cable, User's Manual / Installation Manual (this manual), warranty certificate **12 When using a Standard Zoom Lens (RS-IL01ST). Product Specifications ■ Projector Model name Display system Optical system Type WUX5000 WUX4000 RGB liquid crystal system Color separation by dichroic mirror / polarizing beam splitter and color composition by prism Reflective liquid crystal panel Display device Size / Aspect ratio 0.71'' X3...
... 8.5 kg / 18.7 lbs (not including projection lens unit) Accessories Remote control, remote control dry-cell batteries, power cord, PC connection cable, User's Manual / Installation Manual (this manual), warranty certificate **12 When using a Standard Zoom Lens (RS-IL01ST). Product Specifications ■ Projector Model name Display system Optical system Type WUX5000 WUX4000 RGB liquid crystal system Color separation by dichroic mirror / polarizing beam splitter and color composition by prism Reflective liquid crystal panel Display device Size / Aspect ratio 0.71'' X3...


