User Guide
Page 6
Seek 36 Easily Composing Shots after Manual Zooming (Framing Assist - Lock 36 Before Use Basic Guide Advanced Guide 1 Camera Basics 2 Auto Mode / Hybrid Auto Mode 3 Other Shooting Modes 4 P Mode 5 Tv, Av, and M Mode 6 Playback Mode 7 Setting Menu 8 Accessories 9 Appendix Index 6 Menu 26 Using the Menu Screen 27 Indicator Display 28 Clock 28 2 Auto Mode / Hybrid Auto Mode 29 Shooting with Camera-Determined Settings 29 Shooting (Smart Auto 29 Shooting in Playback Mode 24 Shutter Button 24 Shooting Modes 25 Shooting Display Options 25 Using the FUNC. Table of Contents Before ...
Seek 36 Easily Composing Shots after Manual Zooming (Framing Assist - Lock 36 Before Use Basic Guide Advanced Guide 1 Camera Basics 2 Auto Mode / Hybrid Auto Mode 3 Other Shooting Modes 4 P Mode 5 Tv, Av, and M Mode 6 Playback Mode 7 Setting Menu 8 Accessories 9 Appendix Index 6 Menu 26 Using the Menu Screen 27 Indicator Display 28 Clock 28 2 Auto Mode / Hybrid Auto Mode 29 Shooting with Camera-Determined Settings 29 Shooting (Smart Auto 29 Shooting in Playback Mode 24 Shutter Button 24 Shooting Modes 25 Shooting Display Options 25 Using the FUNC. Table of Contents Before ...
User Guide
Page 7
... Paper Size (for 4:3 Images 42 Red-Eye Correction 43 Changing Movie Image Quality 43 Helpful Shooting Features 44 Displaying Grid Lines 44 Magnifying the Area in Focus 44 Checking for Closed Eyes 45 Customizing Camera Operation 45 Deactivating the AF-Assist Beam 45 Deactivating the Red-Eye Reduction Lamp 46 Changing the Image Display Style after Shots 46 Changing the Image Display Period after Shots 46 Changing the Screen Displayed after Shots 47 3 Other Shooting Modes 48 Brightness / Color Customization (Live View Control 48...
... Paper Size (for 4:3 Images 42 Red-Eye Correction 43 Changing Movie Image Quality 43 Helpful Shooting Features 44 Displaying Grid Lines 44 Magnifying the Area in Focus 44 Checking for Closed Eyes 45 Customizing Camera Operation 45 Deactivating the AF-Assist Beam 45 Deactivating the Red-Eye Reduction Lamp 46 Changing the Image Display Style after Shots 46 Changing the Image Display Period after Shots 46 Changing the Screen Displayed after Shots 47 3 Other Shooting Modes 48 Brightness / Color Customization (Live View Control 48...
User Guide
Page 9
... Digest Movies 93 7 Setting Menu 94 Adjusting Basic Camera Functions 94 Silencing Camera Operations 94 Adjusting the Volume 94 Hiding Hints and Tips 95 Date and Time 95 World Clock 95 Lens Retraction Timing 96 Using Eco Mode 96 Power-Saving Adjustment 96 Screen Brightness 97 Hiding the Start-Up Screen 97 Formatting Memory Cards 97 Low-Level Formatting 98 File Numbering 98 Date-Based Image Storage 99 Metric / Non-Metric Display 99 Checking Certification Logos 99 Display Language 99 Adjusting Other Settings 100 Restoring Defaults...
... Digest Movies 93 7 Setting Menu 94 Adjusting Basic Camera Functions 94 Silencing Camera Operations 94 Adjusting the Volume 94 Hiding Hints and Tips 95 Date and Time 95 World Clock 95 Lens Retraction Timing 96 Using Eco Mode 96 Power-Saving Adjustment 96 Screen Brightness 97 Hiding the Start-Up Screen 97 Formatting Memory Cards 97 Low-Level Formatting 98 File Numbering 98 Date-Based Image Storage 99 Metric / Non-Metric Display 99 Checking Certification Logos 99 Display Language 99 Adjusting Other Settings 100 Restoring Defaults...

User Guide
Page 10
... Adding All Images to a Photobook 116 Removing All Images from a Photobook 117 Using an Eye-Fi Card 117 Checking Connection Information 118 Disabling Eye-Fi Transfer 118 9 Appendix 119 Troubleshooting 119 On-Screen Messages 122 On-Screen Information 123 Shooting (Information Display 123 Battery Level 124 Playback (Detailed Information Display 124 Summary of Shots per Memory Card 135 Recording Time per Memory Card 135 Flash Range 135 Shooting Range 136 Continuous Shooting Speed 136 Shutter Speed 136 Aperture 136 Battery Pack NB-6LH 136 Battery Charger CB...
... Adding All Images to a Photobook 116 Removing All Images from a Photobook 117 Using an Eye-Fi Card 117 Checking Connection Information 118 Disabling Eye-Fi Transfer 118 9 Appendix 119 Troubleshooting 119 On-Screen Messages 122 On-Screen Information 123 Shooting (Information Display 123 Battery Level 124 Playback (Detailed Information Display 124 Summary of Shots per Memory Card 135 Recording Time per Memory Card 135 Flash Range 135 Shooting Range 136 Continuous Shooting Speed 136 Shutter Speed 136 Aperture 136 Battery Pack NB-6LH 136 Battery Charger CB...
User Guide
Page 18
... the setup process. ●●Press the [ ] button when finished. Before Use Basic Guide Advanced Guide 1 Camera Basics 2 Auto Mode / Hybrid Auto Mode 3 Other Shooting Modes 4 P Mode 5 Tv, Av, and M Mode 6 Playback Mode 7 Setting Menu 8 Accessories 9 Appendix Index 18 Information you manage images by pressing the [ ][ ] buttons. You can also add a date stamp to shots, if you turn the camera on. After a confirmation message, the setting screen is no longer displayed. ●●To turn off the camera, press the power button. ●...
... the setup process. ●●Press the [ ] button when finished. Before Use Basic Guide Advanced Guide 1 Camera Basics 2 Auto Mode / Hybrid Auto Mode 3 Other Shooting Modes 4 P Mode 5 Tv, Av, and M Mode 6 Playback Mode 7 Setting Menu 8 Accessories 9 Appendix Index 18 Information you manage images by pressing the [ ][ ] buttons. You can also add a date stamp to shots, if you turn the camera on. After a confirmation message, the setting screen is no longer displayed. ●●To turn off the camera, press the power button. ●...
User Guide
Page 19
... can be displayed when you turn the camera on the [ ] tab. 3 Change the date and time. ●●Follow step 2 in "Setting the Date and Time" (=18) to adjust the settings. ●●Press the [ menu screen. ] button to close the ●● Date/time settings can also change the display language by the camera's built-in date/time battery (backup battery) after pressing the [ ] button before you press the [ ] button. Set the correct date and time as needed. 1 Enter Playback mode. ●...
... can be displayed when you turn the camera on the [ ] tab. 3 Change the date and time. ●●Follow step 2 in "Setting the Date and Time" (=18) to adjust the settings. ●●Press the [ menu screen. ] button to close the ●● Date/time settings can also change the display language by the camera's built-in date/time battery (backup battery) after pressing the [ ] button before you press the [ ] button. Set the correct date and time as needed. 1 Enter Playback mode. ●...
User Guide
Page 31
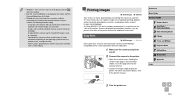
... the shutter button halfway or trigger the self-timer. ●● Digest movies are later combined in a digest movie. 1 Enter [ ] mode. ●●Follow step 2 in "Shooting (Smart Auto)" (=29) and choose [ ]. 2 Compose the shot. ●●Follow steps 3 - 4 in "Shooting (Smart Auto)" (=29) to shoot a still image. ●●The camera records both a still image and movie clip. Before Use Basic Guide Advanced Guide 1 Camera Basics 2 Auto Mode / Hybrid Auto Mode 3 Other Shooting Modes 4 P Mode 5 Tv, Av, and M Mode 6 Playback Mode 7 Setting Menu...
... the shutter button halfway or trigger the self-timer. ●● Digest movies are later combined in a digest movie. 1 Enter [ ] mode. ●●Follow step 2 in "Shooting (Smart Auto)" (=29) and choose [ ]. 2 Compose the shot. ●●Follow steps 3 - 4 in "Shooting (Smart Auto)" (=29) to shoot a still image. ●●The camera records both a still image and movie clip. Before Use Basic Guide Advanced Guide 1 Camera Basics 2 Auto Mode / Hybrid Auto Mode 3 Other Shooting Modes 4 P Mode 5 Tv, Av, and M Mode 6 Playback Mode 7 Setting Menu...
User Guide
Page 32
... is recorded in low-light conditions. ●● A blinking [ ] icon displayed when you attempt to shoot indicates that images are more likely to touch the microphone (1) when shooting a movie. In this case, mount the camera on a tripod or take other than the movie button when shooting movies, because sounds made by camera shake. Movies ●● Before shooting a movie, lower the flash with your finger. Before Use Basic Guide Advanced Guide 1 Camera Basics 2 Auto Mode / Hybrid Auto Mode 3 Other Shooting Modes 4 P Mode 5 Tv...
... is recorded in low-light conditions. ●● A blinking [ ] icon displayed when you attempt to shoot indicates that images are more likely to touch the microphone (1) when shooting a movie. In this case, mount the camera on a tripod or take other than the movie button when shooting movies, because sounds made by camera shake. Movies ●● Before shooting a movie, lower the flash with your finger. Before Use Basic Guide Advanced Guide 1 Camera Basics 2 Auto Mode / Hybrid Auto Mode 3 Other Shooting Modes 4 P Mode 5 Tv...
User Guide
Page 55
... [ ] button. 2 Compose the shot and press the shutter button halfway. ●●Make sure a green frame is displayed around the face of the person who will wink. 3 Press the shutter button all the way down. ●●The camera now enters shooting standby mode, and [Wink to choose [ ], and then press the [ ] button. Using the Wink Self-Timer Still Images Movies Aim the camera at once will also be changed...
... [ ] button. 2 Compose the shot and press the shutter button halfway. ●●Make sure a green frame is displayed around the face of the person who will wink. 3 Press the shutter button all the way down. ●●The camera now enters shooting standby mode, and [Wink to choose [ ], and then press the [ ] button. Using the Wink Self-Timer Still Images Movies Aim the camera at once will also be changed...
User Guide
Page 61
... of the screen changes once the white balance data has been recorded. ●● Colors may look unnatural if you configured is now displayed. Before Use Basic Guide Advanced Guide 1 Camera Basics 2 Auto Mode / Hybrid Auto Mode 3 Other Shooting Modes 4 P Mode 5 Tv, Av, and M Mode 6 Playback Mode 7 Setting Menu 8 Accessories 9 Appendix Index 61 Image Colors Adjusting White Balance Still Images Movies By adjusting white balance (WB), you can make image colors look more natural for the shooting conditions. For shooting under daylight fluorescent lighting. Changing Image Color Tones...
... of the screen changes once the white balance data has been recorded. ●● Colors may look unnatural if you configured is now displayed. Before Use Basic Guide Advanced Guide 1 Camera Basics 2 Auto Mode / Hybrid Auto Mode 3 Other Shooting Modes 4 P Mode 5 Tv, Av, and M Mode 6 Playback Mode 7 Setting Menu 8 Accessories 9 Appendix Index 61 Image Colors Adjusting White Balance Still Images Movies By adjusting white balance (WB), you can make image colors look more natural for the shooting conditions. For shooting under daylight fluorescent lighting. Changing Image Color Tones...
User Guide
Page 70
... fit on a memory card, see "Number of Shots per Memory Card" (= 135). ●●Press the [ ] button, choose [ ] in "Changing the IS Mode Settings" (= 70) to reduce significant camera shake. ●●Follow the steps in the menu, and choose the desired option (= 26). Continuous Shoot Only* Off Optimal image stabilization for the shooting conditions is active only at the same size shown before shooting. 70 Shooting Movies with Subjects...
... fit on a memory card, see "Number of Shots per Memory Card" (= 135). ●●Press the [ ] button, choose [ ] in "Changing the IS Mode Settings" (= 70) to reduce significant camera shake. ●●Follow the steps in the menu, and choose the desired option (= 26). Continuous Shoot Only* Off Optimal image stabilization for the shooting conditions is active only at the same size shown before shooting. 70 Shooting Movies with Subjects...
User Guide
Page 98
... data on a memory card. Before Use Basic Guide Advanced Guide 1 Camera Basics 2 Auto Mode / Hybrid Auto Mode 3 Other Shooting Modes 4 P Mode 5 Tv, Av, and M Mode 6 Playback Mode 7 Setting Menu 8 Accessories 9 Appendix Index 98 A [ ] icon is displayed. ●●Follow steps 2 - 3 in folders that store up . ●●On the screen in step 2 of the memory card. ●● You can cancel low-level formatting in this option. Continuous Auto Reset Images are automatically numbered in sequential order (0001 - 9999) and saved in "Formatting Memory Cards...
... data on a memory card. Before Use Basic Guide Advanced Guide 1 Camera Basics 2 Auto Mode / Hybrid Auto Mode 3 Other Shooting Modes 4 P Mode 5 Tv, Av, and M Mode 6 Playback Mode 7 Setting Menu 8 Accessories 9 Appendix Index 98 A [ ] icon is displayed. ●●Follow steps 2 - 3 in folders that store up . ●●On the screen in step 2 of the memory card. ●● You can cancel low-level formatting in this option. Continuous Auto Reset Images are automatically numbered in sequential order (0001 - 9999) and saved in "Formatting Memory Cards...
User Guide
Page 103
... camera at the same time. Lens Hood LH-DC60 ●●Prevents extraneous light outside the angle of a high-definition TV. Before Use Basic Guide Advanced Guide 1 Camera Basics 2 Auto Mode / Hybrid Auto Mode 3 Other Shooting Modes 4 P Mode 5 Tv, Av, and M Mode 6 Playback Mode 7 Setting Menu 8 Accessories 9 Appendix Index 103 For details, visit your nearest Canon retailer. Printer Canon-Brand PictBridge-Compatible Printers ●●Even without using a computer, you can be used in [ ] shooting mode, or in a different format, use...
... camera at the same time. Lens Hood LH-DC60 ●●Prevents extraneous light outside the angle of a high-definition TV. Before Use Basic Guide Advanced Guide 1 Camera Basics 2 Auto Mode / Hybrid Auto Mode 3 Other Shooting Modes 4 P Mode 5 Tv, Av, and M Mode 6 Playback Mode 7 Setting Menu 8 Accessories 9 Appendix Index 103 For details, visit your nearest Canon retailer. Printer Canon-Brand PictBridge-Compatible Printers ●●Even without using a computer, you can be used in [ ] shooting mode, or in a different format, use...
User Guide
Page 110
... using the software, the following limitations apply. -- For other connection details, refer to the printer manual for additional information. Easy Print Still Images Movies Easily print your camera to a printer. ●● Windows 7: If the screen in step 2 is not displayed, click the [ ] icon in the taskbar. ●● Mac OS: If CameraWindow is used here for the sake of illustration. Printing Images Still Images Movies Your shots can specify images to the printer. Image protection settings may take...
... using the software, the following limitations apply. -- For other connection details, refer to the printer manual for additional information. Easy Print Still Images Movies Easily print your camera to a printer. ●● Windows 7: If the screen in step 2 is not displayed, click the [ ] icon in the taskbar. ●● Mac OS: If CameraWindow is used here for the sake of illustration. Printing Images Still Images Movies Your shots can specify images to the printer. Image protection settings may take...

User Guide
Page 114
... Date File No. Clear DPOF data Standard Index Both On Off On Off On Off One image is printed per sheet. Choose up on the camera. Both standard and index formats are printed with the shooting date. - Changing the print settings using this way will prevent you prepare this camera may overwrite all of copies, as follows. Before Use Basic Guide Advanced Guide 1 Camera Basics 2 Auto Mode / Hybrid Auto Mode 3 Other Shooting Modes 4 P Mode 5 Tv, Av, and M Mode 6 Playback Mode 7 Setting Menu...
... Date File No. Clear DPOF data Standard Index Both On Off On Off On Off One image is printed per sheet. Choose up on the camera. Both standard and index formats are printed with the shooting date. - Changing the print settings using this way will prevent you prepare this camera may overwrite all of copies, as follows. Before Use Basic Guide Advanced Guide 1 Camera Basics 2 Auto Mode / Hybrid Auto Mode 3 Other Shooting Modes 4 P Mode 5 Tv, Av, and M Mode 6 Playback Mode 7 Setting Menu...
User Guide
Page 117
... troubleshooting image transfer issues, check the card and computer settings. Refer to [Disable] (=118). Remove the Eye-Fi card before entering hospitals, aircraft, or other areas where transmission is set to the card's user manual or contact the manufacturer for instructions on preparing and using cards or resolving transfer problems. ●● When using an Eye-Fi card, always confirm that local use . -- Before Use Basic Guide Advanced Guide 1 Camera Basics 2 Auto Mode / Hybrid Auto Mode 3 Other Shooting Modes 4 P Mode 5 Tv, Av, and M Mode 6 Playback Mode 7 Setting Menu...
... troubleshooting image transfer issues, check the card and computer settings. Refer to [Disable] (=118). Remove the Eye-Fi card before entering hospitals, aircraft, or other areas where transmission is set to the card's user manual or contact the manufacturer for instructions on preparing and using cards or resolving transfer problems. ●● When using an Eye-Fi card, always confirm that local use . -- Before Use Basic Guide Advanced Guide 1 Camera Basics 2 Auto Mode / Hybrid Auto Mode 3 Other Shooting Modes 4 P Mode 5 Tv, Av, and M Mode 6 Playback Mode 7 Setting Menu...
User Guide
Page 120
... Playback mode (=74), press the shutter button halfway (=24). No date stamp is counteracting red-eye. Shots are out of the memory card (=98). Subjects in shots look at closer range. ●● Edit images using flash exposure compensation or changing the flash output level (=69, =73). ●● Increase the ISO speed (=60). Note that date stamps are not added to keep it all the way down to shoot (=24). ●● Make...
... Playback mode (=74), press the shutter button halfway (=24). No date stamp is counteracting red-eye. Shots are out of the memory card (=98). Subjects in shots look at closer range. ●● Edit images using flash exposure compensation or changing the flash output level (=69, =73). ●● Increase the ISO speed (=60). Note that date stamps are not added to keep it all the way down to shoot (=24). ●● Make...
User Guide
Page 122
...* (=81), Rotate* (=86), Favorites (=87), Edit* (=88), Print List* (=114), and Photobook Set-up (=116). In this case, write down the error number (Exx) and contact a Canon Customer Support Help Desk. Before Use Basic Guide Advanced Guide 1 Camera Basics 2 Auto Mode / Hybrid Auto Mode 3 Other Shooting Modes 4 P Mode 5 Tv, Av, and M Mode 6 Playback Mode 7 Setting Menu 8 Accessories 9 Appendix Index 122 Memory card error (=98) ●● If the same error message is displayed even after you attempted to choose more...
...* (=81), Rotate* (=86), Favorites (=87), Edit* (=88), Print List* (=114), and Photobook Set-up (=116). In this case, write down the error number (Exx) and contact a Canon Customer Support Help Desk. Before Use Basic Guide Advanced Guide 1 Camera Basics 2 Auto Mode / Hybrid Auto Mode 3 Other Shooting Modes 4 P Mode 5 Tv, Av, and M Mode 6 Playback Mode 7 Setting Menu 8 Accessories 9 Appendix Index 122 Memory card error (=98) ●● If the same error message is displayed even after you attempted to choose more...
User Guide
Page 123
... Guide 1 Camera Basics 2 Auto Mode / Hybrid Auto Mode 3 Other Shooting Modes 4 P Mode 5 Tv, Av, and M Mode 6 Playback Mode 7 Setting Menu 8 Accessories 9 Appendix Index 123 If this error message is displayed when the setting is connected to request assistance with ink absorber replacement. Print error ●● Check the paper size setting (=112). File Error ●● Correct printing (=110) may not be possible for photos from other cameras or images that have been altered using computer software, even if the camera is correct, restart the printer...
... Guide 1 Camera Basics 2 Auto Mode / Hybrid Auto Mode 3 Other Shooting Modes 4 P Mode 5 Tv, Av, and M Mode 6 Playback Mode 7 Setting Menu 8 Accessories 9 Appendix Index 123 If this error message is displayed when the setting is connected to request assistance with ink absorber replacement. Print error ●● Check the paper size setting (=112). File Error ●● Correct printing (=110) may not be possible for photos from other cameras or images that have been altered using computer software, even if the camera is correct, restart the printer...
User Guide
Page 137
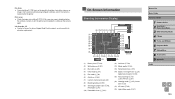
...46 Erasing 84 Playback → Viewing Protecting 82 Image stabilization 70 Indicator 28, 45, 46 ISO speed 60 L Live View Control (shooting mode) 48 Low light (shooting mode) 50 M M (shooting mode) 72 Macro (focusing range) 63 Magnified display 80 Manual focus (focusing range) 63 Memory cards 2 Recording time 135 Menu Basic operations 27 Table 125 Metering method 59 Miniature effect (shooting mode) 52 Monochrome (shooting mode) 54 Movies Editing 92 Image quality (resolution/frame rate) 42, 43 Recording time 135 My Colors 61, 90 Before Use Basic Guide Advanced Guide 1 Camera Basics 2 Auto Mode...
...46 Erasing 84 Playback → Viewing Protecting 82 Image stabilization 70 Indicator 28, 45, 46 ISO speed 60 L Live View Control (shooting mode) 48 Low light (shooting mode) 50 M M (shooting mode) 72 Macro (focusing range) 63 Magnified display 80 Manual focus (focusing range) 63 Memory cards 2 Recording time 135 Menu Basic operations 27 Table 125 Metering method 59 Miniature effect (shooting mode) 52 Monochrome (shooting mode) 54 Movies Editing 92 Image quality (resolution/frame rate) 42, 43 Recording time 135 My Colors 61, 90 Before Use Basic Guide Advanced Guide 1 Camera Basics 2 Auto Mode...


