User Manual
Page 1
...Wi-Fi Functions 7 Setting Menu 8 Accessories 9 Appendix Index © CANON INC. 2016 CT0-D068-000-F101-A 1 Camera User Guide ENGLISH ●● Make sure you read this guide, including the "Safety Precautions" (= 11) section, before using the camera. ●● Reading this guide will help you learn to use the... camera properly. ●● Store this guide safely so that you can use it in the future. &#...
...Wi-Fi Functions 7 Setting Menu 8 Accessories 9 Appendix Index © CANON INC. 2016 CT0-D068-000-F101-A 1 Camera User Guide ENGLISH ●● Make sure you read this guide, including the "Safety Precautions" (= 11) section, before using the camera. ●● Reading this guide will help you learn to use the... camera properly. ●● Store this guide safely so that you can use it in the future. &#...
User Manual
Page 2
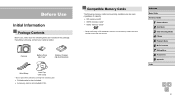
... NB-11LH* Battery Charger CB-2LF/CB-2LFE Wrist Strap Lens Cap (with the camera. If anything is not included (=2). However, not all memory cards have been verified to SD standards. Before Use Initial Information Package Contents ...off the adhesive covering from a battery pack. ●● Printed matter is also included. ●● A memory card is missing, contact your camera retailer. Before Use Basic Guide Advanced Guide 1 Camera Basics 2 Auto Mode 3 Other Shooting Modes 4 P Mode 5 Playback Mode 6 Wi-Fi Functions 7 Setting Menu 8 Accessories 9 Appendix Index 2 Compatible...
... NB-11LH* Battery Charger CB-2LF/CB-2LFE Wrist Strap Lens Cap (with the camera. If anything is not included (=2). However, not all memory cards have been verified to SD standards. Before Use Initial Information Package Contents ...off the adhesive covering from a battery pack. ●● Printed matter is also included. ●● A memory card is missing, contact your camera retailer. Before Use Basic Guide Advanced Guide 1 Camera Basics 2 Auto Mode 3 Other Shooting Modes 4 P Mode 5 Playback Mode 6 Wi-Fi Functions 7 Setting Menu 8 Accessories 9 Appendix Index 2 Compatible...
User Manual
Page 3
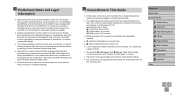
...return to the area of purchase before contacting a Canon Customer Support Help Desk. ●● Although the screen is produced under default settings. ●● For convenience, all supported memory cards are represented by the camera shall be for personal use. Refrain from unauthorized ... and controls are simply referred to the camera under extremely high-precision manufacturing conditions and more than 99.99% of the pixels meet design specifications, in the failure of purchase. Please note that Canon Inc., its subsidiaries and affiliates, and its distributors are not ...
...return to the area of purchase before contacting a Canon Customer Support Help Desk. ●● Although the screen is produced under default settings. ●● For convenience, all supported memory cards are represented by the camera shall be for personal use. Refrain from unauthorized ... and controls are simply referred to the camera under extremely high-precision manufacturing conditions and more than 99.99% of the pixels meet design specifications, in the failure of purchase. Please note that Canon Inc., its subsidiaries and affiliates, and its distributors are not ...
User Manual
Page 4
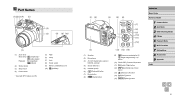
... (11) [ (Flash)] / Right button (12) [ (Information)] / Down button (13) [ (Macro)] / Left button (14) [ (Wi-Fi)] button (15) [ (Menu)] button Before Use Basic Guide Advanced Guide 1 Camera Basics 2 Auto Mode 3 Other Shooting Modes 4 P Mode 5 Playback Mode 6 Wi-Fi Functions 7 Setting Menu 8 Accessories 9 Appendix Index 4
... (11) [ (Flash)] / Right button (12) [ (Information)] / Down button (13) [ (Macro)] / Left button (14) [ (Wi-Fi)] button (15) [ (Menu)] button Before Use Basic Guide Advanced Guide 1 Camera Basics 2 Auto Mode 3 Other Shooting Modes 4 P Mode 5 Playback Mode 6 Wi-Fi Functions 7 Setting Menu 8 Accessories 9 Appendix Index 4
User Manual
Page 5
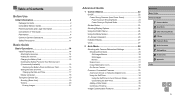
...Using the FUNC. Menu 24 Using the Menu Screen 25 On-Screen Keyboard 26 Indicator Display 27 Clock 27 2 Auto Mode 28 Shooting with Camera-Determined Settings 28 Shooting (Smart Auto 28 Still Images/Movies 30 Still Images 30 Movies 31 Scene Icons 31 Image Stabilization Icons 32 On-... Common, Convenient Features 33 Zooming In Closer on Subjects (Digital Zoom 33 Using the Self-Timer 34 Using the Self-Timer to Avoid Camera Shake 34 Customizing the Self-Timer 35 Adding a Date Stamp 35 Continuous Shooting 36 Image Customization Features 37 Before Use Basic Guide Advanced Guide...
...Using the FUNC. Menu 24 Using the Menu Screen 25 On-Screen Keyboard 26 Indicator Display 27 Clock 27 2 Auto Mode 28 Shooting with Camera-Determined Settings 28 Shooting (Smart Auto 28 Still Images/Movies 30 Still Images 30 Movies 31 Scene Icons 31 Image Stabilization Icons 32 On-... Common, Convenient Features 33 Zooming In Closer on Subjects (Digital Zoom 33 Using the Self-Timer 34 Using the Self-Timer to Avoid Camera Shake 34 Customizing the Self-Timer 35 Adding a Date Stamp 35 Continuous Shooting 36 Image Customization Features 37 Before Use Basic Guide Advanced Guide...
User Manual
Page 6
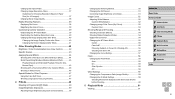
... Images 37 Changing Movie Image Quality 38 Helpful Shooting Features 38 Displaying Grid Lines 38 Magnifying the Area in Focus 39 Customizing Camera Operation 39 Deactivating the AF-Assist Beam 39 Deactivating the Red-Eye Reduction Lamp 40 Changing the Image Display Style after Shots 40... Shots Resembling Miniature Models (Miniature Effect 45 Playback Speed and Estimated Playback Time (for OneMinute Clips 45 Shooting with a Toy Camera Effect (Toy Camera Effect 46 Shooting in Monochrome 46 Special Modes for Other Purposes 47 Using the Face Self-Timer 47 Shooting Long Exposures (Long...
... Images 37 Changing Movie Image Quality 38 Helpful Shooting Features 38 Displaying Grid Lines 38 Magnifying the Area in Focus 39 Customizing Camera Operation 39 Deactivating the AF-Assist Beam 39 Deactivating the Red-Eye Reduction Lamp 40 Changing the Image Display Style after Shots 40... Shots Resembling Miniature Models (Miniature Effect 45 Playback Speed and Estimated Playback Time (for OneMinute Clips 45 Shooting with a Toy Camera Effect (Toy Camera Effect 46 Shooting in Monochrome 46 Special Modes for Other Purposes 47 Using the Face Self-Timer 47 Shooting Long Exposures (Long...
User Manual
Page 7
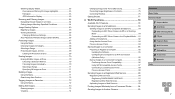
...Sending Images to a Smartphone 79 Sending Images to an NFC-Compatible Smartphone 79 Connecting via NFC When Camera Is Off or in Shooting Mode 79 Connecting via NFC When Camera Is in Playback Mode......81 Adding a Smartphone 82 Using Another Access Point 84 Previous Access Points ... Connecting to Listed Access Points 89 Previous Access Points 90 Sending Images to a Registered Web Service 90 Registering Web Services 90 Registering CANON iMAGE GATEWAY 91 Registering Other Web Services 92 Uploading Images to Web Services 93 Printing Images Wirelessly from a Connected Printer 94 Sending...
...Sending Images to a Smartphone 79 Sending Images to an NFC-Compatible Smartphone 79 Connecting via NFC When Camera Is Off or in Shooting Mode 79 Connecting via NFC When Camera Is in Playback Mode......81 Adding a Smartphone 82 Using Another Access Point 84 Previous Access Points ... Connecting to Listed Access Points 89 Previous Access Points 90 Sending Images to a Registered Web Service 90 Registering Web Services 90 Registering CANON iMAGE GATEWAY 91 Registering Other Web Services 92 Uploading Images to Web Services 93 Printing Images Wirelessly from a Connected Printer 94 Sending...
User Manual
Page 8
... Recording Pixels (Image Size)...........98 Adding Comments 99 Sending Images Automatically (Image Sync 99 Initial Preparations 99 Preparing the Camera 99 Preparing the Computer 100 Sending Images 100 Viewing Images Sent via Image Sync on Your Smartphone 101 Using a Smartphone to View... Camera Images and Control the Camera 102 Geotagging Images on the Camera 102 Shooting Remotely 102 Editing or Erasing Wi-Fi Settings 103 Editing Connection Information 103 Changing a Device ...
... Recording Pixels (Image Size)...........98 Adding Comments 99 Sending Images Automatically (Image Sync 99 Initial Preparations 99 Preparing the Camera 99 Preparing the Computer 100 Sending Images 100 Viewing Images Sent via Image Sync on Your Smartphone 101 Using a Smartphone to View... Camera Images and Control the Camera 102 Geotagging Images on the Camera 102 Shooting Remotely 102 Editing or Erasing Wi-Fi Settings 103 Editing Connection Information 103 Changing a Device ...
User Manual
Page 9
...Fi (Wireless LAN) Precautions 147 Radio Wave Interference Precautions 147 Security Precautions 147 Trademarks and Licensing 148 Disclaimer 149 Before Use Basic Guide Advanced Guide 1 Camera Basics 2 Auto Mode 3 Other Shooting Modes 4 P Mode 5 Playback Mode 6 Wi-Fi Functions 7 Setting Menu 8 Accessories 9 Appendix Index 9... 137 Set Up Tab 139 Playback Tab 139 Print Tab 140 Playback Mode FUNC. Menu 140 Handling Precautions 140 Specifications 141 Camera 141 Number of Shots/Recording Time, Playback Time 142 Shooting Range 142 Number of Movie Control Panel 133 Functions and Menu...
...Fi (Wireless LAN) Precautions 147 Radio Wave Interference Precautions 147 Security Precautions 147 Trademarks and Licensing 148 Disclaimer 149 Before Use Basic Guide Advanced Guide 1 Camera Basics 2 Auto Mode 3 Other Shooting Modes 4 P Mode 5 Playback Mode 6 Wi-Fi Functions 7 Setting Menu 8 Accessories 9 Appendix Index 9... 137 Set Up Tab 139 Playback Tab 139 Print Tab 140 Playback Mode FUNC. Menu 140 Handling Precautions 140 Specifications 141 Camera 141 Number of Shots/Recording Time, Playback Time 142 Shooting Range 142 Number of Movie Control Panel 133 Functions and Menu...

User Manual
Page 10
...Low Light (= 43) Applying special effects Fireworks (= 43) Vivid Colors (= 44) Poster Effect (= 44) Fish-Eye Effect (= 44) Miniature Effect (= 45) Toy Camera Effect (= 46) Monochrome (= 46) ●● While adjusting image settings (Live View Control) -- =42 ●● Focus on faces -- =28, =43,... computer -- =117 ●● Browse through images quickly -- =64 ●● Erase images -- =70 Before Use Basic Guide Advanced Guide 1 Camera Basics 2 Auto Mode 3 Other Shooting Modes 4 P Mode 5 Playback Mode 6 Wi-Fi Functions 7 Setting Menu 8 Accessories 9 Appendix Index 10
...Low Light (= 43) Applying special effects Fireworks (= 43) Vivid Colors (= 44) Poster Effect (= 44) Fish-Eye Effect (= 44) Miniature Effect (= 45) Toy Camera Effect (= 46) Monochrome (= 46) ●● While adjusting image settings (Live View Control) -- =42 ●● Focus on faces -- =28, =43,... computer -- =117 ●● Browse through images quickly -- =64 ●● Erase images -- =70 Before Use Basic Guide Advanced Guide 1 Camera Basics 2 Auto Mode 3 Other Shooting Modes 4 P Mode 5 Playback Mode 6 Wi-Fi Functions 7 Setting Menu 8 Accessories 9 Appendix Index 10
User Manual
Page 11
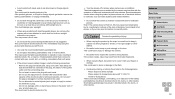
... equipment out of the reach of serious injury or death. ●● Do not trigger the flash in asphyxiation. Before Use Basic Guide Advanced Guide 1 Camera Basics 2 Auto Mode 3 Other Shooting Modes 4 P Mode 5 Playback Mode 6 Wi-Fi Functions 7 Setting Menu 8 Accessories 9 Appendix Index 11 If your eyesight. In particular, remain at...
... equipment out of the reach of serious injury or death. ●● Do not trigger the flash in asphyxiation. Before Use Basic Guide Advanced Guide 1 Camera Basics 2 Auto Mode 3 Other Shooting Modes 4 P Mode 5 Playback Mode 6 Wi-Fi Functions 7 Setting Menu 8 Accessories 9 Appendix Index 11 If your eyesight. In particular, remain at...
User Manual
Page 12
... Do not insert or remove the plug with wet hands. -- Places subject to strong impacts. This could lead to injury or damage the camera. ●● Be careful not to subject the screen to temperatures above 40 °C (104 °F) -- This could result in ...the product uses a battery charger, note the following places: -- Caution Denotes the possibility of the skin or blistering. Before Use Basic Guide Advanced Guide 1 Camera Basics 2 Auto Mode 3 Other Shooting Modes 4 P Mode 5 Playback Mode 6 Wi-Fi Functions 7 Setting Menu 8 Accessories 9 Appendix Index 12 This ...
... Do not insert or remove the plug with wet hands. -- Places subject to strong impacts. This could lead to injury or damage the camera. ●● Be careful not to subject the screen to temperatures above 40 °C (104 °F) -- This could result in ...the product uses a battery charger, note the following places: -- Caution Denotes the possibility of the skin or blistering. Before Use Basic Guide Advanced Guide 1 Camera Basics 2 Auto Mode 3 Other Shooting Modes 4 P Mode 5 Playback Mode 6 Wi-Fi Functions 7 Setting Menu 8 Accessories 9 Appendix Index 12 This ...
User Manual
Page 13
... come into contact with a cotton swab or cloth. Doing so may cause malfunctions or damage the screen. ●● When putting the camera in your bag, ensure that raise and lower the flash automatically, make sure to avoid pinching your pant pocket. This could cause leakage, ... or other metal materials may lead to fire or explosions. ●● Unplug any battery charger used with the camera in your fingers with the + and - Before Use Basic Guide Advanced Guide 1 Camera Basics 2 Auto Mode 3 Other Shooting Modes 4 P Mode 5 Playback Mode 6 Wi-Fi Functions 7 Setting Menu 8 ...
... come into contact with a cotton swab or cloth. Doing so may cause malfunctions or damage the screen. ●● When putting the camera in your bag, ensure that raise and lower the flash automatically, make sure to avoid pinching your pant pocket. This could cause leakage, ... or other metal materials may lead to fire or explosions. ●● Unplug any battery charger used with the camera in your fingers with the + and - Before Use Basic Guide Advanced Guide 1 Camera Basics 2 Auto Mode 3 Other Shooting Modes 4 P Mode 5 Playback Mode 6 Wi-Fi Functions 7 Setting Menu 8 ...
User Manual
Page 14
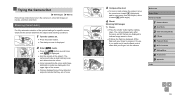
Before Use Basic Guide Advanced Guide 1 Camera Basics 2 Auto Mode 3 Other Shooting Modes 4 P Mode 5 Playback Mode 6 Wi-Fi Functions 7 Setting Menu 8 Accessories 9 Appendix Index 14 Attaching Accessories 1 Attach the strap. (2) ●●... and instructions, from the lens momentarily, thread the end of the strap through the loop (2). ●●Always remove the lens cap before turning the camera on. ●●Keep the lens cap on the lens when the...
Before Use Basic Guide Advanced Guide 1 Camera Basics 2 Auto Mode 3 Other Shooting Modes 4 P Mode 5 Playback Mode 6 Wi-Fi Functions 7 Setting Menu 8 Accessories 9 Appendix Index 14 Attaching Accessories 1 Attach the strap. (2) ●●... and instructions, from the lens momentarily, thread the end of the strap through the loop (2). ●●Always remove the lens cap before turning the camera on. ●●Keep the lens cap on the lens when the...
User Manual
Page 15
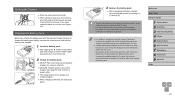
...arms close to your fingers on it from moving. Charging the Battery Pack Before use an electrical transformer designed for the plug. Holding the Camera ●●Place the strap around your wrist. ●●When shooting, keep it in optimal condition, do not charge it continuously for... more than 24 hours. ●● For battery chargers that use a power cord, do not rest your body and hold the camera securely to prevent it . Never use , charge the battery pack with the battery pack charged. (1) (2) 1 Insert the battery pack. ●●...
...arms close to your fingers on it from moving. Charging the Battery Pack Before use an electrical transformer designed for the plug. Holding the Camera ●●Place the strap around your wrist. ●●When shooting, keep it in optimal condition, do not charge it continuously for... more than 24 hours. ●● For battery chargers that use a power cord, do not rest your body and hold the camera securely to prevent it . Never use , charge the battery pack with the battery pack charged. (1) (2) 1 Insert the battery pack. ●●...
User Manual
Page 16
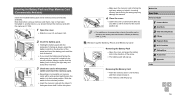
... memory card (commercially available). Removing the Memory Card ●●Push the memory card in another device, you should format the memory card with this camera (=109). (2) 1 Open the cover. ●●Slide the cover (1) and open it (2). (1) 2 Insert the battery pack. ●●...the lock clicks shut. ●●If you insert it . ●●The memory card will pop up . Before Use Basic Guide Advanced Guide 1 Camera Basics 2 Auto Mode 3 Other Shooting Modes 4 P Mode 5 Playback Mode 6 Wi-Fi Functions 7 Setting Menu 8 Accessories 9 Appendix Index 16 Inserting...
... memory card (commercially available). Removing the Memory Card ●●Push the memory card in another device, you should format the memory card with this camera (=109). (2) 1 Open the cover. ●●Slide the cover (1) and open it (2). (1) 2 Insert the battery pack. ●●...the lock clicks shut. ●●If you insert it . ●●The memory card will pop up . Before Use Basic Guide Advanced Guide 1 Camera Basics 2 Auto Mode 3 Other Shooting Modes 4 P Mode 5 Playback Mode 6 Wi-Fi Functions 7 Setting Menu 8 Accessories 9 Appendix Index 16 Inserting...
User Manual
Page 17
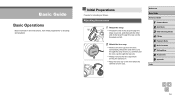
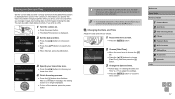
... Date and Time" (=17) to adjust the settings. ●●Press the [ menu screen. ] button to close the Before Use Basic Guide Advanced Guide 1 Camera Basics 2 Auto Mode 3 Other Shooting Modes 4 P Mode 5 Playback Mode 6 Wi-Fi Functions 7 Setting Menu 8 Accessories 9 Appendix Index 17 You can also ...add a date stamp to shots, if you turn the camera on . Information you specify this way is recorded in image properties when you shoot, and it is displayed. 2 Set the date and time. ●&#...
... Date and Time" (=17) to adjust the settings. ●●Press the [ menu screen. ] button to close the Before Use Basic Guide Advanced Guide 1 Camera Basics 2 Auto Mode 3 Other Shooting Modes 4 P Mode 5 Playback Mode 6 Wi-Fi Functions 7 Setting Menu 8 Accessories 9 Appendix Index 17 You can also ...add a date stamp to shots, if you turn the camera on . Information you specify this way is recorded in image properties when you shoot, and it is displayed. 2 Set the date and time. ●&#...
User Manual
Page 18
... Once the date/time battery is a build-in date/time battery (backup battery) in step 2 after pressing the [ ] button before you turn the camera on the [ ] tab. ●● There is depleted, the [Date/Time] screen will be displayed when you press the [ ] button. Before... Use Basic Guide Advanced Guide 1 Camera Basics 2 Auto Mode 3 Other Shooting Modes 4 P Mode 5 Playback Mode 6 Wi-Fi Functions 7 Setting Menu 8 Accessories 9 Appendix Index 18 Date/time settings...
... Once the date/time battery is a build-in date/time battery (backup battery) in step 2 after pressing the [ ] button before you turn the camera on the [ ] tab. ●● There is depleted, the [Date/Time] screen will be displayed when you press the [ ] button. Before... Use Basic Guide Advanced Guide 1 Camera Basics 2 Auto Mode 3 Other Shooting Modes 4 P Mode 5 Playback Mode 6 Wi-Fi Functions 7 Setting Menu 8 Accessories 9 Appendix Index 18 Date/time settings...
User Manual
Page 19
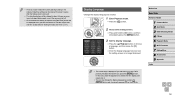
...For fully automatic selection of the screen. ●●Frames displayed around any detected subjects indicate that they are displayed to use . The camera beeps twice after focusing, and AF frames are in focus. 3 Compose the shot. ●●To zoom in focus. ●●... Still Images 1) Focus. ●●Press the shutter button lightly, halfway down with your finger to prepare it toward [ ] (telephoto), and to turn the camera on . ●●Press the power button. ●●The startup screen is displayed. 2 Enter [ ] mode. ●●Press the [ ] button...
...For fully automatic selection of the screen. ●●Frames displayed around any detected subjects indicate that they are displayed to use . The camera beeps twice after focusing, and AF frames are in focus. 3 Compose the shot. ●●To zoom in focus. ●●... Still Images 1) Focus. ●●Press the shutter button lightly, halfway down with your finger to prepare it toward [ ] (telephoto), and to turn the camera on . ●●Press the power button. ●●The startup screen is displayed. 2 Enter [ ] mode. ●●Press the [ ] button...
User Manual
Page 20
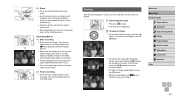
...icon. In this screen (Scroll Display mode), press and hold the [ ][ ] buttons for at least one second. Before Use Basic Guide Advanced Guide 1 Camera Basics 2 Auto Mode 3 Other Shooting Modes 4 P Mode 5 Playback Mode 6 Wi-Fi Functions 7 Setting Menu 8 Accessories 9 Appendix Index 20 Viewing After ...shooting images or movies, you have raised the flash, it fires automatically. ●●Keep the camera still until the shutter sound ends. ●●After displaying your finger off the movie button. 2) Finish recording. ●●Press ...
...icon. In this screen (Scroll Display mode), press and hold the [ ][ ] buttons for at least one second. Before Use Basic Guide Advanced Guide 1 Camera Basics 2 Auto Mode 3 Other Shooting Modes 4 P Mode 5 Playback Mode 6 Wi-Fi Functions 7 Setting Menu 8 Accessories 9 Appendix Index 20 Viewing After ...shooting images or movies, you have raised the flash, it fires automatically. ●●Keep the camera still until the shutter sound ends. ●●After displaying your finger off the movie button. 2) Finish recording. ●●Press ...
