Software Starter Guide DC SD Ver.9
Page 20
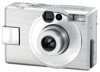
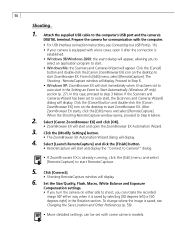
... with the computer. • Turn the camera's Mode Dial, Mode Switch or POWER /REPLAY Button to . Attach the supplied USB cable to the computer's USB port and the camera's Digital Terminal. • You do not need to turn off the computer for communication with the camera ..., never disconnect the USB cable. Prepare the camera for this occurs, disconnect the other USB devices, excluding USB mice or keyboards, at the same time. 16 Connecting to a USB Port Connection Precautions • Connect the camera directly to a USB port on how to attach / detach the cable. Please refer to...
... with the computer. • Turn the camera's Mode Dial, Mode Switch or POWER /REPLAY Button to . Attach the supplied USB cable to the computer's USB port and the camera's Digital Terminal. • You do not need to turn off the computer for communication with the camera ..., never disconnect the USB cable. Prepare the camera for this occurs, disconnect the other USB devices, excluding USB mice or keyboards, at the same time. 16 Connecting to a USB Port Connection Precautions • Connect the camera directly to a USB port on how to attach / detach the cable. Please refer to...
Software Starter Guide DC SD Ver.9
Page 24
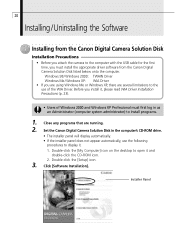
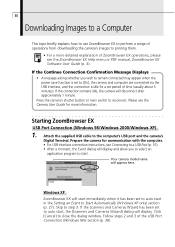
...installer panel does not appear automatically, use the following procedures to the computer with the USB cable for the first time, you must install the appropriate driver software from the Canon Digital Camera Solution Disk Installation Precautions • Before you install it . 1. 20 ...Installing/Uninstalling the Software Installing from the Canon Digital Camera Solution Disk listed below onto the computer. Set the Canon Digital Camera Solution Disk in as an Administrator (computer system administrator) to install programs. 1....
...installer panel does not appear automatically, use the following procedures to the computer with the USB cable for the first time, you must install the appropriate driver software from the Canon Digital Camera Solution Disk Installation Precautions • Before you install it . 1. 20 ...Installing/Uninstalling the Software Installing from the Canon Digital Camera Solution Disk listed below onto the computer. Set the Canon Digital Camera Solution Disk in as an Administrator (computer system administrator) to install programs. 1....
Software Starter Guide DC SD Ver.9
Page 27
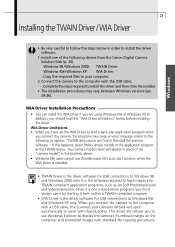
...not a stand-alone program, you connect the camera, the program may vary between Windows versions (pp. 24-26). Since it from the Canon Digital Camera Solution Disk (p. 20). Windows 23 Installing the TWAIN Driver/ WIA Driver • Be very careful to follow the steps below ... • WIA Driver is the software required to appear: "TWAIN data source not found. Copy the required files to the computer with the USB cable. - Connect the camera to your computer. 2. Reinstall the scanner software." Complete the steps required to install the driver and then close the installer...
...not a stand-alone program, you connect the camera, the program may vary between Windows versions (pp. 24-26). Since it from the Canon Digital Camera Solution Disk (p. 20). Windows 23 Installing the TWAIN Driver/ WIA Driver • Be very careful to follow the steps below ... • WIA Driver is the software required to appear: "TWAIN data source not found. Copy the required files to the computer with the USB cable. - Connect the camera to your computer. 2. Reinstall the scanner software." Complete the steps required to install the driver and then close the installer...
Software Starter Guide DC SD Ver.9
Page 28
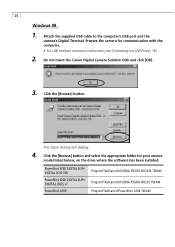
... has been installed. PowerShot S330 DIGITAL ELPH DIGITAL IXUS 330 PowerShot S200 DIGITAL ELPH DIGITAL IXUS v2 PowerShot A100 ProgramFiles\Canon\IXY300A PSS330 IXUS330 TWAIN ProgramFiles\Canon\IXY200A PSS200 IXUSV2 TWAIN ProgramFiles\Canon\PowerShot A100 TWAIN 24 Windows...Canon Digital Camera Solution Disk and click [OK]. 3. Click the [Browse] button and select the appropriate folder for communication with the computer. • For USB interface connection instructions, see Connecting to the computer's USB port and the camera's Digital Terminal. Attach the supplied USB cable to a USB...
... has been installed. PowerShot S330 DIGITAL ELPH DIGITAL IXUS 330 PowerShot S200 DIGITAL ELPH DIGITAL IXUS v2 PowerShot A100 ProgramFiles\Canon\IXY300A PSS330 IXUS330 TWAIN ProgramFiles\Canon\IXY200A PSS200 IXUSV2 TWAIN ProgramFiles\Canon\PowerShot A100 TWAIN 24 Windows...Canon Digital Camera Solution Disk and click [OK]. 3. Click the [Browse] button and select the appropriate folder for communication with the computer. • For USB interface connection instructions, see Connecting to the computer's USB port and the camera's Digital Terminal. Attach the supplied USB cable to a USB...

Software Starter Guide DC SD Ver.9
Page 30
... must first log in as an Administrator to install programs. 1. Attach the supplied USB cable to the computer's USB port and the camera's Digital Terminal. Attach the supplied USB cable to the computer's USB port and the camera's Digital Terminal. When you are using Windows Me, the Scanners...EX or the Scanners and Cameras Wizard (p. 27). Prepare the camera for communication with the computer. • For USB interface connection instructions, see Connecting to a USB port (p. 16). • The Found New Hardware Wizard will start (ZoomBrowser EX or Scanners and Cameras Wizard). The...
... must first log in as an Administrator to install programs. 1. Attach the supplied USB cable to the computer's USB port and the camera's Digital Terminal. Attach the supplied USB cable to the computer's USB port and the camera's Digital Terminal. When you are using Windows Me, the Scanners...EX or the Scanners and Cameras Wizard (p. 27). Prepare the camera for communication with the computer. • For USB interface connection instructions, see Connecting to a USB port (p. 16). • The Found New Hardware Wizard will start (ZoomBrowser EX or Scanners and Cameras Wizard). The...
Software Starter Guide DC SD Ver.9
Page 31
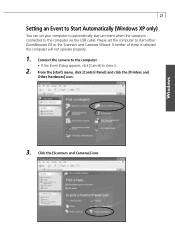
... or the Scanners and Cameras Wizard. Connect the camera to the computer. • If the Event Dialog appears, click [Cancel] to the computer via the USB cable. Please set your computer to automatically start ] menu, click [Control Panel] and click the [Printers and Other Hardware] icon. 3.
... or the Scanners and Cameras Wizard. Connect the camera to the computer. • If the Event Dialog appears, click [Cancel] to the computer via the USB cable. Please set your computer to automatically start ] menu, click [Control Panel] and click the [Printers and Other Hardware] icon. 3.
Software Starter Guide DC SD Ver.9
Page 34
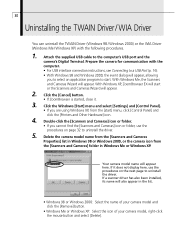
... from the [start . If it . 3. Double-click the [Scanners and Cameras] icon or folder. • If you to select an application program to the computer's USB port and the camera's Digital Terminal. Prepare the camera for communication with the following procedures. 1. Delete the camera model name from the [Scanners and Cameras... appear, allowing you cannot find the [Scanners and Cameras] icon or folder, use the procedures on page 32 to uninstall the driver. Attach the supplied USB cable to start ] menu, click [Control Panel] and click the [Printers and Other Hardware] icon. 4.
... from the [start . If it . 3. Double-click the [Scanners and Cameras] icon or folder. • If you to select an application program to the computer's USB port and the camera's Digital Terminal. Prepare the camera for communication with the following procedures. 1. Delete the camera model name from the [Scanners and Cameras... appear, allowing you cannot find the [Scanners and Cameras] icon or folder, use the procedures on page 32 to uninstall the driver. Attach the supplied USB cable to start ] menu, click [Control Panel] and click the [Printers and Other Hardware] icon. 4.
Software Starter Guide DC SD Ver.9
Page 40
...main switch to the computer's USB port and the camera's Digital Terminal. Attach the supplied USB cable to reconnect. Follow steps 2 and 3 of time (usually about 5 minutes). Please see the Camera User Guide for communication with the computer. • For USB interface connection instructions, see the... them. • For a more information. Prepare the camera for more detailed explanation of ZoomBrowser EX operations, please see Connecting to a USB Port (p. 16). • After a moment, the Event dialog will display and allow you wish to remain connected may appear when the...
...main switch to the computer's USB port and the camera's Digital Terminal. Attach the supplied USB cable to reconnect. Follow steps 2 and 3 of time (usually about 5 minutes). Please see the Camera User Guide for communication with the computer. • For USB interface connection instructions, see the... them. • For a more information. Prepare the camera for more detailed explanation of ZoomBrowser EX operations, please see Connecting to a USB Port (p. 16). • After a moment, the Event dialog will display and allow you wish to remain connected may appear when the...

Software Starter Guide DC SD Ver.9
Page 42
...automatically without showing the Event dialog. 1. Prepare the camera for communication with the computer. • For USB interface connection instructions, see Connecting to close the Wizard. 2. Click [Canon Camera] in the Tree View area. • Thumbnail versions of the camera images will automatically open. ... list of your camera model. 3. Remove the check mark from all programs except ZoomBrowser EX and click [OK]. Attach the supplied USB cable to have now set ZoomBrowser EX to use the My Pictures folder. 38 How to Have ZoomBrowser EX Start Automatically (Windows 98/Windows...
...automatically without showing the Event dialog. 1. Prepare the camera for communication with the computer. • For USB interface connection instructions, see Connecting to close the Wizard. 2. Click [Canon Camera] in the Tree View area. • Thumbnail versions of the camera images will automatically open. ... list of your camera model. 3. Remove the check mark from all programs except ZoomBrowser EX and click [OK]. Attach the supplied USB cable to have now set ZoomBrowser EX to use the My Pictures folder. 38 How to Have ZoomBrowser EX Start Automatically (Windows 98/Windows...
Software Starter Guide DC SD Ver.9
Page 60
Attach the supplied USB cable to start ZoomBrowser EX. dialog. • If ZoomBrowser EX is equipped ...Rotation section. When the Shooting-RemoteCapture window opens, proceed to Start Automatically (Windows XP only) section (p. 27). Select [Canon ZoomBrowser EX] and click [OK]. • ZoomBrowser EX will start , the [Scanners and Cameras Wizard] dialog will ...click the [Edit] menu and select [RemoteCapture]. Click the [Cancel] button and double-click the [Canon ZoomBrowser EX] icon on the desktop to Step 6. • Windows XP: ZoomBrowser EX will display. Click the [...
Attach the supplied USB cable to start ZoomBrowser EX. dialog. • If ZoomBrowser EX is equipped ...Rotation section. When the Shooting-RemoteCapture window opens, proceed to Start Automatically (Windows XP only) section (p. 27). Select [Canon ZoomBrowser EX] and click [OK]. • ZoomBrowser EX will start , the [Scanners and Cameras Wizard] dialog will ...click the [Edit] menu and select [RemoteCapture]. Click the [Cancel] button and double-click the [Canon ZoomBrowser EX] icon on the desktop to Step 6. • Windows XP: ZoomBrowser EX will display. Click the [...
Software Starter Guide DC SD Ver.9
Page 63
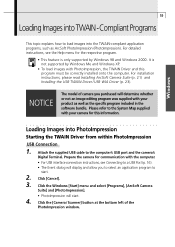
...software bundle. For installation instructions, please read Installing ArcSoft Camera Suite (p. 21) and Installing the USB TWAIN Driver / USB WIA Driver (p. 23). Attach the supplied USB cable to the computer's USB port and the camera's Digital Terminal. It is only supported by Windows Me and Windows XP.... • To load images with the computer. • For USB interface connection instructions, see the Help menu for...
...software bundle. For installation instructions, please read Installing ArcSoft Camera Suite (p. 21) and Installing the USB TWAIN Driver / USB WIA Driver (p. 23). Attach the supplied USB cable to the computer's USB port and the camera's Digital Terminal. It is only supported by Windows Me and Windows XP.... • To load images with the computer. • For USB interface connection instructions, see the Help menu for...
Software Starter Guide DC SD Ver.9
Page 68
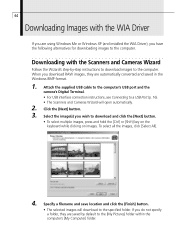
... in the Windows BMP format. 1. To select all the images, click [Select All]. 4. Attach the supplied USB cable to the computer's USB port and the camera's Digital Terminal. • For USB interface connection instructions, see Connecting to download and click the [Next] button. • To select multiple images,... press and hold the [Ctrl] or [Shift] key on the keyboard while clicking on images. If you wish to a USB Port (p. 16). • The Scanners and Cameras Wizard will download to the computer. Downloading with the WIA Driver If you have the following ...
... in the Windows BMP format. 1. To select all the images, click [Select All]. 4. Attach the supplied USB cable to the computer's USB port and the camera's Digital Terminal. • For USB interface connection instructions, see Connecting to download and click the [Next] button. • To select multiple images,... press and hold the [Ctrl] or [Shift] key on the keyboard while clicking on images. If you wish to a USB Port (p. 16). • The Scanners and Cameras Wizard will download to the computer. Downloading with the WIA Driver If you have the following ...

Software Starter Guide DC SD Ver.9
Page 69
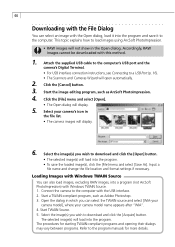
Attach the supplied USB cable to the computer's USB port and the camera's Digital Terminal. • For USB interface connection instructions, see Connecting to a USB Port (p. 16). • The Scanners and Cameras Wizard will become [CRW_0001] on the computer. The image and its thumbnail. For more on the hard disk ...
Attach the supplied USB cable to the computer's USB port and the camera's Digital Terminal. • For USB interface connection instructions, see Connecting to a USB Port (p. 16). • The Scanners and Cameras Wizard will become [CRW_0001] on the computer. The image and its thumbnail. For more on the hard disk ...
Software Starter Guide DC SD Ver.9
Page 70
...load into the program. Select your camera model name appears after "WIA". 4. Select the image(s) you wish to the computer with the USB interface. 2. Start a TWAIN-compliant program, such as ArcSoft PhotoImpression. 4. The selected image(s) will load into the program. •...images, into a program (not ArcSoft PhotoImpression) with Windows TWAIN Source. 1. Attach the supplied USB cable to the computer's USB port and the camera's Digital Terminal. • For USB interface connection instructions, see Connecting to the program manuals for starting TWAIN-compliant programs and opening ...
...load into the program. Select your camera model name appears after "WIA". 4. Select the image(s) you wish to the computer with the USB interface. 2. Start a TWAIN-compliant program, such as ArcSoft PhotoImpression. 4. The selected image(s) will load into the program. •...images, into a program (not ArcSoft PhotoImpression) with Windows TWAIN Source. 1. Attach the supplied USB cable to the computer's USB port and the camera's Digital Terminal. • For USB interface connection instructions, see Connecting to the program manuals for starting TWAIN-compliant programs and opening ...
Software Starter Guide DC SD Ver.9
Page 72
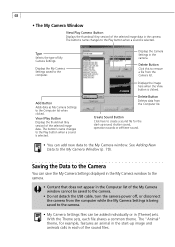
... to remove a file from the computer while the My Camera Settings is selected. Delete Button Click this to the camera. • Do not detach the USB cable, turn the camera power off, or disconnect the camera from the Camera list. Delete Button Deletes data from the Computer list. With the Theme sets...
... to remove a file from the computer while the My Camera Settings is selected. Delete Button Click this to the camera. • Do not detach the USB cable, turn the camera power off, or disconnect the camera from the Camera list. Delete Button Deletes data from the Computer list. With the Theme sets...
Software Starter Guide DC SD Ver.9
Page 84
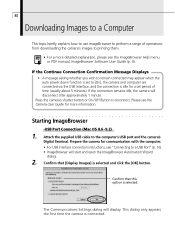
...start and open the ImageBrowser Automation Wizard dialog. 2. Please see the Camera User Guide for communication with the computer. • For USB interface connection instructions, see the ImageBrowser Help menu or PDF manual, ImageBrowser Software User Guide (p. 4). 80 Downloading Images to a ...is selected and click the [OK] button. The Communications Settings dialog will disconnect after approximately 1 minute. Attach the supplied USB cable to reconnect. If the connection remains idle, the camera will display. Confirm that [Display Images] is connected. If the ...
...start and open the ImageBrowser Automation Wizard dialog. 2. Please see the Camera User Guide for communication with the computer. • For USB interface connection instructions, see the ImageBrowser Help menu or PDF manual, ImageBrowser Software User Guide (p. 4). 80 Downloading Images to a ...is selected and click the [OK] button. The Communications Settings dialog will disconnect after approximately 1 minute. Attach the supplied USB cable to reconnect. If the connection remains idle, the camera will display. Confirm that [Display Images] is connected. If the ...

Software Starter Guide DC SD Ver.9
Page 86
... to the computer's USB port and the camera's DIGITAL Terminal. USB Port Connection (Mac OS X) 1. Attach the supplied USB cable to Not Start Automatically 1. Click here to clear the check mark. 3. The Settings for communication with the computer. • For USB interface connection instructions, ...8226; The Communications Settings dialog will display. 2. Double-click the [Canon ImageBrowser] icon on the desktop. • If the Canon ImageBrowser icon does not appear on the desktop, double-click the [Canon Utilities] folder on the drive on which the program was installed, ...
... to the computer's USB port and the camera's DIGITAL Terminal. USB Port Connection (Mac OS X) 1. Attach the supplied USB cable to Not Start Automatically 1. Click here to clear the check mark. 3. The Settings for communication with the computer. • For USB interface connection instructions, ...8226; The Communications Settings dialog will display. 2. Double-click the [Canon ImageBrowser] icon on the desktop. • If the Canon ImageBrowser icon does not appear on the desktop, double-click the [Canon Utilities] folder on the drive on which the program was installed, ...
Software Starter Guide DC SD Ver.9
Page 102
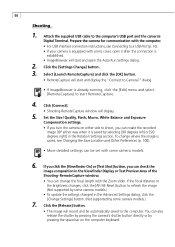
...8226; To update the settings changed in the Rotation Settings section. To change the focal length with the computer. • For USB interface connection instructions, see Changing the Save Location and Other Preferences (p. 100). • More detailed settings can change where the ... • The image will start and display the "Connect to refresh the image. (Not supported by some camera models. 6. Attach the supplied USB cable to start and open the Auto Run Settings dialog. 2. Click the [Settings Change] button. 3. Click [Connect]. • Shooting-RemoteCapture window...
...8226; To update the settings changed in the Rotation Settings section. To change the focal length with the computer. • For USB interface connection instructions, see Changing the Save Location and Other Preferences (p. 100). • More detailed settings can change where the ... • The image will start and display the "Connect to refresh the image. (Not supported by some camera models. 6. Attach the supplied USB cable to start and open the Auto Run Settings dialog. 2. Click the [Settings Change] button. 3. Click [Connect]. • Shooting-RemoteCapture window...

Software Starter Guide DC SD Ver.9
Page 105
... load images into Adobe Photoshop LE, the Plug-in Module and Adobe Photoshop LE must be used to the computer's USB port and the camera's Digital Terminal. Attach the supplied USB cable to start and open them. 2. 101 Loading Images into Plug-In Compliant Programs (Compatible with Mac OS 8.6 - ... plug-in compliant and cannot be correctly installed onto the computer. Double-click the folder in which you installed the program, followed by the [Canon Utilities] and [Camera Plug-In] folders to close it , click the [File] menu and select [Quit] to open the ImageBrowser Automation Wizard...
... load images into Adobe Photoshop LE, the Plug-in Module and Adobe Photoshop LE must be used to the computer's USB port and the camera's Digital Terminal. Attach the supplied USB cable to start and open them. 2. 101 Loading Images into Plug-In Compliant Programs (Compatible with Mac OS 8.6 - ... plug-in compliant and cannot be correctly installed onto the computer. Double-click the folder in which you installed the program, followed by the [Canon Utilities] and [Camera Plug-In] folders to close it , click the [File] menu and select [Quit] to open the ImageBrowser Automation Wizard...

Software Starter Guide DC SD Ver.9
Page 111
..., use the card reader downloading procedures in the camera and drag and drop them . • Never turn off the power or detach the USB cable while copying. Attach the supplied USB cable to download from a Card Reader (p. 103) for ImageBrowser and Downloading from the camera. Double-click the camera icon. See CF Card Reader...
..., use the card reader downloading procedures in the camera and drag and drop them . • Never turn off the power or detach the USB cable while copying. Attach the supplied USB cable to download from a Card Reader (p. 103) for ImageBrowser and Downloading from the camera. Double-click the camera icon. See CF Card Reader...


