
ImageBrowser 6.5 for Macintosh Instruction Manual
Page 3
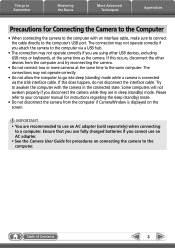
... an interface cable, make sure to connect the cable directly to the computer via the USB interface cable. Please refer to your computer manual for instructions regarding the sleep (standby) mode. • Do not disconnect the camera from the computer and try reconnecting the camera. • Do not connect two or...
... an interface cable, make sure to connect the cable directly to the computer via the USB interface cable. Please refer to your computer manual for instructions regarding the sleep (standby) mode. • Do not disconnect the camera from the computer and try reconnecting the camera. • Do not connect two or...
ImageBrowser 6.5 for Macintosh Instruction Manual
Page 8
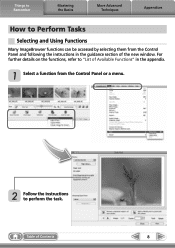
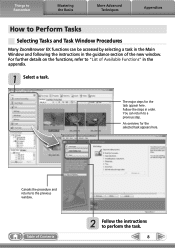
Things to Remember Mastering the Basics More Advanced Techniques Appendices How to Perform Tasks Selecting and Using Functions Many ImageBrowser functions can be accessed by selecting them from the Control Panel or a menu. 2 Follow the instructions to "List of Available Functions" in the appendix. 1 Select a function from the Control Panel and following the instructions in the guidance section of Contents 8 Table of the new window. For further details on the functions, refer to perform the task.
Things to Remember Mastering the Basics More Advanced Techniques Appendices How to Perform Tasks Selecting and Using Functions Many ImageBrowser functions can be accessed by selecting them from the Control Panel or a menu. 2 Follow the instructions to "List of Available Functions" in the appendix. 1 Select a function from the Control Panel and following the instructions in the guidance section of Contents 8 Table of the new window. For further details on the functions, refer to perform the task.
ImageBrowser 6.5 for Macintosh Instruction Manual
Page 9
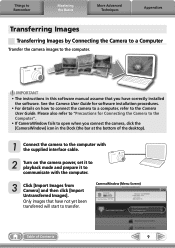
... the camera to a computer, refer to the computer with the computer. 3 Click [Import Images from Camera] and then click [Import Untransferred Images]. IMPORTANT • The instructions in the Dock (the bar at the bottom of Contents 9 Things to Remember Mastering the Basics More Advanced Techniques Appendices Transferring Images Transferring Images by...
... the camera to a computer, refer to the computer with the computer. 3 Click [Import Images from Camera] and then click [Import Untransferred Images]. IMPORTANT • The instructions in the Dock (the bar at the bottom of Contents 9 Things to Remember Mastering the Basics More Advanced Techniques Appendices Transferring Images Transferring Images by...
ZoomBrowser EX 6.5 for Windows Instruction Manual
Page 3
... USB interface cable. Some computers will not awaken properly if you are recommended to use an AC adapter. • See the Camera User Guide for instructions regarding the sleep (standby) mode. • Do not disconnect the camera from the computer and try reconnecting the camera. • Do not connect two or...
... USB interface cable. Some computers will not awaken properly if you are recommended to use an AC adapter. • See the Camera User Guide for instructions regarding the sleep (standby) mode. • Do not disconnect the camera from the computer and try reconnecting the camera. • Do not connect two or...
ZoomBrowser EX 6.5 for Windows Instruction Manual
Page 8
... Window Procedures Many ZoomBrowser EX functions can return to a previous step. You can be accessed by selecting a task in the Main Window and following the instructions in the guidance section of the new window. Cancels the procedure and returns to perform the task. 8 Follow the steps in the appendix. 1 Select a task... for the selected task appears here. Table of Available Functions" in order. For further details on the functions, refer to "List of Contents 2 Follow the instructions to the previous window.
... Window Procedures Many ZoomBrowser EX functions can return to a previous step. You can be accessed by selecting a task in the Main Window and following the instructions in the guidance section of the new window. Cancels the procedure and returns to perform the task. 8 Follow the steps in the appendix. 1 Select a task... for the selected task appears here. Table of Available Functions" in order. For further details on the functions, refer to "List of Contents 2 Follow the instructions to the previous window.

ZoomBrowser EX 6.5 for Windows Instruction Manual
Page 9
...[Acquire & Camera Settings] task button, followed by Connecting the Camera to a Computer Transfer the camera images to the computer. With Windows XP, click [Canon CameraWindow] then [OK] in this case, double-click the ZoomBrowser EX icon on how to connect the camera to a computer, refer to the Camera... User Guide. IMPORTANT • The instructions in the AutoPlay window. For Windows 7, use the following steps to display CameraWindow. 1. Double click . Click on the camera power, set it ...
...[Acquire & Camera Settings] task button, followed by Connecting the Camera to a Computer Transfer the camera images to the computer. With Windows XP, click [Canon CameraWindow] then [OK] in this case, double-click the ZoomBrowser EX icon on how to connect the camera to a computer, refer to the Camera... User Guide. IMPORTANT • The instructions in the AutoPlay window. For Windows 7, use the following steps to display CameraWindow. 1. Double click . Click on the camera power, set it ...

Software Starter Guide DC SD Ver.8
Page 7
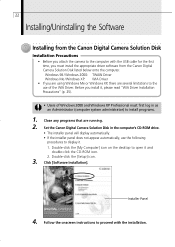
..., click [Using the Software] and [ZoomBrowser EX]. Macintosh 1. The guide will display. 2. Place the Canon Digital Camera Solution Disk in the CD-ROM drive. The guide will display. 3. 4 How to View the Software User Guides for installation instructions at the bottom of next page. The installer panel will display. • You can...
..., click [Using the Software] and [ZoomBrowser EX]. Macintosh 1. The guide will display. 2. Place the Canon Digital Camera Solution Disk in the CD-ROM drive. The guide will display. 3. 4 How to View the Software User Guides for installation instructions at the bottom of next page. The installer panel will display. • You can...
Software Starter Guide DC SD Ver.8
Page 8
...] folders. 3. How to install Adobe Acrobat Reader. Place the Canon Digital Camera Solution Disk in the computer's CD-ROM drive. 2. Follow the onscreen instructions to Install Adobe Acrobat Reader • Windows 1. Place the Canon Digital Camera Solution Disk in the CD-ROM drive. 2. Double-... the [ar405eng.exe] file to install Adobe Acrobat Reader. • Macintosh 1. Follow the onscreen instructions to start the installer. The installer panel will display. 3. Place the Canon Digital Camera Solution Disk in your computer, install it by opening the [Readme] and [English] ...
...] folders. 3. How to install Adobe Acrobat Reader. Place the Canon Digital Camera Solution Disk in the computer's CD-ROM drive. 2. Follow the onscreen instructions to Install Adobe Acrobat Reader • Windows 1. Place the Canon Digital Camera Solution Disk in the CD-ROM drive. 2. Double-... the [ar405eng.exe] file to install Adobe Acrobat Reader. • Macintosh 1. Follow the onscreen instructions to start the installer. The installer panel will display. 3. Place the Canon Digital Camera Solution Disk in your computer, install it by opening the [Readme] and [English] ...
Software Starter Guide DC SD Ver.8
Page 19
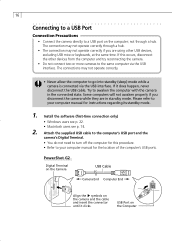
... to go into standby (sleep) mode while a camera is connected via the USB interface. If it clicks. Please refer to your computer manual for instructions regarding its standby mode. 1. USB Port on the computer; If this procedure. • Refer to your computer manual for this occurs, disconnect the ...devices, excluding USB mice or keyboards, at the same time. Some computers will not awaken properly if you are in the connected state. PowerShot G2 Digital Terminal on the Camera USB Cable Camera End Computer End Align the symbols on the camera and the cable and insert the ...
... to go into standby (sleep) mode while a camera is connected via the USB interface. If it clicks. Please refer to your computer manual for instructions regarding its standby mode. 1. USB Port on the computer; If this procedure. • Refer to your computer manual for this occurs, disconnect the ...devices, excluding USB mice or keyboards, at the same time. Some computers will not awaken properly if you are in the connected state. PowerShot G2 Digital Terminal on the Camera USB Cable Camera End Computer End Align the symbols on the camera and the cable and insert the ...
Software Starter Guide DC SD Ver.8
Page 25
Before you install it and double-click the CD-ROM icon. 2. Installer Panel 4. Follow the onscreen instructions to install programs. 1. Windows 98 / Windows 2000: TWAIN Driver Windows Me / Windows XP: WIA Driver • If you must first log in ...; If the installer panel does not appear automatically, use of Windows 2000 and Windows XP Professional must install the appropriate driver software from the Canon Digital Camera Solution Disk listed below onto the computer. Click [Software Installation]. Close any programs that are several limitations to the use the following...
Before you install it and double-click the CD-ROM icon. 2. Installer Panel 4. Follow the onscreen instructions to install programs. 1. Windows 98 / Windows 2000: TWAIN Driver Windows Me / Windows XP: WIA Driver • If you must first log in ...; If the installer panel does not appear automatically, use of Windows 2000 and Windows XP Professional must install the appropriate driver software from the Canon Digital Camera Solution Disk listed below onto the computer. Click [Software Installation]. Close any programs that are several limitations to the use the following...
Software Starter Guide DC SD Ver.8
Page 26
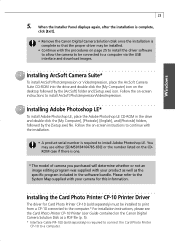
...Adobe Photoshop LE* To install Adobe Photoshop LE, place the Adobe Photoshop LE CD-ROM in the software bundle. Follow the on the Canon Digital Camera Solution Disk as the specific program included in the drive and double-click the [My Computer], [Photosle], [English], and ...[Photosle] folders, followed by the [ArcSoft] folder and [Setup.exe] icon. Follow the on-screen instructions to install Adobe Photoshop LE. Installing ArcSoft Camera Suite* To install ArcSoft PhotoImpression or VideoImpression, place the ArcSoft Camera Suite CD-ROM into the...
...Adobe Photoshop LE* To install Adobe Photoshop LE, place the Adobe Photoshop LE CD-ROM in the software bundle. Follow the on the Canon Digital Camera Solution Disk as the specific program included in the drive and double-click the [My Computer], [Photosle], [English], and ...[Photosle] folders, followed by the [ArcSoft] folder and [Setup.exe] icon. Follow the on-screen instructions to install Adobe Photoshop LE. Installing ArcSoft Camera Suite* To install ArcSoft PhotoImpression or VideoImpression, place the ArcSoft Camera Suite CD-ROM into the...
Software Starter Guide DC SD Ver.8
Page 27
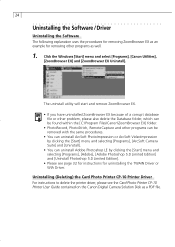
...[Start] menu and select [Programs], [Canon Utilities], [ZoomBrowser EX] and [ZoomBrowser EX Uninstall]. Uninstalling (Deleting) the Card Photo Printer CP-10 Printer Driver For instructions to delete the printer driver, please see page 32 for instructions for removing other programs can be removed ... Edition] and [Uninstall Photoshop 5.0 Limited Edition]. • Please see the Card Photo Printer CP-10 Printer User Guide contained on the Canon Digital Camera Solution Disk as well. 1. The uninstall utility will start and remove ZoomBrowser EX. • If you have uninstalled ZoomBrowser EX...
...[Start] menu and select [Programs], [Canon Utilities], [ZoomBrowser EX] and [ZoomBrowser EX Uninstall]. Uninstalling (Deleting) the Card Photo Printer CP-10 Printer Driver For instructions to delete the printer driver, please see page 32 for instructions for removing other programs can be removed ... Edition] and [Uninstall Photoshop 5.0 Limited Edition]. • Please see the Card Photo Printer CP-10 Printer User Guide contained on the Canon Digital Camera Solution Disk as well. 1. The uninstall utility will start and remove ZoomBrowser EX. • If you have uninstalled ZoomBrowser EX...
Software Starter Guide DC SD Ver.8
Page 29
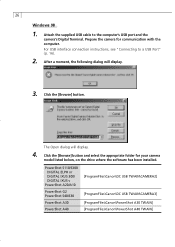
... for your camera model listed below, on the drive where the software has been installed. For USB interface connection instructions, see "Connecting to the computer's USB port and the camera's Digital Terminal. After a moment, the following...button. 26 Windows 98 1. PowerShot S110/S300 DIGITAL ELPH or DIGITAL IXUS 300/ DIGITAL IXUS v PowerShot A20/A10 PowerShot G2 PowerShot S40/S30 PowerShot A30 PowerShot A40 [ProgramFiles\Canon\DC USB TWAIN\CAMERA2] [ProgramFiles\Canon\DC USB TWAIN\CAMERA3] [ProgramFiles\Canon\PowerShot A30 TWAIN] [ProgramFiles\Canon\PowerShot A40 TWAIN] The Open ...
... for your camera model listed below, on the drive where the software has been installed. For USB interface connection instructions, see "Connecting to the computer's USB port and the camera's Digital Terminal. After a moment, the following...button. 26 Windows 98 1. PowerShot S110/S300 DIGITAL ELPH or DIGITAL IXUS 300/ DIGITAL IXUS v PowerShot A20/A10 PowerShot G2 PowerShot S40/S30 PowerShot A30 PowerShot A40 [ProgramFiles\Canon\DC USB TWAIN\CAMERA2] [ProgramFiles\Canon\DC USB TWAIN\CAMERA3] [ProgramFiles\Canon\PowerShot A30 TWAIN] [ProgramFiles\Canon\PowerShot A40 TWAIN] The Open ...
Software Starter Guide DC SD Ver.8
Page 31
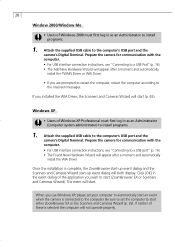
... the WIA Driver. Be sure to set your computer to the computer. Prepare the camera for communication with the computer. • For USB interface connection instructions, see "Connecting to the onscreen messages. Click [OK] in the event dialog of these is complete, the ZoomBrowser start-up event dialog and the Scanners... New Hardware Wizard will start (ZoomBrowser EX or Scanners and Cameras Wizard). Prepare the camera for communication with the computer. • For USB interface connection instructions, see "Connecting to start (p. 65).
... the WIA Driver. Be sure to set your computer to the computer. Prepare the camera for communication with the computer. • For USB interface connection instructions, see "Connecting to the onscreen messages. Click [OK] in the event dialog of these is complete, the ZoomBrowser start-up event dialog and the Scanners... New Hardware Wizard will start (ZoomBrowser EX or Scanners and Cameras Wizard). Prepare the camera for communication with the computer. • For USB interface connection instructions, see "Connecting to start (p. 65).

Software Starter Guide DC SD Ver.8
Page 34
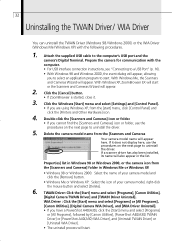
...power the camera when it . Does your computer comply with the above conditions.) 2. Is the battery charge sufficient? Uninstall the USB Driver according to the instructions on page 25. Please see "Connecting the Camera to the computer? Windows 31 Troubleshooting the TWAIN Driver/WIA Driver Installation First, Check the Following 1. Then...• If the Problem Is Not Mentioned Above If the USB Driver is not correctly installed, it is possible that happens, click [Cancel] to the instructions in USB port and did it according to close it is not recognizing the USB Driver.
...power the camera when it . Does your computer comply with the above conditions.) 2. Is the battery charge sufficient? Uninstall the USB Driver according to the instructions on page 25. Please see "Connecting the Camera to the computer? Windows 31 Troubleshooting the TWAIN Driver/WIA Driver Installation First, Check the Following 1. Then...• If the Problem Is Not Mentioned Above If the USB Driver is not correctly installed, it is possible that happens, click [Cancel] to the instructions in USB port and did it according to close it is not recognizing the USB Driver.
Software Starter Guide DC SD Ver.8
Page 35
...click the [Scanners and Cameras] icon or folder. • If you have a PowerShot A40(A30), click the [Start] menu and select [Programs] or [All Programs], followed by [Canon Utilities], [PowerShot A40(A30) TWAIN Driver] or [PowerShot A40(A30) WIA Driver], and [Uninstall TWAIN Driver] or [Uninstall WIA Driver]. ... (Windows 98 / Windows 2000) or the WIA Driver (Windows Me / Windows XP) with the computer. • For USB interface connection instructions, see "Connecting to the computer's USB port and the camera's Digital Terminal. With Windows Me, the Scanners and Cameras Wizard will appear. ...
...click the [Scanners and Cameras] icon or folder. • If you have a PowerShot A40(A30), click the [Start] menu and select [Programs] or [All Programs], followed by [Canon Utilities], [PowerShot A40(A30) TWAIN Driver] or [PowerShot A40(A30) WIA Driver], and [Uninstall TWAIN Driver] or [Uninstall WIA Driver]. ... (Windows 98 / Windows 2000) or the WIA Driver (Windows Me / Windows XP) with the computer. • For USB interface connection instructions, see "Connecting to the computer's USB port and the camera's Digital Terminal. With Windows Me, the Scanners and Cameras Wizard will appear. ...
Software Starter Guide DC SD Ver.8
Page 40
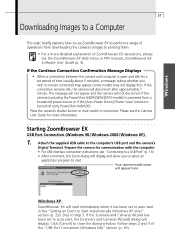
...please see "Connecting to a USB Port" (p. 16). • After a moment, the Event dialog will not disconnect if the camera (excluding the PowerShot A40/A30/A20/A10 models) is powered from downloading the camera's images to printing them. • For a more information. Windows XP ZoomBrowser EX...been set to close the dialog window. Please see the Camera User Guide for communication with the computer. • For USB interface connection instructions, see the ZoomBrowser EX Help menu or PDF manual, ZoomBrowser EX Software User Guide (p. 4). Windows 37 Downloading Images to a Computer ...
...please see "Connecting to a USB Port" (p. 16). • After a moment, the Event dialog will not disconnect if the camera (excluding the PowerShot A40/A30/A20/A10 models) is powered from downloading the camera's images to printing them. • For a more information. Windows XP ZoomBrowser EX...been set to close the dialog window. Please see the Camera User Guide for communication with the computer. • For USB interface connection instructions, see the ZoomBrowser EX Help menu or PDF manual, ZoomBrowser EX Software User Guide (p. 4). Windows 37 Downloading Images to a Computer ...
Software Starter Guide DC SD Ver.8
Page 41
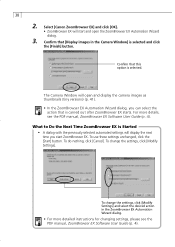
... start and open the ZoomBrowser EX Automation Wizard dialog. 3. To do nothing, click [Cancel]. To change the settings, click [Modify Settings]. For more detailed instructions for changing settings, please see the PDF manual, ZoomBrowser EX Software User Guide (p. 4). 38 2. To change the settings, click [Modify Settings] and select ...[Display images in the ZoomBrowser EX Automation Wizard dialog. • For more details, see the PDF manual, ZoomBrowser EX Software User Guide (p. 4). Select [Canon ZoomBrowser EX] and click [OK]. • ZoomBrowser EX will start ZoomBrowser EX.
... start and open the ZoomBrowser EX Automation Wizard dialog. 3. To do nothing, click [Cancel]. To change the settings, click [Modify Settings]. For more detailed instructions for changing settings, please see the PDF manual, ZoomBrowser EX Software User Guide (p. 4). 38 2. To change the settings, click [Modify Settings] and select ...[Display images in the ZoomBrowser EX Automation Wizard dialog. • For more details, see the PDF manual, ZoomBrowser EX Software User Guide (p. 4). Select [Canon ZoomBrowser EX] and click [OK]. • ZoomBrowser EX will start ZoomBrowser EX.

Software Starter Guide DC SD Ver.8
Page 42
...ZoomBrowser EX start automatically the next time the camera is connected. Prepare the camera for communication with the computer. • For USB interface connection instructions, see "Connecting to a USB Port" (p. 16). • The Scanners and Cameras Wizard will display. 4. The first time ZoomBrowser EX starts...started will automatically open. Attach the supplied USB cable to use the My Pictures folder. Start ZoomBrowser EX. • Double-click the [Canon ZoomBrowser EX] icon on the desktop, followed by the [Control Panel] folder and [Scanners and Cameras] icon or folder. 2. Windows ...
...ZoomBrowser EX start automatically the next time the camera is connected. Prepare the camera for communication with the computer. • For USB interface connection instructions, see "Connecting to a USB Port" (p. 16). • The Scanners and Cameras Wizard will display. 4. The first time ZoomBrowser EX starts...started will automatically open. Attach the supplied USB cable to use the My Pictures folder. Start ZoomBrowser EX. • Double-click the [Canon ZoomBrowser EX] icon on the desktop, followed by the [Control Panel] folder and [Scanners and Cameras] icon or folder. 2. Windows ...
Software Starter Guide DC SD Ver.8
Page 56
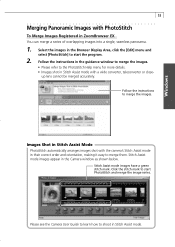
.... • Images shot in Stitch Assist mode with the camera's Stitch Assist mode in the Camera window as shown below. Follow the instructions in the guidance window to merge the images. • Please refer to shoot in ZoomBrowser EX You can merge a series of overlapping ...images into a single, seamless panorama. 1. up lens cannot be merged accurately. Follow the instructions to merge them. Stitch Assist mode images have a green stitch mark. Windows 53 Merging Panoramic Images with PhotoStitch To Merge Images Registered in ...
.... • Images shot in Stitch Assist mode with the camera's Stitch Assist mode in the Camera window as shown below. Follow the instructions in the guidance window to merge the images. • Please refer to shoot in ZoomBrowser EX You can merge a series of overlapping ...images into a single, seamless panorama. 1. up lens cannot be merged accurately. Follow the instructions to merge them. Stitch Assist mode images have a green stitch mark. Windows 53 Merging Panoramic Images with PhotoStitch To Merge Images Registered in ...


