
PowerShot G12 Camera User Guide
Page 1
Camera User Guide • Make sure you read this guide, including the "Safety Precautions" section, before using the camera. • Store this guide safely so that you can use it in the future. ENGLISH
Camera User Guide • Make sure you read this guide, including the "Safety Precautions" section, before using the camera. • Store this guide safely so that you can use it in the future. ENGLISH
PowerShot G12 Camera User Guide
Page 2
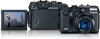
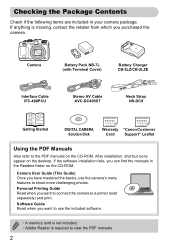
... Charger CB-2LZ/CB-2LZE Interface Cable IFC-400PCU Stereo AV Cable AVC-DC400ST Neck Strap NS-DC9 Getting Started DIGITAL CAMERA Solution Disk Warranty "Canon Customer Card Support" Leaflet Using the PDF Manuals Also refer to the PDF manuals on the CD-ROM. • Camera User Guide (This Guide) Once...
... Charger CB-2LZ/CB-2LZE Interface Cable IFC-400PCU Stereo AV Cable AVC-DC400ST Neck Strap NS-DC9 Getting Started DIGITAL CAMERA Solution Disk Warranty "Canon Customer Card Support" Leaflet Using the PDF Manuals Also refer to the PDF manuals on the CD-ROM. • Camera User Guide (This Guide) Once...

PowerShot G12 Camera User Guide
Page 3
...against scratches during shipment. LCD Monitor (Screen) • The LCD monitor is a problem with the camera while abroad, please return it to a Canon Customer Support Help Desk. Please be covered with a thin plastic film for personal use . If there is produced with a warranty claim to the... be advised that in a way that infringe upon copyright laws without the prior permission of sale. This is machine readable. For Canon Customer Support contacts, please see the customer support list supplied with this camera are not liable for any consequential damages arising from any...
...against scratches during shipment. LCD Monitor (Screen) • The LCD monitor is a problem with the camera while abroad, please return it to a Canon Customer Support Help Desk. Please be covered with a thin plastic film for personal use . If there is produced with a warranty claim to the... be advised that in a way that infringe upon copyright laws without the prior permission of sale. This is machine readable. For Canon Customer Support contacts, please see the customer support list supplied with this camera are not liable for any consequential damages arising from any...
PowerShot G12 Camera User Guide
Page 4
What Do You Want to Do? 4 Shoot ● Shoot, leaving it to the camera to make settings 24 Take good people shots I Portraits V Kids and pets (p. 62) (p. 63) w At the beach (p. 63) P Against snow (p. 64) Shoot various other scenes J Landscape (p. 62) Sports (p. 63) OFoliage (p. 64) t Fireworks (p. 64) Shoot with special effects S Aquarium (p. 63) Low Light (p. 61) Super vivid colors (p. 64) Poster Effect (p. 65) With faded colors (p. 73) Fish-eye Effect (p. 73) Miniature Effect (p. 74) ● Focus on faces 24, 62, 68, 70, 92, 97 ● Shoot in places where I cannot ...
What Do You Want to Do? 4 Shoot ● Shoot, leaving it to the camera to make settings 24 Take good people shots I Portraits V Kids and pets (p. 62) (p. 63) w At the beach (p. 63) P Against snow (p. 64) Shoot various other scenes J Landscape (p. 62) Sports (p. 63) OFoliage (p. 64) t Fireworks (p. 64) Shoot with special effects S Aquarium (p. 63) Low Light (p. 61) Super vivid colors (p. 64) Poster Effect (p. 65) With faded colors (p. 73) Fish-eye Effect (p. 73) Miniature Effect (p. 74) ● Focus on faces 24, 62, 68, 70, 92, 97 ● Shoot in places where I cannot ...

PowerShot G12 Camera User Guide
Page 5
What Do You Want to Do? 1 View ● Look at my pictures 27 ● Automatically play back pictures (slideshow 129 ● Look at my pictures on a TV 133, 134 ● Look at my pictures on a computer 32 ● Quickly search pictures 126, 127 ● Erase pictures 28, 140 E Shoot/View Movies ● Shoot movies 28, 117 ● View movies 30, 117 2 Print ● Easily print pictures 152 Save ● Save images to a computer 32 3 Other ● Turn off sounds 49 ● Use the camera abroad 15, 164 ● Use the front dial to change settings 171 ● Understand what...
What Do You Want to Do? 1 View ● Look at my pictures 27 ● Automatically play back pictures (slideshow 129 ● Look at my pictures on a TV 133, 134 ● Look at my pictures on a computer 32 ● Quickly search pictures 126, 127 ● Erase pictures 28, 140 E Shoot/View Movies ● Shoot movies 28, 117 ● View movies 30, 117 2 Print ● Easily print pictures 152 Save ● Save images to a computer 32 3 Other ● Turn off sounds 49 ● Use the camera abroad 15, 164 ● Use the front dial to change settings 171 ● Understand what...
PowerShot G12 Camera User Guide
Page 6
Chapters 4 onward explain the advanced functions, letting you learn more as you read each chapter. Basic Operations 48 Changing the Sound Settings ......... 49 Changing the Screen Brightness .... 50 Returning the Camera to Default Settings 51 Low Level Memory Card Formatting 52 Power Saving Function (Auto Power Down 53 Clock Functions 54 3 Shooting with Commonly Used Functions 55 Turning the Flash Off 56 Using the Self-Timer 56 Zooming in More Closely on Subjects (Digital Zoom 58 Inserting the Date and Time 60 Shooting in Low Light Conditions (Low Light 61 Shooting in Various ...
Chapters 4 onward explain the advanced functions, letting you learn more as you read each chapter. Basic Operations 48 Changing the Sound Settings ......... 49 Changing the Screen Brightness .... 50 Returning the Camera to Default Settings 51 Low Level Memory Card Formatting 52 Power Saving Function (Auto Power Down 53 Clock Functions 54 3 Shooting with Commonly Used Functions 55 Turning the Flash Off 56 Using the Self-Timer 56 Zooming in More Closely on Subjects (Digital Zoom 58 Inserting the Date and Time 60 Shooting in Low Light Conditions (Low Light 61 Shooting in Various ...

PowerShot G12 Camera User Guide
Page 7
Table of Contents 4 Choosing Settings Yourself 75 Shooting in Program AE 76 Adjusting the Brightness (Exposure Compensation 76 Turning the Flash On 77 Shooting Close-ups (Macro 77 Changing the Aspect Ratio 78 Changing the Recording Pixel Setting (Image Size 78 Changing the Compression Ratio (Image Quality 79 Shooting RAW Images 80 Changing the ISO Speed 82 Adjusting the White Balance 84 Continuous Shooting 86 Changing the Tone of an Image (My Colors 87 Shooting Using the Viewfinder........ 89 Changing the Composition with the Focus Lock 90 Shooting Using a TV Monitor .......... ...
Table of Contents 4 Choosing Settings Yourself 75 Shooting in Program AE 76 Adjusting the Brightness (Exposure Compensation 76 Turning the Flash On 77 Shooting Close-ups (Macro 77 Changing the Aspect Ratio 78 Changing the Recording Pixel Setting (Image Size 78 Changing the Compression Ratio (Image Quality 79 Shooting RAW Images 80 Changing the ISO Speed 82 Adjusting the White Balance 84 Continuous Shooting 86 Changing the Tone of an Image (My Colors 87 Shooting Using the Viewfinder........ 89 Changing the Composition with the Focus Lock 90 Shooting Using a TV Monitor .......... ...

PowerShot G12 Camera User Guide
Page 8
Table of Contents 7 Using Various Playback and Editing Functions 125 Quickly Searching Images 126 Viewing Images in Filtered Playback 127 Viewing Slideshows 129 Checking the Focus 130 Magnifying Images 131 Displaying Various Images (Smart Shuffle 131 Changing Image Transitions..........132 Viewing Images on a TV 133 Viewing Images on a High-Definition TV 134 Protecting Images 136 Erasing All Images 140 Tagging Images as Favorites ........142 Organizing Images by Category (My Category 143 Rotating Images 145 Resizing Images 146 Trimming 147 Adding Effects with the My Colors ...
Table of Contents 7 Using Various Playback and Editing Functions 125 Quickly Searching Images 126 Viewing Images in Filtered Playback 127 Viewing Slideshows 129 Checking the Focus 130 Magnifying Images 131 Displaying Various Images (Smart Shuffle 131 Changing Image Transitions..........132 Viewing Images on a TV 133 Viewing Images on a High-Definition TV 134 Protecting Images 136 Erasing All Images 140 Tagging Images as Favorites ........142 Organizing Images by Category (My Category 143 Rotating Images 145 Resizing Images 146 Trimming 147 Adding Effects with the My Colors ...

PowerShot G12 Camera User Guide
Page 9
... used correctly. • The safety precautions noted on a clear day). Strap: Putting the strap around a child's neck could damage your camera distributor or the closest Canon Customer Support Help Desk. • Do not use the camera's viewfinder in the presence of the product if it has been dropped or otherwise damaged...
... used correctly. • The safety precautions noted on a clear day). Strap: Putting the strap around a child's neck could damage your camera distributor or the closest Canon Customer Support Help Desk. • Do not use the camera's viewfinder in the presence of the product if it has been dropped or otherwise damaged...

PowerShot G12 Camera User Guide
Page 10
In the event that a battery leaks and the battery acid contacts eyes, mouth, skin or clothing, immediately flush with wet hands. • Do not use if the power cord or plug are damaged, or not fully plugged into the outlet. • Do not allow dirt or metal objects (such as pins or keys) to the flash. • Avoid using, placing or storing the product in the following places. - These could cause injury and damage the surroundings. Do not use the equipment in a manner that exceeds the rated capacity of the electrical outlet or wiring accessories. This could cause leakage, ...
In the event that a battery leaks and the battery acid contacts eyes, mouth, skin or clothing, immediately flush with wet hands. • Do not use if the power cord or plug are damaged, or not fully plugged into the outlet. • Do not allow dirt or metal objects (such as pins or keys) to the flash. • Avoid using, placing or storing the product in the following places. - These could cause injury and damage the surroundings. Do not use the equipment in a manner that exceeds the rated capacity of the electrical outlet or wiring accessories. This could cause leakage, ...
PowerShot G12 Camera User Guide
Page 11
If the battery is left inside the camera, damage caused by leakage may occur. • Before you discard the battery, cover the terminals with tape or other metal materials may cause it is due to the high intensity of the unit. Leaving the unit plugged in for a long period of time may lead to fire or explosions. • Unplug the battery charger from the power outlet after charging is complete, or when you are not using it. • Do not place anything, such as cloth on a beach or at bright light sources (the sun, etc.). Safety Precautions Caution Denotes the possibility of ...
If the battery is left inside the camera, damage caused by leakage may occur. • Before you discard the battery, cover the terminals with tape or other metal materials may cause it is due to the high intensity of the unit. Leaving the unit plugged in for a long period of time may lead to fire or explosions. • Unplug the battery charger from the power outlet after charging is complete, or when you are not using it. • Do not place anything, such as cloth on a beach or at bright light sources (the sun, etc.). Safety Precautions Caution Denotes the possibility of ...
PowerShot G12 Camera User Guide
Page 12
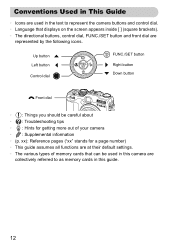
xx): Reference pages ("xx" stands for getting more out of memory cards that can be used in the text to represent the camera buttons and control dial. • Language that displays on the screen appears inside [ ] (square brackets). • The directional buttons, control dial, FUNC./SET button and front dial are collectively referred to as memory cards in this guide. 12 Up button Left button Control dial FUNC./SET button Right button Down button ÷ Front dial • : Things you should be careful about • : Troubleshooting tips • : Hints for a page number) • ...
xx): Reference pages ("xx" stands for getting more out of memory cards that can be used in the text to represent the camera buttons and control dial. • Language that displays on the screen appears inside [ ] (square brackets). • The directional buttons, control dial, FUNC./SET button and front dial are collectively referred to as memory cards in this guide. 12 Up button Left button Control dial FUNC./SET button Right button Down button ÷ Front dial • : Things you should be careful about • : Troubleshooting tips • : Hints for a page number) • ...
PowerShot G12 Camera User Guide
Page 13
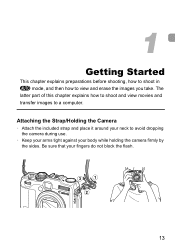
Be sure that your body while holding the camera firmly by the sides. The latter part of this chapter explains how to shoot and view movies and transfer images to view and erase the images you take. Attaching the Strap/Holding the Camera • Attach the included strap and place it around your neck to avoid dropping the camera during use. • Keep your arms tight against your fingers do not block the flash. 13 1 Getting Started This chapter explains preparations before shooting, how to shoot in A mode, and then how to a computer.
Be sure that your body while holding the camera firmly by the sides. The latter part of this chapter explains how to shoot and view movies and transfer images to view and erase the images you take. Attaching the Strap/Holding the Camera • Attach the included strap and place it around your neck to avoid dropping the camera during use. • Keep your arms tight against your fingers do not block the flash. 13 1 Getting Started This chapter explains preparations before shooting, how to shoot in A mode, and then how to a computer.

PowerShot G12 Camera User Guide
Page 14
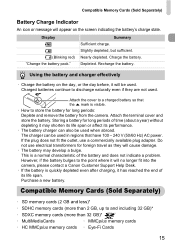
Charge the battery. ● For CB-2LZ: Flip out the plug ( ) and plug the charger into a power outlet ( ). ● For CB-2LZE: Plug the power cord into the charger, then plug the other end into a power outlet. To protect the battery and prolong its life, do not charge it for longer than mentioned above. 14 Remove the cover. X The charge lamp will light green when charging has finished. Remove the battery. ● Unplug the battery charger from the power outlet, then remove the battery by sliding it in ( ) and up ( ). Charging the Battery Use the included charger to ...
Charge the battery. ● For CB-2LZ: Flip out the plug ( ) and plug the charger into a power outlet ( ). ● For CB-2LZE: Plug the power cord into the charger, then plug the other end into a power outlet. To protect the battery and prolong its life, do not charge it for longer than mentioned above. 14 Remove the cover. X The charge lamp will light green when charging has finished. Remove the battery. ● Unplug the battery charger from the power outlet, then remove the battery by sliding it in ( ) and up ( ). Charging the Battery Use the included charger to ...
PowerShot G12 Camera User Guide
Page 15
... and store the battery. Storing a battery for long periods of time (about a year) without depleting it will no longer fit into the camera, please contact a Canon Customer Support Help Desk. • If the battery is a normal characteristic of its performance. • The battery charger can be used in regions that the...
... and store the battery. Storing a battery for long periods of time (about a year) without depleting it will no longer fit into the camera, please contact a Canon Customer Support Help Desk. • If the battery is a normal characteristic of its performance. • The battery charger can be used in regions that the...

PowerShot G12 Camera User Guide
Page 16
Check to use Eye-Fi cards in the area, please check with the card manufacturer. Also note that an approval is required to make sure that your computer's OS version, SDXC memory cards may not operate properly depending on your OS supports this function beforehand. If it is in the correct direction or it will not be recognized when using a commercially available card reader. Open the cover. ● Slide the cover ( ) and open it locks into place. Without approval, use in many countries or regions. Some cards may not be able to record images if the tab is unclear whether...
Check to use Eye-Fi cards in the area, please check with the card manufacturer. Also note that an approval is required to make sure that your computer's OS version, SDXC memory cards may not operate properly depending on your OS supports this function beforehand. If it is in the correct direction or it will not be recognized when using a commercially available card reader. Open the cover. ● Slide the cover ( ) and open it locks into place. Without approval, use in many countries or regions. Some cards may not be able to record images if the tab is unclear whether...

PowerShot G12 Camera User Guide
Page 17
SD, SDHC and SDXC memory cards, and Eye-Fi cards have a write-protect tab. Removing the Battery and Memory Card Remove the battery. ● Open the cover and press the battery lock in until it locks into place ( ). Label Inserting the Battery and Memory Card Insert the memory card. ● Insert the memory card as you slide it until you will not be taken will pop up . Inserting the memory card in the locked position, [Memory card locked] will pop up . What if [Memory card locked] appears on camera settings, the subject and the memory card used. 17 Close the cover. ●...
SD, SDHC and SDXC memory cards, and Eye-Fi cards have a write-protect tab. Removing the Battery and Memory Card Remove the battery. ● Open the cover and press the battery lock in until it locks into place ( ). Label Inserting the Battery and Memory Card Insert the memory card. ● Insert the memory card as you slide it until you will not be taken will pop up . Inserting the memory card in the locked position, [Memory card locked] will pop up . What if [Memory card locked] appears on camera settings, the subject and the memory card used. 17 Close the cover. ●...
PowerShot G12 Camera User Guide
Page 18
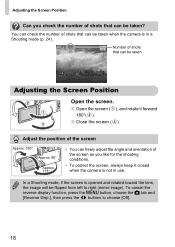
In a Shooting mode, if the screen is in use. To cancel the reverse display function, press the n button, choose the 4 tab and [Reverse Disp.], then press the qr buttons to right (mirror image). You can check the number of shots that can be taken? Adjust the position of shots that can freely adjust the angle and orientation of the screen as you check the number of the screen Approx. 180° Approx. 90° Approx. 177° • You can be flipped from left to choose [Off]. 18 Number of shots that can be taken when the camera is opened and rotated toward the ...
In a Shooting mode, if the screen is in use. To cancel the reverse display function, press the n button, choose the 4 tab and [Reverse Disp.], then press the qr buttons to right (mirror image). You can check the number of shots that can be taken? Adjust the position of shots that can freely adjust the angle and orientation of the screen as you check the number of the screen Approx. 180° Approx. 90° Approx. 177° • You can be flipped from left to choose [Off]. 18 Number of shots that can be taken when the camera is opened and rotated toward the ...
PowerShot G12 Camera User Guide
Page 19
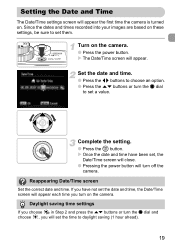
X The Date/Time screen will appear. Reappearing Date/Time screen Set the correct date and time. Daylight saving time settings If you will set the time to set them. Set the date and time. ● Press the qr buttons to choose an option. ● Press the op buttons or turn the Ê dial and choose , you choose in Step 2 and press the op buttons or turn the Ê dial to set , the Date/Time screen will close. ● Pressing the power button will turn on . If you turn off the camera. Since the dates and times recorded into your images are based on the camera. ● ...
X The Date/Time screen will appear. Reappearing Date/Time screen Set the correct date and time. Daylight saving time settings If you will set the time to set them. Set the date and time. ● Press the qr buttons to choose an option. ● Press the op buttons or turn the Ê dial and choose , you choose in Step 2 and press the op buttons or turn the Ê dial to set , the Date/Time screen will close. ● Pressing the power button will turn on . If you turn off the camera. Since the dates and times recorded into your images are based on the camera. ● ...
PowerShot G12 Camera User Guide
Page 20
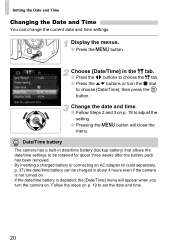
Follow the steps on p. 19 to choose [Date/Time], then press the m button. Choose [Date/Time] in the 3 tab. ● Press the qr buttons to be charged in about three weeks after the battery pack has been removed. • By inserting a charged battery or connecting an AC adapter kit (sold separately, p. 37) the date/time battery can change the current date and time settings. Date/Time battery • The camera has a built-in date/time battery (backup battery) that allows the date/time settings to choose the 3 tab. ● Press the op buttons or turn the camera on. Change the ...
Follow the steps on p. 19 to choose [Date/Time], then press the m button. Choose [Date/Time] in the 3 tab. ● Press the qr buttons to be charged in about three weeks after the battery pack has been removed. • By inserting a charged battery or connecting an AC adapter kit (sold separately, p. 37) the date/time battery can change the current date and time settings. Date/Time battery • The camera has a built-in date/time battery (backup battery) that allows the date/time settings to choose the 3 tab. ● Press the op buttons or turn the camera on. Change the ...
