
ImageBrowser 6.5 for Macintosh Instruction Manual
Page 3
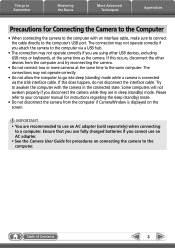
... AC adapter (sold separately) when connecting to a computer. Table of Contents 3 The connection may not operate correctly if you disconnect the camera while they are recommended to use fully charged batteries if you are using other devices from the computer if CameraWindow is connected via a USB hub. • The connection may not...
... AC adapter (sold separately) when connecting to a computer. Table of Contents 3 The connection may not operate correctly if you disconnect the camera while they are recommended to use fully charged batteries if you are using other devices from the computer if CameraWindow is connected via a USB hub. • The connection may not...
ImageBrowser 6.5 for Macintosh Instruction Manual
Page 58
...you are powering the camera with a battery. Are the camera and computer in the correct modes to the computer? See the Camera User Guide for the correct connection procedures. Is the battery sufficiently charged? Does your computer satisfy the requirements listed in the Camera User Guide. Problems You... of Contents 58 You are using the software. Some models require the camera to be set to the playback mode to a computer. Check the battery charge if you encounter a problem. See the Camera User Guide for details. Refer to "Changing the Transfer Destination Folder" to...
...you are powering the camera with a battery. Are the camera and computer in the correct modes to the computer? See the Camera User Guide for the correct connection procedures. Is the battery sufficiently charged? Does your computer satisfy the requirements listed in the Camera User Guide. Problems You... of Contents 58 You are using the software. Some models require the camera to be set to the playback mode to a computer. Check the battery charge if you encounter a problem. See the Camera User Guide for details. Refer to "Changing the Transfer Destination Folder" to...
ZoomBrowser EX 6.5 for Windows Instruction Manual
Page 3
... this does happen, do not disconnect the interface cable. Ensure that you use fully charged batteries if you disconnect the camera while they are recommended to use an AC adapter. • See the Camera User Guide for instructions regarding the sleep (standby) mode. • Do not disconnect the... camera from the computer and try reconnecting the camera. • Do not connect two or more cameras at the same time as the camera. Please refer to the computer's USB port. Things to Remember Mastering the ...
... this does happen, do not disconnect the interface cable. Ensure that you use fully charged batteries if you disconnect the camera while they are recommended to use an AC adapter. • See the Camera User Guide for instructions regarding the sleep (standby) mode. • Do not disconnect the... camera from the computer and try reconnecting the camera. • Do not connect two or more cameras at the same time as the camera. Please refer to the computer's USB port. Things to Remember Mastering the ...
ZoomBrowser EX 6.5 for Windows Instruction Manual
Page 57
...the correct modes to transfer data? See the Camera User Guide for details. Are the camera and computer in the Camera User Guide. Does your computer satisfy the requirements listed in the System Requirements section? Check the battery charge if you encounter a problem using the... Basics More Advanced Techniques Appendices Troubleshooting Please read this section if you are powering the camera with a battery. Also check to ensure that you encounter a problem. Is the battery sufficiently charged? Start by Checking This Investigate the following points first if you are using...
...the correct modes to transfer data? See the Camera User Guide for details. Are the camera and computer in the Camera User Guide. Does your computer satisfy the requirements listed in the System Requirements section? Check the battery charge if you encounter a problem using the... Basics More Advanced Techniques Appendices Troubleshooting Please read this section if you are powering the camera with a battery. Also check to ensure that you encounter a problem. Is the battery sufficiently charged? Start by Checking This Investigate the following points first if you are using...

PowerShot G10 Camera User Guide
Page 2
a Camera b Battery Pack c Battery Charger NB-7L CB-2LZ/CB-2LZE (With Terminal Cover) d Interface Cable IFC-400PCU e AV Cable AVC-DC300 f Neck Strap NS-DC8 g Canon Digital Camera Solution Disk h Warranty Card i "Canon Customer Support" Leaflet j User Guides • Camera User Guide (this guide) • Direct Print User Guide (Connecting the camera to a printer) • Software Starter Guide (Connecting...
a Camera b Battery Pack c Battery Charger NB-7L CB-2LZ/CB-2LZE (With Terminal Cover) d Interface Cable IFC-400PCU e AV Cable AVC-DC300 f Neck Strap NS-DC8 g Canon Digital Camera Solution Disk h Warranty Card i "Canon Customer Support" Leaflet j User Guides • Camera User Guide (this guide) • Direct Print User Guide (Connecting the camera to a printer) • Software Starter Guide (Connecting...

PowerShot G10 Camera User Guide
Page 12
...Preparations Charging the Battery 1. Plug the battery charger (CB-2LZ) into a power outlet, or attach the power cord to the battery charger (CB-2LZE) and plug it for longer than 24 hours continuously. Charge Indicator (Upper) Charging: lights orange 3. Remove the battery after charging ...is complete. Align the symbols. 2. Charge Indicator (Lower) Charging Complete: lights green To protect the battery and prolong its life, do not charge it into the battery charger. Charging takes approximately 2 hours 20 minutes....
...Preparations Charging the Battery 1. Plug the battery charger (CB-2LZ) into a power outlet, or attach the power cord to the battery charger (CB-2LZE) and plug it for longer than 24 hours continuously. Charge Indicator (Upper) Charging: lights orange 3. Remove the battery after charging ...is complete. Align the symbols. 2. Charge Indicator (Lower) Charging Complete: lights green To protect the battery and prolong its life, do not charge it into the battery charger. Charging takes approximately 2 hours 20 minutes....

PowerShot G10 Camera User Guide
Page 13
Slide the cover (a) and open it locks. Battery Lock c Getting Started Preparations 11 Installing the Battery and Memory Card 1. Push the battery lock in the direction of the arrow (c) and insert the battery until it (b). b a 2.
Slide the cover (a) and open it locks. Battery Lock c Getting Started Preparations 11 Installing the Battery and Memory Card 1. Push the battery lock in the direction of the arrow (c) and insert the battery until it (b). b a 2.

PowerShot G10 Camera User Guide
Page 15
In order to avoid dropping the camera, we recommend attaching the neck strap before using the camera. Getting Started Preparations 13 To Remove the Battery Push the battery lock in the buckle so that it . Battery Lock To Remove the Memory Card Push the memory card with your finger until the memory card clicks and then release it does not slip. Attaching the Neck Strap a c b Pull the strap tight in the direction of the camera. Perform the same steps on the other side of the arrow and hold it while pulling the battery out.
In order to avoid dropping the camera, we recommend attaching the neck strap before using the camera. Getting Started Preparations 13 To Remove the Battery Push the battery lock in the buckle so that it . Battery Lock To Remove the Memory Card Push the memory card with your finger until the memory card clicks and then release it does not slip. Attaching the Neck Strap a c b Pull the strap tight in the direction of the camera. Perform the same steps on the other side of the arrow and hold it while pulling the battery out.

PowerShot G10 Camera User Guide
Page 17
...15 z A rechargeable lithium battery is turned off. It will charge in the LCD monitor menus and messages. Reset the date/time settings if this occurs. z The date/time settings may be lost after approximately three weeks if you insert a charged battery into the camera, or use the separately sold... AC Adapter Kit ACK-DC50, the battery will charge even if the camera is built into the camera to select a language. 4. Hold down the button and press the MENU ...
...15 z A rechargeable lithium battery is turned off. It will charge in the LCD monitor menus and messages. Reset the date/time settings if this occurs. z The date/time settings may be lost after approximately three weeks if you insert a charged battery into the camera, or use the separately sold... AC Adapter Kit ACK-DC50, the battery will charge even if the camera is built into the camera to select a language. 4. Hold down the button and press the MENU ...

PowerShot G10 Camera User Guide
Page 36
Getting Started 34 System Map System Map Speedlite 220EX Speedlite 430EX II*4 Speedlite 580EX II*4 Speedlite Transmitter ST-E2 High-Power Flash HF-DC1 Supplied with Camera Neck Strap NS-DC8 Interface Cable IFC-400PCU*1 Battery Pack NB-7L*1 (With Terminal Cover) AV Cable AVC-DC300*1 Battery Charger CB-2LZ/CB-2LZE*1 Canon Digital Camera Solution Disk AC Adapter Kit ACK-DC50 Compact Power Adapter CA-PS700 Soft Case SC-DC60 series Remote Switch RS60-E3 Waterproof Case WP-DC28 DC Coupler DR-50 Power Cord Waterproof Case Weight WW-DC1
Getting Started 34 System Map System Map Speedlite 220EX Speedlite 430EX II*4 Speedlite 580EX II*4 Speedlite Transmitter ST-E2 High-Power Flash HF-DC1 Supplied with Camera Neck Strap NS-DC8 Interface Cable IFC-400PCU*1 Battery Pack NB-7L*1 (With Terminal Cover) AV Cable AVC-DC300*1 Battery Charger CB-2LZ/CB-2LZE*1 Canon Digital Camera Solution Disk AC Adapter Kit ACK-DC50 Compact Power Adapter CA-PS700 Soft Case SC-DC60 series Remote Switch RS60-E3 Waterproof Case WP-DC28 DC Coupler DR-50 Power Cord Waterproof Case Weight WW-DC1
PowerShot G10 Camera User Guide
Page 39
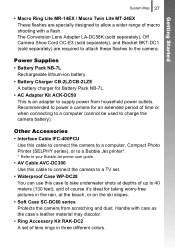
...-400PCU Use this cable to connect the camera to a computer, Compact Photo Printer (SELPHY series), or to a Bubble Jet printer*. * Refer to your Bubble Jet printer user guide. • AV Cable AVC-DC300 Use this cable to connect the camera to a TV set of macro shooting ... of time or when connecting to a computer (cannot be used to charge the camera battery). Handle with a flash. Power Supplies • Battery Pack NB-7L Rechargeable lithium-ion battery. • Battery Charger CB-2LZ/CB-2LZE A battery charger for taking worry-free pictures in three different colors. Recommended to power...
...-400PCU Use this cable to connect the camera to a computer, Compact Photo Printer (SELPHY series), or to a Bubble Jet printer*. * Refer to your Bubble Jet printer user guide. • AV Cable AVC-DC300 Use this cable to connect the camera to a TV set of macro shooting ... of time or when connecting to a computer (cannot be used to charge the camera battery). Handle with a flash. Power Supplies • Battery Pack NB-7L Rechargeable lithium-ion battery. • Battery Charger CB-2LZ/CB-2LZE A battery charger for taking worry-free pictures in three different colors. Recommended to power...

PowerShot G10 Camera User Guide
Page 40
...any damage to the camera with genuine Canon accessories. This product is recommended. You can produce photo quality prints quickly and easily by connecting them to this warranty does not apply to repairs arising out of the malfunction of a battery pack). Getting Started... with a single cable and operating the camera's controls. • Compact Photo Printers (SELPHY series) • Bubble Jet Printers (PIXMA series) For more information, visit your nearest Canon retailer. Canon shall not be liable for use with the camera attached to release the shutter button without touching...
...any damage to the camera with genuine Canon accessories. This product is recommended. You can produce photo quality prints quickly and easily by connecting them to this warranty does not apply to repairs arising out of the malfunction of a battery pack). Getting Started... with a single cable and operating the camera's controls. • Compact Photo Printers (SELPHY series) • Bubble Jet Printers (PIXMA series) For more information, visit your nearest Canon retailer. Canon shall not be liable for use with the camera attached to release the shutter button without touching...

PowerShot G10 Camera User Guide
Page 43
... 41 „ Back View a Screen (LCD Monitor) (p. 63) b Viewfinder c Terminal Cover d DC Coupler Cable Cover (p. 259) e Memory Card/Battery Cover (p. 11) f Tripod Socket g A/V OUT (Audio/Video output) Terminal (p. 228) h Remote Terminal (p. 274) i DIGITAL Terminal (pp. 21, 29) Using the Optical Viewfinder to Shoot Turning the LCD monitor off (p. 63) and using the...
... 41 „ Back View a Screen (LCD Monitor) (p. 63) b Viewfinder c Terminal Cover d DC Coupler Cable Cover (p. 259) e Memory Card/Battery Cover (p. 11) f Tripod Socket g A/V OUT (Audio/Video output) Terminal (p. 228) h Remote Terminal (p. 274) i DIGITAL Terminal (pp. 21, 29) Using the Optical Viewfinder to Shoot Turning the LCD monitor off (p. 63) and using the...
PowerShot G10 Camera User Guide
Page 47
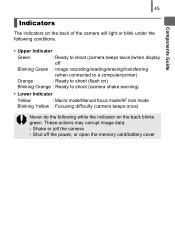
...) Orange : Ready to shoot (flash on) Blinking Orange : Ready to shoot (camera shake warning) • Lower Indicator Yellow : Macro mode/Manual focus mode/AF lock mode Blinking Yellow : Focusing difficulty (camera beeps once) Never do the following while the indicator on the back blinks green. ... jolt the camera - 45 Components Guide Indicators The indicators on the back of the camera will light or blink under the following conditions. • Upper Indicator Green : Ready to shoot (camera beeps twice)/when display off the power, or open the memory card/battery cover These ...
...) Orange : Ready to shoot (flash on) Blinking Orange : Ready to shoot (camera shake warning) • Lower Indicator Yellow : Macro mode/Manual focus mode/AF lock mode Blinking Yellow : Focusing difficulty (camera beeps once) Never do the following while the indicator on the back blinks green. ... jolt the camera - 45 Components Guide Indicators The indicators on the back of the camera will light or blink under the following conditions. • Upper Indicator Green : Ready to shoot (camera beeps twice)/when display off the power, or open the memory card/battery cover These ...
PowerShot G10 Camera User Guide
Page 51
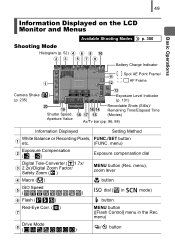
menu) b Exposure Compensation (...) Exposure compensation dial Digital Tele-Converter ( 1.7x/ c 2.2x)/Digital Zoom Factor/ Safety Zoom ( ) MENU button (Rec. menu) h Drive ( Mode ) / button 49 Basic Operations Information Displayed on the LCD Monitor and Menus Available Shooting Modes p. 300 Shooting Mode Histogram (p. 52) d f h j bc egi Battery Charge Indicator a Camera Shake ( ) (p. 235) t s Shutter Speed, Aperture Value k Spot...
menu) b Exposure Compensation (...) Exposure compensation dial Digital Tele-Converter ( 1.7x/ c 2.2x)/Digital Zoom Factor/ Safety Zoom ( ) MENU button (Rec. menu) h Drive ( Mode ) / button 49 Basic Operations Information Displayed on the LCD Monitor and Menus Available Shooting Modes p. 300 Shooting Mode Histogram (p. 52) d f h j bc egi Battery Charge Indicator a Camera Shake ( ) (p. 235) t s Shutter Speed, Aperture Value k Spot...

PowerShot G10 Camera User Guide
Page 52
.... menu) MENU button (Rec. Display on using the camera for an extended period. (blinking red) Low battery charge. Battery is depleted and the camera can no Change the battery pack. menu) About the Battery Charge Indicator • The following icons and message will display. 50 Information Displayed i Auto Rotate ( ) j Shooting ...button button button button MENU button (Rec. longer operate. Recharge the battery as soon as possible if you plan on the LCD monitor Summary Sufficient battery charge. Recharge the battery. menu) MENU button (Set up menu) MENU button (Set up...
.... menu) MENU button (Rec. Display on using the camera for an extended period. (blinking red) Low battery charge. Battery is depleted and the camera can no Change the battery pack. menu) About the Battery Charge Indicator • The following icons and message will display. 50 Information Displayed i Auto Rotate ( ) j Shooting ...button button button button MENU button (Rec. longer operate. Recharge the battery as soon as possible if you plan on the LCD monitor Summary Sufficient battery charge. Recharge the battery. menu) MENU button (Set up menu) MENU button (Set up...
PowerShot G10 Camera User Guide
Page 53
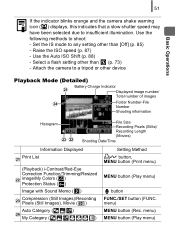
... - Use the Auto ISO Shift (p. 88) - menu) MENU button (Rec. Set the IS mode to a tripod or other device Playback Mode (Detailed) u Battery Charge Indicator Displayed image number/ Total number of images x Folder Number-File Number Shooting information Histogram wv File Size Recording Pixels (Stills)/ Recording Length (Movies...(FUNC. Raise the ISO speed (p. 87) - menu) MENU button (Play menu) 51 Basic Operations If the indicator blinks orange and the camera shake warning icon ( ) displays, this indicates that a slow shutter speed may have been selected due to shoot: - Attach the...
... - Use the Auto ISO Shift (p. 88) - menu) MENU button (Rec. Set the IS mode to a tripod or other device Playback Mode (Detailed) u Battery Charge Indicator Displayed image number/ Total number of images x Folder Number-File Number Shooting information Histogram wv File Size Recording Pixels (Stills)/ Recording Length (Movies...(FUNC. Raise the ISO speed (p. 87) - menu) MENU button (Play menu) 51 Basic Operations If the indicator blinks orange and the camera shake warning icon ( ) displays, this indicates that a slow shutter speed may have been selected due to shoot: - Attach the...

PowerShot G10 Camera User Guide
Page 61
... playback sound. Set up Menu Menu Item Mute Options On/Off* Volume Off/ 1 / 2*/ 3 / 4 / 5 Start-up sound when the camera is set to silence all operation sounds (except for when the memory card/battery cover is pressed. Adjusts the volume of the selftimer sound played 2 sec. before the shutter is recording. Adjusts the...
... playback sound. Set up Menu Menu Item Mute Options On/Off* Volume Off/ 1 / 2*/ 3 / 4 / 5 Start-up sound when the camera is set to silence all operation sounds (except for when the memory card/battery cover is pressed. Adjusts the volume of the selftimer sound played 2 sec. before the shutter is recording. Adjusts the...

PowerShot G10 Camera User Guide
Page 122
... AF mode. 2. This will be set when the AF frame mode is set to [AiAF] (p. 121). Press the MENU button. 2. Single The camera only focuses when the shutter button is not pressed, allowing you to shoot without missing opportunities. 120 Switching between Focus Settings Available Shooting Modes p. 300... You can set to [Face Detect], [FlexiZone] or [Center]. Press the MENU button. The camera is continually focusing on whatever it is aimed at Continuous even when the shutter button is pressed halfway, conserving...
... AF mode. 2. This will be set when the AF frame mode is set to [AiAF] (p. 121). Press the MENU button. 2. Single The camera only focuses when the shutter button is not pressed, allowing you to shoot without missing opportunities. 120 Switching between Focus Settings Available Shooting Modes p. 300... You can set to [Face Detect], [FlexiZone] or [Center]. Press the MENU button. The camera is continually focusing on whatever it is aimed at Continuous even when the shutter button is pressed halfway, conserving...

PowerShot G10 Camera User Guide
Page 176
... there is not enough space left unchanged. Press the button. 4 Save the file. 1. When editing movies, it may take some time to use a fully charged battery or the separately sold AC Adapter Kit ACK-DC50 (p. 258). Depending on the memory card, only [Overwrite] can be saved. Use the , , or button to... FUNC./SET button while saving the movie, saving is left on the movie's file size, it is recommended to save an edited movie. If the battery runs out of charge partway through, edited movie clips cannot be selected.
... there is not enough space left unchanged. Press the button. 4 Save the file. 1. When editing movies, it may take some time to use a fully charged battery or the separately sold AC Adapter Kit ACK-DC50 (p. 258). Depending on the memory card, only [Overwrite] can be saved. Use the , , or button to... FUNC./SET button while saving the movie, saving is left on the movie's file size, it is recommended to save an edited movie. If the battery runs out of charge partway through, edited movie clips cannot be selected.


