User Guide
Page 2
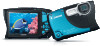
... is required to view the PDF manuals. Camera Battery Pack NB-6L (with the camera. 2 However, not all memory cards have been verified to SD specifications. If anything is not included (p. 2). Warranty Card PDF Manuals For information about the included software, refer to the ImageBrowser EX User Guide, in the package...
... is required to view the PDF manuals. Camera Battery Pack NB-6L (with the camera. 2 However, not all memory cards have been verified to SD specifications. If anything is not included (p. 2). Warranty Card PDF Manuals For information about the included software, refer to the ImageBrowser EX User Guide, in the package...
User Guide
Page 3
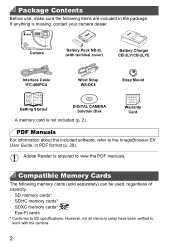
...manufacturer. If covered, remove the film before contacting a Canon Customer Support Help Desk. • Although the LCD monitor is produced under extremely high-precision manufacturing conditions and more than 99.99% of the pixels meet design specifications, in rare cases some test shots initially to be...purchase. Please note that an approval is valid only in many countries or regions. This does not indicate damage. 3 Also note that Canon Inc., its subsidiaries and affiliates, and its distributors are supported on copyright law, and note that is machine readable. • Images ...
...manufacturer. If covered, remove the film before contacting a Canon Customer Support Help Desk. • Although the LCD monitor is produced under extremely high-precision manufacturing conditions and more than 99.99% of the pixels meet design specifications, in rare cases some test shots initially to be...purchase. Please note that an approval is valid only in many countries or regions. This does not indicate damage. 3 Also note that Canon Inc., its subsidiaries and affiliates, and its distributors are supported on copyright law, and note that is machine readable. • Images ...
User Guide
Page 6
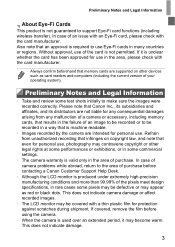
... in Smart Auto Mode..........54 Common, Convenient Features.......62 Image Customization Features........67 Helpful Shooting Features 72 Customizing Camera Operation ......75 6 4 Other Shooting Modes.....77 Specific Scenes 78 Applying Special Effects 82 Special Modes for Other Purposes 90 Shooting Various Movies 96 5 G mode 99 Shooting in This Guide 4 Contents 6 Contents: Basic...
... in Smart Auto Mode..........54 Common, Convenient Features.......62 Image Customization Features........67 Helpful Shooting Features 72 Customizing Camera Operation ......75 6 4 Other Shooting Modes.....77 Specific Scenes 78 Applying Special Effects 82 Special Modes for Other Purposes 90 Shooting Various Movies 96 5 G mode 99 Shooting in This Guide 4 Contents 6 Contents: Basic...

User Guide
Page 8
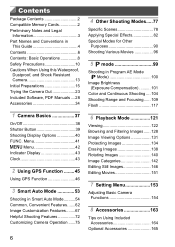
Contents: Basic Operations 4 Shoot Use camera-determined settings (Auto Mode 54 Shooting people well I Portraits (p. 79) P Against Snow (p. 79) Matching specific scenes Night Scenes (p. 79) Low Light (p. 79) S Under Water (p. 78) Underwater Close-ups (p. 78) t Fireworks (p. 79) Applying special effects Vivid Colors (p. 82) Poster Effect (p. 82) ...
Contents: Basic Operations 4 Shoot Use camera-determined settings (Auto Mode 54 Shooting people well I Portraits (p. 79) P Against Snow (p. 79) Matching specific scenes Night Scenes (p. 79) Low Light (p. 79) S Under Water (p. 78) Underwater Close-ups (p. 78) t Fireworks (p. 79) Applying special effects Vivid Colors (p. 82) Poster Effect (p. 82) ...
User Guide
Page 13
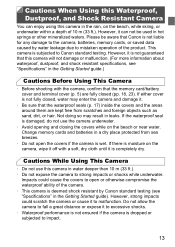
... (33 ft.). • Do not expose the camera to mistaken operation of the camera. • This camera is deemed shock resistant by Canon standard testing (see "Specifications" in the Getting Started guide.) Cautions Before Using This Camera • Before shooting with a soft, dry cloth until it . • ...Be sure that Canon is not liable for any damage to the camera, batteries, memory cards, or saved data caused by water leakage...
... (33 ft.). • Do not expose the camera to mistaken operation of the camera. • This camera is deemed shock resistant by Canon standard testing (see "Specifications" in the Getting Started guide.) Cautions Before Using This Camera • Before shooting with a soft, dry cloth until it . • ...Be sure that Canon is not liable for any damage to the camera, batteries, memory cards, or saved data caused by water leakage...
User Guide
Page 17
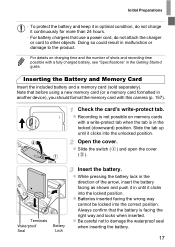
... Seal Battery Lock Insert the battery. While pressing the battery lock in the direction of shots and recording time possible with a fully charged battery, see "Specifications" in the Getting Started guide. Batteries inserted facing the wrong way cannot be locked into the locked position. Initial Preparations • To protect the battery...
... Seal Battery Lock Insert the battery. While pressing the battery lock in the direction of shots and recording time possible with a fully charged battery, see "Specifications" in the Getting Started guide. Batteries inserted facing the wrong way cannot be locked into the locked position. Initial Preparations • To protect the battery...
User Guide
Page 23
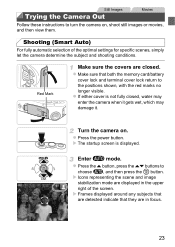
... images or movies, and then view them. X Icons representing the scene and image stabilization mode are in the upper right of the optimal settings for specific scenes, simply let the camera determine the subject and shooting conditions. Shooting (Smart Auto) For fully automatic selection of the screen. X Frames displayed around any...
... images or movies, and then view them. X Icons representing the scene and image stabilization mode are in the upper right of the optimal settings for specific scenes, simply let the camera determine the subject and shooting conditions. Shooting (Smart Auto) For fully automatic selection of the screen. X Frames displayed around any...

User Guide
Page 38
...). Playback Mode Press the 1 button to conserve battery power, the camera automatically deactivates the screen and then turns itself off automatically after about a minute after a specific period of screen deactivation (p. 160). 38
...). Playback Mode Press the 1 button to conserve battery power, the camera automatically deactivates the screen and then turns itself off automatically after about a minute after a specific period of screen deactivation (p. 160). 38
User Guide
Page 54
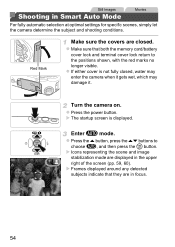
Make sure that they are displayed in Smart Auto Mode Movies For fully automatic selection at optimal settings for specific scenes, simply let the camera determine the subject and shooting conditions. If either cover is displayed. Turn the camera on. X The startup screen is not ...
Make sure that they are displayed in Smart Auto Mode Movies For fully automatic selection at optimal settings for specific scenes, simply let the camera determine the subject and shooting conditions. If either cover is displayed. Turn the camera on. X The startup screen is not ...

User Guide
Page 57
... as the flash is not possible until the flash has finished recharging. In this case, mount the camera on the focusing range (shooting range), see "Specifications" in the Getting Started guide. • The subject may be activated when shooting in low-light conditions. • A blinking h icon displayed when ...press the shutter button all the way down while turning the camera on), press the n button and choose [Mute] on the flash range, see "Specifications" in the Getting Started guide. • To reduce red-eye and to assist in focusing, the lamp may be blurred by holding the p button...
... as the flash is not possible until the flash has finished recharging. In this case, mount the camera on the focusing range (shooting range), see "Specifications" in the Getting Started guide. • The subject may be activated when shooting in low-light conditions. • A blinking h icon displayed when ...press the shutter button all the way down while turning the camera on), press the n button and choose [Mute] on the flash range, see "Specifications" in the Getting Started guide. • To reduce red-eye and to assist in focusing, the lamp may be blurred by holding the p button...
User Guide
Page 68
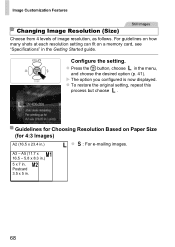
... is now displayed. A5 (11.7 x 16.5 - 5.8 x 8.3 in.) 5 x 7 in the menu, and choose the desired option (p. 41). Guidelines for Choosing Resolution Based on a memory card, see "Specifications" in the Getting Started guide. Postcard 3.5 x 5 in .) : For e-mailing images. Configure the setting. A3 - Image Customization Features Still Images Changing Image Resolution (Size) Choose from...
... is now displayed. A5 (11.7 x 16.5 - 5.8 x 8.3 in.) 5 x 7 in the menu, and choose the desired option (p. 41). Guidelines for Choosing Resolution Based on a memory card, see "Specifications" in the Getting Started guide. Postcard 3.5 x 5 in .) : For e-mailing images. Configure the setting. A3 - Image Customization Features Still Images Changing Image Resolution (Size) Choose from...

User Guide
Page 70
... For shooting in Full HD For shooting in HD For shooting in standard definition • In and modes, black bars displayed on a memory card, see "Specifications" in the menu, and choose the desired option (p. 41). Image Customization Features Movies Changing Movie Image Quality 3 image quality settings are available. X The option you...
... For shooting in Full HD For shooting in HD For shooting in standard definition • In and modes, black bars displayed on a memory card, see "Specifications" in the menu, and choose the desired option (p. 41). Image Customization Features Movies Changing Movie Image Quality 3 image quality settings are available. X The option you...
User Guide
Page 78
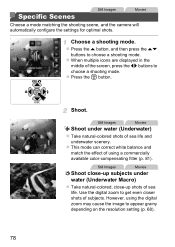
... and match the effect of using the digital zoom may cause the image to get even closer shots of sea life. Press the m button. Shoot. Specific Scenes Still Images Movies Choose a mode matching the shooting scene, and the camera will automatically configure the settings for optimal shots. Still Images Movies Shoot...
... and match the effect of using the digital zoom may cause the image to get even closer shots of sea life. Press the m button. Shoot. Specific Scenes Still Images Movies Choose a mode matching the shooting scene, and the camera will automatically configure the settings for optimal shots. Still Images Movies Shoot...

User Guide
Page 79
...) Shoot with minimal camera shake and subject blur even in A mode (p. 54). Still Images Shoot evening scenes without using a tripod, shoot in low-light conditions. Specific Scenes Still Images Movies P Shoot with a softening effect.
...) Shoot with minimal camera shake and subject blur even in A mode (p. 54). Still Images Shoot evening scenes without using a tripod, shoot in low-light conditions. Specific Scenes Still Images Movies P Shoot with a softening effect.

User Guide
Page 80
... the qr buttons to [Off] (p. 119). • mode resolution is (1984 x 1488) and cannot be used. In this case, set to 8. Choose the focusing range. Specific Scenes • Because the camera will shoot continuously in the center frame, and then press the shutter button halfway. mode, hold it still and prevent...
... the qr buttons to [Off] (p. 119). • mode resolution is (1984 x 1488) and cannot be used. In this case, set to 8. Choose the focusing range. Specific Scenes • Because the camera will shoot continuously in the center frame, and then press the shutter button halfway. mode, hold it still and prevent...

User Guide
Page 81
... . Still Images Movies Correcting White Balance White balance can be manually corrected by recording custom white balance data (p. 105) before following the preceding steps. 81 Specific Scenes • The AF frame will be reset if you switch to adjust the correction level for B and A, and then press the m button. • The...
... . Still Images Movies Correcting White Balance White balance can be manually corrected by recording custom white balance data (p. 105) before following the preceding steps. 81 Specific Scenes • The AF frame will be reset if you switch to adjust the correction level for B and A, and then press the m button. • The...

User Guide
Page 100
Follow step 1 on the shooting range in G mode, see "Specifications" in the Getting Started guide. 100 Choose a higher ISO speed (p. 102) • Movies can customize many function settings to suit your preferred shooting style. To ...
Follow step 1 on the shooting range in G mode, see "Specifications" in the Getting Started guide. 100 Choose a higher ISO speed (p. 102) • Movies can customize many function settings to suit your preferred shooting style. To ...

User Guide
Page 108
...). • During continuous shooting, focus and exposure are taken, shooting may slow down. • Shooting may slow down depending on the continuous shooting speed, see "Specifications" in the menu, and then choose W (p. 41). Press the m button, choose in the Getting Started guide. Shoot. Color and Continuous Shooting Still Images Continuous Shooting...
...). • During continuous shooting, focus and exposure are taken, shooting may slow down. • Shooting may slow down depending on the continuous shooting speed, see "Specifications" in the menu, and then choose W (p. 41). Press the m button, choose in the Getting Started guide. Shoot. Color and Continuous Shooting Still Images Continuous Shooting...

User Guide
Page 109
... zoom bar, e will turn gray and the camera will not focus. • To prevent camera shake, try mounting the camera on the focusing range, see "Specifications" in AF mode, use manual focus. Press the q button, press the qr buttons to e. For details on the focusing range, see... "Specifications" in the Getting Started guide. Shooting Range and Focusing Shooting Close-ups (Macro) Still Images To restrict the focus to subjects at close range, set ...
... zoom bar, e will turn gray and the camera will not focus. • To prevent camera shake, try mounting the camera on the focusing range, see "Specifications" in AF mode, use manual focus. Press the q button, press the qr buttons to e. For details on the focusing range, see... "Specifications" in the Getting Started guide. Shooting Range and Focusing Shooting Close-ups (Macro) Still Images To restrict the focus to subjects at close range, set ...

User Guide
Page 117
...Shoot. Press the r button, press the qr buttons to choose Z, and then press the m button. For details on the flash range, see "Flash Range" (see "Specifications" in the Getting Started guide). For details on a tripod or take other measures to increase the brightness of the background that the main subject does... the setting. Even after the flash fires, ensure that is finished playing. • Mount the camera on the flash range, see "Flash Range" (see "Specifications" in the Getting Started guide). Flash Still Images Activating Flash You can have the flash fire for each shot.
...Shoot. Press the r button, press the qr buttons to choose Z, and then press the m button. For details on the flash range, see "Flash Range" (see "Specifications" in the Getting Started guide). For details on a tripod or take other measures to increase the brightness of the background that the main subject does... the setting. Even after the flash fires, ensure that is finished playing. • Mount the camera on the flash range, see "Flash Range" (see "Specifications" in the Getting Started guide). Flash Still Images Activating Flash You can have the flash fire for each shot.
