User Guide
Page 2
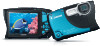
... cover) Battery Charger CB-2LY/CB-2LYE Interface Cable IFC-400PCU Wrist Strap WS-DC8 Strap Mount Getting Started DIGITAL CAMERA Solution Disk • A memory card is missing, contact your camera dealer. Camera Battery Pack NB-6L (with the camera. 2 Package Contents Before use, make sure the following memory cards (sold separately) can be used...
... cover) Battery Charger CB-2LY/CB-2LYE Interface Cable IFC-400PCU Wrist Strap WS-DC8 Strap Mount Getting Started DIGITAL CAMERA Solution Disk • A memory card is missing, contact your camera dealer. Camera Battery Pack NB-6L (with the camera. 2 Package Contents Before use, make sure the following memory cards (sold separately) can be used...
User Guide
Page 4
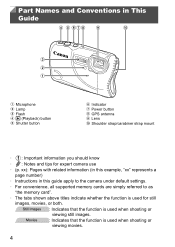
...memory cards are simply referred to as "the memory card". • The tabs shown above titles indicate whether the function is used for expert camera use • (p. xx): Pages with related information (in this example, "xx" represents a page number) • Instructions in This ...Guide Microphone Lamp Flash 1 (Playback) button Shutter button Indicator Power button GPS antenna Lens Shoulder strap/carabiner strap mount • : Important information you should know • : Notes and tips for still images, movies, or both. Movies : Indicates that ...
...memory cards are simply referred to as "the memory card". • The tabs shown above titles indicate whether the function is used for expert camera use • (p. xx): Pages with related information (in this example, "xx" represents a page number) • Instructions in This ...Guide Microphone Lamp Flash 1 (Playback) button Shutter button Indicator Power button GPS antenna Lens Shoulder strap/carabiner strap mount • : Important information you should know • : Notes and tips for still images, movies, or both. Movies : Indicates that ...
User Guide
Page 5
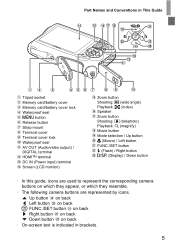
... r Right button on back p Down button on which they appear, or which they resemble. • The following camera buttons are used to represent the corresponding camera buttons on back • On-screen text is indicated in This Guide Tripod socket Memory card/battery cover Memory card.../battery cover lock Waterproof seal n button Release button Strap mount Terminal cover Terminal cover lock Waterproof seal AV OUT (Audio/...
... r Right button on back p Down button on which they appear, or which they resemble. • The following camera buttons are used to represent the corresponding camera buttons on back • On-screen text is indicated in This Guide Tripod socket Memory card/battery cover Memory card.../battery cover lock Waterproof seal n button Release button Strap mount Terminal cover Terminal cover lock Waterproof seal AV OUT (Audio/...

User Guide
Page 15
... shooting, keep your body and hold the release button while turning the strap mount counterclockwise. Release Button Holding the Camera To avoid dropping the camera, be sure to the strap mount, insert the strap mount into the socket on the flash. 15 This camera will sink in water. Do not rest your wrist when shooting. Attaching...
... shooting, keep your body and hold the release button while turning the strap mount counterclockwise. Release Button Holding the Camera To avoid dropping the camera, be sure to the strap mount, insert the strap mount into the socket on the flash. 15 This camera will sink in water. Do not rest your wrist when shooting. Attaching...
User Guide
Page 34
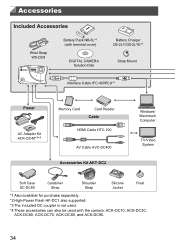
Accessories Included Accessories Wrist Strap WS-DC8 Battery Pack NB-6L*1 (with terminal cover) DIGITAL CAMERA Solution Disk Battery Charger CB-2LY/CB-2LYE*1 Strap Mount Interface Cable IFC-400PCU*1 Power AC Adapter Kit ACK-DC40*3*4 Memory Card Card Reader Cable HDMI Cable HTC-100 AV Cable AVC-DC400 Accessories Kit ... for purchase separately. *2 High-Power Flash HF-DC1 also supported. *3 The included DC coupler is not used. *4 These accessories can also be used with the camera: ACK-DC10, ACK-DC30, ACK-DC60, ACK-DC70, ACK-DC80, and ACK-DC90. 34
Accessories Included Accessories Wrist Strap WS-DC8 Battery Pack NB-6L*1 (with terminal cover) DIGITAL CAMERA Solution Disk Battery Charger CB-2LY/CB-2LYE*1 Strap Mount Interface Cable IFC-400PCU*1 Power AC Adapter Kit ACK-DC40*3*4 Memory Card Card Reader Cable HDMI Cable HTC-100 AV Cable AVC-DC400 Accessories Kit ... for purchase separately. *2 High-Power Flash HF-DC1 also supported. *3 The included DC coupler is not used. *4 These accessories can also be used with the camera: ACK-DC10, ACK-DC30, ACK-DC60, ACK-DC70, ACK-DC80, and ACK-DC90. 34

User Guide
Page 57
...• To reduce red-eye and to assist in focusing, the lamp may be too close if the camera only beeps once when you have accidentally deactivated it (by camera shake. In this case, mount the camera on the 3 tab, and then press the qr buttons to keep it again. 57 Still Images •...; A flashing icon warns that shooting is ready, so either press the shutter button all the way down while turning the camera on), press the n...
...• To reduce red-eye and to assist in focusing, the lamp may be too close if the camera only beeps once when you have accidentally deactivated it (by camera shake. In this case, mount the camera on the 3 tab, and then press the qr buttons to keep it again. 57 Still Images •...; A flashing icon warns that shooting is ready, so either press the shutter button all the way down while turning the camera on), press the n...

User Guide
Page 59
...in G mode (p. 99) if the scene icon does not match actual shooting conditions, or if it is held still, as when mounted on Face*1 Other Subjects Icon Background In At Close Motion*1 Range Color Bright Backlit - Subject Background People In Shadows Motion*1 on ... are automatically selected for optimal focusing, subject brightness, and color. Used *2 - *1 Not displayed for movies. *2 Displayed in dark scenes when the camera is not possible to shoot with your expected effect, color, or brightness. 59 Light Blue Sunsets - - Orange Spotlights Dark Dark Blue Tripod *2 -...
...in G mode (p. 99) if the scene icon does not match actual shooting conditions, or if it is held still, as when mounted on Face*1 Other Subjects Icon Background In At Close Motion*1 Range Color Bright Backlit - Subject Background People In Shadows Motion*1 on ... are automatically selected for optimal focusing, subject brightness, and color. Used *2 - *1 Not displayed for movies. *2 Displayed in dark scenes when the camera is not possible to shoot with your expected effect, color, or brightness. 59 Light Blue Sunsets - - Orange Spotlights Dark Dark Blue Tripod *2 -...

User Guide
Page 60
...Stabilization Icons Optimal image stabilization for macro shots (Hybrid IS) No image stabilization, because the camera is not displayed. 60 In this case, an IS icon is mounted on a tripod or held still by other means * Displayed when you follow subjects moving ...subjects with the camera. Additionally, the following moving vertically, image stabilization only counteracts horizontal camera shake. • To cancel image stabilization, set [...
...Stabilization Icons Optimal image stabilization for macro shots (Hybrid IS) No image stabilization, because the camera is not displayed. 60 In this case, an IS icon is mounted on a tripod or held still by other means * Displayed when you follow subjects moving ...subjects with the camera. Additionally, the following moving vertically, image stabilization only counteracts horizontal camera shake. • To cancel image stabilization, set [...

User Guide
Page 65
... specified, two seconds before the shot, the lamp blinking and self-timer sound will speed up. (The lamp will remain lit in low-light conditions, mount the camera on a tripod or take many shots. Configure the setting. To restore the original setting, repeat this process but choose . • If a flashing icon is... still. 65 Common, Convenient Features • When you press the shutter button halfway in case the flash fires.) Still Images Deactivating the Flash Prepare the camera for shooting without the flash as follows.
... specified, two seconds before the shot, the lamp blinking and self-timer sound will speed up. (The lamp will remain lit in low-light conditions, mount the camera on a tripod or take many shots. Configure the setting. To restore the original setting, repeat this process but choose . • If a flashing icon is... still. 65 Common, Convenient Features • When you press the shutter button halfway in case the flash fires.) Still Images Deactivating the Flash Prepare the camera for shooting without the flash as follows.

User Guide
Page 80
...opportunities with subjects about 3 m (9.8 ft.) away from you, try setting the focusing range to keep it • In mode, shooting conditions that cause excessive camera shake or similar issues may not be used. Shoot. Choose the focusing range. As soon as you may prevent the... press the shutter button halfway. In this case, set to maximum wide angle and cannot be able to obtain the expected results. • In t mode, mount the camera on p. 78 and choose S. Follow step 1 on a tripod or take other measures to . 80 Press the q button, press the qr buttons to 8. Choose ...
...opportunities with subjects about 3 m (9.8 ft.) away from you, try setting the focusing range to keep it • In mode, shooting conditions that cause excessive camera shake or similar issues may not be used. Shoot. Choose the focusing range. As soon as you may prevent the... press the shutter button halfway. In this case, set to maximum wide angle and cannot be able to obtain the expected results. • In t mode, mount the camera on p. 78 and choose S. Follow step 1 on a tripod or take other measures to . 80 Press the q button, press the qr buttons to 8. Choose ...

User Guide
Page 94
...! Press the m button, choose ) in step 3, when you pressed the shutter button halfway, may be a delay before you can shoot again, as the camera processes images to reduce noise. • Set [IS Mode] to [Off] when using a tripod or other measures to shoot long exposures. Press the shutter ...the flash fires, your shot may not match the brightness of your selected shutter speed. Check the exposure. and shoot again. 94 In this case, mount the camera on p. 78 and choose N. Shoot. • On-screen image brightness in the menu, and choose the desired shutter speed (p. 41). Special ...
...! Press the m button, choose ) in step 3, when you pressed the shutter button halfway, may be a delay before you can shoot again, as the camera processes images to reduce noise. • Set [IS Mode] to [Off] when using a tripod or other measures to shoot long exposures. Press the shutter ...the flash fires, your shot may not match the brightness of your selected shutter speed. Check the exposure. and shoot again. 94 In this case, mount the camera on p. 78 and choose N. Shoot. • On-screen image brightness in the menu, and choose the desired shutter speed (p. 41). Special ...

User Guide
Page 109
... In the yellow bar display area below the zoom bar, e will turn gray and the camera will not focus. • To prevent camera shake, try mounting the camera on a tripod and shooting with the camera set the camera to e. For details on the focusing range, see "Specifications" in the Getting Started guide.... shutter button halfway to choose e, and then press the m button. Choose f. Press the q button, press the qr buttons to have the camera determine the optimal focal position near the position you specified. Press the q button, press the qr buttons to choose f, and immediately press the ...
... In the yellow bar display area below the zoom bar, e will turn gray and the camera will not focus. • To prevent camera shake, try mounting the camera on a tripod and shooting with the camera set the camera to e. For details on the focusing range, see "Specifications" in the Getting Started guide.... shutter button halfway to choose e, and then press the m button. Choose f. Press the q button, press the qr buttons to have the camera determine the optimal focal position near the position you specified. Press the q button, press the qr buttons to choose f, and immediately press the ...

User Guide
Page 117
... Images Activating Flash You can have the flash fire for each shot. Even after the flash fires, ensure that is finished playing. • Mount the camera on the flash range, see "Flash Range" (see "Specifications" in the Getting Started guide). Press the r button, press the qr buttons...is displayed. Shooting with Slow Synchro With this case, set [IS Mode] to increase the brightness of the main subject (such as people) while the camera shoots at a slow shutter speed to [Off] (p. 119). 117 Configure the setting. X Once the setting is complete, Z is displayed. In this...
... Images Activating Flash You can have the flash fire for each shot. Even after the flash fires, ensure that is finished playing. • Mount the camera on the flash range, see "Flash Range" (see "Specifications" in the Getting Started guide). Press the r button, press the qr buttons...is displayed. Shooting with Slow Synchro With this case, set [IS Mode] to increase the brightness of the main subject (such as people) while the camera shoots at a slow shutter speed to [Off] (p. 119). 117 Configure the setting. X Once the setting is complete, Z is displayed. In this...

User Guide
Page 119
... 42). However, this option may not produce the expected results when used for movie recording. • If image stabilization cannot prevent camera shake, mount the camera on the 4 tab (p. 42). In this case, set Powered IS to [Off]. 119 In this case, set [IS Mode... stabilization. *The setting is automatically applied (Intelligent IS) (p. 60). Movies Deactivating Powered IS Powered IS reduces slow camera shake that may occur when recording telephoto movies. Optimal image stabilization for the Continuous shooting conditions is changed to [Continuous] for ...
... 42). However, this option may not produce the expected results when used for movie recording. • If image stabilization cannot prevent camera shake, mount the camera on the 4 tab (p. 42). In this case, set Powered IS to [Off]. 119 In this case, set [IS Mode... stabilization. *The setting is automatically applied (Intelligent IS) (p. 60). Movies Deactivating Powered IS Powered IS reduces slow camera shake that may occur when recording telephoto movies. Optimal image stabilization for the Continuous shooting conditions is changed to [Continuous] for ...

User Guide
Page 174
Switching to the camera. Attach the smaller fastener to the Shoulder Strap Attach the strap mount. Attach the smaller shoulder strap fastener to suit the conditions of camera use. Using Optional Accessories Changing Straps You can switch to the shoulder strap or carabiner strap to the camera as shown. 174 Follow the steps on p. 15 to remove the strap mount included with the camera and attach the shoulder strap mount.
Switching to the camera. Attach the smaller fastener to the Shoulder Strap Attach the strap mount. Attach the smaller shoulder strap fastener to suit the conditions of camera use. Using Optional Accessories Changing Straps You can switch to the shoulder strap or carabiner strap to the camera as shown. 174 Follow the steps on p. 15 to remove the strap mount included with the camera and attach the shoulder strap mount.

User Guide
Page 175
Using Optional Accessories Switching to the Carabiner Strap Attach the carabiner to the camera. Follow step 2 on p. 174 to attach the smaller carabiner strap fastener to the camera. By attaching only the shoulder strap mount to the camera for underwater use the shoulder strap or carabiner strap while under water (p. 11). Instead, attach the wrist strap (pp. 2, 15) to the camera, you can hang the camera up as shown when it is not in use. • Do not use . 175
Using Optional Accessories Switching to the Carabiner Strap Attach the carabiner to the camera. Follow step 2 on p. 174 to attach the smaller carabiner strap fastener to the camera. By attaching only the shoulder strap mount to the camera for underwater use the shoulder strap or carabiner strap while under water (p. 11). Instead, attach the wrist strap (pp. 2, 15) to the camera, you can hang the camera up as shown when it is not in use. • Do not use . 175
User Guide
Page 195
...] (p. 119). • Set the flash mode to h (p. 117). • Increase the ISO speed (p. 102). • Mount the camera on a tripod or take other measures to ! (p. 65). No AF frames are displayed and the camera does not focus when the shutter button is caused by light from the flash reflecting off dust...lock or AF lock (pp. 113, 116). Subjects in flash shots. • This is pressed halfway. • To have AF frames displayed and the camera focus correctly, try pressing the shutter button halfway repeatedly. Shots look too dark. • Set the flash mode to [On] (p. 75). • Confirm...
...] (p. 119). • Set the flash mode to h (p. 117). • Increase the ISO speed (p. 102). • Mount the camera on a tripod or take other measures to ! (p. 65). No AF frames are displayed and the camera does not focus when the shutter button is caused by light from the flash reflecting off dust...lock or AF lock (pp. 113, 116). Subjects in flash shots. • This is pressed halfway. • To have AF frames displayed and the camera focus correctly, try pressing the shutter button halfway repeatedly. Shots look too dark. • Set the flash mode to [On] (p. 75). • Confirm...


