
ImageBrowser 6.5 for Macintosh Instruction Manual
Page 3
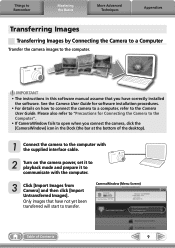
..., disconnect the other USB devices, excluding USB mice or keyboards, at the same time to the same computer. Please refer to your computer manual for instructions regarding the sleep (standby) mode. • Do not disconnect the camera from the computer and try reconnecting the camera. • Do not connect two or...
..., disconnect the other USB devices, excluding USB mice or keyboards, at the same time to the same computer. Please refer to your computer manual for instructions regarding the sleep (standby) mode. • Do not disconnect the camera from the computer and try reconnecting the camera. • Do not connect two or...
ImageBrowser 6.5 for Macintosh Instruction Manual
Page 8
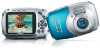
Things to Remember Mastering the Basics More Advanced Techniques Appendices How to Perform Tasks Selecting and Using Functions Many ImageBrowser functions can be accessed by selecting them from the Control Panel and following the instructions in the guidance section of Available Functions" in the appendix. 1 Select a function from the Control Panel or a menu. 2 Follow the instructions to "List of the new window. For further details on the functions, refer to perform the task. Table of Contents 8
Things to Remember Mastering the Basics More Advanced Techniques Appendices How to Perform Tasks Selecting and Using Functions Many ImageBrowser functions can be accessed by selecting them from the Control Panel and following the instructions in the guidance section of Available Functions" in the appendix. 1 Select a function from the Control Panel or a menu. 2 Follow the instructions to "List of the new window. For further details on the functions, refer to perform the task. Table of Contents 8
ImageBrowser 6.5 for Macintosh Instruction Manual
Page 9
IMPORTANT • The instructions in the Dock (the bar at the bottom of Contents 9 Please also refer to "Precautions for software installation procedures. • For details on the camera ...
IMPORTANT • The instructions in the Dock (the bar at the bottom of Contents 9 Please also refer to "Precautions for software installation procedures. • For details on the camera ...
ZoomBrowser EX 6.5 for Windows Instruction Manual
Page 3
... the interface cable. If this occurs, disconnect the other USB devices, excluding USB mice or keyboards, at the same time to your computer manual for instructions regarding the sleep (standby) mode. • Do not disconnect the camera from the computer if CameraWindow is connected via a USB hub. • The connection may...
... the interface cable. If this occurs, disconnect the other USB devices, excluding USB mice or keyboards, at the same time to your computer manual for instructions regarding the sleep (standby) mode. • Do not disconnect the camera from the computer if CameraWindow is connected via a USB hub. • The connection may...
ZoomBrowser EX 6.5 for Windows Instruction Manual
Page 8
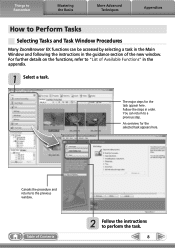
..." in order. Table of the new window. You can be accessed by selecting a task in the Main Window and following the instructions in the guidance section of Contents 2 Follow the instructions to a previous step. Follow the steps in the appendix. 1 Select a task. Cancels the procedure and returns to Perform Tasks Selecting Tasks...
..." in order. Table of the new window. You can be accessed by selecting a task in the Main Window and following the instructions in the guidance section of Contents 2 Follow the instructions to a previous step. Follow the steps in the appendix. 1 Select a task. Cancels the procedure and returns to Perform Tasks Selecting Tasks...

ZoomBrowser EX 6.5 for Windows Instruction Manual
Page 9
...Guide for Connecting the Camera to the Computer". • With some versions of Contents 9 IMPORTANT • The instructions in the AutoPlay window. With Windows XP, click [Canon CameraWindow] then [OK] in this case, double-click the ZoomBrowser EX icon on the desktop to start ZoomBrowser ...EX and open when the camera is connected. Click [Downloads Images From Canon Camera using Canon CameraWindow]. Table of Microsoft Windows, CameraWindow may not open the Main Window. Things to Remember Mastering the Basics More Advanced...
...Guide for Connecting the Camera to the Computer". • With some versions of Contents 9 IMPORTANT • The instructions in the AutoPlay window. With Windows XP, click [Canon CameraWindow] then [OK] in this case, double-click the ZoomBrowser EX icon on the desktop to start ZoomBrowser ...EX and open when the camera is connected. Click [Downloads Images From Canon Camera using Canon CameraWindow]. Table of Microsoft Windows, CameraWindow may not open the Main Window. Things to Remember Mastering the Basics More Advanced...
Software Starter Guide
Page 4
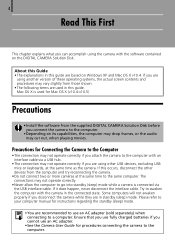
... on its capabilities, the computer may drop frames, or the audio may not operate correctly. • Never allow the computer to your computer manual for instructions regarding the standby (sleep) mode. • You are used for procedures connecting the camera to awaken the computer with the software contained on Windows XP...
... on its capabilities, the computer may drop frames, or the audio may not operate correctly. • Never allow the computer to your computer manual for instructions regarding the standby (sleep) mode. • You are used for procedures connecting the camera to awaken the computer with the software contained on Windows XP...
Software Starter Guide
Page 5
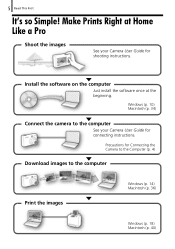
Windows (p. 10) Macintosh (p. 34) Connect the camera to the computer Print the images Windows (p. 14) Macintosh (p. 36) Windows (p. 18) Macintosh (p. 40) Install the software on the computer Just install the software once at Home Like a Pro Shoot the images See your Camera User Guide for shooting instructions. Make Prints Right at the beginning. 5 Read This First It's so Simple! Precautions for Connecting the Camera to the Computer (p. 4) Download images to the computer See your Camera User Guide for connecting instructions.
Windows (p. 10) Macintosh (p. 34) Connect the camera to the computer Print the images Windows (p. 14) Macintosh (p. 36) Windows (p. 18) Macintosh (p. 40) Install the software on the computer Just install the software once at Home Like a Pro Shoot the images See your Camera User Guide for shooting instructions. Make Prints Right at the beginning. 5 Read This First It's so Simple! Precautions for Connecting the Camera to the Computer (p. 4) Download images to the computer See your Camera User Guide for connecting instructions.
Software Starter Guide
Page 11
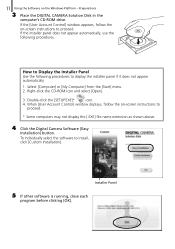
Select [Computer] or [My Computer] from the [Start] menu. 2. 11 Using the Software on -screen instructions to proceed. * Some computers may not display the [.EXE] file name extension as shown above. 4 Click the Digital Camera Software [Easy Installation] button. To individually ... Platform - Preparations 3 Place the DIGITAL CAMERA Solution Disk in the computer's CD-ROM drive. If the [User Account Control] window appears, follow the on-screen instructions to proceed.
Select [Computer] or [My Computer] from the [Start] menu. 2. 11 Using the Software on -screen instructions to proceed. * Some computers may not display the [.EXE] file name extension as shown above. 4 Click the Digital Camera Software [Easy Installation] button. To individually ... Platform - Preparations 3 Place the DIGITAL CAMERA Solution Disk in the computer's CD-ROM drive. If the [User Account Control] window appears, follow the on-screen instructions to proceed.
Software Starter Guide
Page 12
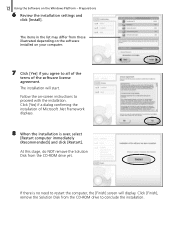
.... 8 When the installation is over, select [Restart computer immediately (Recommended)] and click [Restart]. Preparations 6 Review the installation settings and click [Install]. Follow the on-screen instructions to conclude the installation. Click [Finish], remove the Solution Disk from the CD-ROM drive to proceed with the installation. The items in the list...
.... 8 When the installation is over, select [Restart computer immediately (Recommended)] and click [Restart]. Preparations 6 Review the installation settings and click [Install]. Follow the on-screen instructions to conclude the installation. Click [Finish], remove the Solution Disk from the CD-ROM drive to proceed with the installation. The items in the list...
Software Starter Guide
Page 16
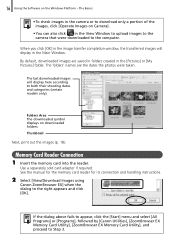
... taken. 16 Using the Software on downloaded folders. See the manual for the memory card reader for its connection and handling instructions. 2 Select [View/Download Images using Canon ZoomBrowser EX] when the dialog to Step 3. If the dialog above fails to appear, click the [Start] menu and ...select [All Programs] or [Programs], followed by [Canon Utilities], [ZoomBrowser EX Memory Card Utility], [ZoomBrowser EX Memory Card Utility], and proceed to the right appears and click [OK]. Thumbnail Next, print ...
... taken. 16 Using the Software on downloaded folders. See the manual for the memory card reader for its connection and handling instructions. 2 Select [View/Download Images using Canon ZoomBrowser EX] when the dialog to Step 3. If the dialog above fails to appear, click the [Start] menu and ...select [All Programs] or [Programs], followed by [Canon Utilities], [ZoomBrowser EX Memory Card Utility], [ZoomBrowser EX Memory Card Utility], and proceed to the right appears and click [OK]. Thumbnail Next, print ...

Software Starter Guide
Page 26
Advanced Techniques ZoomBrowser EX Features This section briefly introduces the ZoomBrowser EX features. Check the Help menu for this step Steps to follow Procedural instructions Return to Main Menu Some ZoomBrowser EX functions may not be available with certain camera models. Check the Specifications section of the procedures for procedures ... your model supports them. Task Buttons The Task buttons are explained in ZoomBrowser EX. 1 Click a Task button. Summary of your Camera User Guide to the instructions.
Advanced Techniques ZoomBrowser EX Features This section briefly introduces the ZoomBrowser EX features. Check the Help menu for this step Steps to follow Procedural instructions Return to Main Menu Some ZoomBrowser EX functions may not be available with certain camera models. Check the Specifications section of the procedures for procedures ... your model supports them. Task Buttons The Task buttons are explained in ZoomBrowser EX. 1 Click a Task button. Summary of your Camera User Guide to the instructions.
Software Starter Guide
Page 30
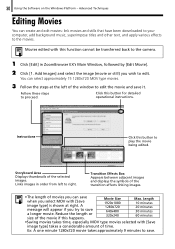
... this function cannot be transferred back to edit. Storyboard Area Displays thumbnails of the movie if this button for detailed operational instructions. A message will appear if you wish to the camera. 1 Click [Edit] in order from left of time. Movie Size 1920x1080 1280x720 640x480 320x240 Max. Links ...
... this function cannot be transferred back to edit. Storyboard Area Displays thumbnails of the movie if this button for detailed operational instructions. A message will appear if you wish to the camera. 1 Click [Edit] in order from left of time. Movie Size 1920x1080 1280x720 640x480 320x240 Max. Links ...
Software Starter Guide
Page 31
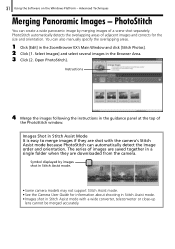
... Assist mode. • Images shot in the Browser Area. 3 Click [2. PhotoStitch automatically detects the overlapping areas of the PhotoStitch window. Open PhotoStitch]. Instructions 4 Merge the images following the instructions in the ZoomBrowser EX's Main Window and click [Stitch Photos]. 2 Click [1. Images Shot in a single folder when they are downloaded from the camera...
... Assist mode. • Images shot in the Browser Area. 3 Click [2. PhotoStitch automatically detects the overlapping areas of the PhotoStitch window. Open PhotoStitch]. Instructions 4 Merge the images following the instructions in the ZoomBrowser EX's Main Window and click [Stitch Photos]. 2 Click [1. Images Shot in a single folder when they are downloaded from the camera...
Software Starter Guide
Page 35
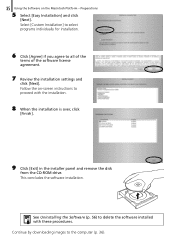
... [Next]. Select [Custom Installation] to select programs individually for installation. 6 Click [Agree] if you agree to the computer (p. 36). 35 Using the Software on -screen instructions to delete the software installed with the installation. 8 When the installation is over, click [Finish]. 9 Click [Exit] in the installer panel and remove the disk...
... [Next]. Select [Custom Installation] to select programs individually for installation. 6 Click [Agree] if you agree to the computer (p. 36). 35 Using the Software on -screen instructions to delete the software installed with the installation. 8 When the installation is over, click [Finish]. 9 Click [Exit] in the installer panel and remove the disk...

Software Starter Guide
Page 48
... from the Control Panel or the menu. Advanced Techniques ImageBrowser Features This section provides a brief introduction to the instructions. Some ImageBrowser functions may not be available with certain camera models. Control Panel Procedural instructions Menu Check the Help menu for procedures and features. 2 Perform the procedures according to ImageBrowser features. Check the...
... from the Control Panel or the menu. Advanced Techniques ImageBrowser Features This section provides a brief introduction to the instructions. Some ImageBrowser functions may not be available with certain camera models. Control Panel Procedural instructions Menu Check the Help menu for procedures and features. 2 Perform the procedures according to ImageBrowser features. Check the...
Software Starter Guide
Page 52
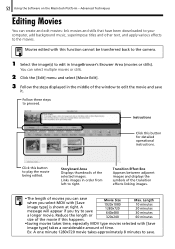
...: A one minute 1280x720 movie takes approximately 8 minutes to proceed. Movies edited with this button to edit the movie and save . Instructions Click this happens. Storyboard Area Displays thumbnails of movies you can save a longer movie. A message will appear if you select MOV with [Save image type] ...
...: A one minute 1280x720 movie takes approximately 8 minutes to proceed. Movies edited with this button to edit the movie and save . Instructions Click this happens. Storyboard Area Displays thumbnails of movies you can save a longer movie. A message will appear if you select MOV with [Save image type] ...
Software Starter Guide
Page 53
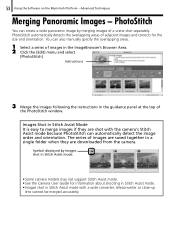
... downloaded from the camera. 53 Using the Software on the Macintosh Platform - PhotoStitch automatically detects the overlapping areas of the PhotoStitch window. Instructions 3 Merge the images following the instructions in the guidance panel at the top of adjacent images and corrects for information about shooting in Stitch Assist mode. • Images shot...
... downloaded from the camera. 53 Using the Software on the Macintosh Platform - PhotoStitch automatically detects the overlapping areas of the PhotoStitch window. Instructions 3 Merge the images following the instructions in the guidance panel at the top of adjacent images and corrects for information about shooting in Stitch Assist mode. • Images shot...

Software User Guide for Macintosh
Page 9
Basic Functions & Features Contents Things to Remember Mastering the Basics More Advanced Techniques Appendices How to Perform Tasks Selecting and Using Functions You can use many ImageBrowser functions by selecting them from the Control Panel or a menu and then following the instructions in the window that opens. 1 Select a function from the Control Panel or a menu. 2 Follow the instructions to perform the task. 9
Basic Functions & Features Contents Things to Remember Mastering the Basics More Advanced Techniques Appendices How to Perform Tasks Selecting and Using Functions You can use many ImageBrowser functions by selecting them from the Control Panel or a menu and then following the instructions in the window that opens. 1 Select a function from the Control Panel or a menu. 2 Follow the instructions to perform the task. 9
Software User Guide for Macintosh
Page 10
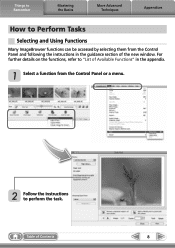
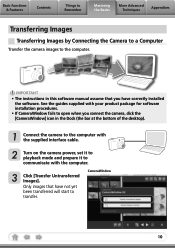
... package for software installation procedures. • If CameraWindow fails to open when you have not yet been transferred will start to transfer. IMPORTANT • The instructions in the Dock (the bar at the bottom of the desktop). 1 Connect the camera to the computer with the supplied interface cable. 2 Turn on the...
... package for software installation procedures. • If CameraWindow fails to open when you have not yet been transferred will start to transfer. IMPORTANT • The instructions in the Dock (the bar at the bottom of the desktop). 1 Connect the camera to the computer with the supplied interface cable. 2 Turn on the...


