Reference Guide
Page 2
..., these spots have no effect on the image you for purchasing a Canon PowerShot A5, the easy-to-use the camera. All rights reserved. 2 Disclaimer While every effort has been made to ensure that the information contained in this guide and the Quick Start Guide to use , compact digital camera with the PowerShot A5. and PhotoImpact are trademarks of the highquality digital imaging made possible with a large range of...
..., these spots have no effect on the image you for purchasing a Canon PowerShot A5, the easy-to-use the camera. All rights reserved. 2 Disclaimer While every effort has been made to ensure that the information contained in this guide and the Quick Start Guide to use , compact digital camera with the PowerShot A5. and PhotoImpact are trademarks of the highquality digital imaging made possible with a large range of...
Reference Guide
Page 3
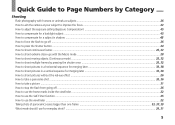
... Numbers by Category 5 Handling and Safety Precautions 9 Guide to Components 16 Basic Functions of the PowerShot A5 18 Image Size and Quality Specifications 18 Power On/Off Switch 19 Power Save Function 19 Camera Modes 20 Display Panel 21 Viewfinder 22 Viewfinder Frame Marks 22 Indicators 23 Shutter Button 24 Pressing Halfway 24 Pressing Fully 25 Continuous/Self-Timer (+) Button 25 Flash (-) Button 26 Macro/Jump Button 28 LCD Button 29 MENU Button 29 SET Button 30 Mode Dial Functions 31 Lock 31 Auto Mode 31 Buttons Available in Auto Mode...
... Numbers by Category 5 Handling and Safety Precautions 9 Guide to Components 16 Basic Functions of the PowerShot A5 18 Image Size and Quality Specifications 18 Power On/Off Switch 19 Power Save Function 19 Camera Modes 20 Display Panel 21 Viewfinder 22 Viewfinder Frame Marks 22 Indicators 23 Shutter Button 24 Pressing Halfway 24 Pressing Fully 25 Continuous/Self-Timer (+) Button 25 Flash (-) Button 26 Macro/Jump Button 28 LCD Button 29 MENU Button 29 SET Button 30 Mode Dial Functions 31 Lock 31 Auto Mode 31 Buttons Available in Auto Mode...
Reference Guide
Page 4
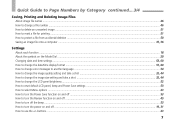
Table of Contents continued... 2/2 About File Numbers 46 Play Menu 47 Show Info 47 Slide Show 47 Protect 50 Erase 51 Print Mark 51 Setup 52 LCD 52 Beep 53 Power Save 53 Reset 53 Date/Time 53 Format 54 Language 54 Connecting to a TV 55 Connecting to a Computer 56 Connecting to a Windows Computer 56 Connecting to a Macintosh Computer 56 Changing the Button Battery and Setting the Date/Time 58 Changing the Button Battery 58 Setting the Date/Time 60 Camera Maintenance 61 Optional Accessories 62...
Table of Contents continued... 2/2 About File Numbers 46 Play Menu 47 Show Info 47 Slide Show 47 Protect 50 Erase 51 Print Mark 51 Setup 52 LCD 52 Beep 53 Power Save 53 Reset 53 Date/Time 53 Format 54 Language 54 Connecting to a TV 55 Connecting to a Computer 56 Connecting to a Windows Computer 56 Connecting to a Macintosh Computer 56 Changing the Button Battery and Setting the Date/Time 58 Changing the Button Battery 58 Setting the Date/Time 60 Camera Maintenance 61 Optional Accessories 62...
Reference Guide
Page 5
... shoot pictures without the red-eye effect ...26 How to take a panorama shot ...33, 36 How to take a picture ...31 How to stop the flash from going off ...26 How to use the frame marks inside the viewfinder ...22 How to use the Self-Timer function ...25 How to use the viewfinder ...22 Taking shots of panoramic scenes bigger than one frame 33, 37, 39 What mode should I use for everyday shots...
... shoot pictures without the red-eye effect ...26 How to take a panorama shot ...33, 36 How to take a picture ...31 How to stop the flash from going off ...26 How to use the frame marks inside the viewfinder ...22 How to use the Self-Timer function ...25 How to use the viewfinder ...22 Taking shots of panoramic scenes bigger than one frame 33, 37, 39 What mode should I use for everyday shots...
Reference Guide
Page 7
... the Mode Dial ...20 Changing date and time settings ...53, 60 How to change the date/time display format ...53, 60 How to change error messages to another language ...54 How to change the image quality setting and take a shot ...32, 44 How to change the image size setting and take a shot ...32, 44 How to change the LCD panel brightness ...52 How to reset default LCD panel, beep and Power Save settings ...53 How to select Menu options ...43 How to turn the Power Save function on...
... the Mode Dial ...20 Changing date and time settings ...53, 60 How to change the date/time display format ...53, 60 How to change error messages to another language ...54 How to change the image quality setting and take a shot ...32, 44 How to change the image size setting and take a shot ...32, 44 How to change the LCD panel brightness ...52 How to reset default LCD panel, beep and Power Save settings ...53 How to select Menu options ...43 How to turn the Power Save function on...
Reference Guide
Page 8
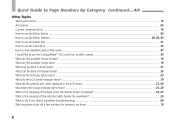
... Page Numbers by Category continued....4/4 Other Topics About part names ...16 Accessories ...62 Camera components list ...16 How to use the Menu button ...43 How to use the Menu features ...29, 42, 43 How to use the Mode Dial ...31 How to use the Set button ...43 How to view date/time data in Play mode ...47 I would like to use the CompactFlashTM (CF) card from another camera 54 What are the available image formats...
... Page Numbers by Category continued....4/4 Other Topics About part names ...16 Accessories ...62 Camera components list ...16 How to use the Menu button ...43 How to use the Menu features ...29, 42, 43 How to use the Mode Dial ...31 How to use the Set button ...43 How to view date/time data in Play mode ...47 I would like to use the CompactFlashTM (CF) card from another camera 54 What are the available image formats...

Reference Guide
Page 9
... if the image was shot for any consequential damages arising from any malfunction in a PowerShot camera or CompactFlashTM CF card that results in a format that you shoot images of subjects of an image to be recorded or to you, we recommend that you have read the instructions on the next few pages, we highly recommend that you operate your PowerShot A5 Digital Camera. Please be recorded in...
... if the image was shot for any consequential damages arising from any malfunction in a PowerShot camera or CompactFlashTM CF card that results in a format that you shoot images of subjects of an image to be recorded or to you, we recommend that you have read the instructions on the next few pages, we highly recommend that you operate your PowerShot A5 Digital Camera. Please be recorded in...

Reference Guide
Page 20
... CF card. Basic Functions of nine. Images are displayed on the CF card. The focus, exposure and white balance settings as well as the flash are automatically selected by the camera. The focus, exposure and white balance settings are automatically selected or activated by the camera. Merging images is for viewing and processing images with the Exposure Compensation function. (p. 45) : Stitch Assist Mode Taking pictures in groups of the PowerShot A5 continued... 3/13 Camera Modes The PowerShot A5 features six operating modes that can be adjusted manually with...
... CF card. Basic Functions of nine. Images are displayed on the CF card. The focus, exposure and white balance settings as well as the flash are automatically selected by the camera. The focus, exposure and white balance settings are automatically selected or activated by the camera. Merging images is for viewing and processing images with the Exposure Compensation function. (p. 45) : Stitch Assist Mode Taking pictures in groups of the PowerShot A5 continued... 3/13 Camera Modes The PowerShot A5 features six operating modes that can be adjusted manually with...

Reference Guide
Page 21
Basic Functions of the PowerShot A5 continued....4/13 Display Panel The Display Panel on the Display Panel will indicate errors or camera status. (p. 69) Single Mode Continuous Mode Self-Timer Mode Fine Normal CCD RAW Large Small Flash On Flash Off Red-Eye Reduction Macro Mode Exposure Compensation Beep On Low Battery Clock Not Set 21 Changing size and quality settings will alter this number. • Message codes on the camera top shows the status of camera settings, battery levels and the approximate number of images that can...
Basic Functions of the PowerShot A5 continued....4/13 Display Panel The Display Panel on the Display Panel will indicate errors or camera status. (p. 69) Single Mode Continuous Mode Self-Timer Mode Fine Normal CCD RAW Large Small Flash On Flash Off Red-Eye Reduction Macro Mode Exposure Compensation Beep On Low Battery Clock Not Set 21 Changing size and quality settings will alter this number. • Message codes on the camera top shows the status of camera settings, battery levels and the approximate number of images that can...

Reference Guide
Page 23
Upper Indicator Upper Indicator Green: Ready to take picture (no flash) Flashing Green: Storing to CF card Red: Flash On mode, ready to confirm various actions and camera modes. These lights shine or flash when the shutter button is pressed to take picture Flashing Red: Flash Off mode, insufficient light (image may blur) Lower Indicator Orange: Macro Mode On Lower Indicator 23 Basic Functions of the PowerShot A5 continued....6/13 Indicators Two indicators appear to the left of the viewfinder.
Upper Indicator Upper Indicator Green: Ready to take picture (no flash) Flashing Green: Storing to CF card Red: Flash On mode, ready to confirm various actions and camera modes. These lights shine or flash when the shutter button is pressed to take picture Flashing Red: Flash Off mode, insufficient light (image may blur) Lower Indicator Orange: Macro Mode On Lower Indicator 23 Basic Functions of the PowerShot A5 continued....6/13 Indicators Two indicators appear to the left of the viewfinder.

Reference Guide
Page 26
... Play mode, this button selects the next stored image. In Multi mode, this button displays the next stored image. Flash (-) Button In Program or Stitch Assist mode, this button moves the selection to produce the red-eye effect in prints of humans and animals, the result of the PowerShot A5 continued....9/13 • mark indicates the Continuous mode. The images are stored at the small size. • mark indicates the Self-Timer mode. The flash emitted before the actual shutter operation...
... Play mode, this button selects the next stored image. In Multi mode, this button displays the next stored image. Flash (-) Button In Program or Stitch Assist mode, this button moves the selection to produce the red-eye effect in prints of humans and animals, the result of the PowerShot A5 continued....9/13 • mark indicates the Continuous mode. The images are stored at the small size. • mark indicates the Self-Timer mode. The flash emitted before the actual shutter operation...
Reference Guide
Page 28
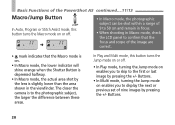
Basic Functions of the PowerShot A5 continued....11/13 Macro/Jump Button In Auto, Program or Stitch Assist mode, this button turns the Jump mode on or off . § • In Macro mode, the photographic subject can be shot within a range of 9 to 50 cm and remain in focus. • When shooting in Macro mode, check the LCD panel to confirm that the focus and scope of nine images by the lens is slightly...
Basic Functions of the PowerShot A5 continued....11/13 Macro/Jump Button In Auto, Program or Stitch Assist mode, this button turns the Jump mode on or off . § • In Macro mode, the photographic subject can be shot within a range of 9 to 50 cm and remain in focus. • When shooting in Macro mode, check the LCD panel to confirm that the focus and scope of nine images by the lens is slightly...

Reference Guide
Page 29
Basic Functions of the PowerShot A5 continued....12/13 LCD Button MENU Button This button turns the LCD panel on or off . • In Stitch Assist mode, the LCD panel is automatically turned on for a long period the camera may become warm. This button displays the Recording (Rec.) Menu when pressed in the Auto, Program and Stitch Assist modes. (p.44) The button displays the Play Menu in the Auto and Program modes. In the Play and Multi modes, the button turns the Video Output function on...
Basic Functions of the PowerShot A5 continued....12/13 LCD Button MENU Button This button turns the LCD panel on or off . • In Stitch Assist mode, the LCD panel is automatically turned on for a long period the camera may become warm. This button displays the Recording (Rec.) Menu when pressed in the Auto, Program and Stitch Assist modes. (p.44) The button displays the Play Menu in the Auto and Program modes. In the Play and Multi modes, the button turns the Video Output function on...

Reference Guide
Page 31
... lens. The mark displays in Auto Mode Macro Button Use this mode, but the quality setting can be set the Mode Dial to the Lock position before you to select between the various shooting and playback modes featured on the PowerShot A5. Auto Mode In Auto mode, the camera selects whether or not to use . The picture format is pressed. 31 Lock The Mode Dial should be changed. Buttons Available in the Display Panel when this button to activate the Self-Timer mode. Mode Dial Functions...
... lens. The mark displays in Auto Mode Macro Button Use this mode, but the quality setting can be set the Mode Dial to the Lock position before you to select between the various shooting and playback modes featured on the PowerShot A5. Auto Mode In Auto mode, the camera selects whether or not to use . The picture format is pressed. 31 Lock The Mode Dial should be changed. Buttons Available in the Display Panel when this button to activate the Self-Timer mode. Mode Dial Functions...
Reference Guide
Page 36
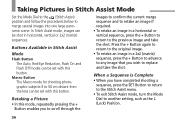
Buttons Available in Stitch Assist Mode Flash Button The Auto, Red-Eye Reduction, Flash On and Flash Off modes can be shot in a horizontal or vertical sequence, press the + Button to return to 50 cm distant from the lens can be set with this button. Retaking a Picture • In this button. Macro Button The Macro mode for shooting photographic subjects 9 to the previous image and take the shot. When a Sequence is Complete • When you wish to...
Buttons Available in Stitch Assist Mode Flash Button The Auto, Red-Eye Reduction, Flash On and Flash Off modes can be shot in a horizontal or vertical sequence, press the + Button to return to 50 cm distant from the lens can be set with this button. Retaking a Picture • In this button. Macro Button The Macro mode for shooting photographic subjects 9 to the previous image and take the shot. When a Sequence is Complete • When you wish to...
Reference Guide
Page 53
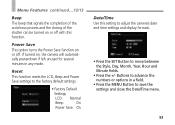
Reset This function resets the LCD, Beep and Power Save settings to the factory default settings. • Factory Default Settings LCD: Normal Beep: On Power Save: On Date/Time Use this function. Buttons to advance the numbers or options in any mode. Power Save This option turns the Power Save function on or off with this setting to adjust the camera's date and time settings and display formats. • Press the SET Button to save the settings and close the Date/Time menu. 53 Menu Features continued....12/13 Beep The beep that signals the completion of...
Reset This function resets the LCD, Beep and Power Save settings to the factory default settings. • Factory Default Settings LCD: Normal Beep: On Power Save: On Date/Time Use this function. Buttons to advance the numbers or options in any mode. Power Save This option turns the Power Save function on or off with this setting to adjust the camera's date and time settings and display formats. • Press the SET Button to save the settings and close the Date/Time menu. 53 Menu Features continued....12/13 Beep The beep that signals the completion of...
Reference Guide
Page 63
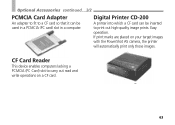
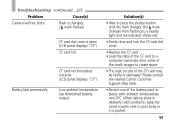
Digital Printer CD-200 A printer into which a CF card can be inserted to print out high-quality image prints. Easy operation. If print marks are placed on a CF card. 63 CF Card Reader This device enables computers lacking a PCMCIA (PC Card) slot to carry out read and write operations on your target images with the PowerShot A5 camera, the printer will automatically print only those images. Optional Accessories continued....2/2 PCMCIA Card Adapter An adapter to fit to a CF card so that it can be used in a PCMCIA (PC card) slot in a computer.
Digital Printer CD-200 A printer into which a CF card can be inserted to print out high-quality image prints. Easy operation. If print marks are placed on a CF card. 63 CF Card Reader This device enables computers lacking a PCMCIA (PC Card) slot to carry out read and write operations on your target images with the PowerShot A5 camera, the printer will automatically print only those images. Optional Accessories continued....2/2 PCMCIA Card Adapter An adapter to fit to a CF card so that it can be used in a PCMCIA (PC card) slot in a computer.
Reference Guide
Page 65
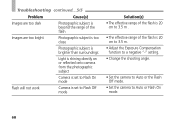
Troubleshooting continued....2/5 Problem Cause(s) Camera will not shoot Flash is charging ( mark flashes) CF card slot cover is open (LCD panel displays "CF") CF card full Battery fails prematurely CF card not formatted correctly (LCD panel displays "CF") Low ambient temperature has diminished battery output Solution(s) • Wait to press the shutter button until the flash charges, the mark changes from flashing to a steady light and the indicator shines red. • Firmly close and lock the CF card slot cover. • Replace the...
Troubleshooting continued....2/5 Problem Cause(s) Camera will not shoot Flash is charging ( mark flashes) CF card slot cover is open (LCD panel displays "CF") CF card full Battery fails prematurely CF card not formatted correctly (LCD panel displays "CF") Low ambient temperature has diminished battery output Solution(s) • Wait to press the shutter button until the flash charges, the mark changes from flashing to a steady light and the indicator shines red. • Firmly close and lock the CF card slot cover. • Replace the...
Reference Guide
Page 68
... surroundings Light is shining directly on or reflected onto camera from the photographic subject Camera is set to Flash On mode Flash will not work Camera is set to Flash Off mode Solution(s) • The effective range of the flash is 20 cm to 3.5 m . • The effective range of the flash is 20 cm to 3.5 m. • Adjust the Exposure Compensation function to a negative "-" setting. • Change the shooting angle. • Set the camera to Auto...
... surroundings Light is shining directly on or reflected onto camera from the photographic subject Camera is set to Flash On mode Flash will not work Camera is set to Flash Off mode Solution(s) • The effective range of the flash is 20 cm to 3.5 m . • The effective range of the flash is 20 cm to 3.5 m. • Adjust the Exposure Compensation function to a negative "-" setting. • Change the shooting angle. • Set the camera to Auto...
Reference Guide
Page 69
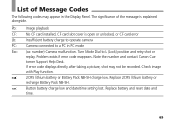
... battery charge to operate camera PC: Camera connected to L (Lock) position and retry shot or replay. Pb: Image playback CF: No CF card installed, CF card slot cover is explained alongside. Turn Mode Dial to a PC in the Display Panel. Check image with Play function. : 2CR5 lithium battery or Battery Pack NB-5H charge low. The significance of Message Codes The following codes may not be recorded. Replace 2CR5 lithium battery or recharge Battery Pack NB-5H. : Button battery charge low and date/time setting...
... battery charge to operate camera PC: Camera connected to L (Lock) position and retry shot or replay. Pb: Image playback CF: No CF card installed, CF card slot cover is explained alongside. Turn Mode Dial to a PC in the Display Panel. Check image with Play function. : 2CR5 lithium battery or Battery Pack NB-5H charge low. The significance of Message Codes The following codes may not be recorded. Replace 2CR5 lithium battery or recharge Battery Pack NB-5H. : Button battery charge low and date/time setting...


