

Software Starter Guide Ver. 19
Page 16
... to the software installed. Select [Custom Installation] to select programs individually for your operating system). •Windows 2000/Windows 98: Canon Camera TWAIN Driver •Windows Me: Canon Camera WIA Driver With Windows XP, the USB driver supplied with the Windows operating system is used so there is connected to...When [Custom Installation] is Selected The USB driver (the software for connecting) is required when the camera is no need to all the conditions. 8 Review the installation settings and click [Next]. The items displayed here differ according to proceed.
... to the software installed. Select [Custom Installation] to select programs individually for your operating system). •Windows 2000/Windows 98: Canon Camera TWAIN Driver •Windows Me: Canon Camera WIA Driver With Windows XP, the USB driver supplied with the Windows operating system is used so there is connected to...When [Custom Installation] is Selected The USB driver (the software for connecting) is required when the camera is no need to all the conditions. 8 Review the installation settings and click [Next]. The items displayed here differ according to proceed.
Software Starter Guide Ver. 19
Page 52
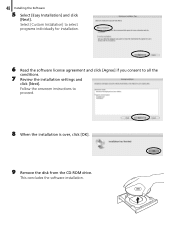
This concludes the software installation. Follow the onscreen instructions to all the conditions. 7 Review the installation settings and click [Next]. Select [Custom Installation] to select programs individually for installation. 6 Read the software license agreement and click [Agree] if you consent to proceed. 8 When the installation is over, click [OK]. 9 Remove the disk from the CD-ROM drive. 48 Installing the Software 5 Select [Easy Installation] and click [Next].
This concludes the software installation. Follow the onscreen instructions to all the conditions. 7 Review the installation settings and click [Next]. Select [Custom Installation] to select programs individually for installation. 6 Read the software license agreement and click [Agree] if you consent to proceed. 8 When the installation is over, click [OK]. 9 Remove the disk from the CD-ROM drive. 48 Installing the Software 5 Select [Easy Installation] and click [Next].
PowerShot A400 Camera User Guide
Page 5
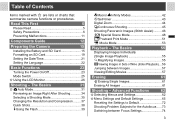
... or charts that summarize camera functions or procedures. Table of Nine (Index Playback) ... 56 Jumping between Focus Settings 74 3 The Basics 31 Auto Mode 31 Reviewing an Image Right After Shooting............34 Selecting a Shooting Mode 35 Changing the Resolution and Compression .........37 Quick Shots 38 Using the Flash 39 Macro/ Infinity...
... or charts that summarize camera functions or procedures. Table of Nine (Index Playback) ... 56 Jumping between Focus Settings 74 3 The Basics 31 Auto Mode 31 Reviewing an Image Right After Shooting............34 Selecting a Shooting Mode 35 Changing the Resolution and Compression .........37 Quick Shots 38 Using the Flash 39 Macro/ Infinity...

PowerShot A400 Camera User Guide
Page 28
... LCD monitor to [Off] (p. 74) z Green: Focusing complete z Yellow: Focusing difficulty 26 Basic Functions Using the LCD Monitor Use the LCD monitor to shoot and review images, for menu operations and playing back images.
... LCD monitor to [Off] (p. 74) z Green: Focusing complete z Yellow: Focusing difficulty 26 Basic Functions Using the LCD Monitor Use the LCD monitor to shoot and review images, for menu operations and playing back images.

PowerShot A400 Camera User Guide
Page 29
... Basic Functions zWhen a Shooting mode setting is changed, the Shooting Mode p. 35, 48 settings appear on the LCD monitor for approximately three seconds (or the review duration you set from 3 to shoot. zSetting to the , or modes turns the LCD Flash p. 39 monitor on regardless of insufficient lighting if the upper...
... Basic Functions zWhen a Shooting mode setting is changed, the Shooting Mode p. 35, 48 settings appear on the LCD monitor for approximately three seconds (or the review duration you set from 3 to shoot. zSetting to the , or modes turns the LCD Flash p. 39 monitor on regardless of insufficient lighting if the upper...
PowerShot A400 Camera User Guide
Page 34
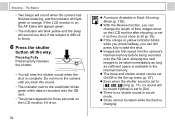
... flash is set On/Off in the internal memory. Pressing Fully Pressing fully releases the shutter. • You will light green or orange. z With the Review function, you can be taken immediately as long as sufficient space is no sound will sound one time if the subject is difficult to focus...
... flash is set On/Off in the internal memory. Pressing Fully Pressing fully releases the shutter. • You will light green or orange. z With the Review function, you can be taken immediately as long as sufficient space is no sound will sound one time if the subject is difficult to focus...

PowerShot A400 Camera User Guide
Page 36
Reviewing an Image Right After Shooting Shooting Mode After a photo is turned off (p. 65). dark conditions. - The Basics AF-assist Beam - Shooting - However, please keep on ... may emit when you press the shutter button halfway even if the AF-assist beam is taken, the image displays on displaying regardless of the review duration setting if one of the image (p. 26). • Magnifying Images (p. 55) * This cannot be turned off . In order to prevent any lamp from emitting...
Reviewing an Image Right After Shooting Shooting Mode After a photo is turned off (p. 65). dark conditions. - The Basics AF-assist Beam - Shooting - However, please keep on ... may emit when you press the shutter button halfway even if the AF-assist beam is taken, the image displays on displaying regardless of the review duration setting if one of the image (p. 26). • Magnifying Images (p. 55) * This cannot be turned off . In order to prevent any lamp from emitting...
PowerShot A400 Camera User Guide
Page 37
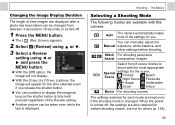
...). 35 The Basics Selecting a Shooting Mode The following modes are kept even if the shooting mode is fully held pressed regardless of the Review setting. You can continue to display the image as long as the shutter button is changed from 8 scene modes to shoot with this camera... the most of time images are displayed after a photo has been taken can be changed . z The [ (Rec.)] menu appears. 2 Select (Review) using or . 3 Select a Review setting using or and press the MENU button. z With the [Off] option, the image will appear for the scene. z You can manually adjust...
...). 35 The Basics Selecting a Shooting Mode The following modes are kept even if the shooting mode is fully held pressed regardless of the Review setting. You can continue to display the image as long as the shutter button is changed from 8 scene modes to shoot with this camera... the most of time images are displayed after a photo has been taken can be changed . z The [ (Rec.)] menu appears. 2 Select (Review) using or . 3 Select a Review setting using or and press the MENU button. z With the [Off] option, the image will appear for the scene. z You can manually adjust...

PowerShot A400 Camera User Guide
Page 68
Sets the date format to be embedded in image data when is released. 34 • Off / 3* - 10 sec. Shooting - Advanced Functions Review Sets the duration images display on the LCD monitor after the shutter button is Date Stamp selected. 52 • Off* / Date / Date & Time 66
Sets the date format to be embedded in image data when is released. 34 • Off / 3* - 10 sec. Shooting - Advanced Functions Review Sets the duration images display on the LCD monitor after the shutter button is Date Stamp selected. 52 • Off* / Date / Date & Time 66
PowerShot A400 Quick Start Guide
Page 2
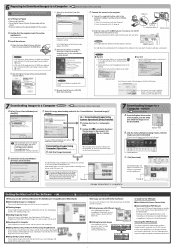
...; Using the My Camera Settings You can register images and sounds that you send. ■ Shooting with the installation while reviewing installation settings. http://www.adobe.com/products/acrobat/readstep2.html Select [Easy Installation] and click [Next]. B. d.When the ... Window C. Downloaded images will appear here. 7 Downloading Images to a Computer ➜ Camera User Guide, Software Starter Guide A.Select [Canon CameraWindow] and click [OK]. 6 Preparing to Download Images to a Computer ➜ Camera User Guide, Software Starter Guide Never connect the...
...; Using the My Camera Settings You can register images and sounds that you send. ■ Shooting with the installation while reviewing installation settings. http://www.adobe.com/products/acrobat/readstep2.html Select [Easy Installation] and click [Next]. B. d.When the ... Window C. Downloaded images will appear here. 7 Downloading Images to a Computer ➜ Camera User Guide, Software Starter Guide A.Select [Canon CameraWindow] and click [OK]. 6 Preparing to Download Images to a Computer ➜ Camera User Guide, Software Starter Guide Never connect the...


