User Guide
Page 3
... • When the camera is produced under extremely high-precision manufacturing conditions and more than 99.99% of the pixels meet design specifications, in rare cases some pixels may be defective or may appear as red or black dots. Preliminary Notes and Legal Information •... Auto Mode 3 Other Shooting Modes 4 P Mode 5 Playback Mode 6 Setting Menu 7 Accessories 8 Appendix Index 3 If covered, remove the film before contacting a Canon Customer Support Help Desk. • Although the LCD monitor is used over an extended period, it may be recorded in a way that even for any...
... • When the camera is produced under extremely high-precision manufacturing conditions and more than 99.99% of the pixels meet design specifications, in rare cases some pixels may be defective or may appear as red or black dots. Preliminary Notes and Legal Information •... Auto Mode 3 Other Shooting Modes 4 P Mode 5 Playback Mode 6 Setting Menu 7 Accessories 8 Appendix Index 3 If covered, remove the film before contacting a Canon Customer Support Help Desk. • Although the LCD monitor is used over an extended period, it may be recorded in a way that even for any...
User Guide
Page 5
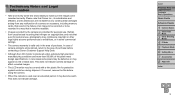
... Appendix 92 Troubleshooting 93 On-Screen Messages 95 On-Screen Information 97 Functions and Menu Tables..........99 Handling Precautions 103 Specifications 103 Index 106 Cover Preliminary Notes and Legal Information Contents: Basic Operations Basic Guide Advanced Guide 1 Camera Basics 2 ...Common, Convenient Features....32 Image Customization Features.....36 Helpful Shooting Features............37 Customizing Camera Operation...38 3 Other Shooting Modes.........39 Specific Scenes 40 Applying Special Effects 42 Special Modes for Other Purposes 45 4 P Mode 47 Shooting in This Guide 4...
... Appendix 92 Troubleshooting 93 On-Screen Messages 95 On-Screen Information 97 Functions and Menu Tables..........99 Handling Precautions 103 Specifications 103 Index 106 Cover Preliminary Notes and Legal Information Contents: Basic Operations Basic Guide Advanced Guide 1 Camera Basics 2 ...Common, Convenient Features....32 Image Customization Features.....36 Helpful Shooting Features............37 Customizing Camera Operation...38 3 Other Shooting Modes.........39 Specific Scenes 40 Applying Special Effects 42 Special Modes for Other Purposes 45 4 P Mode 47 Shooting in This Guide 4...
User Guide
Page 6
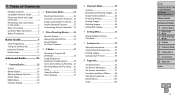
Contents: Basic Operations 4 Shoot zzUse camera-determined settings (Auto Mode 29 Shooting people well I P Portraits (= 40) Against Snow (= 40) Matching specific scenes Low Light (= 40) Applying special effects t Fireworks (= 40) Vivid Colors (= 42) Poster Effect (= 42) Fish-Eye Effect (= 42) zzWhile adjusting image settings (Live View ...
Contents: Basic Operations 4 Shoot zzUse camera-determined settings (Auto Mode 29 Shooting people well I P Portraits (= 40) Against Snow (= 40) Matching specific scenes Low Light (= 40) Applying special effects t Fireworks (= 40) Vivid Colors (= 42) Poster Effect (= 42) Fish-Eye Effect (= 42) zzWhile adjusting image settings (Live View ...
User Guide
Page 14
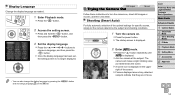
... and choosing [Language ] on the [3] tab. XXFrames displayed around any detected subjects indicate that they are in the upper right of the optimal settings for specific scenes, simply let the camera determine the subject and shooting conditions. 1 Turn the camera on , shoot still images or movies, and then view them. zzPress...
... and choosing [Language ] on the [3] tab. XXFrames displayed around any detected subjects indicate that they are in the upper right of the optimal settings for specific scenes, simply let the camera determine the subject and shooting conditions. 1 Turn the camera on , shoot still images or movies, and then view them. zzPress...
User Guide
Page 23
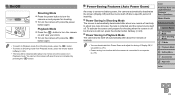
... zzPress the power button to turn the camera on and view your shots. zzTo turn the camera off when the lens is automatically deactivated after a specific period of inactivity. Power-Saving Features (Auto Power Down) As a way to conserve battery power, the camera automatically deactivates the screen (Display Off) and then...
... zzPress the power button to turn the camera on and view your shots. zzTo turn the camera off when the lens is automatically deactivated after a specific period of inactivity. Power-Saving Features (Auto Power Down) As a way to conserve battery power, the camera automatically deactivates the screen (Display Off) and then...
User Guide
Page 29
... For fully automatic selection at the subject. zzPress the power button. zzTo zoom in focus. 3 Compose the shot. zzAim the camera at optimal settings for specific scenes, simply let the camera determine the subject and shooting conditions. 1 Turn the camera on. zzPress the shutter button all the way down. Cover Preliminary...
... For fully automatic selection at the subject. zzPress the power button. zzTo zoom in focus. 3 Compose the shot. zzAim the camera at optimal settings for specific scenes, simply let the camera determine the subject and shooting conditions. 1 Turn the camera on. zzPress the shutter button all the way down. Cover Preliminary...
User Guide
Page 39
4 3 Other Shooting Modes Shoot more effectively in various scenes, and take shots enhanced with unique image effects or captured using special functions Cover Preliminary Notes and Legal Information Contents: Basic Operations Basic Guide Advanced Guide 1 Camera Basics 2 Smart Auto Mode 3 Other Shooting Modes 4 P Mode 5 Playback Mode 6 Setting Menu 7 Accessories 8 Appendix Index Specific Scenes 40 Applying Special Effects..........42 Special Modes for Other Purposes 45 39
4 3 Other Shooting Modes Shoot more effectively in various scenes, and take shots enhanced with unique image effects or captured using special functions Cover Preliminary Notes and Legal Information Contents: Basic Operations Basic Guide Advanced Guide 1 Camera Basics 2 Smart Auto Mode 3 Other Shooting Modes 4 P Mode 5 Playback Mode 6 Setting Menu 7 Accessories 8 Appendix Index Specific Scenes 40 Applying Special Effects..........42 Special Modes for Other Purposes 45 39
User Guide
Page 40
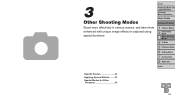
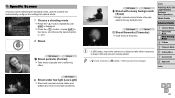
.... zzPress the button repeatedly until [ ] is [ ] (2304 x 1728) and cannot be changed. Still Images Movies t Shoot fireworks (Fireworks) zzVivid shots of people with a softening effect. Specific Scenes Choose a mode matching the shooting scene, and the camera will automatically configure the settings for optimal shots. 1 Choose a shooting mode. zzPress the button, choose...
.... zzPress the button repeatedly until [ ] is [ ] (2304 x 1728) and cannot be changed. Still Images Movies t Shoot fireworks (Fireworks) zzVivid shots of people with a softening effect. Specific Scenes Choose a mode matching the shooting scene, and the camera will automatically configure the settings for optimal shots. 1 Choose a shooting mode. zzPress the button, choose...
User Guide
Page 41
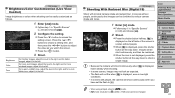
zzFollow step 1 in "Specific Scenes" (=40) and choose [ ]. 2 Shoot. zzPress the button to adjust the value as follows. 1 Enter [ ] mode. Brightness Color Tone For brighter images, adjust the level ... in [ ] mode. • [ ] mode resolution is displayed, even in low-light conditions. • In scenes with minimal camera shake and subject blur. zzFollow step 1 in "Specific Scenes" (=40) and choose [ ]. 2 Configure the setting. Cover Preliminary Notes and Legal Information Contents: Basic Operations Basic Guide Advanced Guide 1 Camera Basics 2 Smart Auto Mode...
zzFollow step 1 in "Specific Scenes" (=40) and choose [ ]. 2 Shoot. zzPress the button to adjust the value as follows. 1 Enter [ ] mode. Brightness Color Tone For brighter images, adjust the level ... in [ ] mode. • [ ] mode resolution is displayed, even in low-light conditions. • In scenes with minimal camera shake and subject blur. zzFollow step 1 in "Specific Scenes" (=40) and choose [ ]. 2 Configure the setting. Cover Preliminary Notes and Legal Information Contents: Basic Operations Basic Guide Advanced Guide 1 Camera Basics 2 Smart Auto Mode...
User Guide
Page 42
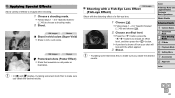
... the desired results. 42 Still Images Movies Posterized shots (Poster Effect) zzShots that resemble an old poster or illustration. zzFollow steps 1 - 2 in "Specific Scenes" (=40) to choose an effect level, and then press the button. zzFollow steps 1 - 2 in rich, vivid colors. Still Images Movies ...Shoot in vivid colors (Super Vivid) zzShots in "Specific Scenes" (=40) and choose [ ]. 2 Choose an effect level. XXA preview is shown of how your shot will look with the distorting effect ...
... the desired results. 42 Still Images Movies Posterized shots (Poster Effect) zzShots that resemble an old poster or illustration. zzFollow steps 1 - 2 in "Specific Scenes" (=40) to choose an effect level, and then press the button. zzFollow steps 1 - 2 in rich, vivid colors. Still Images Movies ...Shoot in vivid colors (Super Vivid) zzShots in "Specific Scenes" (=40) and choose [ ]. 2 Choose an effect level. XXA preview is shown of how your shot will look with the distorting effect ...
User Guide
Page 43
... sure to set the zoom before the movie is selected (=44). zzPress the button to return to the shooting screen and shoot. zzFollow step 1 in "Specific Scenes" (=40) and choose [ ]. zzMove the zoom lever to resize the frame, and press the buttons to move the frame, press the buttons again. Cover...
... sure to set the zoom before the movie is selected (=44). zzPress the button to return to the shooting screen and shoot. zzFollow step 1 in "Specific Scenes" (=40) and choose [ ]. zzMove the zoom lever to resize the frame, and press the buttons to move the frame, press the buttons again. Cover...

User Guide
Page 44
... look with the effect applied. 3 Shoot. Warm Images have a cooler tone than with the effect applied. 3 Shoot. Still Images Shooting in Monochrome Shoot images in "Specific Scenes" (=40) and choose [ ]. 2 Choose a color tone. zzPress the button, press the buttons to choose a color tone, and then press the button. Cool Images have... shots first, to make sure you obtain the desired results. XXA preview is shown of how your shot will look with [Standard]. zzFollow step 1 in "Specific Scenes" (=40) and choose [ ]. 2 Choose a color tone.
... look with the effect applied. 3 Shoot. Warm Images have a cooler tone than with the effect applied. 3 Shoot. Still Images Shooting in Monochrome Shoot images in "Specific Scenes" (=40) and choose [ ]. 2 Choose a color tone. zzPress the button, press the buttons to choose a color tone, and then press the button. Cool Images have... shots first, to make sure you obtain the desired results. XXA preview is shown of how your shot will look with [Standard]. zzFollow step 1 in "Specific Scenes" (=40) and choose [ ]. 2 Choose a color tone.
User Guide
Page 45
... button. [Blink Detection] (=37) is only available for the final shot. XXThe lamp blinks and the self-timer sound is played. 4 Join the subjects in "Specific Scenes" (=40) and choose [ ]. 2 Compose the shot and press the shutter button halfway. zzFollow steps 1 - 2 in the shooting area and look at camera to choose...
... button. [Blink Detection] (=37) is only available for the final shot. XXThe lamp blinks and the self-timer sound is played. 4 Join the subjects in "Specific Scenes" (=40) and choose [ ]. 2 Compose the shot and press the shutter button halfway. zzFollow steps 1 - 2 in the shooting area and look at camera to choose...
User Guide
Page 46
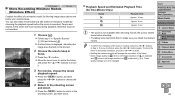
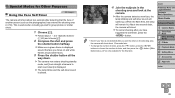
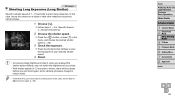
... the exposure. Still Images Shooting Long Exposures (Long Shutter) Specify a shutter speed of 1.3 seconds or slower, there will be overexposed. zzPress the button, choose [)] in "Specific Scenes" (=40) and choose [N]. 2 Choose the shutter speed. In this case, mount the camera on a tripod or take other measures to reduce noise. • If...
... the exposure. Still Images Shooting Long Exposures (Long Shutter) Specify a shutter speed of 1.3 seconds or slower, there will be overexposed. zzPress the button, choose [)] in "Specific Scenes" (=40) and choose [N]. 2 Choose the shutter speed. In this case, mount the camera on a tripod or take other measures to reduce noise. • If...
User Guide
Page 48
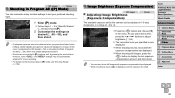
... case, try adjusting the ISO speed (=50) or activating the flash (if subjects are displayed in a range of -2 to adjust brightness (=25). zzFollow steps 1 - 2 in "Specific Scenes" (=40) and choose [G]. 2 Customize the settings as well, by pressing the movie button. zzPress the button and choose [#] in [G] mode, see "Shooting Range" (= 104...
... case, try adjusting the ISO speed (=50) or activating the flash (if subjects are displayed in a range of -2 to adjust brightness (=25). zzFollow steps 1 - 2 in "Specific Scenes" (=40) and choose [G]. 2 Customize the settings as well, by pressing the movie button. zzPress the button and choose [#] in [G] mode, see "Shooting Range" (= 104...
User Guide
Page 63
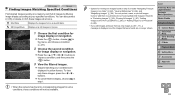
Still Images Movies Finding Images Matching Specified Conditions Find desired images quickly on a specific date. zzPress the buttons to your conditions are no corresponding images for some conditions, those conditions will not be available. • Options for image display ...
Still Images Movies Finding Images Matching Specified Conditions Find desired images quickly on a specific date. zzPress the buttons to your conditions are no corresponding images for some conditions, those conditions will not be available. • Options for image display ...
User Guide
Page 92
4 8 Appendix Helpful information when using the camera Troubleshooting 93 On-Screen Messages 95 On-Screen Information 97 Functions and Menu Tables.....99 Handling Precautions 103 Specifications 103 Cover Preliminary Notes and Legal Information Contents: Basic Operations Basic Guide Advanced Guide 1 Camera Basics 2 Smart Auto Mode 3 Other Shooting Modes 4 P Mode 5 Playback Mode 6 Setting Menu 7 Accessories 8 Appendix Index 92
4 8 Appendix Helpful information when using the camera Troubleshooting 93 On-Screen Messages 95 On-Screen Information 97 Functions and Menu Tables.....99 Handling Precautions 103 Specifications 103 Cover Preliminary Notes and Legal Information Contents: Basic Operations Basic Guide Advanced Guide 1 Camera Basics 2 Smart Auto Mode 3 Other Shooting Modes 4 P Mode 5 Playback Mode 6 Setting Menu 7 Accessories 8 Appendix Index 92
User Guide
Page 103
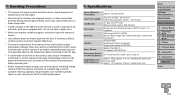
... Mode 6 Setting Menu 7 Accessories 8 Appendix Index 103 If cleaning is difficult, contact a Canon Customer Support Help Desk. • To prevent condensation from forming on the camera after sudden temperature changes (when the camera is a high-precision electronic device. Specifications Camera Effective Pixels (Max.) Lens Focal Length LCD Monitor File Format Data Type...
... Mode 6 Setting Menu 7 Accessories 8 Appendix Index 103 If cleaning is difficult, contact a Canon Customer Support Help Desk. • To prevent condensation from forming on the camera after sudden temperature changes (when the camera is a high-precision electronic device. Specifications Camera Effective Pixels (Max.) Lens Focal Length LCD Monitor File Format Data Type...
User Guide
Page 105
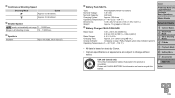
... ion/polymer battery that powers the product is based on how to change without notice. Please call 1-800-8-BATTERY for information on tests by Canon. • Camera specifications or appearance are subject to recycle this battery. Continuous Shooting Speed Shooting Mode Speed G Approx. 0.8 shots/sec. Shutter Speed [ ] mode, automatically set range 1 - 1/2000...
... ion/polymer battery that powers the product is based on how to change without notice. Please call 1-800-8-BATTERY for information on tests by Canon. • Camera specifications or appearance are subject to recycle this battery. Continuous Shooting Speed Shooting Mode Speed G Approx. 0.8 shots/sec. Shutter Speed [ ] mode, automatically set range 1 - 1/2000...