Advanced Owners Manual
Page 2
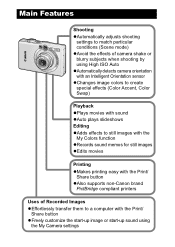
... camera shake or blurry subjects when shooting by using High ISO Auto zAutomatically detects camera orientation with an Intelligent Orientation sensor zChanges image colors to create special effects (Color Accent, Color Swap) Playback zPlays movies with sound zAuto plays slideshows Editing zAdds effects to still images with the My Colors function zRecords sound memos for still images zEdits movies Printing zMakes printing easy with the Print/ Share button zAlso supports non-Canon brand PictBridge compliant printers Uses of Recorded Images zEffortlessly transfer...
... camera shake or blurry subjects when shooting by using High ISO Auto zAutomatically detects camera orientation with an Intelligent Orientation sensor zChanges image colors to create special effects (Color Accent, Color Swap) Playback zPlays movies with sound zAuto plays slideshows Editing zAdds effects to still images with the My Colors function zRecords sound memos for still images zEdits movies Printing zMakes printing easy with the Print/ Share button zAlso supports non-Canon brand PictBridge compliant printers Uses of Recorded Images zEffortlessly transfer...

Advanced Owners Manual
Page 5
Switching between Focusing Modes 46 Shooting Hard-to-Focus Subjects (Focus Lock, AF Lock) . .47 Locking the Exposure Setting (AE Lock 48 Locking the Flash Exposure Setting (FE Lock 49 Switching between Metering Modes 50 Adjusting the Exposure Compensation 51 Shooting in Long Shutter Mode 52 Adjusting the Tone (White Balance 54 Shooting in a My Colors Mode 57 Changing Colors 59 Adjusting the ISO Speed 64 Setting the Auto Rotate Function 65 Creating an Image Destination (Folder 66 Resetting the File Number 67 Playback/Erasing 69 Magnifying Images 69 Viewing Images in Sets of Nine ...
Switching between Focusing Modes 46 Shooting Hard-to-Focus Subjects (Focus Lock, AF Lock) . .47 Locking the Exposure Setting (AE Lock 48 Locking the Flash Exposure Setting (FE Lock 49 Switching between Metering Modes 50 Adjusting the Exposure Compensation 51 Shooting in Long Shutter Mode 52 Adjusting the Tone (White Balance 54 Shooting in a My Colors Mode 57 Changing Colors 59 Adjusting the ISO Speed 64 Setting the Auto Rotate Function 65 Creating an Image Destination (Folder 66 Resetting the File Number 67 Playback/Erasing 69 Magnifying Images 69 Viewing Images in Sets of Nine ...
Advanced Owners Manual
Page 6
... My Camera Settings 92 Troubleshooting 94 Camera 94 When the power is turned on 94 LCD monitor 95 Shooting 96 Shooting Movies 100 Playback 101 Battery/Battery Charger 102 TV monitor output 102 Printing on Direct Print Compatible Printers 103 List of Messages 104 Appendix 107 Battery Handling 107 Handling the Memory Card 109 Using an AC Adapter Kit (Sold Separately 111 Using an Externally Mounted Flash (Sold Separately) . . . . 112 Camera Care and Maintenance 114 Specifications 115 INDEX 123 Functions...
... My Camera Settings 92 Troubleshooting 94 Camera 94 When the power is turned on 94 LCD monitor 95 Shooting 96 Shooting Movies 100 Playback 101 Battery/Battery Charger 102 TV monitor output 102 Printing on Direct Print Compatible Printers 103 List of Messages 104 Appendix 107 Battery Handling 107 Handling the Memory Card 109 Using an AC Adapter Kit (Sold Separately 111 Using an Externally Mounted Flash (Sold Separately) . . . . 112 Camera Care and Maintenance 114 Specifications 115 INDEX 123 Functions...
Advanced Owners Manual
Page 24
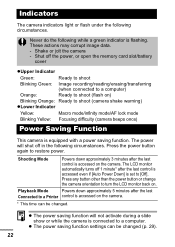
...Macro mode/infinity mode/AF lock mode Blinking Yellow: Focusing difficulty (camera beeps once) Power Saving Function This camera is connected to [Off]. The LCD monitor automatically turns off the power, or open the memory card slot/battery cover zUpper Indicator Green: Ready to shoot Blinking Green: Image recording/reading/erasing/transferring (when connected to a computer) Orange: Ready to shoot (flash on) Blinking Orange: Ready to a Printer control is accessed on the camera. * This time can be changed (p. 29). 22 Indicators The camera indicators light...
...Macro mode/infinity mode/AF lock mode Blinking Yellow: Focusing difficulty (camera beeps once) Power Saving Function This camera is connected to [Off]. The LCD monitor automatically turns off the power, or open the memory card slot/battery cover zUpper Indicator Green: Ready to shoot Blinking Green: Image recording/reading/erasing/transferring (when connected to a computer) Orange: Ready to shoot (flash on) Blinking Orange: Ready to a Printer control is accessed on the camera. * This time can be changed (p. 29). 22 Indicators The camera indicators light...
Advanced Owners Manual
Page 31
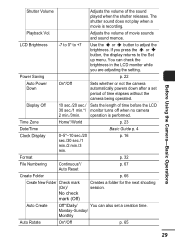
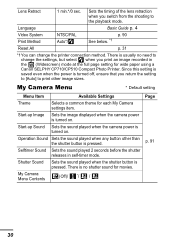
... +7 Use the or button to the Set up menu. Power Saving p. 22 Auto Power Down On*/Off Sets whether or not the camera automatically powers down after a set a creation time. Format p. 32 File Numbering Continuous*/ Auto Reset p. 67 Create Folder p. 66 Create New Folder Check mark (On)/ No check mark (Off) Creates a folder for the next shooting session. You can also set period of the sound played when the shutter releases. Time Zone Home*/World p. 23 Date/Time Basic Guide p. 4 Clock Display...
... +7 Use the or button to the Set up menu. Power Saving p. 22 Auto Power Down On*/Off Sets whether or not the camera automatically powers down after a set a creation time. Format p. 32 File Numbering Continuous*/ Auto Reset p. 67 Create Folder p. 66 Create New Folder Check mark (On)/ No check mark (Off) Creates a folder for the next shooting session. You can also set period of the sound played when the shutter releases. Time Zone Home*/World p. 23 Date/Time Basic Guide p. 4 Clock Display...
Advanced Owners Manual
Page 32
... Image Sets the image displayed when the camera power is usually no shutter sound for movies. Operation Sound Sets the sound played when any button other image sizes. Shutter Sound Sets the sound played when the shutter button is pressed. There is turned off, ensure that you return the setting to [Auto] to the playback mode. Language Basic Guide p. 4 Video System Print Method NTSC/PAL Auto*/ p. 90 See below. *1 Reset All p. 31 *1You can change the settings, but select when you switch from the shooting to print other than the shutter button...
... Image Sets the image displayed when the camera power is usually no shutter sound for movies. Operation Sound Sets the sound played when any button other image sizes. Shutter Sound Sets the sound played when the shutter button is pressed. There is turned off, ensure that you return the setting to [Auto] to the playback mode. Language Basic Guide p. 4 Video System Print Method NTSC/PAL Auto*/ p. 90 See below. *1 Reset All p. 31 *1You can change the settings, but select when you switch from the shooting to print other than the shutter button...
Advanced Owners Manual
Page 37
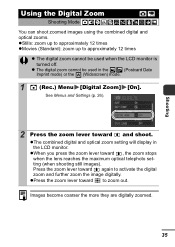
... the digital zoom and further zoom the image digitally. zThe combined digital and optical zoom setting will display in the (Postcard Date Imprint mode) or the (Widescreen) mode. 1 (Rec.) Menu [Digital Zoom] [On]. z The digital zoom cannot be used in the LCD monitor. Shooting Using the Digital Zoom Shooting Mode You can shoot zoomed images using the combined digital and optical zooms. zStills: zoom up to approximately 12 times zMovies (Standard): zoom up to approximately 12 times z The digital zoom cannot be used when the LCD monitor is turned off...
... the digital zoom and further zoom the image digitally. zThe combined digital and optical zoom setting will display in the (Postcard Date Imprint mode) or the (Widescreen) mode. 1 (Rec.) Menu [Digital Zoom] [On]. z The digital zoom cannot be used in the LCD monitor. Shooting Using the Digital Zoom Shooting Mode You can shoot zoomed images using the combined digital and optical zooms. zStills: zoom up to approximately 12 times zMovies (Standard): zoom up to approximately 12 times z The digital zoom cannot be used when the LCD monitor is turned off...
Advanced Owners Manual
Page 44
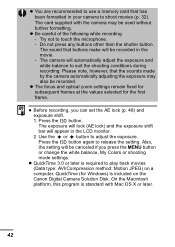
... exposure shift bar will automatically adjust the exposure and white balance to shoot movies (p. 32). The card supplied with Mac OS X or later. 42 Do not press any buttons other than the shutter button. z The focus and optical zoom settings remain fixed for subsequent frames at the values selected for Windows) is required to adjust the exposure. Use the or button to play back movies (Data type: AVI/Compression method: Motion JPEG) on the Canon Digital Camera Solution Disk...
... exposure shift bar will automatically adjust the exposure and white balance to shoot movies (p. 32). The card supplied with Mac OS X or later. 42 Do not press any buttons other than the shutter button. z The focus and optical zoom settings remain fixed for subsequent frames at the values selected for Windows) is required to adjust the exposure. Use the or button to play back movies (Data type: AVI/Compression method: Motion JPEG) on the Canon Digital Camera Solution Disk...
Advanced Owners Manual
Page 45
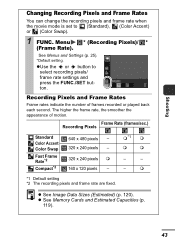
... Frame Rates Frame rates indicate the number of motion. z See Image Data Sizes (Estimated) (p. 120). Frame Rate (frames/sec.) Recording Pixels Standard Color Accent Color Swap Fast Frame Rate*2 Compact*2 640 x 480 pixels - 320 x 240 pixels - 320 x 240 pixels 160 x 120 pixels - *1 - - - *1 Default setting *2 The recording pixels and frame rate are fixed. Shooting Changing Recording Pixels and Frame Rates...
... Frame Rates Frame rates indicate the number of motion. z See Image Data Sizes (Estimated) (p. 120). Frame Rate (frames/sec.) Recording Pixels Standard Color Accent Color Swap Fast Frame Rate*2 Compact*2 640 x 480 pixels - 320 x 240 pixels - 320 x 240 pixels 160 x 120 pixels - *1 - - - *1 Default setting *2 The recording pixels and frame rate are fixed. Shooting Changing Recording Pixels and Frame Rates...
Advanced Owners Manual
Page 46
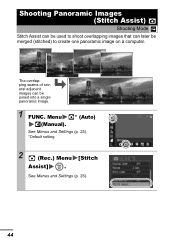
Menu * (Auto) (Manual). See Menus and Settings (p. 25). *Default setting. 2 (Rec.) Menu [Stitch Assist] . Shooting Panoramic Images (Stitch Assist) Shooting Mode Stitch Assist can be used to shoot overlapping images that can be merged (stitched) to create one panoramic image on a computer. The overlapping seams of several adjacent images can later be joined into a single panoramic image. 1 FUNC. See Menus and Settings (p. 26). 44
Menu * (Auto) (Manual). See Menus and Settings (p. 25). *Default setting. 2 (Rec.) Menu [Stitch Assist] . Shooting Panoramic Images (Stitch Assist) Shooting Mode Stitch Assist can be used to shoot overlapping images that can be merged (stitched) to create one panoramic image on a computer. The overlapping seams of several adjacent images can later be joined into a single panoramic image. 1 FUNC. See Menus and Settings (p. 26). 44
Advanced Owners Manual
Page 58
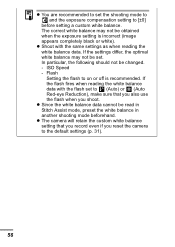
... white balance data. z Shoot with the flash set the shooting mode to and the exposure compensation setting to [±0] before setting a custom white balance. ISO Speed - If the settings differ, the optimal white balance may not be set. z The camera will retain the custom white balance setting that you also use the flash when you reset the camera to the default settings (p. 31). 56 z You are recommended to set to (Auto) or (Auto Red-eye Reduction), make sure that you record even if you shoot. The correct white balance...
... white balance data. z Shoot with the flash set the shooting mode to and the exposure compensation setting to [±0] before setting a custom white balance. ISO Speed - If the settings differ, the optimal white balance may not be set. z The camera will retain the custom white balance setting that you also use the flash when you reset the camera to the default settings (p. 31). 56 z You are recommended to set to (Auto) or (Auto Red-eye Reduction), make sure that you record even if you shoot. The correct white balance...
Advanced Owners Manual
Page 66
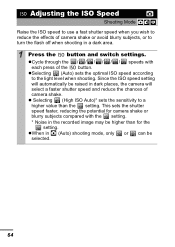
... setting. zSelecting (Auto) sets the optimal ISO speed according to turn the flash off when shooting in the recorded image may be selected. 64 This sets the shutter speed faster, reducing the potential for camera shake or blurry subjects compared with each press of the button. zWhen in dark places, the camera will select a faster shutter speed and reduce the chances of camera shake. Adjusting the ISO Speed Shooting Mode Raise the ISO speed to use a fast shutter speed...
... setting. zSelecting (Auto) sets the optimal ISO speed according to turn the flash off when shooting in the recorded image may be selected. 64 This sets the shutter speed faster, reducing the potential for camera shake or blurry subjects compared with each press of the button. zWhen in dark places, the camera will select a faster shutter speed and reduce the chances of camera shake. Adjusting the ISO Speed Shooting Mode Raise the ISO speed to use a fast shutter speed...
Advanced Owners Manual
Page 85
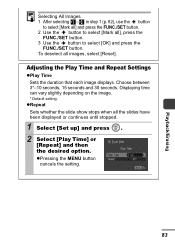
... [Play Time] or [Repeat] and then the desired option. zRepeat Sets whether the slide show stops when all images, select [Reset]. in step 1 (p. 82), use the button to select [Mark all] and press the FUNC./SET button. 2 Use the button to select [Mark all], press the FUNC./SET button. 3 Use the button to select [OK] and press the FUNC./SET button. Displaying time can vary slightly depending on the image. * Default setting. Playback/Erasing...
... [Play Time] or [Repeat] and then the desired option. zRepeat Sets whether the slide show stops when all images, select [Reset]. in step 1 (p. 82), use the button to select [Mark all] and press the FUNC./SET button. 2 Use the button to select [Mark all], press the FUNC./SET button. 3 Use the button to select [OK] and press the FUNC./SET button. Displaying time can vary slightly depending on the image. * Default setting. Playback/Erasing...
Advanced Owners Manual
Page 91
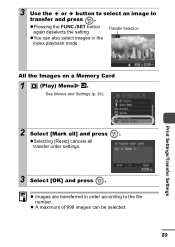
See Menus and Settings (p. 26). z A maximum of 998 images can also select images in order according to transfer and press . zPressing the FUNC./SET button again deselects the setting. z Images are transferred in the index playback mode. zYou can be selected. 89 Print Settings/Transfer Settings 2 Select [Mark all transfer order settings. 3 Select [OK] and press . zSelecting [Reset] cancels all ] and press . 3 Use the or button to select an image to the file number. Transfer Selection All the Images on a Memory Card 1 (Play) Menu .
See Menus and Settings (p. 26). z A maximum of 998 images can also select images in order according to transfer and press . zPressing the FUNC./SET button again deselects the setting. z Images are transferred in the index playback mode. zYou can be selected. 89 Print Settings/Transfer Settings 2 Select [Mark all transfer order settings. 3 Select [OK] and press . zSelecting [Reset] cancels all ] and press . 3 Use the or button to select an image to the file number. Transfer Selection All the Images on a Memory Card 1 (Play) Menu .
Advanced Owners Manual
Page 96
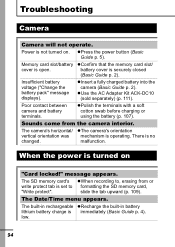
.... Troubleshooting Camera Camera will not operate. Power is turned on . When the power is not turned on "Card locked!" slide the tab upward (p. 109). zInsert a fully charged battery into the camera (Basic Guide p. 2). The built-in rechargeable zRecharge the built-in battery lithium battery charge is set to , erasing from the camera interior. Insufficient battery voltage ("Change the battery pack" message displays). Sounds come from or write protect tab is immediately (Basic Guide p. 4). message appears. The SD memory card's zWhen recording to formatting...
.... Troubleshooting Camera Camera will not operate. Power is turned on . When the power is not turned on "Card locked!" slide the tab upward (p. 109). zInsert a fully charged battery into the camera (Basic Guide p. 2). The built-in rechargeable zRecharge the built-in battery lithium battery charge is set to , erasing from the camera interior. Insufficient battery voltage ("Change the battery pack" message displays). Sounds come from or write protect tab is immediately (Basic Guide p. 4). message appears. The SD memory card's zWhen recording to formatting...
Advanced Owners Manual
Page 101
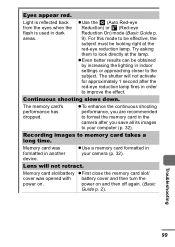
... look directly at the red-eye reduction lamp. Continuous shooting slows down. Memory card was opened with battery cover and then turn the power on and then off again. (Basic Guide p. 2). Recording images to the subject. zUse a memory card formatted in another device. zEven better results can be looking right at the lamp. Troubleshooting 99 zUse the (Auto Red-eye Reduction) or (Red-eye Reduction On) mode (Basic Guide p. 9). For this mode to your camera (p. 32). Eyes appear red...
... look directly at the red-eye reduction lamp. Continuous shooting slows down. Memory card was opened with battery cover and then turn the power on and then off again. (Basic Guide p. 2). Recording images to the subject. zUse a memory card formatted in another device. zEven better results can be looking right at the lamp. Troubleshooting 99 zUse the (Auto Red-eye Reduction) or (Red-eye Reduction On) mode (Basic Guide p. 9). For this mode to your camera (p. 32). Eyes appear red...
Advanced Owners Manual
Page 106
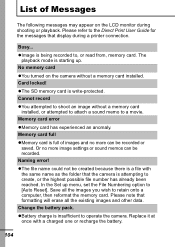
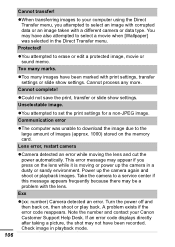
... name as the folder that the camera is full of Messages The following messages may appear on the camera without a memory card installed, or attempted to attach a sound memo to operate the camera. Change the battery pack. Card locked! Please note that display during shooting or playback. zBattery charge is write-protected. No memory card zYou turned on the LCD monitor during a printer connection. Please refer to the Direct Print User Guide for the messages that formatting will erase all the images you wish to...
... name as the folder that the camera is full of Messages The following messages may appear on the camera without a memory card installed, or attempted to attach a sound memo to operate the camera. Change the battery pack. Card locked! Please note that display during shooting or playback. zBattery charge is write-protected. No memory card zYou turned on the LCD monitor during a printer connection. Please refer to the Direct Print User Guide for the messages that formatting will erase all the images you wish to...
Advanced Owners Manual
Page 108
... print settings for a non-JPEG image. Lens error, restart camera zCamera detected an error while moving or power up the camera again and shoot or playback images. Exx z(xx: number) Camera detected an error. Turn the power off and then back on the memory card. Unselectable image. This error message may have been marked with a different camera or data type. zYou attempted to erase or edit a protected image, movie or sound memo. If an error code displays directly after taking a picture, the shot may be a problem with the lens...
... print settings for a non-JPEG image. Lens error, restart camera zCamera detected an error while moving or power up the camera again and shoot or playback images. Exx z(xx: number) Camera detected an error. Turn the power off and then back on the memory card. Unselectable image. This error message may have been marked with a different camera or data type. zYou attempted to erase or edit a protected image, movie or sound memo. If an error code displays directly after taking a picture, the shot may be a problem with the lens...

Advanced Owners Manual
Page 125
..., 18 ISO Speed 64 J JUMP (Image Search 71 123 INDEX A AC Adapter Kit ACK-DC10... 111 AE Lock 48 AF Frame 18, 46 AF Lock 47 AF-assist Beam 27 AiAF 46 Auto Play (Slide Show 80 Auto Rotate Function 65 AV Cable 90 B Battery Battery Capacity 118 Charging 108, Basic 1 Handling 107 Installing Basic 2 C Clock Display 16 Compression 34 Continuous Shooting 36 Create Folder 66 Custom White Balance........... 55 D Date/Time Setting Basic 4 Using the...
..., 18 ISO Speed 64 J JUMP (Image Search 71 123 INDEX A AC Adapter Kit ACK-DC10... 111 AE Lock 48 AF Frame 18, 46 AF Lock 47 AF-assist Beam 27 AiAF 46 Auto Play (Slide Show 80 Auto Rotate Function 65 AV Cable 90 B Battery Battery Capacity 118 Charging 108, Basic 1 Handling 107 Installing Basic 2 C Clock Display 16 Compression 34 Continuous Shooting 36 Create Folder 66 Custom White Balance........... 55 D Date/Time Setting Basic 4 Using the...
Advanced Owners Manual
Page 131
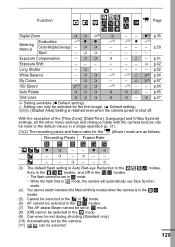
... exception of the [Time Zone], [Date/Time], [Language] and [Video System] settings, all the other menu settings and changes made with the camera buttons can be selected for the (Movie) mode are as follows. p.52 White Balance - -(10) -(10) U (5) p.54 My Colors - - - U (5) p.57 ISO Speed (11) -(10) -(10) - - p.64 Auto Rotate U - Function Page Digital Zoom ...
... exception of the [Time Zone], [Date/Time], [Language] and [Video System] settings, all the other menu settings and changes made with the camera buttons can be selected for the (Movie) mode are as follows. p.52 White Balance - -(10) -(10) U (5) p.54 My Colors - - - U (5) p.57 ISO Speed (11) -(10) -(10) - - p.64 Auto Rotate U - Function Page Digital Zoom ...


