
mini320 series Direct Photo Guide
Page 1
Photo Printer series Direct Photo Guide Table of Contents Introduction 1 How to Use the Documentation Provided 2 Printer Parts and Their Functions 3 Loading Printing Paper 8 Printing from a Memory Card 10 Printing Photographs Directly from a Compliant Device 21 Printing Photographs from a Wireless Communication Device 25 Routine Maintenance 27 Changing the Printer Settings 33 Troubleshooting 35 Appendix 47
Photo Printer series Direct Photo Guide Table of Contents Introduction 1 How to Use the Documentation Provided 2 Printer Parts and Their Functions 3 Loading Printing Paper 8 Printing from a Memory Card 10 Printing Photographs Directly from a Compliant Device 21 Printing Photographs from a Wireless Communication Device 25 Routine Maintenance 27 Changing the Printer Settings 33 Troubleshooting 35 Appendix 47
mini320 series Direct Photo Guide
Page 6
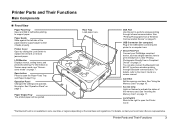
...Tray The printed paper will be ejected. See "Using the Memory Card" on the local laws and regulations. See "Inserting the Memory Card" on page 25. Operation Panel Changes the settings and operates the printer. Direct Print Port Connect your local Canon Service representative. For... details, contact your PictBridge compliant device, such as a digital camera, here to open the Paper Feed Tray and Paper Output Tray. Paper Guide Slide against the left side of the memory card....
...Tray The printed paper will be ejected. See "Using the Memory Card" on the local laws and regulations. See "Inserting the Memory Card" on page 25. Operation Panel Changes the settings and operates the printer. Direct Print Port Connect your local Canon Service representative. For... details, contact your PictBridge compliant device, such as a digital camera, here to open the Paper Feed Tray and Paper Output Tray. Paper Guide Slide against the left side of the memory card....

mini320 series Direct Photo Guide
Page 7
... Tank" on page 29. Print Head Holder The print head is stained. AC Adapter Connector Connector used to attach the optional Portable Kit. See "The Paper Thickness Lever position is incorrect." If you have accidentally pulled them up . See "Aligning the Print Head" on page 31...
... Tank" on page 29. Print Head Holder The print head is stained. AC Adapter Connector Connector used to attach the optional Portable Kit. See "The Paper Thickness Lever position is incorrect." If you have accidentally pulled them up . See "Aligning the Print Head" on page 31...

mini320 series Direct Photo Guide
Page 8
... 2 Turn the Easy-Scroll Wheel to navigate menus with the Easy-Scroll Wheel, {, }, [, and ] buttons, and the OK button, taking the HOME screen as paper-out or ink-out, occurs. See "How to Print-Select and print" on or off. (1) Home screen (1) (2) Left Function button (3) Right Function button (2) ...printer is in operation. Dismisses the error message and resumes the printer's normal operation after resolving a printing error or removing jammed paper. (4) [+][-] buttons Specifies the number of the desired menu to Navigate Menus on the LCD" on the LCD See "How to position (A).
... 2 Turn the Easy-Scroll Wheel to navigate menus with the Easy-Scroll Wheel, {, }, [, and ] buttons, and the OK button, taking the HOME screen as paper-out or ink-out, occurs. See "How to Print-Select and print" on or off. (1) Home screen (1) (2) Left Function button (3) Right Function button (2) ...printer is in operation. Dismisses the error message and resumes the printer's normal operation after resolving a printing error or removing jammed paper. (4) [+][-] buttons Specifies the number of the desired menu to Navigate Menus on the LCD" on the LCD See "How to position (A).
mini320 series Direct Photo Guide
Page 9
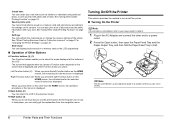
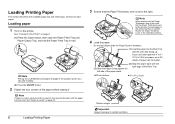
... saved on a memory card and print photos according to the settings on the HOME screen, the introductions for the frequent use or how to load paper, you can display photos saved on a memory card on the other end to a power outlet. 2 Press the Open button, then open the... Paper Feed Tray and the Paper Output Tray, and then fold the Paper Feed Tray in the AC Adapter and connect the other than the HOME screen, the operation procedure or the menus...
... saved on a memory card and print photos according to the settings on the HOME screen, the introductions for the frequent use or how to load paper, you can display photos saved on a memory card on the other end to a power outlet. 2 Press the Open button, then open the... Paper Feed Tray and the Paper Output Tray, and then fold the Paper Feed Tray in the AC Adapter and connect the other than the HOME screen, the operation procedure or the menus...
mini320 series Direct Photo Guide
Page 10
... and Their Functions 7 z The Access lamp of the memory card is not operating. z The printer is not flashing. Push down the LCD Monitor. 2 Close the Paper Feed Tray and then the...
... and Their Functions 7 z The Access lamp of the memory card is not operating. z The printer is not flashing. Push down the LCD Monitor. 2 Close the Paper Feed Tray and then the...
mini320 series Direct Photo Guide
Page 11
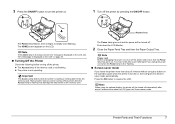
...the LCD Monitor and adjust its angle in half. Note If paper is stained. Return the Paper Thickness Lever to load paper. See "Paper is set the Paper Thickness Lever to 20 sheets of paper can see it clearly. (2) Press the ON/OFF button....Paper This section describes the available page size and media type, and how to the right after printing. 4 Load the paper. Loading paper 1 Turn on page 6. (1) Press the Open button, then open the Paper Feed Tray and Paper Output Tray, and fold the Paper Feed Tray in the position where you use Canon genuine 4" x 6" / 101.6 x 152.4 mm paper...
...the LCD Monitor and adjust its angle in half. Note If paper is stained. Return the Paper Thickness Lever to load paper. See "Paper is set the Paper Thickness Lever to 20 sheets of paper can see it clearly. (2) Press the ON/OFF button....Paper This section describes the available page size and media type, and how to the right after printing. 4 Load the paper. Loading paper 1 Turn on page 6. (1) Press the Open button, then open the Paper Feed Tray and Paper Output Tray, and fold the Paper Feed Tray in the position where you use Canon genuine 4" x 6" / 101.6 x 152.4 mm paper...
mini320 series Direct Photo Guide
Page 12
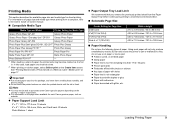
... Tray Load Limit We recommend that you remove the previously printed sheet from a computer, refer to purchase some Canon genuine papers depending on -screen manual. „ Compatible Media Type Media Type and Model Printer Setting for Page Size Credit card 4"x6"(101.6x152.4) 5"x7"(127.0x177.8) ... Saved on a Memory Card-Sticker print" on the Create item screen. Printing Media This section describes the available page size and media type for each Canon genuine paper, visit our website.
... Tray Load Limit We recommend that you remove the previously printed sheet from a computer, refer to purchase some Canon genuine papers depending on -screen manual. „ Compatible Media Type Media Type and Model Printer Setting for Page Size Credit card 4"x6"(101.6x152.4) 5"x7"(127.0x177.8) ... Saved on a Memory Card-Sticker print" on the Create item screen. Printing Media This section describes the available page size and media type for each Canon genuine paper, visit our website.
mini320 series Direct Photo Guide
Page 15
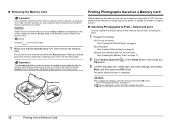
...the memory card. See "Turning On/Off the Printer" on the screen, make sure that the Access lamp is not displayed on page 6. (2) Load paper. See "Inserting the Memory Card" on the printer's LCD. Hold the part of the memory card that the Access lamp is flashing. The photo ... lit, then remove the memory card. on page 8. (3) Insert the memory card into the Trash. 1 Make sure that is displayed. See "Loading Printing Paper" on the Home screen, then press the 3 Confirm the page size, media type, and other settings, then select Next, and then press the OK button...
...the memory card. See "Turning On/Off the Printer" on the screen, make sure that the Access lamp is not displayed on page 6. (2) Load paper. See "Inserting the Memory Card" on the printer's LCD. Hold the part of the memory card that the Access lamp is flashing. The photo ... lit, then remove the memory card. on page 8. (3) Insert the memory card into the Trash. 1 Make sure that is displayed. See "Loading Printing Paper" on the Home screen, then press the 3 Confirm the page size, media type, and other settings, then select Next, and then press the OK button...

mini320 series Direct Photo Guide
Page 16
... Function button and confirm the selected photos and number of each photo. See "Print Setting Screens" on the printer. Examples: . See "Loading Printing Paper" on page 6. (2) Load paper. Note You can do... See "Searching for Photos with the shooting date. ON are set, only the shooting date will be printed. See "Turning...
... Function button and confirm the selected photos and number of each photo. See "Print Setting Screens" on the printer. Examples: . See "Loading Printing Paper" on page 6. (2) Load paper. Note You can do... See "Searching for Photos with the shooting date. ON are set, only the shooting date will be printed. See "Turning...
mini320 series Direct Photo Guide
Page 18
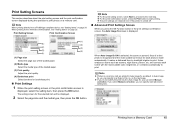
... settings confirmation screen, the Auto image fix screen is displayed. (1) (1) (2) (2) (3) (3) (4) (4) (1) Page size Select the page size of the loaded paper. (2) Media type Select the media type of a shot photo is turned off. „ Advanced Print Settings Screen When you can select Manual correction. If you...fix, you can specify only Date or File no. When Auto image fix ON is selected, the scene or person's face of the loaded paper. (3) Print quality Adjust the print quality. (4) Borderless print Select bordered or borderless print. „ Print Settings 1 When the print setting...
... settings confirmation screen, the Auto image fix screen is displayed. (1) (1) (2) (2) (3) (3) (4) (4) (1) Page size Select the page size of the loaded paper. (2) Media type Select the media type of a shot photo is turned off. „ Advanced Print Settings Screen When you can select Manual correction. If you...fix, you can specify only Date or File no. When Auto image fix ON is selected, the scene or person's face of the loaded paper. (3) Print quality Adjust the print quality. (4) Borderless print Select bordered or borderless print. „ Print Settings 1 When the print setting...

mini320 series Direct Photo Guide
Page 19
... Brightens a darkened face on page 8. (3) Insert the memory card into the Card Slot. z Color hue Adjust color hue. See "Loading Printing Paper" on the photo taken against the light. Printing menus on the Special photo print screen: z ID photo size See "Printing ID Photo-ID photo.... 2 Select Create item or Special photo print screen, then press the OK button. See "Inserting the Memory Card" on page 6. (2) Load paper. z Image optimizer Corrects and smooths the jagged contours for Photos with the shooting date. on page 18. z Red eye correc. z Effects Applies...
... Brightens a darkened face on page 8. (3) Insert the memory card into the Card Slot. z Color hue Adjust color hue. See "Loading Printing Paper" on the photo taken against the light. Printing menus on the Special photo print screen: z ID photo size See "Printing ID Photo-ID photo.... 2 Select Create item or Special photo print screen, then press the OK button. See "Inserting the Memory Card" on page 6. (2) Load paper. z Image optimizer Corrects and smooths the jagged contours for Photos with the shooting date. on page 18. z Red eye correc. z Effects Applies...

mini320 series Direct Photo Guide
Page 20
... the Print button. z When printing stickers, be printed. z Right Function button: Rotate the printing area. Caution Print the photo on the larger-sized paper than your favorite photo with a frame. 1 Select Framed photo print on the printed calendar, press the left Function button in the frame selection screen. ...Wheel: Sets the printing area. If you want to print the file no . „ Printing Stickers with your favorite photo with a frame on the Canon genuine Photo Stickers. 1 Select Sticker print on page 19. „ Printing ID Photo-ID photo size print You can use the { or } ...
... the Print button. z When printing stickers, be printed. z Right Function button: Rotate the printing area. Caution Print the photo on the larger-sized paper than your favorite photo with a frame. 1 Select Framed photo print on the printed calendar, press the left Function button in the frame selection screen. ...Wheel: Sets the printing area. If you want to print the file no . „ Printing Stickers with your favorite photo with a frame on the Canon genuine Photo Stickers. 1 Select Sticker print on page 19. „ Printing ID Photo-ID photo size print You can use the { or } ...

mini320 series Direct Photo Guide
Page 21
... printing layout Print Photo Select: Prints only photos specified with DPOF (cannot be specified from the Operation Panel) Number of copies: Prints the number of paper depends on the page size, as which photos are sorted follows that were specified as "Standard Print" with DPOF using index printing, the number of...
... printing layout Print Photo Select: Prints only photos specified with DPOF (cannot be specified from the Operation Panel) Number of copies: Prints the number of paper depends on the page size, as which photos are sorted follows that were specified as "Standard Print" with DPOF using index printing, the number of...

mini320 series Direct Photo Guide
Page 22
... show You can do... z To change the way photos are other useful functions to match the paper, or be cropped is specified, and the original photo is displayed on the screen, you change the paper settings after specifying the page size, media type, and bordered or borderless printing in the print setting...
... show You can do... z To change the way photos are other useful functions to match the paper, or be cropped is specified, and the original photo is displayed on the screen, you change the paper settings after specifying the page size, media type, and bordered or borderless printing in the print setting...
mini320 series Direct Photo Guide
Page 24
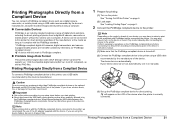
Printing Photographs Directly from a Compliant Device 1 Prepare for direct printing. See "Loading Printing Paper" on the device or select Play mode manually after connecting the device to the printer. When disconnecting the USB cable between the PictBridge...from a Compliant Device You can be sure to charge it complies with PictBridge before connecting it on the printer. Note Depending on page 6. (2) Load paper. To connect a PictBridge compliant device to this mark is an industry standard enabling a range of digital photo solutions, including the direct printing of the...
Printing Photographs Directly from a Compliant Device 1 Prepare for direct printing. See "Loading Printing Paper" on the device or select Play mode manually after connecting the device to the printer. When disconnecting the USB cable between the PictBridge...from a Compliant Device You can be sure to charge it complies with PictBridge before connecting it on the printer. Note Depending on page 6. (2) Load paper. To connect a PictBridge compliant device to this mark is an industry standard enabling a range of digital photo solutions, including the direct printing of the...

mini320 series Direct Photo Guide
Page 25
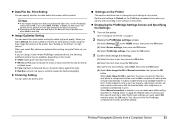
... compliant device. Note z In the following description, names of your PictBridge compliant device. Also, when some items are given according to purchase some Canon genuine papers depending on sticker paper, see "Layout Setting" below . z Layout Setting Various layout options are applied. z When printing onto Photo Stickers (PS-101) (16-up , printing on Photo...
... compliant device. Note z In the following description, names of your PictBridge compliant device. Also, when some items are given according to purchase some Canon genuine papers depending on sticker paper, see "Layout Setting" below . z Layout Setting Various layout options are applied. z When printing onto Photo Stickers (PS-101) (16-up , printing on Photo...
mini320 series Direct Photo Guide
Page 26
...Off. It makes a darkened face by flash photography. and corrects each scene with specified settings. z Date/File No. z Depending on the paper size and layout, the date will be available, depending on page 24. If you select On, photos are using the Auto image fix ...Default on black areas. Printing Photographs Directly from the PictBridge compliant device with the most suitable correction for each photo is made using a Canon-brand PictBridge compliant device, the following additional options may be printed over the date printed by the device's function. See "Setting on ...
...Off. It makes a darkened face by flash photography. and corrects each scene with specified settings. z Date/File No. z Depending on the paper size and layout, the date will be available, depending on page 24. If you select On, photos are using the Auto image fix ...Default on black areas. Printing Photographs Directly from the PictBridge compliant device with the most suitable correction for each photo is made using a Canon-brand PictBridge compliant device, the following additional options may be printed over the date printed by the device's function. See "Setting on ...

mini320 series Direct Photo Guide
Page 27
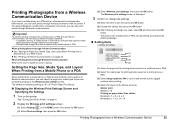
Select the media type, when Paper type printing directly from a PictBridge compliant device. Reduces the noise on black areas. Corrects and smooths the jagged contours for printing. Applies special effects to ...) Color hue (14) Effects Description Corresponding Setting of PictBridge Compliant Devices* Automatically optimizes brightness and tone of PictBridge Compliant Devices* Select the page size, when Paper size printing directly from a PictBridge compliant device. For example, you want to adjust the skin tone.
Select the media type, when Paper type printing directly from a PictBridge compliant device. Reduces the noise on black areas. Corrects and smooths the jagged contours for printing. Applies special effects to ...) Color hue (14) Effects Description Corresponding Setting of PictBridge Compliant Devices* Automatically optimizes brightness and tone of PictBridge Compliant Devices* Select the page size, when Paper size printing directly from a PictBridge compliant device. For example, you want to adjust the skin tone.
mini320 series Direct Photo Guide
Page 28
...print settings screen. (1) Select Settings on page 26. If the optional Bluetooth unit BU-20 is borderless printing on 4" x 6" Photo Paper Plus Glossy. „ Displaying the Wireless Print Settings Screen and Specifying the Settings 1 Turn on the printer. z See "Printing via Infrared... select the page size, media type, layout and borderless printing on the Wireless print settings screen. The default is connected to the User's Guide on paper other than sticker: Bordered x 1, x 2, x 4, x 8 Borderless x 1, x 2, x 4, x 8 Printing Photographs from a Mobile Phone or a PDA" below . ...
...print settings screen. (1) Select Settings on page 26. If the optional Bluetooth unit BU-20 is borderless printing on 4" x 6" Photo Paper Plus Glossy. „ Displaying the Wireless Print Settings Screen and Specifying the Settings 1 Turn on the printer. z See "Printing via Infrared... select the page size, media type, layout and borderless printing on the Wireless print settings screen. The default is connected to the User's Guide on paper other than sticker: Bordered x 1, x 2, x 4, x 8 Borderless x 1, x 2, x 4, x 8 Printing Photographs from a Mobile Phone or a PDA" below . ...


