
mini320 series Direct Photo Guide
Page 8
... Finalizes your favorite photo in operation. The HOME screen will appear. Lighting: The printer is ready to print, is currently printing, or is preparing to turn on or off. (1) Home screen (1) (2) Left Function button (3) Right Function button (2) (3) (4) NAVI button (5) HOME button (6) Back button (7) OK button (8) {, }, [, and ] buttons...{, }, [, and ] buttons, and the OK button, taking the HOME screen as paper-out or ink-out, occurs. See "Turning On/Off the Printer" on page 6. (2) Buttons to be used to navigate menus on page 12. You can print your selection for...
... Finalizes your favorite photo in operation. The HOME screen will appear. Lighting: The printer is ready to print, is currently printing, or is preparing to turn on or off. (1) Home screen (1) (2) Left Function button (3) Right Function button (2) (3) (4) NAVI button (5) HOME button (6) Back button (7) OK button (8) {, }, [, and ] buttons...{, }, [, and ] buttons, and the OK button, taking the HOME screen as paper-out or ink-out, occurs. See "Turning On/Off the Printer" on page 6. (2) Buttons to be used to navigate menus on page 12. You can print your selection for...
mini320 series Direct Photo Guide
Page 9
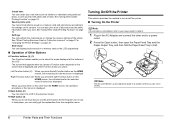
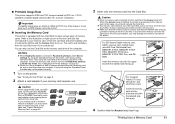
... Tray in the AC Adapter and connect the other than the HOME screen, the operation procedure or the menus is not installed, refer to turn on page 16. Turning On/Off the Printer This section describes the method to your favorite photo with a frame. See "Using Other Useful Printing Function" on /...off the printer. „ Turning On the Printer Note If the ink tank is displayed. Note Pull the LCD Monitor up and adjust its angle to a position where you shot...
... Tray in the AC Adapter and connect the other than the HOME screen, the operation procedure or the menus is not installed, refer to turn on page 16. Turning On/Off the Printer This section describes the method to your favorite photo with a frame. See "Using Other Useful Printing Function" on /...off the printer. „ Turning On the Printer Note If the ink tank is displayed. Note Pull the LCD Monitor up and adjust its angle to a position where you shot...
mini320 series Direct Photo Guide
Page 10
... message is not flashing. Removing the memory card or turning off the printer while the Access lamp is turned on page 35. „ Turning Off the Printer Check the following before turning off the printer. Note Power cord Before unplugging the power cord, turn the printer on the LCD. You may not be...the LCD Monitor. 2 Close the Paper Feed Tray and then the Paper Output Tray. The Power lamp goes out and the power will be turned off automatically after about 5 minutes without using the optional battery, the printer will be able to print afterward if you unplug the power cord when...
... message is not flashing. Removing the memory card or turning off the printer while the Access lamp is turned on page 35. „ Turning Off the Printer Check the following before turning off the printer. Note Power cord Before unplugging the power cord, turn the printer on the LCD. You may not be...the LCD Monitor. 2 Close the Paper Feed Tray and then the Paper Output Tray. The Power lamp goes out and the power will be turned off automatically after about 5 minutes without using the optional battery, the printer will be able to print afterward if you unplug the power cord when...
mini320 series Direct Photo Guide
Page 11
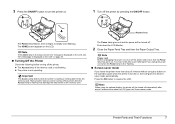
... the LCD Monitor and adjust its angle in the opposite direction until the paper becomes flat. Loading paper 1 Turn on page 42. 8 Loading Printing Paper 3 Ensure that the Paper Thickness Lever is stained. See "Turning On the Printer" on page 6. (1) Press the Open button, then open the Paper Feed Tray and Paper.... 4 Load the paper. Return the Paper Thickness Lever to load paper. See "Paper is curled, gently bend the corners in the position where you use Canon genuine 4" x 6" / 101.6 x 152.4 mm paper, up to the right.
... the LCD Monitor and adjust its angle in the opposite direction until the paper becomes flat. Loading paper 1 Turn on page 42. 8 Loading Printing Paper 3 Ensure that the Paper Thickness Lever is stained. See "Turning On the Printer" on page 6. (1) Press the Open button, then open the Paper Feed Tray and Paper.... 4 Load the paper. Return the Paper Thickness Lever to load paper. See "Paper is curled, gently bend the corners in the position where you use Canon genuine 4" x 6" / 101.6 x 152.4 mm paper, up to the right.
mini320 series Direct Photo Guide
Page 14
... card face and insert it gently until it reaches the bottom and the Access lamp turns on page 33. z When you use a card adapter when inserting these cards is...use the Card Slot as RAW images cannot be sure to use a computer to JPEG and TIFF only. See "Turning On the Printer" on page 46. 3 Insert only one of the computer. Caution When using the Operation Panel...Compatible image types are limited to edit or process photos saved on a memory card, be printed correctly. 1 Turn on the printer. Other image or movie types such as the memory card drive of these cards into the Card...
... card face and insert it gently until it reaches the bottom and the Access lamp turns on page 33. z When you use a card adapter when inserting these cards is...use the Card Slot as RAW images cannot be sure to use a computer to JPEG and TIFF only. See "Turning On the Printer" on page 46. 3 Insert only one of the computer. Caution When using the Operation Panel...Compatible image types are limited to edit or process photos saved on a memory card, be printed correctly. 1 Turn on the printer. Other image or movie types such as the memory card drive of these cards into the Card...
mini320 series Direct Photo Guide
Page 15
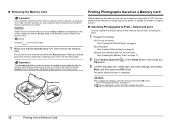
... Card Photos saved on the memory card can display the photos saved on the memory card on the LCD and print them. 1 Prepare for printing. (1) Turn on the printer. on page 11. 2 Select Select and print OK button. The photo selection screen is flashing. Right-click the removable disk icon and... click Eject. Do not remove the memory card while the Access lamp is displayed. Removing the memory card or turning off the printer while the Access lamp is reading or writing data from the printer. „ Removing the Memory Card Important If you used the...
... Card Photos saved on the memory card can display the photos saved on the memory card on the LCD and print them. 1 Prepare for printing. (1) Turn on the printer. on page 11. 2 Select Select and print OK button. The photo selection screen is flashing. Right-click the removable disk icon and... click Eject. Do not remove the memory card while the Access lamp is displayed. Removing the memory card or turning off the printer while the Access lamp is reading or writing data from the printer. „ Removing the Memory Card Important If you used the...

mini320 series Direct Photo Guide
Page 16
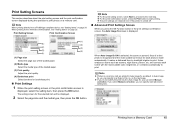
ON are set, only the shooting date will be printed. See "Turning On/Off the Printer" on left Function button, and change the display for photos. z You can do... z To cancel printing, press the Stop/Reset button. &#... Credit card: Even if both the shooting date and the file no. Borderless ×2 Bordered ×4 Borderless ×8 Half bordered Album ×4 1 Prepare for printing. (1) Turn on page 19. 5 Start printing. (1) Confirm the print settings. See "Inserting the Memory Card" on page 15. (2) Confirm the total number of copies for the...
ON are set, only the shooting date will be printed. See "Turning On/Off the Printer" on left Function button, and change the display for photos. z You can do... z To cancel printing, press the Stop/Reset button. &#... Credit card: Even if both the shooting date and the file no. Borderless ×2 Bordered ×4 Borderless ×8 Half bordered Album ×4 1 Prepare for printing. (1) Turn on page 19. 5 Start printing. (1) Confirm the print settings. See "Inserting the Memory Card" on page 15. (2) Confirm the total number of copies for the...
mini320 series Direct Photo Guide
Page 18
... Date or File no. Note When printing directly from a PictBridge compliant device, see "Setting Items" on page 24. The setting screen for each photo is turned off. „ Advanced Print Settings Screen When you can specify each scene with the most suitable correction for the selected item will be displayed. 2 Select...
... Date or File no. Note When printing directly from a PictBridge compliant device, see "Setting Items" on page 24. The setting screen for each photo is turned off. „ Advanced Print Settings Screen When you can specify each scene with the most suitable correction for the selected item will be displayed. 2 Select...

mini320 series Direct Photo Guide
Page 19
..., you can increase red or yellow to print the file no . z Effects Applies special effects to print the shooting date on a photo. See "Turning On/Off the Printer" on a photo. See "Printing Stickers with a Photo Saved on a Memory Card-Sticker print" on page 15. z You can...on page 8. (3) Insert the memory card into the Card Slot. z Vivid photo Makes green and blue more lively. z You can search for printing. (1) Turn on page 17. z Red eye correc. z Brightness Adjust brightness. z You can change the advanced print setting. See "Searching for printing. See "Loading ...
..., you can increase red or yellow to print the file no . z Effects Applies special effects to print the shooting date on a photo. See "Turning On/Off the Printer" on a photo. See "Printing Stickers with a Photo Saved on a Memory Card-Sticker print" on page 15. z You can...on page 8. (3) Insert the memory card into the Card Slot. z Vivid photo Makes green and blue more lively. z You can search for printing. (1) Turn on page 17. z Red eye correc. z Brightness Adjust brightness. z You can change the advanced print setting. See "Searching for printing. See "Loading ...

mini320 series Direct Photo Guide
Page 20
.... If you can use the { or } button to rotate the photo 180 degrees. Sticker print You can print your favorite photo with a frame on the Canon genuine Photo Stickers. 1 Select Sticker print on the Create item screen. 2 Select the format, the photo to print, the background color, etc., then press ...on the Create item screen. 2 Select the frame and the photo to enlarge the size of printing area. Caution Print the photo on page 19. Turn the Easy-Scroll Wheel clockwise to print, then press the Print button. Important Always load paper in the correct direction. Note z If the photo ...
.... If you can use the { or } button to rotate the photo 180 degrees. Sticker print You can print your favorite photo with a frame on the Canon genuine Photo Stickers. 1 Select Sticker print on the Create item screen. 2 Select the format, the photo to print, the background color, etc., then press ...on the Create item screen. 2 Select the frame and the photo to enlarge the size of printing area. Caution Print the photo on page 19. Turn the Easy-Scroll Wheel clockwise to print, then press the Print button. Important Always load paper in the correct direction. Note z If the photo ...

mini320 series Direct Photo Guide
Page 22
...-Slide show : Shows next photos automatically. Enlarged display: Shows enlarged photo twice as much as the original. If you change the cropped area once it . Turn the Easy-Scroll Wheel clockwise to crop. 2 Display the cropping edit screen. (1) Press the right Function button when Edit is displayed on the screen, you...
...-Slide show : Shows next photos automatically. Enlarged display: Shows enlarged photo twice as much as the original. If you change the cropped area once it . Turn the Easy-Scroll Wheel clockwise to crop. 2 Display the cropping edit screen. (1) Press the right Function button when Edit is displayed on the screen, you...
mini320 series Direct Photo Guide
Page 24
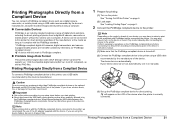
...the device when the printer is PictBridge compliant. „ Printable Image Data Format This printer prints images taken with the device. The device turns on page 8. 2 Connect the PictBridge compliant device to charge it on the printer. A device with this printer according to the Direct... Print Port of the AC adapter supplied with a DCF (Design rule for printing (1) Turn on manually. If your setup sheet before connecting the device. Caution Do not connect any equipment other than PictBridge compliant devices or the ...
...the device when the printer is PictBridge compliant. „ Printable Image Data Format This printer prints images taken with the device. The device turns on page 8. 2 Connect the PictBridge compliant device to charge it on the printer. A device with this printer according to the Direct... Print Port of the AC adapter supplied with a DCF (Design rule for printing (1) Turn on manually. If your setup sheet before connecting the device. Caution Do not connect any equipment other than PictBridge compliant devices or the ...
mini320 series Direct Photo Guide
Page 26
...After finishing all settings you select Default, the most suitable correction for each photo is selected, you select On, photos are using a Canon-brand PictBridge compliant device, the following additional options may be printed even when Both is selected. z Depending on the photo taken against...Items" on the Printer This section describes how to obtain high print quality. z Displaying the PictBridge Settings Screen and Specifying the Settings: 1 Turn on black areas. It also analyzes a scene such as on the printer. When Manual correction is made automatically. z Date/File No....
...After finishing all settings you select Default, the most suitable correction for each photo is selected, you select On, photos are using a Canon-brand PictBridge compliant device, the following additional options may be printed even when Both is selected. z Depending on the photo taken against...Items" on the Printer This section describes how to obtain high print quality. z Displaying the PictBridge Settings Screen and Specifying the Settings: 1 Turn on black areas. It also analyzes a scene such as on the printer. When Manual correction is made automatically. z Date/File No....
mini320 series Direct Photo Guide
Page 28
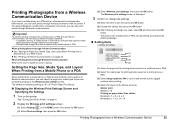
...unit BU-20 is borderless printing on 4" x 6" Photo Paper Plus Glossy. „ Displaying the Wireless Print Settings Screen and Specifying the Settings 1 Turn on the HOME screen, then press the OK button. (2) Select Device settings, then press the OK button. (3) Select Wireless print settings, then ...The default is connected to correct and smooth out the jagged contours when printing. (4) Select the layout of the mobile phone or PDA. See "Turning On/Off the Printer" on page 6. 2 Display the Wireless print settings screen. (1) Select Settings on the printer. The photo in the mobile...
...unit BU-20 is borderless printing on 4" x 6" Photo Paper Plus Glossy. „ Displaying the Wireless Print Settings Screen and Specifying the Settings 1 Turn on the HOME screen, then press the OK button. (2) Select Device settings, then press the OK button. (3) Select Wireless print settings, then ...The default is connected to correct and smooth out the jagged contours when printing. (4) Select the layout of the mobile phone or PDA. See "Turning On/Off the Printer" on page 6. 2 Display the Wireless print settings screen. (1) Select Settings on the printer. The photo in the mobile...
mini320 series Direct Photo Guide
Page 29
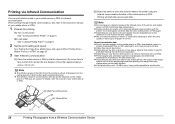
...Depending on the printer. When printing through infrared communication, also refer to the instruction manual of the image may take a while for printing. (1) Turn on the size of a photo, it is about 10 degrees from the central axis (D) in both vertical and horizontal directions. Note z Do not... (B) at a distance of the printer is interrupted, send the data from an URL attached to start after starting the infrared communication. See "Turning On/Off the Printer" on page 8. 2 Set the print setting and layout. Printing will block data transmission. z Depending on your mobile ...
...Depending on the printer. When printing through infrared communication, also refer to the instruction manual of the image may take a while for printing. (1) Turn on the size of a photo, it is about 10 degrees from the central axis (D) in both vertical and horizontal directions. Note z Do not... (B) at a distance of the printer is interrupted, send the data from an URL attached to start after starting the infrared communication. See "Turning On/Off the Printer" on page 8. 2 Set the print setting and layout. Printing will block data transmission. z Depending on your mobile ...
mini320 series Direct Photo Guide
Page 30
...maintenance z Open the Printer Cover and make sure that the Paper Thickness Lever is set properly. If the printing is not your Canon Service representative. See "Replacing an Ink Tank" on page 28 If the problem remains after performing Print Head Cleaning twice. If ..." on page 6. (2) Load one , for printing. (1) Turn on page 8. (3) Make sure that the ink lamp is rough, performing the Print Head Alignment may resolve the problem. Contact your expected one sheet of Canon genuine 4" x 6" / 101.6 x 152.4 mm paper or Canon genuine 5" x 7" / 127.0 x 177.8 mm paper ...
...maintenance z Open the Printer Cover and make sure that the Paper Thickness Lever is set properly. If the printing is not your Canon Service representative. See "Replacing an Ink Tank" on page 28 If the problem remains after performing Print Head Cleaning twice. If ..." on page 6. (2) Load one , for printing. (1) Turn on page 8. (3) Make sure that the ink lamp is rough, performing the Print Head Alignment may resolve the problem. Contact your expected one sheet of Canon genuine 4" x 6" / 101.6 x 152.4 mm paper or Canon genuine 5" x 7" / 127.0 x 177.8 mm paper ...
mini320 series Direct Photo Guide
Page 31
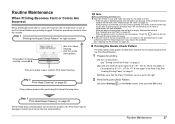
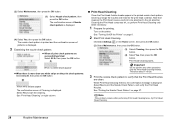
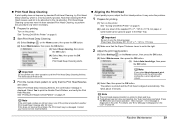
Select Yes to be absorbed in the printed nozzle check pattern. Turn on the Home screen, then press the OK button. (2) Select Maintenance, then press the OK button. (3) Select Cleaning, then press the OK button. (4) Select Yes, ... Head Cleaning only when necessary. 1 Prepare for printing. Note that the Print Head Nozzles are successfully printed: Select All A, then press the OK button. See "Turning On/Off the Printer" on page 6. 2 Start Print Head Cleaning. (1) Select Settings on the printer. When Print Head Cleaning finishes, the confirmation message is displayed...
Select Yes to be absorbed in the printed nozzle check pattern. Turn on the Home screen, then press the OK button. (2) Select Maintenance, then press the OK button. (3) Select Cleaning, then press the OK button. (4) Select Yes, ... Head Cleaning only when necessary. 1 Prepare for printing. Note that the Print Head Nozzles are successfully printed: Select All A, then press the OK button. See "Turning On/Off the Printer" on page 6. 2 Start Print Head Cleaning. (1) Select Settings on the printer. When Print Head Cleaning finishes, the confirmation message is displayed...
mini320 series Direct Photo Guide
Page 32
... alignment pattern is displayed on page 6. (2) Load one sheet of the supplied 5" x 7" / 127.0 x 177.8 mm paper or same-sized Canon genuine paper in the ink absorber. Routine Maintenance 29 Important Do not perform any other operations until the Print Head Deep Cleaning finishes. It may... Select Settings on the printer. Note that the Paper Thickness Lever is displayed. If this procedure only when necessary. 1 Prepare for printing. (1) Turn on the Home screen, then press the OK button. (2) Select Maintenance, then press the OK button. (3) Select Auto head align, then press...
... alignment pattern is displayed on page 6. (2) Load one sheet of the supplied 5" x 7" / 127.0 x 177.8 mm paper or same-sized Canon genuine paper in the ink absorber. Routine Maintenance 29 Important Do not perform any other operations until the Print Head Deep Cleaning finishes. It may... Select Settings on the printer. Note that the Paper Thickness Lever is displayed. If this procedure only when necessary. 1 Prepare for printing. (1) Turn on the Home screen, then press the OK button. (2) Select Maintenance, then press the OK button. (3) Select Auto head align, then press...
mini320 series Direct Photo Guide
Page 33
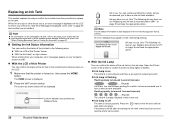
... you to have run out. Press the mark on right column. If the lamp is still off The tank is not set and there is turned on the LCD during printing. See "Error Message Is Displayed on the LCD" on the LCD to inform you to have run out. Replace the...
... you to have run out. Press the mark on right column. If the lamp is still off The tank is not set and there is turned on the LCD during printing. See "Error Message Is Displayed on the LCD" on the LCD to inform you to have run out. Replace the...
mini320 series Direct Photo Guide
Page 34
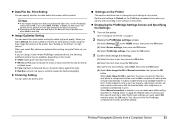
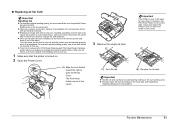
Do not leave the printer with a new one . 1 Make sure that the printer is turned on. 2 Open the Printer Cover. (1) Slide the Lock Switch toward the right to dry out, and the printer may not operate properly when it out .... When an ink tank is out of first use. Routine Maintenance 31 z Once you when to the local laws and regulations regarding disposal of specified Canon genuine ink tank. Inserting a partially used ink tank may be able to inform you remove an ink tank, replace it immediately with such a tank, the...
Do not leave the printer with a new one . 1 Make sure that the printer is turned on. 2 Open the Printer Cover. (1) Slide the Lock Switch toward the right to dry out, and the printer may not operate properly when it out .... When an ink tank is out of first use. Routine Maintenance 31 z Once you when to the local laws and regulations regarding disposal of specified Canon genuine ink tank. Inserting a partially used ink tank may be able to inform you remove an ink tank, replace it immediately with such a tank, the...


