iP4820 series Getting Started
Page 1
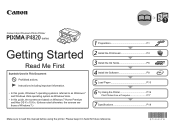
... 7.) 1 Preparation P.1 2 Install the Print Head P.3 3 Install the Ink Tanks P.6 4 Install the Software P.8 5 Load Paper P.13 6 Try Using the Printer P.16 Print Photos from a Computer P.17 7 Specifications P.18 Make sure to read this manual before using the printer. Canon Inkjet Premium Photo Printer series Getting Started Read Me First Symbols Used in hand for future reference.
... 7.) 1 Preparation P.1 2 Install the Print Head P.3 3 Install the Ink Tanks P.6 4 Install the Software P.8 5 Load Paper P.13 6 Try Using the Printer P.16 Print Photos from a Computer P.17 7 Specifications P.18 Make sure to read this manual before using the printer. Canon Inkjet Premium Photo Printer series Getting Started Read Me First Symbols Used in hand for future reference.
iP4820 series Getting Started
Page 2
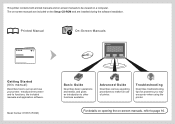
... CD-ROM and are installed during the software installation. Troubleshooting Describes troubleshooting tips for problems you may encounter when using the printer. This printer contains both printed manuals and on-screen manuals to page 16. Model Number: K10357 (iP4820) Basic Guide Describes basic operations and media, and gives an introduction to make full use your...
... CD-ROM and are installed during the software installation. Troubleshooting Describes troubleshooting tips for problems you may encounter when using the printer. This printer contains both printed manuals and on-screen manuals to page 16. Model Number: K10357 (iP4820) Basic Guide Describes basic operations and media, and gives an introduction to make full use your...
iP4820 series Getting Started
Page 3
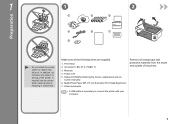
... all orange tape and protective materials from the inside and outside of the printer. Power cord 5. Ink tanks (5: BK, M, C, PGBK, Y) 3. screen manuals) 6. Other documents • A USB cable is necessary to connect the printer with your computer. It may fall into the printer when opening covers, resulting in malfunction. Setup CD-ROM (containing the drivers...
... all orange tape and protective materials from the inside and outside of the printer. Power cord 5. Ink tanks (5: BK, M, C, PGBK, Y) 3. screen manuals) 6. Other documents • A USB cable is necessary to connect the printer with your computer. It may fall into the printer when opening covers, resulting in malfunction. Setup CD-ROM (containing the drivers...
iP4820 series Getting Started
Page 12
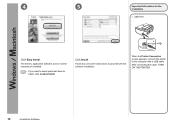
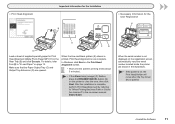
After connecting the cable, TURN ON THE PRINTER. 10 4 Install the Software The drivers, application software, and on -screen instructions to install, click Custom Install. When the Printer Connection screen appears, connect the printer to the computer with the software installation. Follow any on -screen manuals are installed. • If you want to select particular items to proceed with a USB cable. Click Install. 4 5 Important Information for the Installation □ USB Port Click Easy Install.
After connecting the cable, TURN ON THE PRINTER. 10 4 Install the Software The drivers, application software, and on -screen instructions to install, click Custom Install. When the Printer Connection screen appears, connect the printer to the computer with the software installation. Follow any on -screen manuals are installed. • If you want to select particular items to proceed with a USB cable. Click Install. 4 5 Important Information for the Installation □ USB Port Click Easy Install.
iP4820 series Getting Started
Page 13
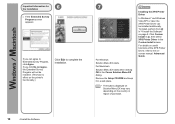
...Wait until the pattern printing ends (about 5 minutes). • If the Alarm lamp (orange) (F) flashes, press the RESUME/CANCEL button (G) on the printer to "When Printing Becomes Faint or Colors Are Incorrect" in the illustration). • If the power is on, the Print Head Holder will move when...the Software 11 When the serial number is not displayed on the registration screen automatically, input the serial number located inside the printer (as shown in the on-screen manual: Basic Guide. When the blue and black pattern (E) shown is printed, Print Head Alignment is opened . □ Print...
...Wait until the pattern printing ends (about 5 minutes). • If the Alarm lamp (orange) (F) flashes, press the RESUME/CANCEL button (G) on the printer to "When Printing Becomes Faint or Colors Are Incorrect" in the illustration). • If the power is on, the Print Head Holder will move when...the Software 11 When the serial number is not displayed on the registration screen automatically, input the serial number located inside the printer (as shown in the on-screen manual: Basic Guide. When the blue and black pattern (E) shown is printed, Print Head Alignment is opened . □ Print...
iP4820 series Getting Started
Page 14
... on the country or region of the XPS Printer Driver, refer to the onscreen manual: Advanced Guide. 12 4 Install the Software Click Custom Install in , then select XPS Printer Driver in the Canon Solution Menu EX dialog. Installing the XPS Printer Driver In Windows 7 and Windows Vista SP1... or later, the XPS Printer Driver can agree to ...
... on the country or region of the XPS Printer Driver, refer to the onscreen manual: Advanced Guide. 12 4 Install the Software Click Custom Install in , then select XPS Printer Driver in the Canon Solution Menu EX dialog. Installing the XPS Printer Driver In Windows 7 and Windows Vista SP1... or later, the XPS Printer Driver can agree to ...

iP4820 series Getting Started
Page 17
Load paper in the center of the Rear Tray (L). Congratulations! Slide the left and right Paper Guides against both edges. Make sure that the height of the paper. 8 J 9 2 K 10 11 M L Open the Paper Support (J), and pull it up . Setup is complete. Proceed to both edges of the paper stack does not exceed the line (M). • For details, refer to the onscreen manual: Basic Guide. Load paper in portrait orientation with the printing side facing up . Move the Paper Guides (K) to "6 Try Using the Printer". 5 Load Paper 15
Load paper in the center of the Rear Tray (L). Congratulations! Slide the left and right Paper Guides against both edges. Make sure that the height of the paper. 8 J 9 2 K 10 11 M L Open the Paper Support (J), and pull it up . Setup is complete. Proceed to both edges of the paper stack does not exceed the line (M). • For details, refer to the onscreen manual: Basic Guide. Load paper in portrait orientation with the printing side facing up . Move the Paper Guides (K) to "6 Try Using the Printer". 5 Load Paper 15

iP4820 series Getting Started
Page 18
...them. For example, • Open the on -screen manual. Solution Menu EX Solution Menu EX is a gateway to make full use the application software and the printer, refer to the on -screen manual. How to open the on -screen manual. • Open various application software. For details, refer... to the on the Dock (Macintosh) to open the on-screen manual Click Help & Settings, then click this icon...
...them. For example, • Open the on -screen manual. Solution Menu EX Solution Menu EX is a gateway to make full use the application software and the printer, refer to the on -screen manual. How to open the on -screen manual. • Open various application software. For details, refer... to the on the Dock (Macintosh) to open the on-screen manual Click Help & Settings, then click this icon...

iP4820 series Getting Started
Page 19
... on the desktop (Windows) or on the Dock (Macintosh). 2. To start . Select the image you are using Macintosh, click Print on -screen manual: Advanced Guide. 6 Try Using the Printer 17 For more information, refer to "1". Easy-PhotoPrint EX starts. Click Photo Print, then click Photo Print (C). If you want to start printing...
... on the desktop (Windows) or on the Dock (Macintosh). 2. To start . Select the image you are using Macintosh, click Print on -screen manual: Advanced Guide. 6 Try Using the Printer 17 For more information, refer to "1". Easy-PhotoPrint EX starts. Click Photo Print, then click Photo Print (C). If you want to start printing...

On-Screen Manual
Page 2
iP4800 series Basic Guide Page 2 of 468 pages How to Use This Manual Printing This Manual About Disc Label Printing MP-5113-V1.00 Contents Overview of the Printer Main Components Printing Printing Photos (Easy-PhotoPrint EX) Printing Documents Printing Web Pages (Easy-WebPrint EX) Starting Various Software Applications Other Usages Printing Photos from... in the Cassette Opening the Maintenance Screen Appendix Legal Limitations on Use of Your Product and Use of Images Tips on How to Use Your Printer
iP4800 series Basic Guide Page 2 of 468 pages How to Use This Manual Printing This Manual About Disc Label Printing MP-5113-V1.00 Contents Overview of the Printer Main Components Printing Printing Photos (Easy-PhotoPrint EX) Printing Documents Printing Web Pages (Easy-WebPrint EX) Starting Various Software Applications Other Usages Printing Photos from... in the Cassette Opening the Maintenance Screen Appendix Legal Limitations on Use of Your Product and Use of Images Tips on How to Use Your Printer
On-Screen Manual
Page 5
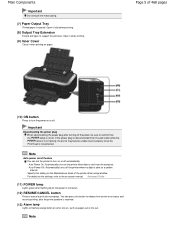
... and resume printing, after flashing when the power is turned on the printer when data is sent from the computer. - Note Auto power on/off feature You can press this setting on or off the power, be sure to the on-screen manual: Advanced Guide . (11) POWER lamp Lights green after the... printer problem is not lit. Specify this button to release from the wall outlet while the POWER lamp is not protected...
... and resume printing, after flashing when the power is turned on the printer when data is sent from the computer. - Note Auto power on/off feature You can press this setting on or off the power, be sure to the on-screen manual: Advanced Guide . (11) POWER lamp Lights green after the... printer problem is not lit. Specify this button to release from the wall outlet while the POWER lamp is not protected...
On-Screen Manual
Page 6
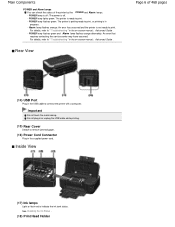
... the metal casing. Inside View (17) Ink lamps Light or flash red to remove jammed paper. (16) Power Cord Connector Plug in the on -screen manual: Advanced Guide . - For details, refer to " Troubleshooting " in the supplied power cord. For details, refer to " Troubleshooting " in progress. - ...: An error has occurred and the printer is ready to print. POWER lamp lights green: The printer is not ready to print. - POWER lamp flashes green: The printer is getting ready to connect the printer with a computer. Rear View Page 6 of the printer by the POWER and Alarm lamps. ...
... the metal casing. Inside View (17) Ink lamps Light or flash red to remove jammed paper. (16) Power Cord Connector Plug in the on -screen manual: Advanced Guide . - For details, refer to " Troubleshooting " in the supplied power cord. For details, refer to " Troubleshooting " in progress. - ...: An error has occurred and the printer is ready to print. POWER lamp lights green: The printer is not ready to print. - POWER lamp flashes green: The printer is getting ready to connect the printer with a computer. Rear View Page 6 of the printer by the POWER and Alarm lamps. ...

On-Screen Manual
Page 9
See Loading Paper . Prepare for printing. (1) Make sure that the printer is turned on your computer by using Easy-PhotoPrint EX supplied with the printer. Here we load 4" x 6" / 10 x 15 cm photo paper in the Photo Print menu. See Solution Menu EX . For details on Easy-PhotoPrint EX, refer to ..., and extend the Output Tray Extension to the on 4" x 6" / 10 x 15 cm photo paper. This section describes the procedure to print borderless photos on -screen manual: Advanced Guide .
See Loading Paper . Prepare for printing. (1) Make sure that the printer is turned on your computer by using Easy-PhotoPrint EX supplied with the printer. Here we load 4" x 6" / 10 x 15 cm photo paper in the Photo Print menu. See Solution Menu EX . For details on Easy-PhotoPrint EX, refer to ..., and extend the Output Tray Extension to the on 4" x 6" / 10 x 15 cm photo paper. This section describes the procedure to print borderless photos on -screen manual: Advanced Guide .

On-Screen Manual
Page 10
... creating albums, calendars, and other settings for Paper Source, refer to the on-screen manual: Guide. For details, refer to cancel in which images are available. Note For details on -screen manual: Advanced Guide . You can also use (Down arrow) to change the number of copies... of Easy-PhotoPrint EX. You can also correct or enhance the selected image. Select the loaded paper. (1) Make sure that your printer's name is selected in Printer. (2) Make sure that Automatically Select is selected in the selected image area (A). See Using Various Functions of copies appears as "1", ...
... creating albums, calendars, and other settings for Paper Source, refer to the on-screen manual: Guide. For details, refer to cancel in which images are available. Note For details on -screen manual: Advanced Guide . You can also use (Down arrow) to change the number of copies... of Easy-PhotoPrint EX. You can also correct or enhance the selected image. Select the loaded paper. (1) Make sure that your printer's name is selected in Printer. (2) Make sure that Automatically Select is selected in the selected image area (A). See Using Various Functions of copies appears as "1", ...

On-Screen Manual
Page 11
...print. Note To cancel a print job in progress, press the RESUME/CANCEL button on the printer or click Cancel Printing on -screen manual: Advanced Guide . (2) Click Print. To display the printer status monitor, click the printer icon on the taskbar. Printing Photos (Easy-PhotoPrint EX) If you select A4 or Letter...paper source or may be ejected. Here we select Borderless (full). Page 11 of the photo. In Windows Vista or Windows XP, click Canon XXX (where " XXX" is selected in the selected layout for confirmation of paper may not print with the proper print quality. (4) Click Layout...
...print. Note To cancel a print job in progress, press the RESUME/CANCEL button on the printer or click Cancel Printing on -screen manual: Advanced Guide . (2) Click Print. To display the printer status monitor, click the printer icon on the taskbar. Printing Photos (Easy-PhotoPrint EX) If you select A4 or Letter...paper source or may be ejected. Here we select Borderless (full). Page 11 of the photo. In Windows Vista or Windows XP, click Canon XXX (where " XXX" is selected in the selected layout for confirmation of paper may not print with the proper print quality. (4) Click Layout...
On-Screen Manual
Page 13
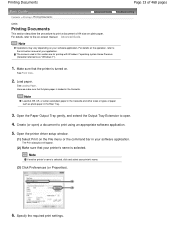
... application. Here we make sure that your printer's name. (3) Click Preferences (or Properties). 6. Open the printer driver setup window. (1) Select Print on the File menu or the command bar in this section are for printing with Windows 7 operating system Home Premium (hereafter referred to the instruction manual of your software application. The Print...
... application. Here we make sure that your printer's name. (3) Click Preferences (or Properties). 6. Open the printer driver setup window. (1) Select Print on the File menu or the command bar in this section are for printing with Windows 7 operating system Home Premium (hereafter referred to the instruction manual of your software application. The Print...
On-Screen Manual
Page 18
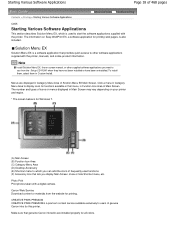
...to which you can add the icons of frequently used to start the software applications supplied with the printer. Starting Various Software Applications Page 18 of genuine Canon inks for this printer. To install them, select them in Category Menu Area of Main Screen. The number and types ...displayed in Custom Install. Canon Web Service Download content or materials from the Setup CD-ROM when they have not been installed or have been uninstalled. Solution Menu EX Solution Menu EX is also included. Photo Print Print photos taken with the printer, manuals, and online product information...
...to which you can add the icons of frequently used to start the software applications supplied with the printer. Starting Various Software Applications Page 18 of genuine Canon inks for this printer. To install them, select them in Category Menu Area of Main Screen. The number and types ...displayed in Custom Install. Canon Web Service Download content or materials from the Setup CD-ROM when they have not been installed or have been uninstalled. Solution Menu EX Solution Menu EX is also included. Photo Print Print photos taken with the printer, manuals, and online product information...
On-Screen Manual
Page 199
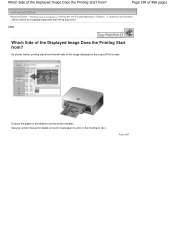
... Start from ? Page top Which Side of the Displayed Image Does the Printing Start from ? Outputs the paper in the Layout/Print screen. See your printer manual for details on how to load paper (to print on the front/back, etc.). As shown below, printing starts from ? Page 199 of 468 pages...
... Start from ? Page top Which Side of the Displayed Image Does the Printing Start from ? Outputs the paper in the Layout/Print screen. See your printer manual for details on how to load paper (to print on the front/back, etc.). As shown below, printing starts from ? Page 199 of 468 pages...
On-Screen Manual
Page 376
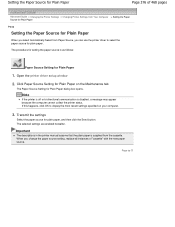
...Plain Paper Page 376 of "cassette" with the new paper source. The selected settings are enabled hereafter. Important The descriptions in the printer manual assume that the plain paper is supplied from Paper Source, you change the paper source setting, replace all instances of 468 pages ...Advanced Guide > Changing the Printer Settings > Changing Printer Settings from Your Computer > Setting the Paper Source for Plain Paper P032 Setting the Paper Source for Plain Paper When you...
...Plain Paper Page 376 of "cassette" with the new paper source. The selected settings are enabled hereafter. Important The descriptions in the printer manual assume that the plain paper is supplied from Paper Source, you change the paper source setting, replace all instances of 468 pages ...Advanced Guide > Changing the Printer Settings > Changing Printer Settings from Your Computer > Setting the Paper Source for Plain Paper P032 Setting the Paper Source for Plain Paper When you...
On-Screen Manual
Page 453
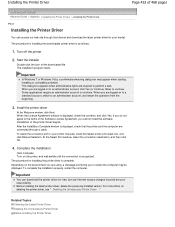
...administrator account to the terms of the Software License Agreement, you are connected through the Internet and download the latest printer driver for your model. When you to restart the computer may appear when starting, installing or uninstalling software. ...printer driver, see " Deleting the Unnecessary Printer Driver ." Complete the installation Click Complete. Turn off the printer 2. Start the installer Double-click the icon of the printer driver begins. To select the connection port for your printer manually, check the Select printer port check box, and click Manual...
...administrator account to the terms of the Software License Agreement, you are connected through the Internet and download the latest printer driver for your model. When you to restart the computer may appear when starting, installing or uninstalling software. ...printer driver, see " Deleting the Unnecessary Printer Driver ." Complete the installation Click Complete. Turn off the printer 2. Start the installer Double-click the icon of the printer driver begins. To select the connection port for your printer manually, check the Select printer port check box, and click Manual...


