Quick Start Guide
Page 21
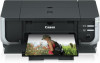
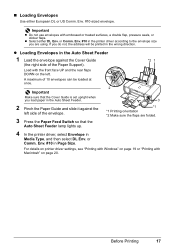
...20. Env. #10 in the printer driver according to the envelope size you are folded. 4 In the printer driver, select Envelope in Media Type, and then select DL Env. z Select either European DL or US Comm. or Comm. For details on printer driver settings, see "Printing with Windows" on page ... at once. 2 Important Make sure that the Auto Sheet Feeder lamp lights up. *1 *1 Printing orientation *2 Make sure the flaps are using. A maximum of 10 envelopes can be printed in the Auto Sheet Feeder. *2 1 3 2 Pinch the Paper Guide and slide it against the left . If you load paper in ...
...20. Env. #10 in the printer driver according to the envelope size you are folded. 4 In the printer driver, select Envelope in Media Type, and then select DL Env. z Select either European DL or US Comm. or Comm. For details on printer driver settings, see "Printing with Windows" on page ... at once. 2 Important Make sure that the Auto Sheet Feeder lamp lights up. *1 *1 Printing orientation *2 Make sure the flaps are using. A maximum of 10 envelopes can be printed in the Auto Sheet Feeder. *2 1 3 2 Pinch the Paper Guide and slide it against the left . If you load paper in ...

Quick Start Guide
Page 22
Env. #10 in the Cassette 1 Extend the Cassette. on the left side. or Comm. See "Adjust the size of the 3 envelope. 4 Press the Paper Feed Switch so ... appear facing UP on page 15. 2 Align the envelope stack against the side of the Cassette." For details on printer driver settings, see "Printing with Windows" on page 20. 18 Before Printing The flap of the Cassette. *1 Load with Macintosh" on page 19 or "Printing with the front face DOWN. z Loading...
Env. #10 in the Cassette 1 Extend the Cassette. on the left side. or Comm. See "Adjust the size of the 3 envelope. 4 Press the Paper Feed Switch so ... appear facing UP on page 15. 2 Align the envelope stack against the side of the Cassette." For details on printer driver settings, see "Printing with Windows" on page 20. 18 Before Printing The flap of the Cassette. *1 Load with Macintosh" on page 19 or "Printing with the front face DOWN. z Loading...
Quick Start Guide
Page 67
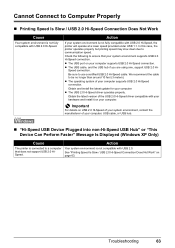
...or USB hub. „ "Hi-Speed USB Device Plugged into non-Hi-Speed USB Hub" or "This Device Can Perform Faster" Message Is Displayed (Windows XP Only) Cause Action The printer is connected to a computer Your system environment is not fully compatible with USB 2.0. z The USB port on page... of your system environment supports USB 2.0 Hi-Speed connection. z The USB 2.0 Hi-Speed driver operates properly. Be sure to be no longer than around 10 feet (3 meters). z The operating system of the USB 2.0 Hi-Speed driver compatible with USB 2.0 Hi-Speed, the printer will operate at a lower ...
...or USB hub. „ "Hi-Speed USB Device Plugged into non-Hi-Speed USB Hub" or "This Device Can Perform Faster" Message Is Displayed (Windows XP Only) Cause Action The printer is connected to a computer Your system environment is not fully compatible with USB 2.0. z The USB port on page... of your system environment supports USB 2.0 Hi-Speed connection. z The USB 2.0 Hi-Speed driver operates properly. Be sure to be no longer than around 10 feet (3 meters). z The operating system of the USB 2.0 Hi-Speed driver compatible with USB 2.0 Hi-Speed, the printer will operate at a lower ...
Quick Start Guide
Page 74
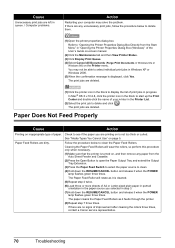
...is not too thick or curled. In Mac® OS X v.10.2.8, click the printer icon in the Dock to start up the Print... Cancel All Documents (Purge Print Documents in queue. / Computer problems. Action Restarting your printer in Windows XP or Windows 2000. (5)When the confirmation message is turned on, and then remove any unnecessary print jobs, follow...paper from the Start Menu" in "Opening the Printer Properties Dialog Box (Windows)" of improvement after cleaning the rollers three times, contact a Canon service representative. 70 Troubleshooting The print jobs are deleted. Paper Does Not...
...is not too thick or curled. In Mac® OS X v.10.2.8, click the printer icon in the Dock to start up the Print... Cancel All Documents (Purge Print Documents in queue. / Computer problems. Action Restarting your printer in Windows XP or Windows 2000. (5)When the confirmation message is turned on, and then remove any unnecessary print jobs, follow...paper from the Start Menu" in "Opening the Printer Properties Dialog Box (Windows)" of improvement after cleaning the rollers three times, contact a Canon service representative. 70 Troubleshooting The print jobs are deleted. Paper Does Not...
Quick Start Guide
Page 91
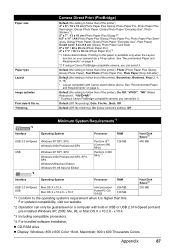
... Paper, Glossy Photo Paper "Everyday Use", Plain Paper) Credit card / 5.4 x 8.6 cm (Glossy Photo Paper Card Size) 8" x 10" / 20 x 25 cm (Photo Paper Pro) 4" x 7.1" / 10.1 x 18 cm (Photo Paper Pro)*2 *1 Canon-brand sticker. z CD-ROM drive z Display: Windows; 800 x 600 Color 16 bit, Macintosh; 800 x 600 Thousands Colors Appendix 87 See "Recommended Paper and Requirements...
... Paper, Glossy Photo Paper "Everyday Use", Plain Paper) Credit card / 5.4 x 8.6 cm (Glossy Photo Paper Card Size) 8" x 10" / 20 x 25 cm (Photo Paper Pro) 4" x 7.1" / 10.1 x 18 cm (Photo Paper Pro)*2 *1 Canon-brand sticker. z CD-ROM drive z Display: Windows; 800 x 600 Color 16 bit, Macintosh; 800 x 600 Thousands Colors Appendix 87 See "Recommended Paper and Requirements...
Easy Setup Instructions
Page 2
...;rmation to Mac OS X v.10.4.x installation. When the Printer List screen appears, select iP4300, then click Utility (Configure when using Mac OS X v.10.2.8) icon. Ensure that the Restart...Yes. After restarting the computer, select Applications from step 3 to install the software. "Windows" is located on the front page. Click Execute, read the message and click Print Head... alignment is printed in "Troubleshooting" of each application below. QT5-0427-V02 © 2006 Canon Inc. and other countries. Follow the on the front page. Note • The pattern ...
...;rmation to Mac OS X v.10.4.x installation. When the Printer List screen appears, select iP4300, then click Utility (Configure when using Mac OS X v.10.2.8) icon. Ensure that the Restart...Yes. After restarting the computer, select Applications from step 3 to install the software. "Windows" is located on the front page. Click Execute, read the message and click Print Head... alignment is printed in "Troubleshooting" of each application below. QT5-0427-V02 © 2006 Canon Inc. and other countries. Follow the on the front page. Note • The pattern ...


