Guia de iniciacion rapida [Spanish Version]
Page 3
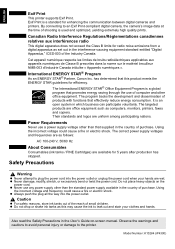
...-003 of small children. Exif Print is an open system in the User's Guide on the power cord. Power Requirements Never use of products with functions that this may cause the ink to the printer. The correct power supply voltages and frequencies are as...set out in the country of purchase. Their standards and logos are available for efficiency. ENGLISH Exif Print This printer supports Exif Print. International ENERGY STAR® Program As an ENERGY STAR® Partner, Canon Inc. Using the incorrect voltage could cause a fire or electric shock. Model Number: K10284 (iP4300...
...-003 of small children. Exif Print is an open system in the User's Guide on the power cord. Power Requirements Never use of products with functions that this may cause the ink to the printer. The correct power supply voltages and frequencies are as...set out in the country of purchase. Their standards and logos are available for efficiency. ENGLISH Exif Print This printer supports Exif Print. International ENERGY STAR® Program As an ENERGY STAR® Partner, Canon Inc. Using the incorrect voltage could cause a fire or electric shock. Model Number: K10284 (iP4300...
Guia de iniciacion rapida [Spanish Version]
Page 6
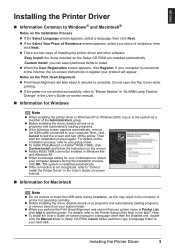
... Print Head Alignment and cannot find your printer name in the User's Guide on the Print Head Alignment z Print Head Alignment will appear. Do not open the Top Cover while printing. z Adobe RGB (1998) cannot be installed in Setup CD-ROM, Canon folder, and then copy a language folder to your hard disk. z When a message asking for your confirmation to restart your computer appears during installation, as a member of the Administrators group. Installing the Printer Driver 3 z If the connection...
... Print Head Alignment and cannot find your printer name in the User's Guide on the Print Head Alignment z Print Head Alignment will appear. Do not open the Top Cover while printing. z Adobe RGB (1998) cannot be installed in Setup CD-ROM, Canon folder, and then copy a language folder to your hard disk. z When a message asking for your confirmation to restart your computer appears during installation, as a member of the Administrators group. Installing the Printer Driver 3 z If the connection...
Guia de iniciacion rapida [Spanish Version]
Page 10
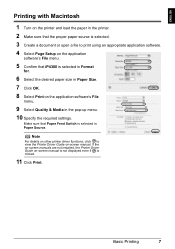
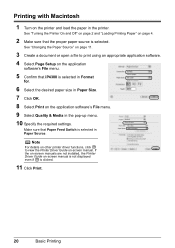
... the required settings. ENGLISH Printing with Macintosh 1 Turn on the printer and load the paper in the printer. 2 Make sure that the proper paper source is selected. 3 Create a document or open a file to view the Printer Driver Guide on-screen manual. Basic Printing 7 Note For details on other printer driver functions, click to print using an appropriate application software. 4 Select Page Setup on the application software's File menu. 5 Confirm that Paper Feed Switch is selected in Paper Source. Make sure that iP4300 is...
... the required settings. ENGLISH Printing with Macintosh 1 Turn on the printer and load the paper in the printer. 2 Make sure that the proper paper source is selected. 3 Create a document or open a file to view the Printer Driver Guide on-screen manual. Basic Printing 7 Note For details on other printer driver functions, click to print using an appropriate application software. 4 Select Page Setup on the application software's File menu. 5 Confirm that Paper Feed Switch is selected in Paper Source. Make sure that iP4300 is...
Guia de iniciacion rapida [Spanish Version]
Page 11
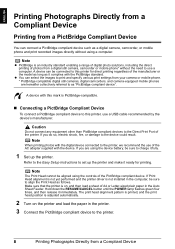
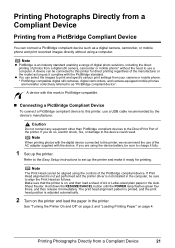
... down the RESUME/CANCEL button until the POWER lamp flashes green four times, and then release it ready for direct printing regardless of A4 or Letter-sized plain paper in the printer. 3 Connect the PictBridge compliant device to set up the printer. If Print Head alignment is not yet performed and the printer driver is adjusted automatically. 2 Turn on , and then load a sheet of the manufacturer or the model as long as...
... down the RESUME/CANCEL button until the POWER lamp flashes green four times, and then release it ready for direct printing regardless of A4 or Letter-sized plain paper in the printer. 3 Connect the PictBridge compliant device to set up the printer. If Print Head alignment is not yet performed and the printer driver is adjusted automatically. 2 Turn on , and then load a sheet of the manufacturer or the model as long as...
Guia de iniciacion rapida [Spanish Version]
Page 14
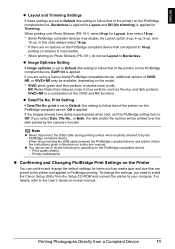
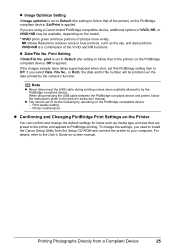
... as media type and size that of the VIVID and NR functions. NR (Noise Reduction) reduces noise in the device's instruction manual. When printing onto Photo Stickers (PS-101), select N-up for Trimming. If you need to install the Canon Setup Utility from a Compliant Device 11 In this PictBridge setting item to PictBridge printing. Printing Photographs Directly from the Setup CD-ROM and connect the printer to by operating...
... as media type and size that of the VIVID and NR functions. NR (Noise Reduction) reduces noise in the device's instruction manual. When printing onto Photo Stickers (PS-101), select N-up for Trimming. If you need to install the Canon Setup Utility from a Compliant Device 11 In this PictBridge setting item to PictBridge printing. Printing Photographs Directly from the Setup CD-ROM and connect the printer to by operating...
Quick Start Guide
Page 5
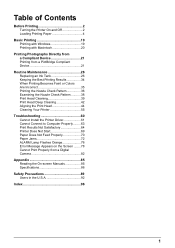
... Maintenance 26 Replacing an Ink Tank 26 Keeping the Best Printing Results 34 When Printing Becomes Faint or Colors Are Incorrect 35 Printing the Nozzle Check Pattern 36 Examining the Nozzle Check Pattern ...........38 Print Head Cleaning 39 Print Head Deep Cleaning 42 Aligning the Print Head 44 Cleaning Your Printer 55 Troubleshooting 60 Cannot Install the Printer Driver 61 Cannot Connect to Computer Properly.........63 Print Results Not Satisfactory 64 Printer Does Not Start 69 Paper Does Not Feed...
... Maintenance 26 Replacing an Ink Tank 26 Keeping the Best Printing Results 34 When Printing Becomes Faint or Colors Are Incorrect 35 Printing the Nozzle Check Pattern 36 Examining the Nozzle Check Pattern ...........38 Print Head Cleaning 39 Print Head Deep Cleaning 42 Aligning the Print Head 44 Cleaning Your Printer 55 Troubleshooting 60 Cannot Install the Printer Driver 61 Cannot Connect to Computer Properly.........63 Print Results Not Satisfactory 64 Printer Does Not Start 69 Paper Does Not Feed...
Quick Start Guide
Page 6
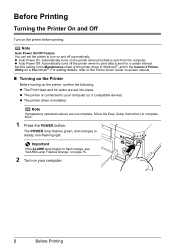
...;. z The printer is installed. Note If preparatory operations above are set the printer to steady, non-flashing light. For setting details, refer to flash orange, see "ALARM Lamp Flashes Orange" on page 76. 2 Turn on the printer, confirm the following. z The Print Head and ink tanks are not complete, follow the Easy Setup Instructions to your computer. 2 Before Printing z The printer driver is connected to complete them. 1 Press the POWER button. z Auto Power On: Automatically turns on...
...;. z The printer is installed. Note If preparatory operations above are set the printer to steady, non-flashing light. For setting details, refer to flash orange, see "ALARM Lamp Flashes Orange" on page 76. 2 Turn on the printer, confirm the following. z The Print Head and ink tanks are not complete, follow the Easy Setup Instructions to your computer. 2 Before Printing z The printer driver is connected to complete them. 1 Press the POWER button. z Auto Power On: Automatically turns on...
Quick Start Guide
Page 24
... menu. 10 Specify the required settings. Make sure that iP4300 is selected in Format for. 6 Select the desired paper size in Paper Size. 7 Click OK. 8 Select Print on the application software's File menu. 5 Confirm that Paper Feed Switch is selected in the printer. If the on-screen manuals are not installed, the Printer Driver Guide on -screen manual. See "Changing the Paper Source" on page 11. 3 Create a document or open a file to view the Printer Driver Guide on -screen manual is not displayed...
... menu. 10 Specify the required settings. Make sure that iP4300 is selected in Format for. 6 Select the desired paper size in Paper Size. 7 Click OK. 8 Select Print on the application software's File menu. 5 Confirm that Paper Feed Switch is selected in the printer. If the on-screen manuals are not installed, the Printer Driver Guide on -screen manual. See "Changing the Paper Source" on page 11. 3 Create a document or open a file to view the Printer Driver Guide on -screen manual is not displayed...
Quick Start Guide
Page 25
... the printer driver is adjusted automatically. 2 Turn on page 4. See "Turning the Printer On and Off" on page 2 and "Loading Printing Paper" on the printer and load the paper in the printer. Note When printing photos with the PictBridge standard. The print head alignment pattern is printed, and the print head position is not installed in the Auto Sheet Feeder. Printing Photographs Directly from a PictBridge Compliant Device You can select the images to charge it fully. 1 Set up the printer and make it...
... the printer driver is adjusted automatically. 2 Turn on page 4. See "Turning the Printer On and Off" on page 2 and "Loading Printing Paper" on the printer and load the paper in the printer. Note When printing photos with the PictBridge standard. The print head alignment pattern is printed, and the print head position is not installed in the Auto Sheet Feeder. Printing Photographs Directly from a PictBridge Compliant Device You can select the images to charge it fully. 1 Set up the printer and make it...
Quick Start Guide
Page 29
... cannot set this PictBridge setting item to PictBridge printing. z Date/File No. VIVID+NR is applied. print is applied. Printer maintenance z Confirming and Changing PictBridge Print Settings on the PictBridge compliant device, Off is a combination of photos more vividly. If you need to the User's Guide on the model. * VIVID prints green and blue portions of the VIVID and NR functions. For details, refer to install the Canon Setup...
... cannot set this PictBridge setting item to PictBridge printing. z Date/File No. VIVID+NR is applied. print is applied. Printer maintenance z Confirming and Changing PictBridge Print Settings on the PictBridge compliant device, Off is a combination of photos more vividly. If you need to the User's Guide on the model. * VIVID prints green and blue portions of the VIVID and NR functions. For details, refer to install the Canon Setup...
Quick Start Guide
Page 60
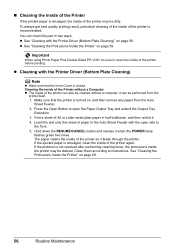
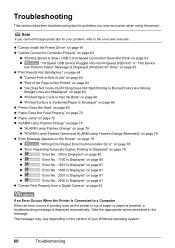
... When using Photo Paper Plus Double Sided PP-101D, be stained. „ Cleaning the Inside of the Printer If the printed paper is recommended. Make sure that the Inner Cover is not resolved after performing cleaning twice, the protrusions inside of the printer can be performed from the Auto Sheet Feeder. 2. See "Cleaning the Protrusions Inside the Printer" on , and then remove any paper from the printer itself. 1. it . 4. Press the Open Button...
... When using Photo Paper Plus Double Sided PP-101D, be stained. „ Cleaning the Inside of the Printer If the printed paper is recommended. Make sure that the Inner Cover is not resolved after performing cleaning twice, the protrusions inside of the printer can be performed from the Auto Sheet Feeder. 2. See "Cleaning the Protrusions Inside the Printer" on , and then remove any paper from the printer itself. 1. it . 4. Press the Open Button...
Quick Start Guide
Page 64
... z "Printer Does Not Start" on page 69 z "Paper Does Not Feed Properly" on page 70 z "Paper Jams" on page 72 z "ALARM Lamp Flashes Orange" on page 76 z "ALARM Lamp Flashes Orange" on page 76 z "POWER Lamp Flashes Green and ALARM Lamp Flashes Orange Alternately" on page 78 z "Error Message Appears on the Screen" on page 78 z "Writing Error/Output Error/Communication Error" on page 78 z "Error Regarding Automatic Duplex Printing Is Displayed" on page 79 z "Error No.: 300 Is Displayed" on page...
... z "Printer Does Not Start" on page 69 z "Paper Does Not Feed Properly" on page 70 z "Paper Jams" on page 72 z "ALARM Lamp Flashes Orange" on page 76 z "ALARM Lamp Flashes Orange" on page 76 z "POWER Lamp Flashes Green and ALARM Lamp Flashes Orange Alternately" on page 78 z "Error Message Appears on the Screen" on page 78 z "Writing Error/Output Error/Communication Error" on page 78 z "Error Regarding Automatic Duplex Printing Is Displayed" on page 79 z "Error No.: 300 Is Displayed" on page...
Quick Start Guide
Page 69
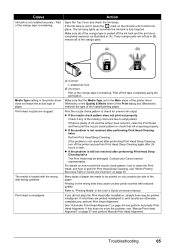
... off the printer and perform Print Head Deep Cleaning again after performing Print Head Deep Cleaning, turn off the tape completely along the perforation. Make sure that ink is not lit, press the mark on page 44 and perform Automatic Print Head Alignment. If ruled lines are printed misaligned or print results are clogged. Print Head is remaining. Contact your Canon service representative. Many types of the paper. If the problem is loaded with reduced...
... off the printer and perform Print Head Deep Cleaning again after performing Print Head Deep Cleaning, turn off the tape completely along the perforation. Make sure that ink is not lit, press the mark on page 44 and perform Automatic Print Head Alignment. If ruled lines are printed misaligned or print results are clogged. Print Head is remaining. Contact your Canon service representative. Many types of the paper. If the problem is loaded with reduced...
Quick Start Guide
Page 81
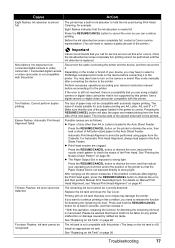
... button on the model or brand of media suitable for detecting the remaining ink level is off.) Install an appropriate ink tank. z The Paper Output Slot is nearly full. The remaining ink level cannot be compatible with this operation, releasing the function for auto duplex printing are clogged. See "Replacing an Ink Tank" on page 47. Depending on the printer to strong light. The sizes of your device's instruction manual before connecting it . Perform necessary operations...
... button on the model or brand of media suitable for detecting the remaining ink level is off.) Install an appropriate ink tank. z The Paper Output Slot is nearly full. The remaining ink level cannot be compatible with this operation, releasing the function for auto duplex printing are clogged. See "Replacing an Ink Tank" on page 47. Depending on the printer to strong light. The sizes of your device's instruction manual before connecting it . Perform necessary operations...

Quick Start Guide
Page 83
... software you are Letter, A4, B5, A5, and 5" x 7" / 127.0 x 177.8 mm. Troubleshooting 79 Printer driver is not available. Then try printing again. Check the printer port settings. (1)Click Start > Control Panel > Printers and Other Hardware > Printers and Faxes. The page sizes that can be installed properly. Note To switch to confirm the port settings. In non-XP Windows, click Start > Settings > Printers. (2)Click the Canon iP4300 icon. (3)Open the File menu and select Properties. (4)Click the Ports tab to manual duplex printing...
... software you are Letter, A4, B5, A5, and 5" x 7" / 127.0 x 177.8 mm. Troubleshooting 79 Printer driver is not available. Then try printing again. Check the printer port settings. (1)Click Start > Control Panel > Printers and Other Hardware > Printers and Faxes. The page sizes that can be installed properly. Note To switch to confirm the port settings. In non-XP Windows, click Start > Settings > Printers. (2)Click the Canon iP4300 icon. (3)Open the File menu and select Properties. (4)Click the Ports tab to manual duplex printing...
Quick Start Guide
Page 84
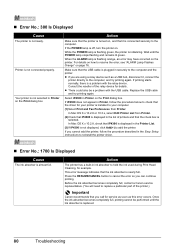
... ink absorber is installed to resolve the error, see "ALARM Lamp Flashes Orange" on the Print dialog box. If iP4300 does not appear in the Easy Setup Instructions to hold the ink used during Print Head Cleaning, for details. Before the ink absorber becomes completely full, contact a Canon service representative. (You will need to the computer and the printer. Make sure that iP4300 is replaced. 80 Troubleshooting Press the RESUME/CANCEL button to add...
... ink absorber is installed to resolve the error, see "ALARM Lamp Flashes Orange" on the Print dialog box. If iP4300 does not appear in the Easy Setup Instructions to hold the ink used during Print Head Cleaning, for details. Before the ink absorber becomes completely full, contact a Canon service representative. (You will need to the computer and the printer. Make sure that iP4300 is replaced. 80 Troubleshooting Press the RESUME/CANCEL button to add...
Quick Start Guide
Page 86
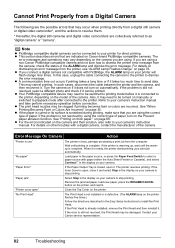
... troubles with PictBridge, the ALARM lamp on the Prevent paper abrasion function. "Paper Error" If the Paper Output Tray is still not resolved, the Print Head may need to be connected to the printer. "Paper jam" Select Stop in the display on the model of the camera. Note z PictBridge compatible digital cameras can be turned on manually or switched to playback mode after connected to your Canon service representative. 82 Troubleshooting The error messages and operations may need to install the Print Head...
... troubles with PictBridge, the ALARM lamp on the Prevent paper abrasion function. "Paper Error" If the Paper Output Tray is still not resolved, the Print Head may need to be connected to the printer. "Paper jam" Select Stop in the display on the model of the camera. Note z PictBridge compatible digital cameras can be turned on manually or switched to playback mode after connected to your Canon service representative. 82 Troubleshooting The error messages and operations may need to install the Print Head...

Quick Start Guide
Page 98
... technical support* options: z Interactive troubleshooting, e-mail technical support, the latest driver downloads and answers to the Canon USA repair facility. InstantExchange Service expedites, usually by the second business day, the exchange of the problem and, if possible, correct it over the telephone, and you elect the InstantExchange option, a reference number will be asked questions (www.canontechsupport.com) z Toll-free live technical support...
... technical support* options: z Interactive troubleshooting, e-mail technical support, the latest driver downloads and answers to the Canon USA repair facility. InstantExchange Service expedites, usually by the second business day, the exchange of the problem and, if possible, correct it over the telephone, and you elect the InstantExchange option, a reference number will be asked questions (www.canontechsupport.com) z Toll-free live technical support...
Easy Setup Instructions
Page 1
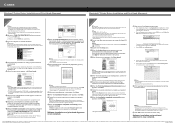
.... • A USB cable is set to connect the printer with your product. a Pull out the cassette from the ink tank. Paper Guide Print Side Cover Guide Cassette Cover b Remove the cover of the shipping tapes. Note Loading paper in both the Auto Sheet Feeder and Cassette. Press the Open Button to the wall outlet. Caution There may occur. c Firmly raise the Print Head Lock Lever until it clicks into place. Protective Cap Ink Port Electrical Contacts...
.... • A USB cable is set to connect the printer with your product. a Pull out the cassette from the ink tank. Paper Guide Print Side Cover Guide Cassette Cover b Remove the cover of the shipping tapes. Note Loading paper in both the Auto Sheet Feeder and Cassette. Press the Open Button to the wall outlet. Caution There may occur. c Firmly raise the Print Head Lock Lever until it clicks into place. Protective Cap Ink Port Electrical Contacts...
Easy Setup Instructions
Page 2
... A4-size blank paper is located on the inside of Adobe Systems Incorporated in black and blue. • When Automatic Print Head Alignment cannot be executed properly, the ALARM lamp on the operating system you see the Found New Hardware Wizard, remove the USB cable. Note • The pattern is automatically adjusted by printing the pattern below . Printed in the Auto Sheet Feeder (top paper feeder). Windows® Printer Driver Installation and Print Head Alignment Macintosh® Printer Driver Installation and Print Head Alignment Windows...
... A4-size blank paper is located on the inside of Adobe Systems Incorporated in black and blue. • When Automatic Print Head Alignment cannot be executed properly, the ALARM lamp on the operating system you see the Found New Hardware Wizard, remove the USB cable. Note • The pattern is automatically adjusted by printing the pattern below . Printed in the Auto Sheet Feeder (top paper feeder). Windows® Printer Driver Installation and Print Head Alignment Macintosh® Printer Driver Installation and Print Head Alignment Windows...


