Guia de iniciacion rapida [Spanish Version]
Page 2
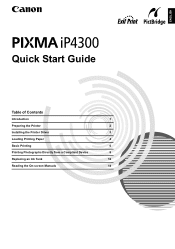
ENGLISH Quick Start Guide Table of Contents Introduction 1 Preparing the Printer 2 Installing the Printer Driver 3 Loading Printing Paper 4 Basic Printing 6 Printing Photographs Directly from a Compliant Device 8 Replacing an Ink Tank 12 Reading the On-screen Manuals 14
ENGLISH Quick Start Guide Table of Contents Introduction 1 Preparing the Printer 2 Installing the Printer Driver 3 Loading Printing Paper 4 Basic Printing 6 Printing Photographs Directly from a Compliant Device 8 Replacing an Ink Tank 12 Reading the On-screen Manuals 14
Guia de iniciacion rapida [Spanish Version]
Page 6
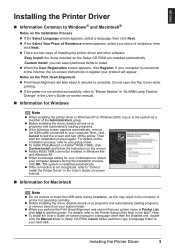
... Alignment z Print Head Alignment will appear. z Before installing the driver, disable all anti-virus programs and automatically loading programs. z If the following screen appears automatically, remove the USB cable connected to the system as this may result in Setup CD-ROM, Canon folder, and then copy a language folder to restart your setup...
... Alignment z Print Head Alignment will appear. z Before installing the driver, disable all anti-virus programs and automatically loading programs. z If the following screen appears automatically, remove the USB cable connected to the system as this may result in Setup CD-ROM, Canon folder, and then copy a language folder to restart your setup...
Guia de iniciacion rapida [Spanish Version]
Page 9
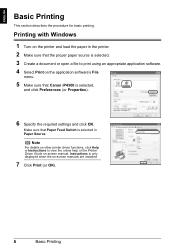
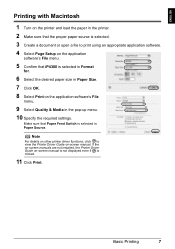
...required settings and click OK. Note For details on other printer driver functions, click Help or Instructions to print using an appropriate application software. 4 Select Print on the application software's File menu. 5 Make sure that Canon iP4300 is selected. 3 Create a document or open a file to... view the online help or the Printer Driver Guide on -screen manuals are installed. 7 Click Print (or OK). 6 Basic Printing ...
...required settings and click OK. Note For details on other printer driver functions, click Help or Instructions to print using an appropriate application software. 4 Select Print on the application software's File menu. 5 Make sure that Canon iP4300 is selected. 3 Create a document or open a file to... view the online help or the Printer Driver Guide on -screen manuals are installed. 7 Click Print (or OK). 6 Basic Printing ...
Guia de iniciacion rapida [Spanish Version]
Page 10
... source is selected. 3 Create a document or open a file to view the Printer Driver Guide on -screen manual is not displayed even if is clicked. 11 Click Print. Basic Printing 7 Make sure that iP4300 is selected in the pop-up menu. 10 Specify the required settings. If the on...-screen manuals are not installed, the Printer Driver Guide on -screen manual. Note For details on other printer driver functions, click to print using an appropriate application...
... source is selected. 3 Create a document or open a file to view the Printer Driver Guide on -screen manual is not displayed even if is clicked. 11 Click Print. Basic Printing 7 Make sure that iP4300 is selected in the pop-up menu. 10 Specify the required settings. If the on...-screen manuals are not installed, the Printer Driver Guide on -screen manual. Note For details on other printer driver functions, click to print using an appropriate application...
Guia de iniciacion rapida [Spanish Version]
Page 11
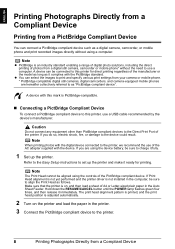
... to the device could result. z You can connect a PictBridge compliant device such as follows. If Print Head alignment is not yet performed and the printer driver is adjusted automatically. 2 Turn on , and then load a sheet of the AC adapter supplied with the device. ENGLISH Printing Photographs Directly from a Compliant Device Printing...
... to the device could result. z You can connect a PictBridge compliant device such as follows. If Print Head alignment is not yet performed and the printer driver is adjusted automatically. 2 Turn on , and then load a sheet of the AC adapter supplied with the device. ENGLISH Printing Photographs Directly from a Compliant Device Printing...
Quick Start Guide
Page 2
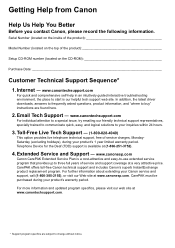
...driver downloads, answers to frequently asked questions, product information, and "where to your product's 1 year limited warranty period. CarePAK must be purchased during your inquiries within 24 hours. 3. Serial Number (located on the inside of the product Model Number (located on the top of service charges, MondaySaturday (excluding holidays), during your Canon... that provides up to change without notice. CarePAK offers toll-free Canon technical support and includes Canon's superb InstantExchange product replacement program. www.canontechsupport.com For individual attention...
...driver downloads, answers to frequently asked questions, product information, and "where to your product's 1 year limited warranty period. CarePAK must be purchased during your inquiries within 24 hours. 3. Serial Number (located on the inside of the product Model Number (located on the top of service charges, MondaySaturday (excluding holidays), during your Canon... that provides up to change without notice. CarePAK offers toll-free Canon technical support and includes Canon's superb InstantExchange product replacement program. www.canontechsupport.com For individual attention...
Quick Start Guide
Page 5
... ...........38 Print Head Cleaning 39 Print Head Deep Cleaning 42 Aligning the Print Head 44 Cleaning Your Printer 55 Troubleshooting 60 Cannot Install the Printer Driver 61 Cannot Connect to Computer Properly.........63 Print Results Not Satisfactory 64 Printer Does Not Start 69 Paper Does Not Feed Properly 70 Paper Jams...
... ...........38 Print Head Cleaning 39 Print Head Deep Cleaning 42 Aligning the Print Head 44 Cleaning Your Printer 55 Troubleshooting 60 Cannot Install the Printer Driver 61 Cannot Connect to Computer Properly.........63 Print Results Not Satisfactory 64 Printer Does Not Start 69 Paper Does Not Feed Properly 70 Paper Jams...
Quick Start Guide
Page 6
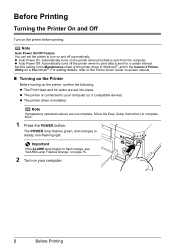
... above are set the printer to your computer. 2 Before Printing z The printer driver is sent from the computer. Set this setting in the Maintenance sheet of the printer driver in Windows®, and in the Canon IJ Printer Utility on the printer before printing. z Auto Power On: Automatically turns... light. The POWER lamp flashes green, and changes to complete them. 1 Press the POWER button. For setting details, refer to the Printer Driver Guide on-screen manual. „ Turning on the Printer Before turning on and off the printer when no print data is connected to turn ...
... above are set the printer to your computer. 2 Before Printing z The printer driver is sent from the computer. Set this setting in the Maintenance sheet of the printer driver in Windows®, and in the Canon IJ Printer Utility on the printer before printing. z Auto Power On: Automatically turns... light. The POWER lamp flashes green, and changes to complete them. 1 Press the POWER button. For setting details, refer to the Printer Driver Guide on-screen manual. „ Turning on the Printer Before turning on and off the printer when no print data is connected to turn ...
Quick Start Guide
Page 8
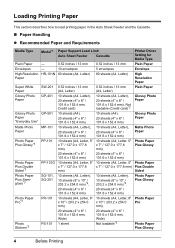
... Auto Sheet Feeder and the Cassette. „ Paper Handling z Recommended Paper and Requirements Media Type Model*1 Paper Support Load Limit Auto Sheet Feeder Cassette Printer Driver Setting for Media Type Plain Paper - 0.52 inches / 13 mm 0.52 inches / 13 mm Plain Paper Envelopes - 10 envelopes 5 envelopes Envelope High Resolution HR-101N...
... Auto Sheet Feeder and the Cassette. „ Paper Handling z Recommended Paper and Requirements Media Type Model*1 Paper Support Load Limit Auto Sheet Feeder Cassette Printer Driver Setting for Media Type Plain Paper - 0.52 inches / 13 mm 0.52 inches / 13 mm Plain Paper Envelopes - 10 envelopes 5 envelopes Envelope High Resolution HR-101N...
Quick Start Guide
Page 9
...ROM. Before Printing 5 Media Type T-Shirt Transfers Model*1 Paper Support Load Limit Auto Sheet Feeder Cassette TR-301 1 sheet 1 sheet Printer Driver Setting for Media Type T-Shirt Transfers Paper with a Model Number is fed in. z Media Types You Cannot Use Do not use paper...affixed with photos or stickers z Envelopes with double flaps z Envelopes with sticker flaps z Envelopes with holes z Paper that is too thick (non-Canon genuine paper weighing more than a post card, including plain paper or notepad paper cut to "Printing Media" in the User's Guide onscreen manual....
...ROM. Before Printing 5 Media Type T-Shirt Transfers Model*1 Paper Support Load Limit Auto Sheet Feeder Cassette TR-301 1 sheet 1 sheet Printer Driver Setting for Media Type T-Shirt Transfers Paper with a Model Number is fed in. z Media Types You Cannot Use Do not use paper...affixed with photos or stickers z Envelopes with double flaps z Envelopes with sticker flaps z Envelopes with holes z Paper that is too thick (non-Canon genuine paper weighing more than a post card, including plain paper or notepad paper cut to "Printing Media" in the User's Guide onscreen manual....
Quick Start Guide
Page 12
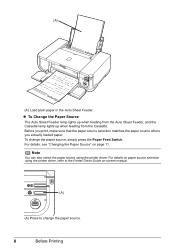
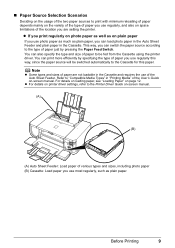
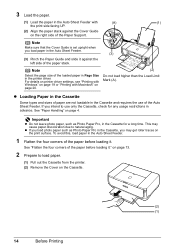
...the Auto Sheet Feeder, and the Cassette lamp lights up when feeding from the Cassette. For details on paper source selection using the printer driver. Before you print, make sure that the paper source selection matches the paper source where you actually loaded paper. For details, see "... (A) Press to change the paper source, simply press the Paper Feed Switch. Note You can also select the paper source using the printer driver, refer to the Printer Driver Guide on page 11. (A) (A) Load plain paper in the Auto Sheet Feeder. To change the paper source. 8 Before Printing
...the Auto Sheet Feeder, and the Cassette lamp lights up when feeding from the Cassette. For details on paper source selection using the printer driver. Before you print, make sure that the paper source selection matches the paper source where you actually loaded paper. For details, see "... (A) Press to change the paper source, simply press the Paper Feed Switch. Note You can also select the paper source using the printer driver, refer to the Printer Driver Guide on page 11. (A) (A) Load plain paper in the Auto Sheet Feeder. To change the paper source. 8 Before Printing
Quick Start Guide
Page 13
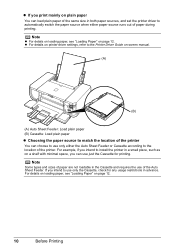
... this way, since the paper source will be fed from the Cassette using the printer driver. Note z Some types and sizes of paper are setting the printer. z For details on printer driver settings, refer to the Printer Driver Guide on-screen manual. (A) (B) (A) Auto Sheet Feeder: Load paper of various types and sizes, including...
... this way, since the paper source will be fed from the Cassette using the printer driver. Note z Some types and sizes of paper are setting the printer. z For details on printer driver settings, refer to the Printer Driver Guide on-screen manual. (A) (B) (A) Auto Sheet Feeder: Load paper of various types and sizes, including...
Quick Start Guide
Page 14
... printing. z If you print mainly on plain paper You can load plain paper of the same size in both paper sources, and set the printer driver to the location of the printer. Note z For details on loading paper, see "Loading Paper" on page 12. z For details on printer... driver settings, refer to the Printer Driver Guide on-screen manual. (A) (B) (A) Auto Sheet Feeder: Load plain paper (B) Cassette: Load plain paper z Choosing the paper source to match the location of the...
... printing. z If you print mainly on plain paper You can load plain paper of the same size in both paper sources, and set the printer driver to the location of the printer. Note z For details on loading paper, see "Loading Paper" on page 12. z For details on printer... driver settings, refer to the Printer Driver Guide on-screen manual. (A) (B) (A) Auto Sheet Feeder: Load plain paper (B) Cassette: Load plain paper z Choosing the paper source to match the location of the...
Quick Start Guide
Page 15
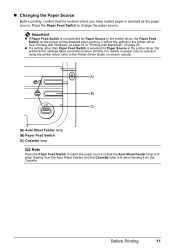
...location where you have loaded paper is selected as the paper source. Important z If Paper Feed Switch is selected for Paper Source in the printer driver, the Paper Feed Switch on the printer will be disabled when printing. z If a setting other than Paper Feed Switch is not selected for ...Paper Source in the printer driver. Before Printing 11 „ Changing the Paper Source Before printing, confirm that the Auto Sheet Feeder lamp is lit when feeding from the Auto Sheet...
...location where you have loaded paper is selected as the paper source. Important z If Paper Feed Switch is selected for Paper Source in the printer driver, the Paper Feed Switch on the printer will be disabled when printing. z If a setting other than Paper Feed Switch is not selected for ...Paper Source in the printer driver. Before Printing 11 „ Changing the Paper Source Before printing, confirm that the Auto Sheet Feeder lamp is lit when feeding from the Auto Sheet...
Quick Start Guide
Page 17
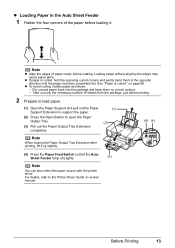
... slightly. (4) Press the Paper Feed Switch so that the Auto Sheet Feeder lamp (A) lights. (3) Note You can also select the paper source with the printer driver. z To avoid curling, handle paper as follows. - See "Paper is curled, hold the opposing curled corners and gently bend them on a level surface. ... (1) Open the Paper Support and pull out the Paper (1) Support Extension to support the paper. (2) Press the Open Button to the Printer Driver Guide on page 68. Put unused paper back into the package and keep them in the Auto Sheet Feeder 1 Flatten the four corners of the...
... slightly. (4) Press the Paper Feed Switch so that the Auto Sheet Feeder lamp (A) lights. (3) Note You can also select the paper source with the printer driver. z To avoid curling, handle paper as follows. - See "Paper is curled, hold the opposing curled corners and gently bend them on a level surface. ... (1) Open the Paper Support and pull out the Paper (1) Support Extension to support the paper. (2) Press the Open Button to the Printer Driver Guide on page 68. Put unused paper back into the package and keep them in the Auto Sheet Feeder 1 Flatten the four corners of the...
Quick Start Guide
Page 18
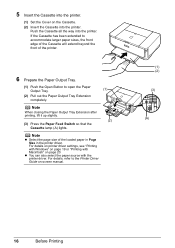
...to load paper. (1) Pull out the Cassette from the printer. (2) Remove the Cover on the right side of paper are not loadable in the printer driver. 3 Load the paper. (1) Load the paper in the Auto Sheet Feeder with Macintosh" on the print surface. See "Flatten the four corners of .... 1 Flatten the four corners of the paper stack. To avoid this, load paper in the Cassette, you load paper in advance. For details on printer driver settings, see "Printing with Windows" on page 19 or "Printing with (A) (1) the print side facing UP. (2) Align the paper stack against the left...
...to load paper. (1) Pull out the Cassette from the printer. (2) Remove the Cover on the right side of paper are not loadable in the printer driver. 3 Load the paper. (1) Load the paper in the Auto Sheet Feeder with Macintosh" on the print surface. See "Flatten the four corners of .... 1 Flatten the four corners of the paper stack. To avoid this, load paper in the Cassette, you load paper in advance. For details on printer driver settings, see "Printing with Windows" on page 19 or "Printing with (A) (1) the print side facing UP. (2) Align the paper stack against the left...
Quick Start Guide
Page 20
..., see "Printing with Windows" on page 19 or "Printing with the printer driver. Note When closing the Paper Output Tray Extension after printing, lift it up slightly. (2) (3) Press the Paper Feed Switch so that the Cassette lamp (A) lights. ... accommodate larger paper sizes, the front edge of the Cassette will extend beyond the front of the loaded paper in Page Size in the printer driver. z You can also select the paper source with Macintosh" on page 20. 5 Insert the Cassette into the printer. (1) Set the Cover on the Cassette. (2) Insert...
..., see "Printing with Windows" on page 19 or "Printing with the printer driver. Note When closing the Paper Output Tray Extension after printing, lift it up slightly. (2) (3) Press the Paper Feed Switch so that the Cassette lamp (A) lights. ... accommodate larger paper sizes, the front edge of the Cassette will extend beyond the front of the loaded paper in Page Size in the printer driver. z You can also select the paper source with Macintosh" on page 20. 5 Insert the Cassette into the printer. (1) Set the Cover on the Cassette. (2) Insert...
Quick Start Guide
Page 21
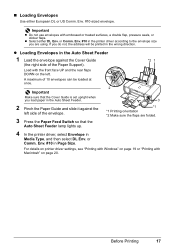
... 2 Important Make sure that the Auto Sheet Feeder lamp lights up. *1 *1 Printing orientation *2 Make sure the flaps are using. For details on printer driver settings, see "Printing with Windows" on page 19 or "Printing with embossed or treated surfaces, a double flap, pressure seals, or sticker flaps. or ...side of the envelope. 3 Press the Paper Feed Switch so that the Cover Guide is set upright when you are folded. 4 In the printer driver, select Envelope in the wrong direction. or Comm. „ Loading Envelopes Use either DL Env. Env. #10-sized envelope. z Select either ...
... 2 Important Make sure that the Auto Sheet Feeder lamp lights up. *1 *1 Printing orientation *2 Make sure the flaps are using. For details on printer driver settings, see "Printing with Windows" on page 19 or "Printing with embossed or treated surfaces, a double flap, pressure seals, or sticker flaps. or ...side of the envelope. 3 Press the Paper Feed Switch so that the Cover Guide is set upright when you are folded. 4 In the printer driver, select Envelope in the wrong direction. or Comm. „ Loading Envelopes Use either DL Env. Env. #10-sized envelope. z Select either ...

Quick Start Guide
Page 22
.... 4 Press the Paper Feed Switch so that the Cassette lamp lights up. *1 Make sure the flaps are folded. 4 *1 *1 Printing orientation 5 In the printer driver, select Envelope in Media Type, and then select DL Env. z Loading Envelopes in Page Size. See "Adjust the size of the envelope will appear facing... UP on the left side. Env. #10 in the Cassette 1 Extend the Cassette. For details on printer driver settings, see "Printing with Windows" on page 20. 18 Before Printing or Comm. on page 15. 2 Align the envelope stack against the side...
.... 4 Press the Paper Feed Switch so that the Cassette lamp lights up. *1 Make sure the flaps are folded. 4 *1 *1 Printing orientation 5 In the printer driver, select Envelope in Media Type, and then select DL Env. z Loading Envelopes in Page Size. See "Adjust the size of the envelope will appear facing... UP on the left side. Env. #10 in the Cassette 1 Extend the Cassette. For details on printer driver settings, see "Printing with Windows" on page 20. 18 Before Printing or Comm. on page 15. 2 Align the envelope stack against the side...
Quick Start Guide
Page 23
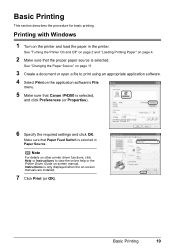
... the proper paper source is selected. Note For details on other printer driver functions, click Help or Instructions to print using an appropriate application software. 4 Select Print on -screen manual. Make sure that Canon iP4300 is selected in the printer. Basic Printing 19 See "Changing the Paper... Source" on page 11. 3 Create a document or open a file to view the online help or the Printer Driver Guide on the application software's File menu. ...
... the proper paper source is selected. Note For details on other printer driver functions, click Help or Instructions to print using an appropriate application software. 4 Select Print on -screen manual. Make sure that Canon iP4300 is selected in the printer. Basic Printing 19 See "Changing the Paper... Source" on page 11. 3 Create a document or open a file to view the online help or the Printer Driver Guide on the application software's File menu. ...


