iP4200 Easy Setup Instructions
Page 1
...lamp still flashes orange even after the printer has stopped making operating noises, an ink tank may prevent the ink from being ejected properly. POWER Button POWER Lamp 3 Raise the top cover. Lower the inner cover. Print Head Nozzles Electrical Contacts 3 Firmly raise the print head lock lever. ...guide, then slide the paper guide toward the left open the paper support and extend the paper output tray. PIXMA iP4200 Photo Printer Documentation and Software Kit PIXMA iP4200 Print Head Power Cord CLI-8BK Black CLI-8Y Yellow PGI-5BK Black CLI-8M Magenta CLI-8C Cyan Ink Tanks 1 ...
...lamp still flashes orange even after the printer has stopped making operating noises, an ink tank may prevent the ink from being ejected properly. POWER Button POWER Lamp 3 Raise the top cover. Lower the inner cover. Print Head Nozzles Electrical Contacts 3 Firmly raise the print head lock lever. ...guide, then slide the paper guide toward the left open the paper support and extend the paper output tray. PIXMA iP4200 Photo Printer Documentation and Software Kit PIXMA iP4200 Print Head Power Cord CLI-8BK Black CLI-8Y Yellow PGI-5BK Black CLI-8M Magenta CLI-8C Cyan Ink Tanks 1 ...
iP4200 Quick Start Guide
Page 6
... or Print dialog box, click in the upper right corner. Clicking provides detailed information about , or click the Help button when displayed. The POWER lamp flashes green while the printer warms up and changes to use the online help within your desired topic. When the Help window appears, select... the F1 key, or click in the lower left corner. If the ALARM lamp begins flashing orange, refer to know more information, view the iP4200 User's Guide and Printer Driver Guide installed on your computer, or use them. For more about each setting. Then click the feature you want to...
... or Print dialog box, click in the upper right corner. Clicking provides detailed information about , or click the Help button when displayed. The POWER lamp flashes green while the printer warms up and changes to use the online help within your desired topic. When the Help window appears, select... the F1 key, or click in the lower left corner. If the ALARM lamp begins flashing orange, refer to know more information, view the iP4200 User's Guide and Printer Driver Guide installed on your computer, or use them. For more about each setting. Then click the feature you want to...
iP4200 Quick Start Guide
Page 7
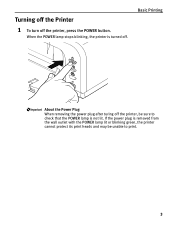
If the power plug is turned off. Turning off the Printer 1 To turn off the printer, be unable to check that the POWER lamp is not lit. Basic Printing About the Power Plug When removing the power plug after turing off the printer, press the POWER button. When the POWER lamp stops blinking, the printer is removed from the wall outlet with the POWER lamp lit or blinking green, the printer cannot protect its print heads and may be sure to print. 3
If the power plug is turned off. Turning off the Printer 1 To turn off the printer, be unable to check that the POWER lamp is not lit. Basic Printing About the Power Plug When removing the power plug after turing off the printer, press the POWER button. When the POWER lamp stops blinking, the printer is removed from the wall outlet with the POWER lamp lit or blinking green, the printer cannot protect its print heads and may be sure to print. 3

iP4200 Quick Start Guide
Page 35
... settings that can be set up the device for direct printing. For details, refer to the printer. A PictBridge-compliant device. A Canon Bubble Jet Direct compatible digital camera. „ Printing Photographs Directly from a PictBridge Compliant Device When operating the device, be made depending... settings The settings explained below . When the connection between the device and printer has been established, the POWER lamp on the printer flashes twice. * The power-on sequence may be made , the default setting explained above is used in the instruction manual supplied with...
... settings that can be set up the device for direct printing. For details, refer to the printer. A PictBridge-compliant device. A Canon Bubble Jet Direct compatible digital camera. „ Printing Photographs Directly from a PictBridge Compliant Device When operating the device, be made depending... settings The settings explained below . When the connection between the device and printer has been established, the POWER lamp on the printer flashes twice. * The power-on sequence may be made , the default setting explained above is used in the instruction manual supplied with...
iP4200 Quick Start Guide
Page 49
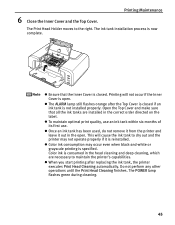
... grayscale printing is closed if an ink tank is now complete. This will not occur if the Inner Cover is consumed in the open . The POWER lamp flashes green during cleaning. 45
... grayscale printing is closed if an ink tank is now complete. This will not occur if the Inner Cover is consumed in the open . The POWER lamp flashes green during cleaning. 45
iP4200 Quick Start Guide
Page 51
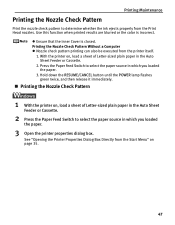
... select the paper source in which you loaded the paper. 3. z Ensure that the Inner Cover is incorrect. Hold down the RESUME/CANCEL button until the POWER lamp flashes green twice, and then release it immediately. „ Printing the Nozzle Check Pattern 1 With the printer on , load a sheet of Letter-sized plain...
... select the paper source in which you loaded the paper. 3. z Ensure that the Inner Cover is incorrect. Hold down the RESUME/CANCEL button until the POWER lamp flashes green twice, and then release it immediately. „ Printing the Nozzle Check Pattern 1 With the printer on , load a sheet of Letter-sized plain...

iP4200 Quick Start Guide
Page 56
... on page 35. 52 Note that the Inner Cover is directly displayed when you click Cleaning on , hold down the RESUME/CANCEL button until the POWER lamp flashes green once, and then release it immediately. Cleaning the Print Head Without a Computer z The Print Head can also be absorbed in the nozzle...
... on page 35. 52 Note that the Inner Cover is directly displayed when you click Cleaning on , hold down the RESUME/CANCEL button until the POWER lamp flashes green once, and then release it immediately. Cleaning the Print Head Without a Computer z The Print Head can also be absorbed in the nozzle...

iP4200 Quick Start Guide
Page 57
Print Head Cleaning starts when the POWER lamp starts blinking green. The nozzle check pattern will not be checked before cleaning. (4) Click Execute. Clicking Initial Check Items displays the items to clean ...
Print Head Cleaning starts when the POWER lamp starts blinking green. The nozzle check pattern will not be checked before cleaning. (4) Click Execute. Clicking Initial Check Items displays the items to clean ...

iP4200 Quick Start Guide
Page 59
... the Print Head condition with the printed nozzle check pattern. See "Print Head Deep Cleaning" on page 56. 55 Print Head Cleaning starts when the POWER lamp starts blinking green. Printing Maintenance (3) Select the ink group to print the nozzle check pattern. When cleaning the nozzles of black ink tanks: select...
... the Print Head condition with the printed nozzle check pattern. See "Print Head Deep Cleaning" on page 56. 55 Print Head Cleaning starts when the POWER lamp starts blinking green. Printing Maintenance (3) Select the ink group to print the nozzle check pattern. When cleaning the nozzles of black ink tanks: select...

iP4200 Quick Start Guide
Page 60
... See "Opening the Printer Properties Dialog Box Directly from the Start Menu" on . 2 Open the printer properties dialog box. Print Head Deep Cleaning consumes more powerful process. Printing Maintenance Print Head Deep Cleaning If print quality does not improve by standard Print Head Cleaning, try Print Head Deep Cleaning, which is...
... See "Opening the Printer Properties Dialog Box Directly from the Start Menu" on . 2 Open the printer properties dialog box. Print Head Deep Cleaning consumes more powerful process. Printing Maintenance Print Head Deep Cleaning If print quality does not improve by standard Print Head Cleaning, try Print Head Deep Cleaning, which is...

iP4200 Quick Start Guide
Page 61
... still not clean, open the Top Cover and ensure that color. If a particular color is displayed, click OK. Print Head Deep Cleaning starts when the POWER lamp starts blinking green. Do not perform any other operation until the Print Head Deep Cleaning finishes. Contact the Customer Care Center. 57 Clicking Initial...
... still not clean, open the Top Cover and ensure that color. If a particular color is displayed, click OK. Print Head Deep Cleaning starts when the POWER lamp starts blinking green. Do not perform any other operation until the Print Head Deep Cleaning finishes. Contact the Customer Care Center. 57 Clicking Initial...

iP4200 Quick Start Guide
Page 63
... page 47. Be sure to perform another Print Head Deep Cleaning 24 hours after turning off the printer. Print Head Deep Cleaning starts when the POWER lamp starts blinking green. z If this does not solve the problem, the Print Head may be checked before cleaning. (4) Click OK.
... page 47. Be sure to perform another Print Head Deep Cleaning 24 hours after turning off the printer. Print Head Deep Cleaning starts when the POWER lamp starts blinking green. z If this does not solve the problem, the Print Head may be checked before cleaning. (4) Click OK.
iP4200 Quick Start Guide
Page 64
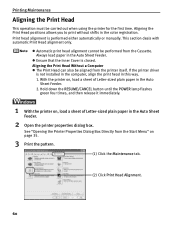
... only. With the printer on, load a sheet of Letter-sized plain paper in the Auto Sheet Feeder. 2. Hold down the RESUME/CANCEL button until the POWER lamp flashes green four times, and then release it immediately. 1 With the printer on page 35. 3 Print the pattern. (1) Click the Maintenance tab. (2) Click Print...
... only. With the printer on, load a sheet of Letter-sized plain paper in the Auto Sheet Feeder. 2. Hold down the RESUME/CANCEL button until the POWER lamp flashes green four times, and then release it immediately. 1 With the printer on page 35. 3 Print the pattern. (1) Click the Maintenance tab. (2) Click Print...

iP4200 Quick Start Guide
Page 73
... then Custom Settings. In Windows XP and Windows 2000 When not logged on , hold down the RESUME/CANCEL button until the POWER lamp flashes green seven times, and then release the button. Select the Prevent paper abrasion check box and click Send. Open the... after correcting paper curl as a computer administrator or Administrators, you cannot open the Custom Settings dialog box. Select Custom Settings from Custom Settings in the Canon IJ Printer Utility dialog box (Macintosh), the setting is curled, it with plain regular paper to 0.2 in the figure below. (1) (2) *1 3. Place...
... then Custom Settings. In Windows XP and Windows 2000 When not logged on , hold down the RESUME/CANCEL button until the POWER lamp flashes green seven times, and then release the button. Select the Prevent paper abrasion check box and click Send. Open the... after correcting paper curl as a computer administrator or Administrators, you cannot open the Custom Settings dialog box. Select Custom Settings from Custom Settings in the Canon IJ Printer Utility dialog box (Macintosh), the setting is curled, it with plain regular paper to 0.2 in the figure below. (1) (2) *1 3. Place...
iP4200 Quick Start Guide
Page 76
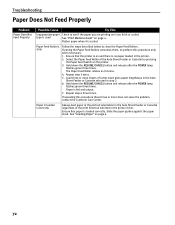
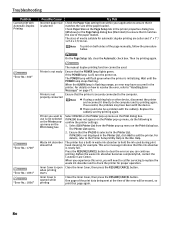
Select the Paper Feed Roller of the print direction selected in the printer. 2. Hold down the RESUME/CANCEL button and release after the POWER lamp flashes green three times. Load three or more does not solve the problem, contact the Customer Care Center. Paper is no paper loaded in ... Feed Switch on the printer. 3. The Paper Feed Roller rotates as it is loaded correctly. Hold down the RESUME/CANCEL button and release after the POWER lamp flashes green three times.
Select the Paper Feed Roller of the print direction selected in the printer. 2. Hold down the RESUME/CANCEL button and release after the POWER lamp flashes green three times. Load three or more does not solve the problem, contact the Customer Care Center. Paper is no paper loaded in ... Feed Switch on the printer. 3. The Paper Feed Roller rotates as it is loaded correctly. Hold down the RESUME/CANCEL button and release after the POWER lamp flashes green three times.
iP4200 Quick Start Guide
Page 78
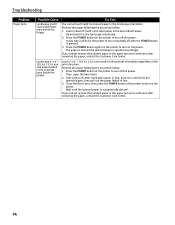
... paper in four. 3. Press the POWER button of the printer to turn on the power. Remove the paper following the procedure below . 1. Close the Rear Cover, then press the POWER button of the printer to turn off after the POWER button is ejected accordingly. If you...paper or the paper jam error continues after removing the paper, contact the Customer Care Center. 74 Press the POWER button again on the printer to turn completely off the power. Troubleshooting Problem Paper Jams Possible Cause Try This Landscape Credit Card-sized Paper Jams inside the printer Load 4"...
... paper in four. 3. Press the POWER button of the printer to turn on the power. Remove the paper following the procedure below . 1. Close the Rear Cover, then press the POWER button of the printer to turn off after the POWER button is ejected accordingly. If you...paper or the paper jam error continues after removing the paper, contact the Customer Care Center. 74 Press the POWER button again on the printer to turn completely off the power. Troubleshooting Problem Paper Jams Possible Cause Try This Landscape Credit Card-sized Paper Jams inside the printer Load 4"...
iP4200 Quick Start Guide
Page 83
...POWER lamp stops flashing. Select the paper source with the Paper Feed Switch on the printer, or select it in and turn the printer on. For non-Windows XP, click Start, select Settings, and then Printers. 2. Select the icon of your printer, and Uninstall. 2. A USB port is selected if either USBnnn (Canon iP4200...) or MPUSBPRNnn (Canon iP4200) (where n is a number) is initializing. If successful, the problem may have been with the cable(s). Replace the cable...
...POWER lamp stops flashing. Select the paper source with the Paper Feed Switch on the printer, or select it in and turn the printer on. For non-Windows XP, click Start, select Settings, and then Printers. 2. Select the icon of your printer, and Uninstall. 2. A USB port is selected if either USBnnn (Canon iP4200...) or MPUSBPRNnn (Canon iP4200) (where n is a number) is initializing. If successful, the problem may have been with the cable(s). Replace the cable...
iP4200 Quick Start Guide
Page 84
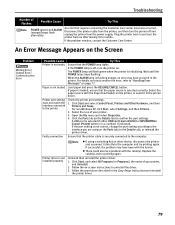
... is flashing orange, an error may have occurred in waste ink absorber to ensure that the POWER lamp lights green. If successful, the problem may have been with the cable(s). If iP4200 does not appear on the Printer pop-up menu on the Page Setup tab in the Printer...Ensure that it directly to "Handling Error Messages" on . This error message indicates that the iP4200 is initializing. Inner Cover is off, turn the printer on page 77. Then try printing again. The POWER lamp will be a problem with the device. Replace the cable(s) and try printing again. Printer...
... is flashing orange, an error may have occurred in waste ink absorber to ensure that the POWER lamp lights green. If successful, the problem may have been with the cable(s). If iP4200 does not appear on the Printer pop-up menu on the Page Setup tab in the Printer...Ensure that it directly to "Handling Error Messages" on . This error message indicates that the iP4200 is initializing. Inner Cover is off, turn the printer on page 77. Then try printing again. The POWER lamp will be a problem with the device. Replace the cable(s) and try printing again. Printer...
iP4200 Quick Start Guide
Page 86
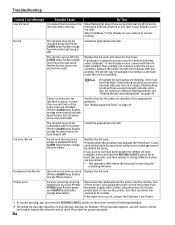
... 38. Replace the empty ink tank immediately after the printing. The printer may not be liable for detecting the remaining ink level. Canon shall not be compatible with the refilled ink tank installed, press and hold the RESUME/CANCEL button for at least five seconds, and... occurred Replace the ink tank. (Printer ALARM lamp flashes orange fifteen times) Printer error An error requiring servicing might have occurred (Printer POWER lamp flashes green and ALARM lamp flashes orange alternately) Disconnect the cable between the printer and the camera, turn on your camera to...
... 38. Replace the empty ink tank immediately after the printing. The printer may not be liable for detecting the remaining ink level. Canon shall not be compatible with the refilled ink tank installed, press and hold the RESUME/CANCEL button for at least five seconds, and... occurred Replace the ink tank. (Printer ALARM lamp flashes orange fifteen times) Printer error An error requiring servicing might have occurred (Printer POWER lamp flashes green and ALARM lamp flashes orange alternately) Disconnect the cable between the printer and the camera, turn on your camera to...
iP4200 Quick Start Guide
Page 90
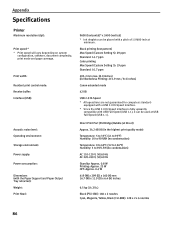
... Speed (Custom Setting 5): 19 ppm Standard: 10.7 ppm 203.2 mm max. (8.0 inches) (for Borderless Printing: 215.9 mm / 8.5 inches) Canon extended mode 42 KB USB 2.0 Hi-Speed * All operations are not guaranteed for computers standard- equipped with a USB 2.0 Hi-Speed interface. * ...Speed (USB 1.1). Print width: Resident print control mode: Receive buffer: Interface (USB): Acoustic noise level: Operating environment: Storage environment: Power supply: Power consumption: Dimensions (with the Paper Support and Paper Output Tray retracted): Weight: Print Head: 9600 (horizontal)* x 2400 (vertical) * ...
... Speed (Custom Setting 5): 19 ppm Standard: 10.7 ppm 203.2 mm max. (8.0 inches) (for Borderless Printing: 215.9 mm / 8.5 inches) Canon extended mode 42 KB USB 2.0 Hi-Speed * All operations are not guaranteed for computers standard- equipped with a USB 2.0 Hi-Speed interface. * ...Speed (USB 1.1). Print width: Resident print control mode: Receive buffer: Interface (USB): Acoustic noise level: Operating environment: Storage environment: Power supply: Power consumption: Dimensions (with the Paper Support and Paper Output Tray retracted): Weight: Print Head: 9600 (horizontal)* x 2400 (vertical) * ...


