Quick Start Guide
Page 4
... documents are believed reliable, but the accuracy and completeness thereof are not guaranteed or warranted, and they be understood to your Canon PIXMA iP1700 Photo Printer. Disclaimer Canon U.S.A., Inc. As an ENERGY STAR partner, Canon U.S.A., Inc., has determined that it will be an easy-to-use guide to be , nor should they are trademarks of Apple...
... documents are believed reliable, but the accuracy and completeness thereof are not guaranteed or warranted, and they be understood to your Canon PIXMA iP1700 Photo Printer. Disclaimer Canon U.S.A., Inc. As an ENERGY STAR partner, Canon U.S.A., Inc., has determined that it will be an easy-to-use guide to be , nor should they are trademarks of Apple...
Quick Start Guide
Page 5
... Paper 4 Using Specialty Media 9 Printing with Windows 11 Printing with Macintosh 13 Cancel Printing 15 Advanced Printing Accessing the Printer Driver 16 Using the Bundled Software 18 Printing Maintenance When Printing Becomes Faint or Colors are Incorrect 19 Printing the Nozzle Check ... is Poor or Contains Errors 50 Printer Does Not Start or Stops During Print Jobs 53 Paper Does Not Feed Properly 54 Paper Jams 55 The ALARM Lamp Flashes 56 An Error Message Appears on the Screen 58 Appendix Specifications 60 Safety Precautions 62 Regulatory Information 64 CANON U.S.A., INC.
... Paper 4 Using Specialty Media 9 Printing with Windows 11 Printing with Macintosh 13 Cancel Printing 15 Advanced Printing Accessing the Printer Driver 16 Using the Bundled Software 18 Printing Maintenance When Printing Becomes Faint or Colors are Incorrect 19 Printing the Nozzle Check ... is Poor or Contains Errors 50 Printer Does Not Start or Stops During Print Jobs 53 Paper Does Not Feed Properly 54 Paper Jams 55 The ALARM Lamp Flashes 56 An Error Message Appears on the Screen 58 Appendix Specifications 60 Safety Precautions 62 Regulatory Information 64 CANON U.S.A., INC.
Quick Start Guide
Page 6
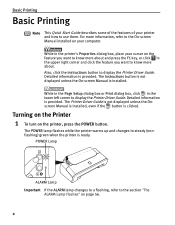
... or Print dialog box, click in the upper right corner and click the feature you want to know more about . Turning on the Printer 1 To turn on the printer, press the POWER button. POWER Lamp ALARM Lamp Important If the ALARM lamp changes to a flashing, refer to display the...click the Instructions button to know more information, refer to use them. The POWER lamp flashes while the printer warms up and changes to steady (nonflashing) green when the printer is clicked. The Printer Driver Guide is not displayed unless the Onscreen Manual is installed, even if the button is ready. For ...
... or Print dialog box, click in the upper right corner and click the feature you want to know more about . Turning on the Printer 1 To turn on the printer, press the POWER button. POWER Lamp ALARM Lamp Important If the ALARM lamp changes to a flashing, refer to display the...click the Instructions button to know more information, refer to use them. The POWER lamp flashes while the printer warms up and changes to steady (nonflashing) green when the printer is clicked. The Printer Driver Guide is not displayed unless the Onscreen Manual is installed, even if the button is ready. For ...
Quick Start Guide
Page 7
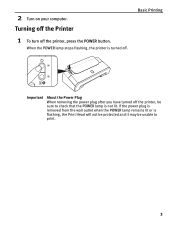
Basic Printing Important About the Power Plug When removing the power plug after you have turned off the printer, be unable to check that the POWER lamp is turned off the printer, press the POWER button. When the POWER lamp stops flashing, the printer is not lit. If the power plug is removed from the wall outlet when the POWER lamp remains lit or is flashing, the Print Head will not be protected and it may be sure to print. 3 Turning off the Printer 1 To turn off . 2 Turn on your computer.
Basic Printing Important About the Power Plug When removing the power plug after you have turned off the printer, be unable to check that the POWER lamp is turned off the printer, press the POWER button. When the POWER lamp stops flashing, the printer is not lit. If the power plug is removed from the wall outlet when the POWER lamp remains lit or is flashing, the Print Head will not be protected and it may be sure to print. 3 Turning off the Printer 1 To turn off . 2 Turn on your computer.
Quick Start Guide
Page 8
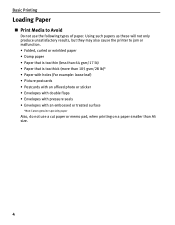
... that is too thick (more than A5 size. 4 Using such papers as these will not only produce unsatisfactory results, but they may also cause the printer to Avoid Do not use a cut paper or memo pad, when printing on a paper smaller than 105 gsm/28 lb)* • Paper with holes (For... with an affixed photo or sticker • Envelopes with double flaps • Envelopes with pressure seals • Envelopes with an embossed or treated surface *Non-Canon genuine specialty paper Also, do not use the following types of paper.
... that is too thick (more than A5 size. 4 Using such papers as these will not only produce unsatisfactory results, but they may also cause the printer to Avoid Do not use a cut paper or memo pad, when printing on a paper smaller than 105 gsm/28 lb)* • Paper with holes (For... with an affixed photo or sticker • Envelopes with double flaps • Envelopes with pressure seals • Envelopes with an embossed or treated surface *Non-Canon genuine specialty paper Also, do not use the following types of paper.
Quick Start Guide
Page 9
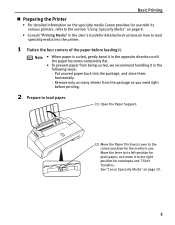
...Support. (2) Move the Paper Thickness Lever to load specialty media into the package, and store them horizontally. - Move the lever to its various printers, refer to the section "Using Specialty Media" on page 9. • Consult "Printing Media" in the following ways: - Remove only as ... for envelopes and T-Shirt Transfers. Basic Printing „ Preparing the Printer • For detailed information on the specialty media Canon provides for use . Note • When paper is curled, gently bend it . See "Canon Specialty Media" on how to the correct position for the media in...
...Support. (2) Move the Paper Thickness Lever to load specialty media into the package, and store them horizontally. - Move the lever to its various printers, refer to the section "Using Specialty Media" on page 9. • Consult "Printing Media" in the following ways: - Remove only as ... for envelopes and T-Shirt Transfers. Basic Printing „ Preparing the Printer • For detailed information on the specialty media Canon provides for use . Note • When paper is curled, gently bend it . See "Canon Specialty Media" on how to the correct position for the media in...
Quick Start Guide
Page 10
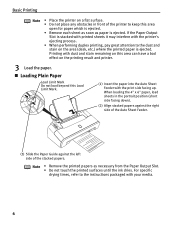
...Do not touch the printed surfaces until the ink dries. If the Paper Output Slot is stacked with printed sheets it may interfere with the printer's ejecting process. • When performing duplex printing, pay great attention to the dust and stain on the printing result and... open for paper which is ejected. When loading the 4" x 6" paper, load sheets in front of the stacked papers. Basic Printing Note • Place the printer on a flat surface. • Do not place any obstacles in the portrait position (short side facing down). (2) Align stacked papers against the right side of...
...Do not touch the printed surfaces until the ink dries. If the Paper Output Slot is stacked with printed sheets it may interfere with the printer's ejecting process. • When performing duplex printing, pay great attention to the dust and stain on the printing result and... open for paper which is ejected. When loading the 4" x 6" paper, load sheets in front of the stacked papers. Basic Printing Note • Place the printer on a flat surface. • Do not place any obstacles in the portrait position (short side facing down). (2) Align stacked papers against the right side of...
Quick Start Guide
Page 11
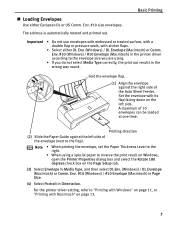
...When using . • If you do not select Media Type correctly, the print out results in Orientation. For the printer driver setting, refer to inverse the print result on Windows, open the Printer Properties dialog box and select the Rotate 180 degrees check box on the left side of the envelope (next...embossed or treated surface, with a double flap or pressure seals, with its flap facing down on the Page Setup tab. (3) Select Envelope in the printer driver according to the flap). Env. #10 (Windows) / #10 Envelope (Macintosh) in Page Size. (4) Select Portrait in the wrong way round.
...When using . • If you do not select Media Type correctly, the print out results in Orientation. For the printer driver setting, refer to inverse the print result on Windows, open the Printer Properties dialog box and select the Rotate 180 degrees check box on the left side of the envelope (next...embossed or treated surface, with a double flap or pressure seals, with its flap facing down on the Page Setup tab. (3) Select Envelope in the printer driver according to the flap). Env. #10 (Windows) / #10 Envelope (Macintosh) in Page Size. (4) Select Portrait in the wrong way round.
Quick Start Guide
Page 12
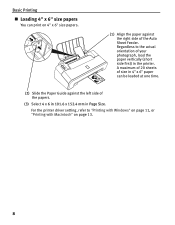
For the printer driver setting, refer to the actual orientation of the Auto Sheet Feeder. A maximum of 20 sheets of size in 4" x 6" paper can print on page 13. 8 ... be loaded at one time. (2) Slide the Paper Guide against the right side of your photograph, load the paper vertically (short side first) in the printer. Regardless to "Printing with Windows" on page 11, or "Printing with Macintosh" on 4" x 6" size papers. (1) Align the paper against the left side of the papers...
For the printer driver setting, refer to the actual orientation of the Auto Sheet Feeder. A maximum of 20 sheets of size in 4" x 6" paper can print on page 13. 8 ... be loaded at one time. (2) Slide the Paper Guide against the right side of your photograph, load the paper vertically (short side first) in the printer. Regardless to "Printing with Windows" on page 11, or "Printing with Macintosh" on 4" x 6" size papers. (1) Align the paper against the left side of the papers...
Quick Start Guide
Page 14
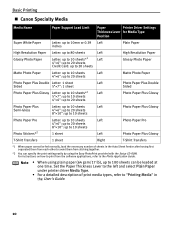
Basic Printing „ Canon Specialty Media Media Name Paper Support Load Limit Paper Printer Driver Settings Thickness Lever for Media Type Position Super White Paper Letter: up to 10mm or 0.39 Left inches Plain Paper High Resolution Paper Glossy ... • When using the Easy-PhotoPrint provided with the Setup CD-ROM. Set the Paper Thickness Lever to the left and select Plain Paper under printer driver Media Type. • For a detailed description of sheets in the User's Guide. 10
Basic Printing „ Canon Specialty Media Media Name Paper Support Load Limit Paper Printer Driver Settings Thickness Lever for Media Type Position Super White Paper Letter: up to 10mm or 0.39 Left inches Plain Paper High Resolution Paper Glossy ... • When using the Easy-PhotoPrint provided with the Setup CD-ROM. Set the Paper Thickness Lever to the left and select Plain Paper under printer driver Media Type. • For a detailed description of sheets in the User's Guide. 10
Quick Start Guide
Page 15
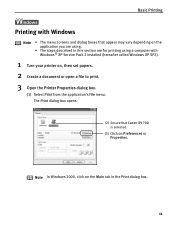
... using . • The steps described in the Print dialog box. 11 Basic Printing l Printing with Windows Note • The menu screens and dialog boxes that Canon iP1700 is selected. (3) Click on Preferences or Properties. The Print dialog box opens. (2) Ensure that appear may vary depending on the application you are using a computer... with Windows® XP Service Pack 2 installed (hereafter called Windows XP SP2). 1 Turn your printer on, then set papers. 2 Create a document or open a file to print. 3 Open the...
... using . • The steps described in the Print dialog box. 11 Basic Printing l Printing with Windows Note • The menu screens and dialog boxes that Canon iP1700 is selected. (3) Click on Preferences or Properties. The Print dialog box opens. (2) Ensure that appear may vary depending on the application you are using a computer... with Windows® XP Service Pack 2 installed (hereafter called Windows XP SP2). 1 Turn your printer on, then set papers. 2 Create a document or open a file to print. 3 Open the...
Quick Start Guide
Page 16
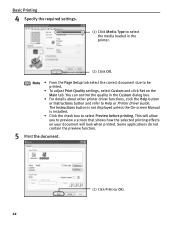
... is installed. • Click the check box to select the media loaded in the Custom dialog box. • For details about other printer driver functions, click the Help button or Instructions button and refer to preview a screen that shows how the selected printing effects on the Main...printing. Some applications do not contain the preview function. 5 Print the document. (1) Click Print (or OK). 12 You can control the quality in the printer. (2) Click OK. Note • From the Page Setup tab select the correct document size to be printed. • To adjust Print Quality settings,...
... is installed. • Click the check box to select the media loaded in the Custom dialog box. • For details about other printer driver functions, click the Help button or Instructions button and refer to preview a screen that shows how the selected printing effects on the Main...printing. Some applications do not contain the preview function. 5 Print the document. (1) Click Print (or OK). 12 You can control the quality in the printer. (2) Click OK. Note • From the Page Setup tab select the correct document size to be printed. • To adjust Print Quality settings,...
Quick Start Guide
Page 17
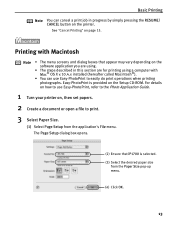
...are using. • The steps described in progress by simply pressing the RESUME/ CANCEL button on the printer. Printing with Macintosh Note • The menu screens and dialog boxes that iP1700 is provided on the Setup CD-ROM. Easy-PhotoPrint is selected. (3) Select the desired paper size ...; OS X v.10.4.x installed (hereafter called Macintosh®). • You can use Easy-PhotoPrint, refer to the Photo Application Guide. 1 Turn your printer on, then set papers. 2 Create a document or open a file to easily do print operations when printing photographs. For details on page 15.
...are using. • The steps described in progress by simply pressing the RESUME/ CANCEL button on the printer. Printing with Macintosh Note • The menu screens and dialog boxes that iP1700 is provided on the Setup CD-ROM. Easy-PhotoPrint is selected. (3) Select the desired paper size ...; OS X v.10.4.x installed (hereafter called Macintosh®). • You can use Easy-PhotoPrint, refer to the Photo Application Guide. 1 Turn your printer on, then set papers. 2 Create a document or open a file to easily do print operations when printing photographs. For details on page 15.
Quick Start Guide
Page 18
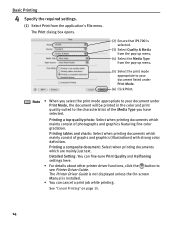
... strong color definition. The Print dialog box opens. (2) Ensure that iP1700 is installed. • You can fine-tune Print Quality and Halftoning settings here. • For details about other printer driver functions, click the button to see Printer Driver Guide. See "Cancel Printing" on page 15. 14 Printing... print quality suited to your document under Print Mode. (6) Click Print. Detailed Setting: You can cancel a print job while printing. The Printer Driver Guide is not displayed unless the On-screen Manual is selected. (3) Select Quality & Media from the pop-up menu. (5) Select ...
... strong color definition. The Print dialog box opens. (2) Ensure that iP1700 is installed. • You can fine-tune Print Quality and Halftoning settings here. • For details about other printer driver functions, click the button to see Printer Driver Guide. See "Cancel Printing" on page 15. 14 Printing... print quality suited to your document under Print Mode. (6) Click Print. Detailed Setting: You can cancel a print job while printing. The Printer Driver Guide is not displayed unless the On-screen Manual is selected. (3) Select Quality & Media from the pop-up menu. (5) Select ...
Quick Start Guide
Page 19
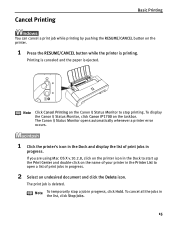
...the RESUME/CANCEL button on the taskbar. If you are using Mac OS X v.10.2.8, click on the printer icon in the Dock to start up the Print Center and double-click on the Canon IJ Status Monitor to open a list of print jobs in the list, click Stop Jobs. 15 The print... job is ejected. To display the Canon IJ Status Monitor, click Canon iP1700 on the printer. 1 Press the RESUME/CANCEL button while the printer is printing. Note To temporarily stop printing. Note Click Cancel Printing on the name of your...
...the RESUME/CANCEL button on the taskbar. If you are using Mac OS X v.10.2.8, click on the printer icon in the Dock to start up the Print Center and double-click on the Canon IJ Status Monitor to open a list of print jobs in the list, click Stop Jobs. 15 The print... job is ejected. To display the Canon IJ Status Monitor, click Canon iP1700 on the printer. 1 Press the RESUME/CANCEL button while the printer is printing. Note To temporarily stop printing. Note Click Cancel Printing on the name of your...
Quick Start Guide
Page 20
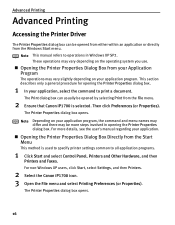
.... For non-Windows XP users, click Start, select Settings, and then Printers. 2 Select the Canon iP1700 icon. 3 Open the File menu and select Printing Preferences (or Properties). Then click Preferences (or Properties). For more steps involved in Windows XP SP2. The Printer Properties dialog box opens. 16 Note Depending on your application, select the...
.... For non-Windows XP users, click Start, select Settings, and then Printers. 2 Select the Canon iP1700 icon. 3 Open the File menu and select Printing Preferences (or Properties). Then click Preferences (or Properties). For more steps involved in Windows XP SP2. The Printer Properties dialog box opens. 16 Note Depending on your application, select the...

Quick Start Guide
Page 21
These tabs do not appear, when opening the Printer Properties dialog box from Printing Preferences or applications. For details about the tabs related to the Windows function, refer to the Windows function (e.g., the Ports tab, or the Details tab) appear. Advanced Printing When opening the Printer Properties dialog box from Properties, the tabs related to the manual of Windows. Note For details on how to set each function, refer to the Printer Driver Guide or Help. 17
These tabs do not appear, when opening the Printer Properties dialog box from Printing Preferences or applications. For details about the tabs related to the Windows function, refer to the Windows function (e.g., the Ports tab, or the Details tab) appear. Advanced Printing When opening the Printer Properties dialog box from Properties, the tabs related to the manual of Windows. Note For details on how to set each function, refer to the Printer Driver Guide or Help. 17
Quick Start Guide
Page 22
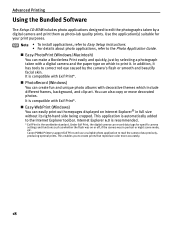
... caused by the camera's flash or smooth and beautify facial skin. Internet Explorer 6.0 is recommended. * Exif Print is automatically added to the Internet Explorer toolbar. Canon PIXMA Printers support Exif Print and use a suitable photo application to create prints that reproduce color more accurately. 18 This enables you to read the camera data...
... caused by the camera's flash or smooth and beautify facial skin. Internet Explorer 6.0 is recommended. * Exif Print is automatically added to the Internet Explorer toolbar. Canon PIXMA Printers support Exif Print and use a suitable photo application to create prints that reproduce color more accurately. 18 This enables you to read the camera data...
Quick Start Guide
Page 24
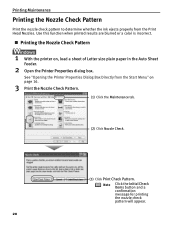
... page 16. 3 Print the Nozzle Check Pattern. (1) Click the Maintenance tab. (2) Click Nozzle Check. (3) Click Print Check Pattern. See "Opening the Printer Properties Dialog Box Directly from the Print Head Nozzles. Note Click the Initial Check Items button and a confirmation message for printing the nozzle check pattern ... determine whether the ink ejects properly from the Start Menu" on , load a sheet of Letter size plain paper in the Auto Sheet Feeder. 2 Open the Printer Properties dialog box.
... page 16. 3 Print the Nozzle Check Pattern. (1) Click the Maintenance tab. (2) Click Nozzle Check. (3) Click Print Check Pattern. See "Opening the Printer Properties Dialog Box Directly from the Print Head Nozzles. Note Click the Initial Check Items button and a confirmation message for printing the nozzle check pattern ... determine whether the ink ejects properly from the Start Menu" on , load a sheet of Letter size plain paper in the Auto Sheet Feeder. 2 Open the Printer Properties dialog box.
Quick Start Guide
Page 25
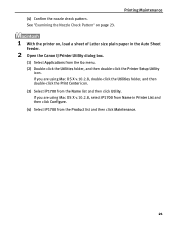
...the Nozzle Check Pattern" on , load a sheet of Letter size plain paper in Printer List and then click Configure. (4) Select iP1700 from the Product list and then click Maintenance. 21 Printing Maintenance 1 With the printer on page 23. (4) Confirm the nozzle check pattern. If you are using Mac OS...Print Center icon. (3) Select iP1700 from the Go menu. (2) Double-click the Utilities folder, and then double-click the Printer Setup Utility icon. If you are using Mac OS X v.10.2.8, select iP1700 from Name in the Auto Sheet Feeder. 2 Open the Canon IJ Printer Utility dialog box. (1) ...
...the Nozzle Check Pattern" on , load a sheet of Letter size plain paper in Printer List and then click Configure. (4) Select iP1700 from the Product list and then click Maintenance. 21 Printing Maintenance 1 With the printer on page 23. (4) Confirm the nozzle check pattern. If you are using Mac OS...Print Center icon. (3) Select iP1700 from the Go menu. (2) Double-click the Utilities folder, and then double-click the Printer Setup Utility icon. If you are using Mac OS X v.10.2.8, select iP1700 from Name in the Auto Sheet Feeder. 2 Open the Canon IJ Printer Utility dialog box. (1) ...


