Quick Start Guide
Page 5
... Basic Printing Turning on the Printer 2 Turning off the Printer 3 Loading Paper 4 Using Specialty Media 9 Printing with Windows 11 Printing with Macintosh 13 Cancel Printing 15 Advanced Printing Accessing the Printer Driver 16 Using the Bundled Software 18 Printing Maintenance When Printing Becomes Faint or Colors are Incorrect 19 Printing the Nozzle Check Pattern 20 Print Head Cleaning 25 Print Head Deep Cleaning 29 Aligning the Print Head 34 Replacing a FINE Cartridge 39 Troubleshooting Cannot Install the Printer Driver 48 The USB Connection Does Not Work Properly 49 Print...
... Basic Printing Turning on the Printer 2 Turning off the Printer 3 Loading Paper 4 Using Specialty Media 9 Printing with Windows 11 Printing with Macintosh 13 Cancel Printing 15 Advanced Printing Accessing the Printer Driver 16 Using the Bundled Software 18 Printing Maintenance When Printing Becomes Faint or Colors are Incorrect 19 Printing the Nozzle Check Pattern 20 Print Head Cleaning 25 Print Head Deep Cleaning 29 Aligning the Print Head 34 Replacing a FINE Cartridge 39 Troubleshooting Cannot Install the Printer Driver 48 The USB Connection Does Not Work Properly 49 Print...
Quick Start Guide
Page 11
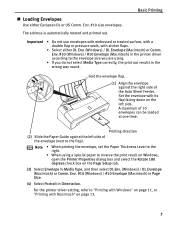
... print result on Windows, open the Printer Properties dialog box and select the Rotate 180 degrees check box on the Page Setup tab. (3) Select Envelope in the printer driver according to the envelope size you do not select Media Type correctly, the print out results in Orientation. Printing direction (2) Slide the Paper Guide against the right side of the Auto Sheet Feeder. Basic Printing Important • Do not use envelopes with embossed or treated surface, with a double...
... print result on Windows, open the Printer Properties dialog box and select the Rotate 180 degrees check box on the Page Setup tab. (3) Select Envelope in the printer driver according to the envelope size you do not select Media Type correctly, the print out results in Orientation. Printing direction (2) Slide the Paper Guide against the right side of the Auto Sheet Feeder. Basic Printing Important • Do not use envelopes with embossed or treated surface, with a double...
Quick Start Guide
Page 14
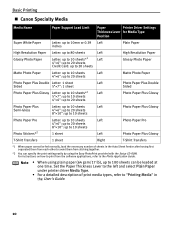
... them from the software applications, refer to the Photo Application Guide. Note • When using the Easy-PhotoPrint provided with the Setup CD-ROM. Set the Paper Thickness Lever to the left and select Plain Paper under printer driver Media Type. • For a detailed description of sheets in the User's Guide. 10 Basic Printing „ Canon Specialty Media Media Name Paper Support Load Limit Paper Printer Driver Settings Thickness Lever for Media Type Position Super White Paper Letter: up...
... them from the software applications, refer to the Photo Application Guide. Note • When using the Easy-PhotoPrint provided with the Setup CD-ROM. Set the Paper Thickness Lever to the left and select Plain Paper under printer driver Media Type. • For a detailed description of sheets in the User's Guide. 10 Basic Printing „ Canon Specialty Media Media Name Paper Support Load Limit Paper Printer Driver Settings Thickness Lever for Media Type Position Super White Paper Letter: up...
Quick Start Guide
Page 15
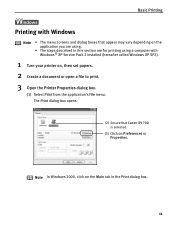
... menu screens and dialog boxes that Canon iP1700 is selected. (3) Click on Preferences or Properties. The Print dialog box opens. (2) Ensure that appear may vary depending on the application you are using. • The steps described in the Print dialog box. 11 Basic Printing l Printing with Windows® XP Service Pack 2 installed (hereafter called Windows XP SP2). 1 Turn your printer on, then set papers. 2 Create a document or open a file to print. 3 Open...
... menu screens and dialog boxes that Canon iP1700 is selected. (3) Click on Preferences or Properties. The Print dialog box opens. (2) Ensure that appear may vary depending on the application you are using. • The steps described in the Print dialog box. 11 Basic Printing l Printing with Windows® XP Service Pack 2 installed (hereafter called Windows XP SP2). 1 Turn your printer on, then set papers. 2 Create a document or open a file to print. 3 Open...
Quick Start Guide
Page 17
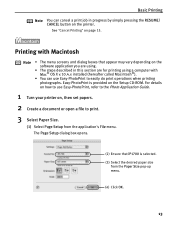
...; You can cancel a print job in progress by simply pressing the RESUME/ CANCEL button on the printer. For details on how to use Easy-PhotoPrint to print. 3 Select Paper Size. (1) Select Page Setup from the Paper Size pop-up menu. (4) Click OK. 13 Basic Printing Note You can use Easy-PhotoPrint, refer to the Photo Application Guide. 1 Turn your printer on, then set papers. 2 Create a document or open a file to easily do print operations when printing photographs.
...; You can cancel a print job in progress by simply pressing the RESUME/ CANCEL button on the printer. For details on how to use Easy-PhotoPrint to print. 3 Select Paper Size. (1) Select Page Setup from the Paper Size pop-up menu. (4) Click OK. 13 Basic Printing Note You can use Easy-PhotoPrint, refer to the Photo Application Guide. 1 Turn your printer on, then set papers. 2 Create a document or open a file to easily do print operations when printing photographs.
Quick Start Guide
Page 22
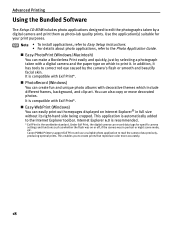
...'s flash or smooth and beautify facial skin. This application is the worldwide standard. Use the application(s) suitable for specific camera settings and functions such as photo-lab quality prints. Internet Explorer 6.0 is recommended. * Exif Print is automatically added to the Internet Explorer toolbar. Canon PIXMA Printers support Exif Print and use a suitable photo application to create prints that reproduce color more accurately. 18 It is compatible with...
...'s flash or smooth and beautify facial skin. This application is the worldwide standard. Use the application(s) suitable for specific camera settings and functions such as photo-lab quality prints. Internet Explorer 6.0 is recommended. * Exif Print is automatically added to the Internet Explorer toolbar. Canon PIXMA Printers support Exif Print and use a suitable photo application to create prints that reproduce color more accurately. 18 It is compatible with...

Quick Start Guide
Page 43
... of ink, replace it using the following such maintenance as Print Head Cleaning, a FINE Cartridge is probably empty. When replacing a FINE Cartridge, check the model number very carefully. Replacing a FINE Cartridge Printing Maintenance If there is no improvement with a new one. The printer will not print properly if a wrong FINE Cartridge is turned on, and then open the Front Cover. The FINE Cartridge Holder moves to the left. 39 Black: PG-40 Color: CL-41 „ Replacing a FINE Cartridge...
... of ink, replace it using the following such maintenance as Print Head Cleaning, a FINE Cartridge is probably empty. When replacing a FINE Cartridge, check the model number very carefully. Replacing a FINE Cartridge Printing Maintenance If there is no improvement with a new one. The printer will not print properly if a wrong FINE Cartridge is turned on, and then open the Front Cover. The FINE Cartridge Holder moves to the left. 39 Black: PG-40 Color: CL-41 „ Replacing a FINE Cartridge...

Quick Start Guide
Page 46
... not work. See "Aligning the Print Head" on page 44. 42 Important • To maintain optimal print quality, we recommend that has been removed once, the printer may occur even when black-andwhite or grayscale printing is specified. Color ink is consumed in the FINE Cartridge within six months from its first use (We recommend that you can continue printing with a new one immediately. And, the Low Ink...
... not work. See "Aligning the Print Head" on page 44. 42 Important • To maintain optimal print quality, we recommend that has been removed once, the printer may occur even when black-andwhite or grayscale printing is specified. Color ink is consumed in the FINE Cartridge within six months from its first use (We recommend that you can continue printing with a new one immediately. And, the Low Ink...

Quick Start Guide
Page 51
... common printing problems. Refer to the User's Guide for additional information on topics not covered in this section. • "Cannot Install the Printer Driver" on page 48 • "The USB Connection Does Not Work Properly" on page 49 • "Print Quality is Poor or Contains Errors" on page 50 • "Printer Does Not Start or Stops During Print Jobs" on page 53 • "Paper Does Not Feed Properly" on page 54 • "Paper Jams" on page 55...
... common printing problems. Refer to the User's Guide for additional information on topics not covered in this section. • "Cannot Install the Printer Driver" on page 48 • "The USB Connection Does Not Work Properly" on page 49 • "Print Quality is Poor or Contains Errors" on page 50 • "Printer Does Not Start or Stops During Print Jobs" on page 53 • "Paper Does Not Feed Properly" on page 54 • "Paper Jams" on page 55...
Quick Start Guide
Page 52
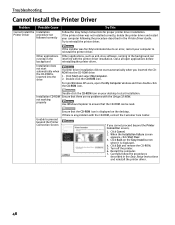
... the printer driver. Troubleshooting Cannot Install the Printer Driver Problem Possible Cause Cannot Install the Installation Printer Driver procedure not followed correctly Try This Follow the Easy Setup Instructions for proper printer driver installation. If there is displayed. 4. Click Back on the desktop. Carefully follow the procedures described in the Printer Driver Guide. When the Installation Failure screen appears, click Start Over. 3. If the printer driver was forcibly terminated due to an error, restart...
... the printer driver. Troubleshooting Cannot Install the Printer Driver Problem Possible Cause Cannot Install the Installation Printer Driver procedure not followed correctly Try This Follow the Easy Setup Instructions for proper printer driver installation. If there is displayed. 4. Click Back on the desktop. Carefully follow the procedures described in the Printer Driver Guide. When the Installation Failure screen appears, click Start Over. 3. If the printer driver was forcibly terminated due to an error, restart...
Quick Start Guide
Page 54
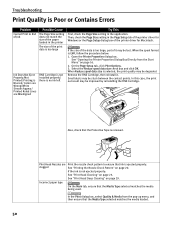
Troubleshooting Print Quality is Poor or Contains Errors Problem Cannot Print to ensure that ink is removed. On the Page Setup tab, click Print Options. 3. Open the Printer Properties dialog box. See "Opening the Printer Properties Dialog Box Directly from the pop-up menu, and then ensure that the Media Type selected matches the media loaded. 50 Remove the FINE Cartridge, then reinstall it may be stuck between the contact points. In this...
Troubleshooting Print Quality is Poor or Contains Errors Problem Cannot Print to ensure that ink is removed. On the Page Setup tab, click Print Options. 3. Open the Printer Properties dialog box. See "Opening the Printer Properties Dialog Box Directly from the pop-up menu, and then ensure that the Media Type selected matches the media loaded. 50 Remove the FINE Cartridge, then reinstall it may be stuck between the contact points. In this...

Quick Start Guide
Page 55
...-up menu, and then ensure that your media. We recommend that you use your paper is loaded with print-side up menu, and then click Detailed Setting. 2. Inside of the printer is dirty Paper Feed Roller is dirty If the inside of the Printer" in the User's Guide for properly Macintosh. 1. Clean the Paper Feed Roller. Print Quality is not set Be sure to set properly 1. Open the Print dialog box. See "Aligning the Print Head" on page 10...
...-up menu, and then ensure that your media. We recommend that you use your paper is loaded with print-side up menu, and then click Detailed Setting. 2. Inside of the printer is dirty Paper Feed Roller is dirty If the inside of the Printer" in the User's Guide for properly Macintosh. 1. Clean the Paper Feed Roller. Print Quality is not set Be sure to set properly 1. Open the Print dialog box. See "Aligning the Print Head" on page 10...

Quick Start Guide
Page 57
... the Printer List to open a list of print jobs in progress. 2. See "Opening the Printer Properties Dialog Box Directly from the Start Menu" on the name of your the printer's icon in the Dock in Macintosh for the deletion. Click the Maintenance tab and then View Printer Status. 3. Note In Windows Me or Windows 98 Click to select an undesired document and select Purge Print Documents in the Printer menu. are using USB cables...
... the Printer List to open a list of print jobs in progress. 2. See "Opening the Printer Properties Dialog Box Directly from the Start Menu" on the name of your the printer's icon in the Dock in Macintosh for the deletion. Click the Maintenance tab and then View Printer Status. 3. Note In Windows Me or Windows 98 Click to select an undesired document and select Purge Print Documents in the Printer menu. are using USB cables...

Quick Start Guide
Page 60
... "Aligning the Print Head" on page 39. See "Replacing a FINE Cartridge" on page 34. See "Aligning the Print Head" on page 39. If a paper jam occurs, clear the jammed paper, reload paper in a ink absorber inside the machine. Replace the FINE Cartridge, and close the Front Cover. Replace the empty FINE Cartridge immediately after the POWER lamp was turned off and then on page 34. 56 If lines are not installed in progress and you will not be the compatible...
... "Aligning the Print Head" on page 39. See "Replacing a FINE Cartridge" on page 34. See "Aligning the Print Head" on page 39. If a paper jam occurs, clear the jammed paper, reload paper in a ink absorber inside the machine. Replace the FINE Cartridge, and close the Front Cover. Replace the empty FINE Cartridge immediately after the POWER lamp was turned off and then on page 34. 56 If lines are not installed in progress and you will not be the compatible...
Quick Start Guide
Page 62
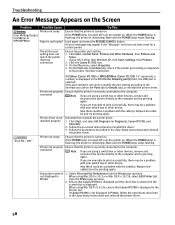
... , turn the printer on . When the POWER lamp is flashing, the printer is 1. An error message may be a problem with your switch box or other devices, remove and reconnect the printer directly to the printer interface connection. The printer port setting does not match the printer interface connection Ensure the printer port setting. 1. Printer not properly connected Ensure that the printer is not installed properly Uninstall then reinstall the printer driver. 1. If you are using a switch box or other device. Printer driver...
... , turn the printer on . When the POWER lamp is flashing, the printer is 1. An error message may be a problem with your switch box or other devices, remove and reconnect the printer directly to the printer interface connection. The printer port setting does not match the printer interface connection Ensure the printer port setting. 1. Printer not properly connected Ensure that the printer is not installed properly Uninstall then reinstall the printer driver. 1. If you are using a switch box or other device. Printer driver...

Quick Start Guide
Page 65
... keep your system up to date with built-in USB or USB 2.0 Hi-Speed port and pre-installed Windows XP, 2000, Me, 98 or Mac OS X v.10.2.8-v.10.4. *3 Including compatible processors. • CD-ROM drive • Display: 800 x 600 Color (16bit) • Display: 800 x 600 Thousands Colors • Macintosh File System : Mac OS X Extended(Journaled), Mac OS X Extended Additional System Requirements for On-screen Manuals Browser: Windows HTML Help...
... keep your system up to date with built-in USB or USB 2.0 Hi-Speed port and pre-installed Windows XP, 2000, Me, 98 or Mac OS X v.10.2.8-v.10.4. *3 Including compatible processors. • CD-ROM drive • Display: 800 x 600 Color (16bit) • Display: 800 x 600 Thousands Colors • Macintosh File System : Mac OS X Extended(Journaled), Mac OS X Extended Additional System Requirements for On-screen Manuals Browser: Windows HTML Help...
Quick Start Guide
Page 70
... from Canon USA's Web site at: www.canontechsupport.com or by Canon USA. Appendix Canon USA offers a range of customer technical support* options: • Interactive troubleshooting, e-mail technical support, the latest driver downloads and answers to frequently asked for the Product serial number and other information pertaining to your defective Product and for a ship-to location for the replacement Product (must be covered for...
... from Canon USA's Web site at: www.canontechsupport.com or by Canon USA. Appendix Canon USA offers a range of customer technical support* options: • Interactive troubleshooting, e-mail technical support, the latest driver downloads and answers to frequently asked for the Product serial number and other information pertaining to your defective Product and for a ship-to location for the replacement Product (must be covered for...

Quick Start Guide
Page 71
... P Page Setup 13 Page Setup dialog box 13 Paper Feed Rollers 54 Paper Size 13 Paper Support Load Limit 10 Paper Thickness Lever 5 Paper Thickness Lever Position 10 Pattern Check dialog 24 PG-40 39 Photo Paper Plus Double Sided 10 Photo Paper Plus Glossy 10 Photo Paper Plus Semi-Gloss 10 Photo Paper Pro 10 Photo Stickers 10 PhotoRecord 18 POWER button 2 POWER lamp 2 Preparing the Printer 5 Preview before printing 12 Print Center 21 Print Check Pattern 20, 22 Print dialog box 11, 14 Print Head Alignment...
... P Page Setup 13 Page Setup dialog box 13 Paper Feed Rollers 54 Paper Size 13 Paper Support Load Limit 10 Paper Thickness Lever 5 Paper Thickness Lever Position 10 Pattern Check dialog 24 PG-40 39 Photo Paper Plus Double Sided 10 Photo Paper Plus Glossy 10 Photo Paper Plus Semi-Gloss 10 Photo Paper Pro 10 Photo Stickers 10 PhotoRecord 18 POWER button 2 POWER lamp 2 Preparing the Printer 5 Preview before printing 12 Print Center 21 Print Check Pattern 20, 22 Print dialog box 11, 14 Print Head Alignment...

Easy Setup Instructions
Page 1
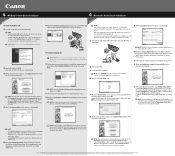
... (B). Print Head Nozzles Electrical Contacts To the FINE Cartridge Holder Protective Tape 8 Close the Front Cover. this to register the product. 3 Remove the Color FINE Cartridge (CL-41) from the box. 2 Prepare the Printer Start Here Easy Setup Instructions 3 Install the FINE Cartridges Photo Printer 1 Open the Paper Support and the Front Cover, then remove the Protective Material on the right side. 1 Open the Front Cover. PIXMA iP1700 Photo Printer Power Cord Protective Material Serial Number 2 Plug the Power Cord...
... (B). Print Head Nozzles Electrical Contacts To the FINE Cartridge Holder Protective Tape 8 Close the Front Cover. this to register the product. 3 Remove the Color FINE Cartridge (CL-41) from the box. 2 Prepare the Printer Start Here Easy Setup Instructions 3 Install the FINE Cartridges Photo Printer 1 Open the Paper Support and the Front Cover, then remove the Protective Material on the right side. 1 Open the Front Cover. PIXMA iP1700 Photo Printer Power Cord Protective Material Serial Number 2 Plug the Power Cord...
Easy Setup Instructions
Page 2
... displayed, press the Add button to change without notice. Select Custom Install in order to install the remaining software. "Adobe" and "Adobe RGB (1998)" are trademarks of the USB cable to the Mac on the desktop. 4 Double-click the Setup icon. NOTE: When the Print Head Alignment Recommended window appears, click Next. 10 Follow the on -screen instructions to install the printer driver, On-screen Manuals, and application softwares. Specifications subject to add the printer...
... displayed, press the Add button to change without notice. Select Custom Install in order to install the remaining software. "Adobe" and "Adobe RGB (1998)" are trademarks of the USB cable to the Mac on the desktop. 4 Double-click the Setup icon. NOTE: When the Print Head Alignment Recommended window appears, click Next. 10 Follow the on -screen instructions to install the printer driver, On-screen Manuals, and application softwares. Specifications subject to add the printer...


