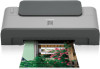
Quick Start Guide
Page 5
... 9 Printing with Windows 11 Printing with Macintosh 13 Cancel Printing 15 Advanced Printing Accessing the Printer Driver 16 Using the Bundled Software 18 Printing Maintenance When Printing Becomes Faint or Colors are Incorrect 19 Printing the Nozzle Check Pattern 20 Print Head Cleaning 25 Print Head Deep Cleaning 29 Aligning the Print Head ... Cannot Install the Printer Driver 48 The USB Connection Does Not Work Properly 49 Print Quality is Poor or Contains Errors 50 Printer Does Not Start or Stops During Print Jobs 53 Paper Does Not Feed Properly 54 Paper Jams 55 The ALARM Lamp ...
... 9 Printing with Windows 11 Printing with Macintosh 13 Cancel Printing 15 Advanced Printing Accessing the Printer Driver 16 Using the Bundled Software 18 Printing Maintenance When Printing Becomes Faint or Colors are Incorrect 19 Printing the Nozzle Check Pattern 20 Print Head Cleaning 25 Print Head Deep Cleaning 29 Aligning the Print Head ... Cannot Install the Printer Driver 48 The USB Connection Does Not Work Properly 49 Print Quality is Poor or Contains Errors 50 Printer Does Not Start or Stops During Print Jobs 53 Paper Does Not Feed Properly 54 Paper Jams 55 The ALARM Lamp ...
Quick Start Guide
Page 6
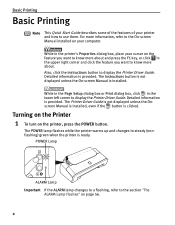
... ALARM Lamp Important If the ALARM lamp changes to a flashing, refer to display the Printer Driver Guide. While in the Page Setup dialog box or Print dialog box, click in the lower left corner to the section "The ALARM Lamp Flashes" on page 56. 2 Turning on the Printer 1 To turn on... the POWER button. While in the upper right corner and click the feature you want to steady (nonflashing) green when the printer is clicked. Basic Printing Basic Printing Note This Quick Start Guide describes some of the features of your printer and how to display the Printer Driver Guide.
... ALARM Lamp Important If the ALARM lamp changes to a flashing, refer to display the Printer Driver Guide. While in the Page Setup dialog box or Print dialog box, click in the lower left corner to the section "The ALARM Lamp Flashes" on page 56. 2 Turning on the Printer 1 To turn on... the POWER button. While in the upper right corner and click the feature you want to steady (nonflashing) green when the printer is clicked. Basic Printing Basic Printing Note This Quick Start Guide describes some of the features of your printer and how to display the Printer Driver Guide.
Quick Start Guide
Page 7
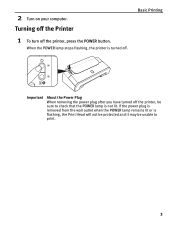
Basic Printing Important About the Power Plug When removing the power plug after you have turned off the printer, be unable to check that the POWER lamp is not lit. When the POWER lamp stops flashing, the printer is flashing, the Print Head will not be protected and it may be sure to print. 3 2 Turn on your computer. If the power plug is removed from the wall outlet when the POWER lamp remains lit or is turned off the printer, press the POWER button. Turning off the Printer 1 To turn off .
Basic Printing Important About the Power Plug When removing the power plug after you have turned off the printer, be unable to check that the POWER lamp is not lit. When the POWER lamp stops flashing, the printer is flashing, the Print Head will not be protected and it may be sure to print. 3 2 Turn on your computer. If the power plug is removed from the wall outlet when the POWER lamp remains lit or is turned off the printer, press the POWER button. Turning off the Printer 1 To turn off .
Quick Start Guide
Page 8
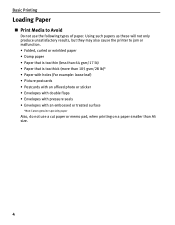
Basic Printing Loading Paper „ Print Media to jam or malfunction. • Folded, curled or wrinkled paper • Damp paper • Paper that is too thin (less than 64 gsm/17 ... with an affixed photo or sticker • Envelopes with double flaps • Envelopes with pressure seals • Envelopes with an embossed or treated surface *Non-Canon genuine specialty paper Also, do not use the following types of paper. Using such papers as these will not only produce unsatisfactory results, but they...
Basic Printing Loading Paper „ Print Media to jam or malfunction. • Folded, curled or wrinkled paper • Damp paper • Paper that is too thin (less than 64 gsm/17 ... with an affixed photo or sticker • Envelopes with double flaps • Envelopes with pressure seals • Envelopes with an embossed or treated surface *Non-Canon genuine specialty paper Also, do not use the following types of paper. Using such papers as these will not only produce unsatisfactory results, but they...
Quick Start Guide
Page 9
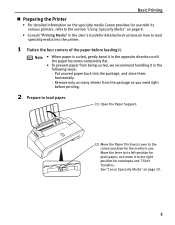
... how to load specialty media into the package, and store them horizontally. - See "Canon Specialty Media" on page 10. 5 Basic Printing „ Preparing the Printer • For detailed information on the specialty media Canon provides for use with its left position for plain paper, and move it to the ...as you need right before loading it. Put unused paper back into the printer. 1 Flatten the four corners of the paper before printing. 2 Prepare to load paper. (1) Open the Paper Support. (2) Move the Paper Thickness Lever to the right position for envelopes and T-Shirt Transfers...
... how to load specialty media into the package, and store them horizontally. - See "Canon Specialty Media" on page 10. 5 Basic Printing „ Preparing the Printer • For detailed information on the specialty media Canon provides for use with its left position for plain paper, and move it to the ...as you need right before loading it. Put unused paper back into the printer. 1 Flatten the four corners of the paper before printing. 2 Prepare to load paper. (1) Open the Paper Support. (2) Move the Paper Thickness Lever to the right position for envelopes and T-Shirt Transfers...
Quick Start Guide
Page 10
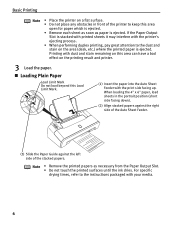
...; Loading Plain Paper Load Limit Mark Do not load beyond this area open for paper which is ejected. Note • Remove the printed papers as paper is ejected. • Remove each sheet as soon as necessary from the Paper Output Slot. • Do not touch the... and stain on the area (desk, etc.) where the printed paper is stacked with printed sheets it may interfere with the printer's ejecting process. • When performing duplex printing, pay great attention to the instructions packaged with the print side facing up. Basic Printing Note • Place the printer on a flat surface....
...; Loading Plain Paper Load Limit Mark Do not load beyond this area open for paper which is ejected. Note • Remove the printed papers as paper is ejected. • Remove each sheet as soon as necessary from the Paper Output Slot. • Do not touch the... and stain on the area (desk, etc.) where the printed paper is stacked with printed sheets it may interfere with the printer's ejecting process. • When performing duplex printing, pay great attention to the instructions packaged with the print side facing up. Basic Printing Note • Place the printer on a flat surface....
Quick Start Guide
Page 11
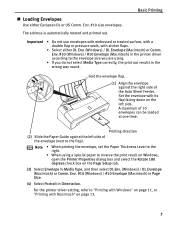
.... #10 (Windows) / #10 Envelope (Macintosh) in the printer driver according to the envelope size you are using a special paper to inverse the print result on Windows, open the Printer Properties dialog box and select the Rotate 180 degrees check box on the Page Setup tab. (3) Select Envelope in... the wrong way round. Note • When printing the envelope, set the Paper Thickness Lever to the flap). Env. #10 (Windows) / #10 Envelope (Macintosh) in Page Size. (4) Select Portrait in ...
.... #10 (Windows) / #10 Envelope (Macintosh) in the printer driver according to the envelope size you are using a special paper to inverse the print result on Windows, open the Printer Properties dialog box and select the Rotate 180 degrees check box on the Page Setup tab. (3) Select Envelope in... the wrong way round. Note • When printing the envelope, set the Paper Thickness Lever to the flap). Env. #10 (Windows) / #10 Envelope (Macintosh) in Page Size. (4) Select Portrait in ...
Quick Start Guide
Page 12
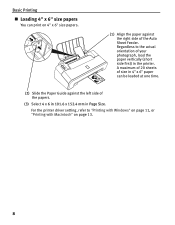
... You can be loaded at one time. (2) Slide the Paper Guide against the right side of the Auto Sheet Feeder. Regardless to "Printing with Windows" on page 11, or "Printing with Macintosh" on 4" x 6" size papers. (1) Align the paper against the left side of size in Page Size. A maximum of 20 sheets of...
... You can be loaded at one time. (2) Slide the Paper Guide against the right side of the Auto Sheet Feeder. Regardless to "Printing with Windows" on page 11, or "Printing with Macintosh" on 4" x 6" size papers. (1) Align the paper against the left side of size in Page Size. A maximum of 20 sheets of...

Quick Start Guide
Page 13
Basic Printing Using Specialty Media Canon recommends that you use genuine Canon media to ensure optimal print quality. „ Photo Quality Media „ Media for Business Documents • Glossy Photo Paper • High Resolution Paper • Matte Photo Paper • Photo Paper Plus Double Sided • Photo Paper Plus Glossy • Photo Paper Plus Semi-Gloss • Photo Paper Pro 9
Basic Printing Using Specialty Media Canon recommends that you use genuine Canon media to ensure optimal print quality. „ Photo Quality Media „ Media for Business Documents • Glossy Photo Paper • High Resolution Paper • Matte Photo Paper • Photo Paper Plus Double Sided • Photo Paper Plus Glossy • Photo Paper Plus Semi-Gloss • Photo Paper Pro 9
Quick Start Guide
Page 14
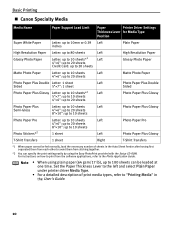
...left and select Plain Paper under printer driver Media Type. • For a detailed description of sheets in the User's Guide. 10 Basic Printing „ Canon Specialty Media Media Name Paper Support Load Limit Paper Printer Driver Settings Thickness Lever for Media Type Position Super White Paper Letter: up to 10mm... Pro Photo Stickers*2 Letter: up to 10 sheets Left 4"×6": up to 20 sheets 8"×10": up to 100 sheets can specify the print setting easily by using plain paper (64 gsm/17 lb), up to 10 sheets 1 sheet Left Photo Paper Pro Photo Paper Plus Glossy T-Shirt...
...left and select Plain Paper under printer driver Media Type. • For a detailed description of sheets in the User's Guide. 10 Basic Printing „ Canon Specialty Media Media Name Paper Support Load Limit Paper Printer Driver Settings Thickness Lever for Media Type Position Super White Paper Letter: up to 10mm... Pro Photo Stickers*2 Letter: up to 10 sheets Left 4"×6": up to 20 sheets 8"×10": up to 100 sheets can specify the print setting easily by using plain paper (64 gsm/17 lb), up to 10 sheets 1 sheet Left Photo Paper Pro Photo Paper Plus Glossy T-Shirt...
Quick Start Guide
Page 15
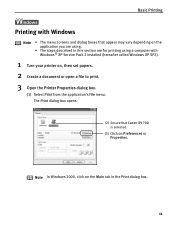
... 2000, click on the Main tab in this section are for printing using a computer with Windows Note • The menu screens and dialog boxes that Canon iP1700 is selected. (3) Click on Preferences or Properties. The Print dialog box opens. (2) Ensure that appear may vary depending on... the application you are using. • The steps described in the Print dialog box. 11 Basic Printing l Printing with Windows® XP ...
... 2000, click on the Main tab in this section are for printing using a computer with Windows Note • The menu screens and dialog boxes that Canon iP1700 is selected. (3) Click on Preferences or Properties. The Print dialog box opens. (2) Ensure that appear may vary depending on... the application you are using. • The steps described in the Print dialog box. 11 Basic Printing l Printing with Windows® XP ...
Quick Start Guide
Page 16
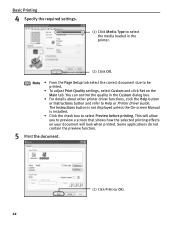
... printer driver functions, click the Help button or Instructions button and refer to select the media loaded in the printer. (2) Click OK. Basic Printing 4 Specify the required settings. (1) Click Media Type to Help or Printer Driver Guide. Note • From the Page Setup tab select the... correct document size to select Preview before printing. The Instructions button is not displayed unless the On-screen Manual is installed. • Click the check box to be printed. • To adjust Print Quality settings, select Custom and click Set on your document will...
... printer driver functions, click the Help button or Instructions button and refer to select the media loaded in the printer. (2) Click OK. Basic Printing 4 Specify the required settings. (1) Click Media Type to Help or Printer Driver Guide. Note • From the Page Setup tab select the... correct document size to select Preview before printing. The Instructions button is not displayed unless the On-screen Manual is installed. • Click the check box to be printed. • To adjust Print Quality settings, select Custom and click Set on your document will...
Quick Start Guide
Page 17
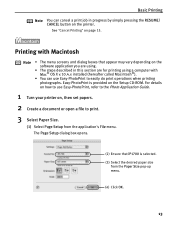
...the software application you are using. • The steps described in progress by simply pressing the RESUME/ CANCEL button on the printer. Basic Printing Note You can use Easy-PhotoPrint, refer to the Photo Application Guide. 1 Turn your printer on, then set papers. 2 Create a ...OS X v.10.4.x installed (hereafter called Macintosh®). • You can cancel a print job in this section are for printing using a computer with Macintosh Note • The menu screens and dialog boxes that iP1700 is provided on page 15. Easy-PhotoPrint is selected. (3) Select the desired paper size...
...the software application you are using. • The steps described in progress by simply pressing the RESUME/ CANCEL button on the printer. Basic Printing Note You can use Easy-PhotoPrint, refer to the Photo Application Guide. 1 Turn your printer on, then set papers. 2 Create a ...OS X v.10.4.x installed (hereafter called Macintosh®). • You can cancel a print job in this section are for printing using a computer with Macintosh Note • The menu screens and dialog boxes that iP1700 is provided on page 15. Easy-PhotoPrint is selected. (3) Select the desired paper size...
Quick Start Guide
Page 18
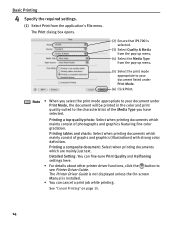
... box opens. (2) Ensure that iP1700 is installed. • You can fine-tune Print Quality and Halftoning settings here. • For details about other printer driver functions, click the button to see Printer Driver Guide. The ... which mainly consist of photographs and graphics featuring fine color gradation. See "Cancel Printing" on page 15. 14 Printing a composite document: Select when printing documents which are mainly just text. Basic Printing 4 Specify the required settings. (1) Select Print from the pop-up menu. (4) Select the Media Type from the application's File menu. ...
... box opens. (2) Ensure that iP1700 is installed. • You can fine-tune Print Quality and Halftoning settings here. • For details about other printer driver functions, click the button to see Printer Driver Guide. The ... which mainly consist of photographs and graphics featuring fine color gradation. See "Cancel Printing" on page 15. 14 Printing a composite document: Select when printing documents which are mainly just text. Basic Printing 4 Specify the required settings. (1) Select Print from the pop-up menu. (4) Select the Media Type from the application's File menu. ...
Quick Start Guide
Page 19
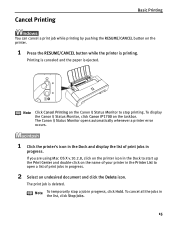
... in progress. 2 Select an undesired document and click the Delete icon. To display the Canon IJ Status Monitor, click Canon iP1700 on the name of print jobs in progress, click Hold. The Canon IJ Status Monitor opens automatically whenever a printer error occurs. 1 Click the printer's icon in the Dock and display the list of your...
... in progress. 2 Select an undesired document and click the Delete icon. To display the Canon IJ Status Monitor, click Canon iP1700 on the name of print jobs in progress, click Hold. The Canon IJ Status Monitor opens automatically whenever a printer error occurs. 1 Click the printer's icon in the Dock and display the list of your...
Quick Start Guide
Page 20
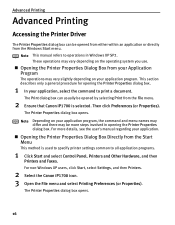
... dialog box opens. For non-Windows XP users, click Start, select Settings, and then Printers. 2 Select the Canon iP1700 icon. 3 Open the File menu and select Printing Preferences (or Properties). This section describes only a general procedure for opening the Printer Properties dialog box. The Printer ...Properties dialog box opens. 16 The Print dialog box can be opened by selecting Print from the File menu. 2 Ensure that Canon iP1700 is used to specify printer settings common to all application programs. 1 Click Start and select...
... dialog box opens. For non-Windows XP users, click Start, select Settings, and then Printers. 2 Select the Canon iP1700 icon. 3 Open the File menu and select Printing Preferences (or Properties). This section describes only a general procedure for opening the Printer Properties dialog box. The Printer ...Properties dialog box opens. 16 The Print dialog box can be opened by selecting Print from the File menu. 2 Ensure that Canon iP1700 is used to specify printer settings common to all application programs. 1 Click Start and select...

Quick Start Guide
Page 21
These tabs do not appear, when opening the Printer Properties dialog box from Printing Preferences or applications. Advanced Printing When opening the Printer Properties dialog box from Properties, the tabs related to the Windows function (e.g., the Ports tab, or the Details tab) appear. Note For details on how to set each function, refer to the manual of Windows. For details about the tabs related to the Windows function, refer to the Printer Driver Guide or Help. 17
These tabs do not appear, when opening the Printer Properties dialog box from Printing Preferences or applications. Advanced Printing When opening the Printer Properties dialog box from Properties, the tabs related to the Windows function (e.g., the Ports tab, or the Details tab) appear. Note For details on how to set each function, refer to the manual of Windows. For details about the tabs related to the Windows function, refer to the Printer Driver Guide or Help. 17
Quick Start Guide
Page 22
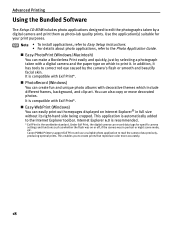
... with decorative themes which to the Photo Application Guide. „ Easy-PhotoPrint (Windows/Macintosh) You can easily print out homepages displayed on Internet Explorer® in portrait or night scene mode, etc. Canon PIXMA Printers support Exif Print and use a suitable photo application to the Internet Explorer toolbar. Note • To install applications, refer...
... with decorative themes which to the Photo Application Guide. „ Easy-PhotoPrint (Windows/Macintosh) You can easily print out homepages displayed on Internet Explorer® in portrait or night scene mode, etc. Canon PIXMA Printers support Exif Print and use a suitable photo application to the Internet Explorer toolbar. Note • To install applications, refer...
Quick Start Guide
Page 23
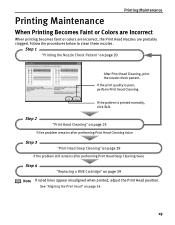
... Cartridge" on page 20 After Print Head Cleaning, print the nozzle check pattern. See "Aligning the Print Head" on page 34. 19 If the pattern is poor, perform Print Head Cleaning. Follow the procedures below to clean these nozzles. If the print quality is printed normally, click Exit. Printing Maintenance Printing Maintenance When Printing Becomes Faint or Colors are...
... Cartridge" on page 20 After Print Head Cleaning, print the nozzle check pattern. See "Aligning the Print Head" on page 34. 19 If the pattern is poor, perform Print Head Cleaning. Follow the procedures below to clean these nozzles. If the print quality is printed normally, click Exit. Printing Maintenance Printing Maintenance When Printing Becomes Faint or Colors are...
Quick Start Guide
Page 24
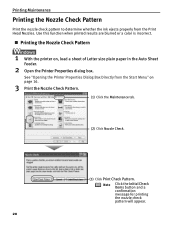
...Check Items button and a confirmation message for printing the nozzle check pattern will appear. 20 Use this function when printed results are blurred or a color is incorrect. „ Printing the Nozzle Check Pattern 1 With the printer on page 16. 3 Print the Nozzle Check Pattern. (1) Click the ...Maintenance tab. (2) Click Nozzle Check. (3) Click Print Check Pattern. See "Opening the...
...Check Items button and a confirmation message for printing the nozzle check pattern will appear. 20 Use this function when printed results are blurred or a color is incorrect. „ Printing the Nozzle Check Pattern 1 With the printer on page 16. 3 Print the Nozzle Check Pattern. (1) Click the ...Maintenance tab. (2) Click Nozzle Check. (3) Click Print Check Pattern. See "Opening the...


