Quick Start Guide
Page 4
...registered trademark of Bluetooth SIG, Inc., U.S.A. Disclaimer Canon U.S.A., Inc. Trademarks z "Microsoft" is a trademark of Microsoft Corporation. Depending on your Canon PIXMA iP100 series Photo Printer. All information regarding the accuracy thereof. and other countries. No part of Microsoft Corporation, registered in the U.S. has ...use guide to as "Windows Vista") and Mac® OS X v.10.4.x. z "Windows" is made regarding non-Canon products was compiled from publicly available information. No representation is a trademark of this manual and in Windows Vista™ ...
...registered trademark of Bluetooth SIG, Inc., U.S.A. Disclaimer Canon U.S.A., Inc. Trademarks z "Microsoft" is a trademark of Microsoft Corporation. Depending on your Canon PIXMA iP100 series Photo Printer. All information regarding the accuracy thereof. and other countries. No part of Microsoft Corporation, registered in the U.S. has ...use guide to as "Windows Vista") and Mac® OS X v.10.4.x. z "Windows" is made regarding non-Canon products was compiled from publicly available information. No representation is a trademark of this manual and in Windows Vista™ ...
Quick Start Guide
Page 8
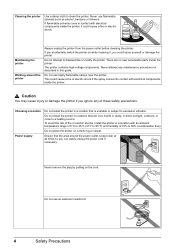
... locations that the area around the printer Always unplug the printer from the power outlet before cleaning the printer. Ensure that are no user serviceable parts inside the printer. Do not use highly flammable sprays near the printer. The printer contains high-voltage components. Choosing a location Power supply Do not install...
... locations that the area around the printer Always unplug the printer from the power outlet before cleaning the printer. Ensure that are no user serviceable parts inside the printer. Do not use highly flammable sprays near the printer. The printer contains high-voltage components. Choosing a location Power supply Do not install...
Quick Start Guide
Page 9
.... If irritation or discomfort occurs, obtain medical advice immediately. In case ink gets in contact with eyes, rinse with soap and water immediately. The metal parts may leak out and stain clothing or the surrounding area. Do not throw ink tanks into the printer, unplug the power cord and call for...
.... If irritation or discomfort occurs, obtain medical advice immediately. In case ink gets in contact with eyes, rinse with soap and water immediately. The metal parts may leak out and stain clothing or the surrounding area. Do not throw ink tanks into the printer, unplug the power cord and call for...
Quick Start Guide
Page 49
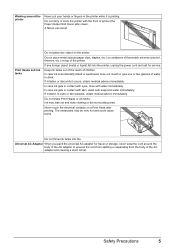
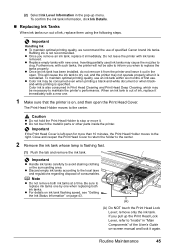
... Cleaning and Print Head Deep Cleaning, which may cause the nozzles to the center. z Do not touch the metallic parts or other parts inside the printer. Color ink is also consumed in the open. Be sure to maintain the printer's performance. Routine ...Maintenance 45 z Once you pull up menu. Furthermore, with new ones. To confirm the ink tank information, click Ink Details. „ Replacing Ink Tanks When ink tanks run out of specified Canon...
... Cleaning and Print Head Deep Cleaning, which may cause the nozzles to the center. z Do not touch the metallic parts or other parts inside the printer. Color ink is also consumed in the open. Be sure to maintain the printer's performance. Routine ...Maintenance 45 z Once you pull up menu. Furthermore, with new ones. To confirm the ink tank information, click Ink Details. „ Replacing Ink Tanks When ink tanks run out of specified Canon...
Quick Start Guide
Page 51
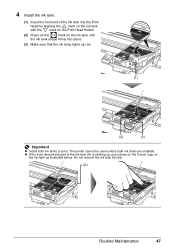
Do not remove the ink tank forcibly. (A) Routine Maintenance 47 The printer cannot be used unless both ink tanks to print. z If the front (innermost) part of the ink tank into place. (3) Make sure that the ink lamp lights up red. (1) (2) (3) Important z Install both ink tanks are installed. 4 Install the ink ...tank. (1) Insert the front end of the ink tank (A) is sticking up, push down on the Canon logo on the ink tank until the ink tank snaps firmly into the Print Head by aligning the mark on the ink tank with the...
Do not remove the ink tank forcibly. (A) Routine Maintenance 47 The printer cannot be used unless both ink tanks to print. z If the front (innermost) part of the ink tank into place. (3) Make sure that the ink lamp lights up red. (1) (2) (3) Important z Install both ink tanks are installed. 4 Install the ink ...tank. (1) Insert the front end of the ink tank (A) is sticking up, push down on the Canon logo on the ink tank until the ink tank snaps firmly into the Print Head by aligning the mark on the ink tank with the...

Quick Start Guide
Page 57
...Driver (Bottom Plate Cleaning)" on page 53. Set the Paper Thickness Lever to use a new piece of paper, and proceed from step 3. Check the folded part of A4 or Letter-sized plain paper. 2. If the problem is smudged with the open side facing up. 5. Load the paper folded in step 3 on... in the Rear Tray. 3. Make sure that the printer is smudged, the inside of the Printer without a Computer The Bottom Plate Cleaning can clean this part in step 3 with ink, perform Bottom Plate Cleaning again. Clean them according to "Front View" in step 2. Prepare two sheets of the ejected paper. ...
...Driver (Bottom Plate Cleaning)" on page 53. Set the Paper Thickness Lever to use a new piece of paper, and proceed from step 3. Check the folded part of A4 or Letter-sized plain paper. 2. If the problem is smudged with the open side facing up. 5. Load the paper folded in step 3 on... in the Rear Tray. 3. Make sure that the printer is smudged, the inside of the Printer without a Computer The Bottom Plate Cleaning can clean this part in step 3 with ink, perform Bottom Plate Cleaning again. Clean them according to "Front View" in step 2. Prepare two sheets of the ejected paper. ...
Quick Start Guide
Page 58
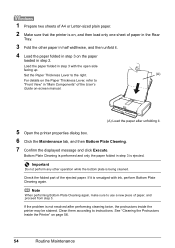
... again. See "Cleaning the Protrusions Inside the Printer" on the Paper Thickness Lever, refer to use a new piece of the ejected paper. Check the folded part of paper, and proceed from step 3. 1 Prepare two sheets of A4 or Letter-sized plain paper. 2 Make sure that the printer is on, and then...
... again. See "Cleaning the Protrusions Inside the Printer" on the Paper Thickness Lever, refer to use a new piece of the ejected paper. Check the folded part of paper, and proceed from step 3. 1 Prepare two sheets of A4 or Letter-sized plain paper. 2 Make sure that the printer is on, and then...
Quick Start Guide
Page 59
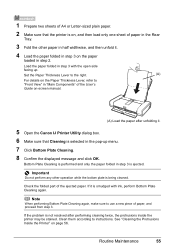
...Cleaning. 8 Confirm the displayed message and click OK. Important Do not perform any other paper in half widthwise, and then unfold it . 5 Open the Canon IJ Printer Utility dialog box. 6 Make sure that the printer is on, and then load only one sheet of the ejected paper. 1 Prepare two ...2 Make sure that Cleaning is selected in the pop-up . Note When performing Bottom Plate Cleaning again, make sure to instructions. Check the folded part of paper in the Rear Tray. 3 Fold the other operation while the bottom plate is ejected. If the problem is not resolved after unfolding it...
...Cleaning. 8 Confirm the displayed message and click OK. Important Do not perform any other paper in half widthwise, and then unfold it . 5 Open the Canon IJ Printer Utility dialog box. 6 Make sure that the printer is on, and then load only one sheet of the ejected paper. 1 Prepare two ...2 Make sure that Cleaning is selected in the pop-up . Note When performing Bottom Plate Cleaning again, make sure to instructions. Check the folded part of paper in the Rear Tray. 3 Fold the other operation while the bottom plate is ejected. If the problem is not resolved after unfolding it...
Quick Start Guide
Page 71
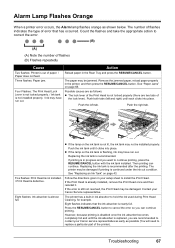
... not feed. Then printing can continue printing. The printer has a built-in your Canon Service representative. Troubleshooting 67 Eight flashes indicates that has occurred. Possible causes are recommended to contact your Canon service representative as early as shown below. z If the lamp on the ink tank... the appropriate action to install the Print Head. Push the right tab. Follow the directions given in ink absorber to replace a particular part of the lock lever). Five flashes: Print Head is not installed. / Print Head is not lit, the ink tank may have run...
... not feed. Then printing can continue printing. The printer has a built-in your Canon Service representative. Troubleshooting 67 Eight flashes indicates that has occurred. Possible causes are recommended to contact your Canon service representative as early as shown below. z If the lamp on the ink tank... the appropriate action to install the Print Head. Push the right tab. Follow the directions given in ink absorber to replace a particular part of the lock lever). Five flashes: Print Head is not installed. / Print Head is not lit, the ink tank may have run...
Quick Start Guide
Page 86
... be (a) repaired utilizing new, remanufactured, repaired and/or recycled parts (b) exchanged for new or; (c) exchanged for help. If this requirement. Canon U.S.A., Inc. The Product is connected. However, there is given by Canon U.S.A., Inc. ("Canon USA") with the instructions, may cause harmful interference to correct .... 82 Appendix A copy of your dated bill of sale will be required to the new or refurbished Canon-brand product ("Product") packaged with Part 15 of the equipment. Users in the United States only. Operation is required at the time of the Product...
... be (a) repaired utilizing new, remanufactured, repaired and/or recycled parts (b) exchanged for new or; (c) exchanged for help. If this requirement. Canon U.S.A., Inc. The Product is connected. However, there is given by Canon U.S.A., Inc. ("Canon USA") with the instructions, may cause harmful interference to correct .... 82 Appendix A copy of your dated bill of sale will be required to the new or refurbished Canon-brand product ("Product") packaged with Part 15 of the equipment. Users in the United States only. Operation is required at the time of the Product...

Quick Start Guide
Page 87
... Product are disclaimed. This limited warranty shall only apply if the Product is used in conjunction with respect to such non-Canon brand items is " and without warranty of parts, media, software or supplies (other than those sold "as is given by the manufacturer or producer thereof.... Canon USA shall have resulted from misuse, abuse or failure to operate the Product as set forth in the user's manual or other documentation for compatible Canon brand peripheral ...
... Product are disclaimed. This limited warranty shall only apply if the Product is used in conjunction with respect to such non-Canon brand items is " and without warranty of parts, media, software or supplies (other than those sold "as is given by the manufacturer or producer thereof.... Canon USA shall have resulted from misuse, abuse or failure to operate the Product as set forth in the user's manual or other documentation for compatible Canon brand peripheral ...


